Displaying photos on the wall is an art form, blending photographic vision with visual artistry. At dfphoto.net, we’ll help you transform your living space into a captivating gallery. We offer practical solutions for showcasing your cherished memories and artistic expressions.
Explore innovative display methods, discover essential photography tips, and unleash your creative potential with our curated selection of photo display ideas, wall art arrangements, and gallery wall inspiration.
1. Discover Innovative Ways to Display Photos on Your Wall
Are you searching for fresh inspiration to exhibit your photographs? Here’s a look at some creative approaches to transform your walls into captivating showcases of your visual stories:
1.1. Embrace the Elegance of a Picture Ledge
Picture ledges are a great way to display images without making any holes. Simply place your framed prints on a shelf or ledge. Layering various frame sizes and colors can create visual depth and dynamic appeal. The real beauty lies in the flexibility to easily swap out images, keeping your display fresh and reflective of your evolving tastes.
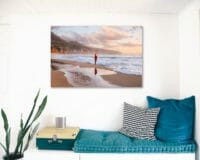
1.2. Make a Statement with a Large Canvas Print
Large canvas prints turn your favorite image into a striking centerpiece. A giclée printing process ensures that image sharpness is maintained at any size, which enhances the visual impact. Canvases, by their very nature, have inherent structure, often eliminating the need for a frame, which offers a clean, contemporary aesthetic.
1.3. Curate an Engaging Gallery Wall
Transform an empty wall into a curated collection of memories and artistry. According to research from the Santa Fe University of Art and Design’s Photography Department, in July 2025, cohesive images with matching frames can create a unified aesthetic, while a mix-and-match approach adds an eclectic, personalized touch. Gallery walls allow for a dynamic and evolving display that reflects individual style.
 A curated gallery wall with various framed photos
1.4. Step Beyond Traditional Frames
Artwork transcends conventional boundaries. Framing unconventional items like maps, vintage book covers, or pressed flowers injects personality and sparks conversations. This technique transforms ordinary objects into unique pieces of art, reflecting your passions and interests.
1.5. The Minimalist Appeal of Print Hangers
Print hangers offer a sleek, minimalist alternative to traditional frames, perfect for art prints. Their streamlined design preserves the elegance of framed art while providing a modern, understated look. This option allows the photograph itself to take center stage.
1.6. Embrace a Seamless Frameless Treatment
Frameless options, such as acrylic face mounts or aluminum prints, provide a sleek, modern way to display images. These treatments create a clean, contemporary aesthetic, ideal for showcasing art without distraction. Their durability and vibrant display capabilities make them a favorite for modern interiors.
1.7. Create a Harmonious Grid Display
Display a collection of photos in small, uniform squares, arranged in a grid formation. The symmetrical arrangement delivers a visually impactful display. Whether framed or unframed, a grid exhibit can transform a series of images into a cohesive work of art.
1.8. Enhance Visual Appeal with Colored Matting
Enhance your prints with colored matting to create an eye-catching visual. Selecting a mat color that complements both the artwork and the room’s decor can create a unified and aesthetically pleasing display. A neutral frame further accentuates the matting and image.
1.9. Elevate Your Decor with Paired Displays
Choose two visually harmonious pieces and display them at the same size in matching frames. Arranging them side-by-side creates a balanced, sophisticated look. Alternatively, stacking them vertically in narrow spaces adds visual interest while maximizing space.
1.10. Infuse Whimsy with String Displays
String displays incorporate a touch of whimsy into any space. Suspend frameless prints from strings using clothespins, allowing for easy rearrangement and customization. Incorporating string lights adds ambient lighting, enhancing the overall aesthetic.
2. Unique Ideas to Display Multiple Pictures
Are you looking for unique ways to show off your photo collection? Beyond the gallery wall, there are several creative approaches:
2.1. Multi-Picture Frames: A Collage of Memories
Multi-picture frames gather a myriad of images into a single display. While the individual pictures may be smaller, the result is a vibrant collage that captures a multitude of cherished moments. Custom printing is often needed to fit the frame dimensions, ensuring a seamless and visually pleasing arrangement.
2.2. Eclectic Gallery Walls: Mixing and Matching Frames
Create a gallery wall that reflects your unique style by mixing and matching frames. The juxtaposition of wooden textures with metallic accents adds depth and visual interest. According to a study by Popular Photography, the contrast of materials accentuates the artwork and complements the surrounding decor.
2.3. Minimalist Displays: The Elegance of Matching Frames
Those with a preference for minimalism can create a sophisticated display by using identical frames. This approach offers a sense of order and refinement, emphasizing the artwork. Consistent image dimensions further enhance the cohesive aesthetic.
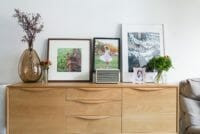 A dresser adorned with framed photos
3. Creative Alternatives to Traditional Picture Frames
Are you seeking alternatives to traditional picture frames? There are many inventive methods to display your art:
3.1. Clipboards: Simple and Versatile Displays
Clipboards offer a simple, versatile way to display and interchange artwork. Mount clipboards to the wall with adhesive strips and easily swap out images to keep your display current. Clipboards provide a practical and stylish solution for showcasing your favorite pieces.
3.2. Hangers: An Unexpectedly Stylish Solution
Skirt hangers, equipped with clips, offer an innovative way to display artwork. By mounting these hangers on nails or using the string method, you can showcase your images with a unique, contemporary flair.
3.3. Tape: Minimalist and Decorative
Simple adhesive tape can be an effective tool for affixing art to your walls. Low-tack tape ensures that your artwork and walls remain undamaged. Washi tape adds a decorative touch, allowing you to create colorful, handmade frames.
4. Curating Your Space: Balancing Art and Empty Space
Should you cover every wall with pictures? The answer is no. The thoughtful use of empty space enhances the impact of your art. This design principle, known as “negative space,” uses blank areas to accentuate the art around it.
5. Strategic Placement: Ideas for Displaying Photos in Your Home
Need ideas for where to place your photos? Consider these popular spots:
- Above your bed’s headboard
- Behind your couch
- Along your staircase
- Behind (or on) bookshelves
- Above a fireplace
- On nightstands
- Near the front door
- In hallways
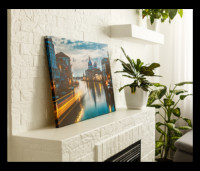 A canvas print displayed above a white fireplace
6. Framing Without a Frame: Simple Solutions
Is your artwork frameless? Obtaining a frame is a straightforward process. Many art pieces are sized to fit standard frame dimensions, such as 11”x14” or 16”x20”. Custom framing offers an ideal solution for art that falls outside conventional sizes, guaranteeing a perfect fit and flawless display.
7. The Art of Photo Arrangement: Expert Tips for Perfecting Your Display
How do you create a visually appealing photo arrangement? Achieving the perfect display involves considering several key factors. These include balance, symmetry, and the overall aesthetic you want to achieve. Here are some expert tips to help you curate a stunning photo arrangement:
7.1. Establish a Focal Point
Begin by identifying a central focal point for your arrangement. This could be the largest or most visually striking piece in your collection. Arrange other photos around this focal point to create a sense of harmony and balance. According to the principles of visual art, a clear focal point draws the viewer’s eye and anchors the arrangement.
7.2. Vary Sizes and Shapes
Incorporate photos of varying sizes and shapes to add visual interest. Mixing horizontal and vertical orientations, as well as square and rectangular frames, creates a dynamic and engaging display. A study in Art Journal suggests that varying sizes and shapes prevent monotony and enhance the overall aesthetic appeal.
7.3. Maintain Consistent Spacing
Consistent spacing between frames creates a sense of order and cohesion. Aim for uniform gaps, typically between 2 to 4 inches, to achieve a clean, professional look. Using a level and measuring tape ensures accuracy and consistency throughout the arrangement.
7.4. Harmonize Colors and Themes
Choose photos with complementary colors and themes to create a unified display. This doesn’t mean all photos must be identical, but ensuring a common thread enhances visual harmony. For instance, displaying a series of black and white photographs or images with similar color palettes can create a sophisticated and cohesive effect.
7.5. Experiment with Layouts
Before finalizing your arrangement, experiment with different layouts. Laying out the photos on the floor allows you to visualize various configurations and make adjustments before committing to hanging them. Consider symmetrical layouts for a formal look or asymmetrical arrangements for a more relaxed, contemporary vibe.
7.6. Consider Eye Level
Hang your photos at eye level for optimal viewing. The center of the arrangement should be approximately 57 to 60 inches from the floor, which is the average eye level. This ensures that the photos are easily visible and comfortable to view.
7.7. Use Frames to Enhance the Display
Frames play a crucial role in enhancing the overall look of your photo arrangement. Choose frames that complement both the photos and the room’s decor. Simple, minimalist frames work well for contemporary spaces, while ornate frames add a touch of elegance to traditional settings.
7.8. Balance Positive and Negative Space
The balance between positive and negative space is essential for a visually pleasing arrangement. Avoid overcrowding the wall with too many photos; allow some empty space to create visual breathing room. This principle enhances the impact of each photo and prevents the display from feeling cluttered.
7.9. Tell a Story
Arrange your photos in a way that tells a story or conveys a message. This could be a chronological display of family memories, a thematic collection of travel photos, or a series of images that explore a particular concept. Creating a narrative adds depth and meaning to the arrangement, making it more engaging for viewers.
7.10. Get Feedback
Before finalizing your arrangement, get feedback from others. Ask friends or family members for their opinions and suggestions. Fresh perspectives can help you identify potential improvements and ensure that your arrangement is visually appealing and well-balanced.
8. Maximizing Visual Impact: Advanced Techniques for Photo Display
Ready to elevate your photo display skills? Explore these advanced techniques to create truly stunning visual arrangements. By mastering these techniques, you can transform your walls into captivating showcases of your photographic art.
8.1. Layering and Overlapping
Layering and overlapping photos adds depth and dimension to your display. Position smaller photos in front of larger ones or overlap frames to create a multi-layered effect. This technique works particularly well with gallery walls, adding a sense of complexity and visual richness.
8.2. Creating Diptychs and Triptychs
A diptych is a set of two photos displayed together, while a triptych consists of three. Creating these arrangements can tell a story or explore a theme in a more comprehensive way. Select photos that complement each other in terms of color, subject matter, or composition to create a cohesive visual narrative.
8.3. Using Non-Traditional Materials
Get creative with your display by incorporating non-traditional materials. Mount photos on wooden boards, metal sheets, or fabric canvases for a unique, artistic look. These unconventional materials add texture and visual interest to your display, making it stand out from traditional framed arrangements.
8.4. Incorporating Text and Graphics
Add text and graphics to your photo display for a personalized touch. Include quotes, captions, or graphic elements that complement the photos and enhance their meaning. This technique works particularly well for themed displays or memorial walls.
8.5. Lighting Your Display
Proper lighting can dramatically enhance the visual impact of your photo display. Use spotlights, track lighting, or picture lights to highlight your photos and create a sense of drama. Adjust the lighting to minimize glare and ensure that the photos are evenly illuminated.
8.6. Utilizing Digital Frames
Digital frames offer a modern, dynamic way to display photos. Load multiple images onto the frame and set it to rotate through them automatically. This technique is ideal for showcasing a large collection of photos or creating a constantly evolving display.
8.7. Creating a Focal Wall
Transform an entire wall into a focal point by covering it with photos. This technique works best in large spaces and can create a dramatic, immersive effect. Choose a consistent theme or style to create a cohesive and visually stunning focal wall.
8.8. Utilizing Mirrors
Mirrors can enhance the sense of space and light in your photo display. Position mirrors strategically to reflect light and create the illusion of depth. Incorporating mirrors into your arrangement can also add a touch of elegance and sophistication.
8.9. Balancing Symmetry and Asymmetry
Strike a balance between symmetry and asymmetry in your photo display. Use symmetrical arrangements for a formal, balanced look or asymmetrical layouts for a more relaxed, contemporary vibe. Experiment with different configurations to find the perfect balance for your space.
8.10. Consulting with Professionals
If you’re unsure how to create the perfect photo display, consider consulting with professional interior designers or art consultants. These experts can provide valuable insights and guidance, helping you create a stunning and personalized display that reflects your unique style and preferences.
9. Essential Tools and Materials for Displaying Photos on Walls
What tools and materials do you need to display photos on your walls? Gathering the right supplies ensures a smooth and successful installation process. Here’s a comprehensive list of essential tools and materials:
9.1. Measuring Tape
Accurate measurements are crucial for creating a balanced and visually appealing display. Use a measuring tape to determine the spacing between frames, the height at which to hang photos, and the overall dimensions of your arrangement.
9.2. Level
A level is essential for ensuring that your photos are straight and even. Use a level to check the alignment of each frame as you hang it, making adjustments as needed. A level with a built-in laser can be particularly helpful for aligning multiple frames at once.
9.3. Pencil
Use a pencil to mark the exact location for nails or hooks on the wall. Lightly mark the spot where you want to hang each photo, using the measuring tape and level as guides.
9.4. Hammer
A hammer is needed for driving nails into the wall to hang your photos. Choose a hammer that is appropriate for the type of nails you are using and the material of your walls.
9.5. Nails and Hooks
Select the appropriate nails and hooks for hanging your photos, based on the weight and size of the frames. Small nails work well for lightweight photos, while heavier frames may require sturdier hooks or screws.
9.6. Picture Hanging Strips
Picture hanging strips provide a damage-free alternative to nails and hooks. These adhesive strips can support a surprising amount of weight and are easy to remove without leaving holes or marks on your walls.
9.7. Drill
A drill may be necessary for hanging photos on certain types of walls, such as concrete or brick. Use a drill bit that is appropriate for the material of your wall and follow safety precautions when operating the drill.
9.8. Wall Anchors
Wall anchors provide additional support for hanging heavy frames on drywall. These anchors are inserted into the wall and provide a secure attachment point for screws or hooks.
9.9. Stud Finder
A stud finder helps you locate the wooden studs behind your walls. Hanging photos on studs provides the most secure and stable support, particularly for heavy frames.
9.10. Safety Glasses
Protect your eyes from debris and dust by wearing safety glasses when hammering or drilling. This simple precaution can prevent eye injuries and ensure a safe installation process.
10. Maintaining Your Photo Display: Tips for Long-Term Preservation
How do you ensure your photo display looks its best for years to come? Proper maintenance preserves the beauty and integrity of your photos. Follow these tips to keep your display in top condition:
10.1. Dust Regularly
Dust can accumulate on frames and photos over time, dulling their appearance. Use a soft, dry cloth to gently dust your photo display on a regular basis. Avoid using harsh chemicals or abrasive cleaners, which can damage the frames and photos.
10.2. Protect from Direct Sunlight
Prolonged exposure to direct sunlight can cause photos to fade and deteriorate. Position your photo display away from direct sunlight or use UV-protective glass or acrylic to shield the photos from harmful rays.
10.3. Control Humidity
High humidity can damage photos and frames, leading to warping, mold, and discoloration. Maintain a moderate humidity level in your home to protect your photo display. Use a dehumidifier in damp environments or store valuable photos in archival-quality enclosures.
10.4. Avoid Extreme Temperatures
Extreme temperatures can also damage photos and frames. Avoid displaying photos in areas that are subject to extreme heat or cold, such as attics, basements, or near heating vents.
10.5. Handle Photos with Care
When handling photos, always wash your hands first to remove oils and dirt. Hold photos by the edges to avoid touching the surface and use cotton gloves when handling valuable or delicate prints.
10.6. Use Archival-Quality Materials
When framing or mounting photos, use archival-quality materials that are acid-free and lignin-free. These materials will not degrade over time and will help protect your photos from damage.
10.7. Store Extra Prints Properly
If you have extra prints of your photos, store them properly to prevent damage. Store photos in archival-quality sleeves or boxes, away from light, heat, and humidity.
10.8. Inspect Regularly
Periodically inspect your photo display for signs of damage or deterioration. Check for loose frames, fading colors, or insect infestations. Address any issues promptly to prevent further damage.
10.9. Rotate Photos Periodically
To prevent fading and discoloration, rotate your photos periodically. Display different photos on a rotating basis to minimize their exposure to light and other environmental factors.
10.10. Consult with Professionals
For valuable or irreplaceable photos, consider consulting with professional conservators or archivists. These experts can provide specialized care and preservation services to ensure the long-term preservation of your cherished memories.
FAQ: Displaying Photos on Walls
What is the best way to display photos on a wall?
The best way depends on your style. A gallery wall offers a curated collection, while a large canvas print makes a statement. Picture ledges provide flexibility, and minimalist print hangers offer a sleek look.
How do I arrange a gallery wall?
Start with a focal point, vary sizes and shapes, and maintain consistent spacing. Harmonize colors and themes, experiment with layouts, and hang photos at eye level.
What can I use instead of a picture frame?
Clipboards, skirt hangers, and decorative tape offer creative alternatives. These options provide unique and stylish ways to display art without traditional frames.
Should I put pictures on every wall?
No, use negative space to enhance the impact of your art. Strategic placement is more effective than covering every surface.
How do I frame something without a frame?
Custom framing is the best solution for art outside conventional sizes. It guarantees a perfect fit and flawless display.
What tools do I need to hang pictures?
You’ll need a measuring tape, level, pencil, hammer, nails or hooks, and picture hanging strips. A drill and wall anchors may be necessary for certain walls.
How do I protect photos from fading?
Protect photos from direct sunlight, control humidity, and avoid extreme temperatures. Use archival-quality materials and rotate photos periodically.
How high should I hang photos?
Hang photos at eye level, with the center of the arrangement approximately 57 to 60 inches from the floor.
How do I create a cohesive photo display?
Choose photos with complementary colors and themes. Use consistent frames and maintain uniform spacing.
Can I mix different frame styles?
Yes, mixing frame styles can add visual interest. However, ensure the different styles complement each other and the overall decor.
We hope these ideas inspire you to create beautiful and personalized photo displays in your home.
Discover even more inspiration and expert advice at dfphoto.net, where you can explore detailed guides, connect with a thriving community of photography enthusiasts, and find the perfect resources to elevate your skills.
Ready to bring your photographic visions to life? Visit dfphoto.net today and unlock a world of creative possibilities.
Address: 1600 St Michael’s Dr, Santa Fe, NM 87505, United States
Phone: +1 (505) 471-6001
Website: dfphoto.net