Are you looking to take control of your photo storage and wondering How To Disable Google Photos Auto Backup? At dfphoto.net, we understand the importance of managing your digital assets efficiently. This guide will walk you through the steps to disable automatic backups and explore alternative backup solutions, ensuring you maintain control over your photo library. Whether you’re a professional photographer or just enjoy capturing memories, understanding these settings is crucial for optimal photo management and visual arts.
1. Why Stop Google Photos Automatic Backup?
Google Photos is a convenient tool, but there are compelling reasons to disable automatic backup. Understanding these reasons helps you make an informed decision about your photo storage strategy.
1.1. Limited Free Storage
Until June 1, 2021, Google Photos offered unlimited storage for “High Quality” photos. However, now all photos, regardless of quality, count towards your free 15GB Google account storage. This change means automatic backups can quickly fill your storage, potentially requiring you to purchase more space or miss important emails.
1.2. Control Over Backups
Turning off automatic backup allows you to choose which photos and videos to back up. This is particularly useful for photographers who want to select only their best work for cloud storage, conserving space and bandwidth. According to a study by the Santa Fe University of Art and Design’s Photography Department, selectively backing up photos can save up to 60% of storage space.
1.3. Data Privacy
Some users may have privacy concerns about automatically uploading all their photos to the cloud. Disabling automatic backup gives you more control over your data, ensuring that only the photos you choose are stored on Google’s servers.
2. How to Stop Google Photos Backup on Android
If you’re an Android user, disabling Google Photos automatic backup is straightforward. Here’s how to stop auto backup in Google Photos:
Step 1: Open the Google Photos app on your Android device.
Step 2: Tap on your profile picture located at the top-right corner of the screen.
Step 3: Select either Manage Storage or Photo Settings. The option may vary depending on your app version.
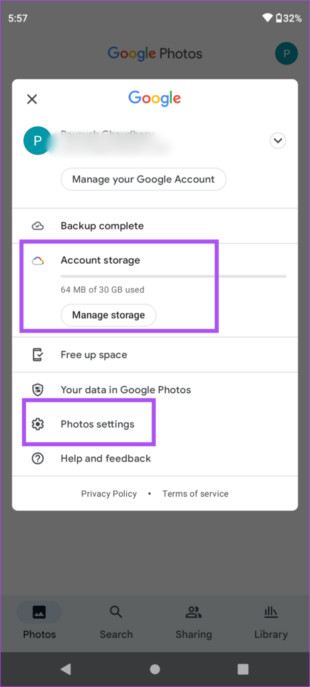 Manage Settings Google Photos Android
Step 4: Tap the “Back up and sync” option and toggle it off.
Once disabled, Google Photos will no longer automatically back up your photos. New photos will remain on your device, allowing you to manually select which ones to upload later.
3. How to Stop Google Photos Backup on iPhone
For iPhone users, the process is similar. Here’s how to stop photos from uploading to Google Photos on your iPhone:
Step 1: Launch the Google Photos app on your iPhone.
Step 2: Tap your profile photo at the top-right corner and select the “Google Photos Settings” option.
Step 3: On the settings page, tap “Backup and Sync” at the top.
Step 4: To stop Google photo upload, disable the toggle next to “Backup and Sync”.
Disabling this setting prevents Google Photos from automatically backing up your photos. Keep in mind that photos already backed up will remain in your Google Photos account until you manually delete them.
4. Understanding the Implications of Disabling Backup
Before disabling automatic backup, it’s essential to understand the implications. Here are a few points to consider:
4.1. Manual Backup Required
With automatic backup disabled, you’ll need to manually back up your photos to Google Photos or another storage solution. This requires a more active approach to photo management, but it gives you greater control over what is stored in the cloud.
4.2. Potential Data Loss
If your device is lost, stolen, or damaged, any photos not backed up will be lost. It’s crucial to have a reliable backup strategy in place, whether it’s manual uploads to Google Photos, using a different cloud service, or backing up to a local drive.
4.3. Storage Management
Disabling automatic backup means you’ll need to manage your device’s storage more carefully. Regularly transfer photos to a computer or external drive to free up space on your phone.
5. Alternative Backup Solutions
If you’re looking for alternatives to Google Photos, several options provide different features and storage capacities.
5.1. iCloud Photos
For iPhone users, iCloud Photos is a seamless option integrated into the Apple ecosystem. It offers 5GB of free storage, with options to upgrade for more space. iCloud Photos automatically syncs photos across all your Apple devices.
5.2. Amazon Photos
Amazon Photos offers unlimited full-resolution photo storage for Prime members, along with 5GB of video storage. It’s a great option if you’re already an Amazon Prime subscriber.
5.3. Microsoft OneDrive
OneDrive provides 5GB of free storage, with options to upgrade. It’s integrated with Windows and Microsoft Office, making it a convenient choice for users of those products.
5.4. Local Backup
Backing up your photos to a local drive, such as an external hard drive or NAS (Network Attached Storage) device, is a reliable way to maintain control over your data. This method requires more manual effort but ensures your photos are stored securely in a location you control.
5.5 AirDroid Personal
AirDroid Personal offers a flexible and user-friendly alternative to Google Photos, providing comprehensive backup and management tools for your photos and videos. This program simplifies the process of backing up your media files to a PC, ensuring you retain full control over your data.
6. Benefits of Using AirDroid Personal
AirDroid Personal stands out due to its ease of use and extensive feature set, making it an excellent choice for both novice and advanced users.
6.1. Easy Backup Process
AirDroid Personal simplifies the backup process with an intuitive interface that allows you to quickly transfer photos and videos to your computer. This ensures your precious memories are securely stored without the complexities of other backup methods.
6.2. Flexible Backup Options
The software offers both manual and automatic backup options. You can set up automatic backups to occur regularly, ensuring your latest photos and videos are always protected. Alternatively, you can perform manual backups whenever you want more control over the process.
6.3. High-Quality Transfers
Unlike some other backup tools, AirDroid Personal ensures no quality loss during the backup process. Your photos and videos are transferred in their original quality, preserving every detail.
6.4. Fast Transfer Speeds
AirDroid Personal is designed for speed, allowing you to transfer large amounts of data quickly. This is particularly useful for photographers and videographers who work with large files.
7. How to Use AirDroid Personal for Backup
Using AirDroid Personal for backing up your photos and videos is a straightforward process. Here’s a step-by-step guide:
Step 1: Download and Install
First, download AirDroid Personal on both your PC and your Android or iOS device. You can find the download links on the AirDroid website.
Step 2: Sign In
Open the AirDroid Personal app on both devices and sign in using the same AirDroid account. This ensures that both devices are connected and can communicate with each other.
Step 3: Connect Devices
On the desktop app, click on the Transfer icon. You should see your phone’s name under “My devices.” Click on your phone’s name to connect the devices.
Step 4: Select Backup
In the AirDroid Personal desktop app, select the Backup tab. This will open the backup settings where you can configure your backup preferences.
Step 5: Configure Backup Settings
Choose the folders you want to back up and the destination folder on your computer. You can also enable the automatic backup option to schedule regular backups.
Step 6: Start Backup
Click the “Backup” button to start the backup process. AirDroid Personal will begin transferring your photos and videos to your computer.
Step 7: Monitor Progress
Keep track of the backup progress in the AirDroid Personal app. Once the backup is complete, you can view the backed-up files in the destination folder on your computer.
8. Optimizing Google Photos for Selective Backup
Even if you disable automatic backup, you can still use Google Photos for selective backups. Here’s how to optimize Google Photos for this purpose:
8.1. Manual Uploads
After disabling automatic backup, manually upload selected photos and videos to Google Photos. This gives you complete control over what is stored in the cloud.
8.2. Organize Albums
Create albums in Google Photos to organize your backed-up photos. This makes it easier to find and manage your photos.
8.3. Use the “Free Up Space” Feature
After backing up photos to Google Photos, use the “Free Up Space” feature to remove them from your device. This ensures you have a cloud backup while freeing up storage on your phone.
9. Managing Existing Backups
If you’ve already backed up a large number of photos to Google Photos, you might want to manage them to free up storage or remove unwanted images.
9.1. Delete Unwanted Photos
Go through your Google Photos library and delete any photos or videos you no longer need. This can significantly reduce your storage usage.
9.2. Check Storage Usage
Regularly check your Google account storage to see how much space you’re using. This helps you identify areas where you can free up space.
9.3. Transfer to Another Service
If you decide to switch to another photo storage service, you can download your photos from Google Photos and upload them to the new service.
10. Tips for Efficient Photo Management
Effective photo management is crucial for both amateur and professional photographers. Here are some tips to help you manage your photo library efficiently:
10.1. Regular Backups
Whether you use automatic or manual backups, make sure to back up your photos regularly. This protects your precious memories from data loss.
10.2. Organize Your Photos
Use folders, albums, and tags to organize your photos. This makes it easier to find specific photos and manage your library.
10.3. Delete Duplicates
Regularly check for and delete duplicate photos. This frees up storage space and makes your library more manageable.
10.4. Use Metadata
Add metadata, such as captions, keywords, and location information, to your photos. This makes it easier to search for and organize your photos.
10.5. Edit Your Photos
Take the time to edit your photos to improve their quality. This can make a big difference in how your photos look and feel. Consider using photo editing software like Adobe Lightroom or Photoshop, or mobile apps like VSCO or Snapseed. dfphoto.net offers tutorials and resources to help you master these tools.
10.6. Print Your Photos
Don’t just let your photos sit on your computer or in the cloud. Print your favorite photos and create albums or display them in your home. This allows you to enjoy your memories in a tangible way.
11. Best Practices for Photo Storage
Adopting best practices for photo storage can ensure the longevity and accessibility of your photo library. Here are some recommendations:
11.1. Use Multiple Backup Locations
Don’t rely on a single backup location. Use a combination of cloud storage, local drives, and offsite backups to protect your photos from data loss.
11.2. Choose Reliable Storage Services
Select reputable cloud storage services with a proven track record of reliability and security.
11.3. Regularly Test Your Backups
Periodically test your backups to ensure they are working correctly. This helps you identify and fix any issues before it’s too late.
11.4. Keep Your Software Up to Date
Keep your photo management software and operating systems up to date. This ensures you have the latest security features and bug fixes.
11.5. Consider Professional Photo Management Services
For large or complex photo libraries, consider using professional photo management services. These services can help you organize, back up, and manage your photos.
12. Additional Tips for Managing Google Photos
Here are some additional tips to help you get the most out of Google Photos:
12.1. Use Facial Recognition
Google Photos uses facial recognition to identify people in your photos. Use this feature to tag people and easily find photos of specific individuals.
12.2. Create Shared Albums
Create shared albums to easily share photos with friends and family. This is a great way to collaborate on photo collections and share memories.
12.3. Use the Assistant Feature
Google Photos has an Assistant feature that automatically creates collages, animations, and other fun creations from your photos. Take advantage of this feature to discover new ways to enjoy your photos.
12.4. Explore Advanced Editing Tools
Google Photos offers a range of advanced editing tools, including filters, adjustments, and cropping. Experiment with these tools to enhance your photos.
12.5. Use the Search Feature
Google Photos has a powerful search feature that allows you to find photos based on keywords, locations, and other criteria. Use this feature to quickly find specific photos in your library.
13. Staying Updated with Photography Trends
Staying updated with the latest photography trends can inspire your creativity and improve your skills. Here are some ways to stay informed:
13.1. Follow Photography Blogs and Websites
Follow photography blogs and websites like dfphoto.net to stay updated with the latest news, techniques, and trends.
13.2. Attend Photography Workshops and Seminars
Attend photography workshops and seminars to learn from experts and network with other photographers.
13.3. Join Photography Communities
Join online and offline photography communities to share your work, get feedback, and learn from others.
13.4. Read Photography Magazines
Read photography magazines like Popular Photography to stay updated with the latest gear, techniques, and trends.
13.5. Experiment with New Techniques
Don’t be afraid to experiment with new techniques and styles. This can help you develop your own unique voice as a photographer.
14. Legal Considerations for Photo Usage
Understanding the legal aspects of photo usage is crucial, especially for professional photographers. Here are some key considerations:
14.1. Copyright
Copyright protects your photos from unauthorized use. Make sure to understand your rights as a photographer and take steps to protect your work.
14.2. Model Releases
If you’re photographing people, obtain model releases to ensure you have the right to use their images for commercial purposes.
14.3. Property Releases
If you’re photographing private property, obtain property releases to ensure you have the right to use the images for commercial purposes.
14.4. Creative Commons Licenses
Understand the different types of Creative Commons licenses and how they affect the use of your photos.
14.5. Privacy Laws
Be aware of privacy laws and regulations when photographing people in public places.
15. Addressing Common Challenges with Photo Backups
Even with the best strategies, you might encounter challenges with photo backups. Here’s how to address some common issues:
15.1. Slow Upload Speeds
If you’re experiencing slow upload speeds, try uploading your photos during off-peak hours or using a faster internet connection.
15.2. Storage Limits
If you’re running out of storage space, consider deleting unwanted photos or upgrading to a larger storage plan.
15.3. Backup Errors
If you’re encountering backup errors, check your internet connection, software settings, and storage device for any issues.
15.4. Data Corruption
To prevent data corruption, use reliable storage devices and regularly check your backups for errors.
15.5. Incompatible File Formats
Ensure your photos are in compatible file formats, such as JPEG or PNG, for easy storage and access.
16. Call to Action
Ready to take control of your photo storage? Visit dfphoto.net for more tips, tutorials, and resources to help you master photo management. Explore our collection of stunning images and connect with a vibrant community of photographers. Whether you’re looking to enhance your skills or find inspiration, dfphoto.net is your ultimate destination for all things photography.
FAQs About How to Stop Google Photos Backup
1. How do I stop uploading photos in Google Photos?
To stop automatic Google Photos backup, open the Google Photos app, tap your profile picture at the top, select “Photo settings,” then “Backup and Sync,” and toggle it off.
2. How do I unsync Google Photos on Android?
To unsync Google Photos on Android, launch the app, click on your profile picture, select “Photo Settings,” then “Backup and Sync,” and toggle it off.
3. Does deleting from Google Photos delete from the gallery?
No, deleting from Google Photos doesn’t delete photos from your phone’s gallery if backup is disabled. If backup is enabled, deleting from Google Photos will also delete it from your device.
4. What happens when I turn off backup and sync in Google Photos?
When you turn off backup and sync, new photos won’t be automatically uploaded to Google Photos. They’ll remain on your device until you manually back them up.
5. How do I manage my Google Photos storage?
To manage your Google Photos storage, go to the Google Photos settings and check your storage usage. Delete unwanted photos, reduce the upload quality, or purchase more storage if needed.
6. Can I selectively back up photos to Google Photos?
Yes, you can selectively back up photos by disabling automatic backup and manually uploading the photos you want to store in Google Photos.
7. What are the best alternatives to Google Photos for photo backup?
Some of the best alternatives to Google Photos include iCloud Photos, Amazon Photos, Microsoft OneDrive, and local backups using external hard drives or NAS devices.
8. How do I ensure my photos are safely backed up?
To ensure your photos are safely backed up, use multiple backup locations, choose reliable storage services, regularly test your backups, and keep your software up to date.
9. How do I transfer photos from Google Photos to another service?
To transfer photos from Google Photos to another service, download your photos from Google Photos and upload them to the new service.
10. What are the legal considerations for using photos online?
Legal considerations for using photos online include understanding copyright laws, obtaining model and property releases, and being aware of privacy laws.
Address: 1600 St Michael’s Dr, Santa Fe, NM 87505, United States.
Phone: +1 (505) 471-6001.
Website: dfphoto.net.