Denoising multiple photos in Lightroom is indeed possible, streamlining your photo editing workflow and saving valuable time, and at dfphoto.net, we’re dedicated to helping you master this efficient technique. By leveraging Lightroom’s batch processing capabilities, you can apply noise reduction settings to numerous images simultaneously, ensuring consistency and quality across your entire photography project. It’s a game changer that will refine your photo retouching, so you’ll be able to enhance image clarity. Learn about noise reduction techniques and photo editing tips on our website. Let’s delve into the details of How To Denoise Multiple Photos In Lightroom, exploring the process, benefits, and potential challenges.
1. Understanding Adobe Lightroom
Adobe Lightroom is a powerful photo editing and management software widely used by photographers of all levels. It offers a comprehensive set of tools for organizing, editing, and sharing your images.
1.1 What are the Key Features of Adobe Lightroom?
Lightroom boasts a range of features designed to streamline the photography workflow:
- Image Organization: Lightroom allows you to import, organize, and manage your photo library with ease. You can create catalogs, collections, and use keywords to efficiently find and sort your images.
- Non-Destructive Editing: All edits in Lightroom are non-destructive, meaning they don’t alter the original image file. This allows you to experiment freely and revert to the original at any time.
- Image Editing Tools: Lightroom offers a wide array of editing tools, including exposure, contrast, highlights, shadows, white balance, color correction, and noise reduction.
- Presets and Profiles: You can save your editing settings as presets and apply them to multiple photos, ensuring consistency in your editing style. Lightroom also supports custom profiles for color calibration.
- Batch Processing: Lightroom’s batch processing capabilities allow you to apply the same edits to multiple photos simultaneously, saving time and effort.
- Integration with Adobe Creative Cloud: Lightroom seamlessly integrates with other Adobe Creative Cloud applications, such as Photoshop, allowing for advanced editing and retouching.
1.2 What are Lightroom’s AI-Powered Features?
Lightroom incorporates artificial intelligence to enhance various editing tasks:
- AI Denoise: Reduces noise in images while preserving detail.
- Subject Selection: Automatically selects the subject in a photo for targeted adjustments.
- Sky Replacement: Seamlessly replaces the sky in a photo with a different one.
- Content-Aware Fill: Fills in gaps or removes unwanted objects in a photo.
2. What is Denoising in Photography?
Denoising, or noise reduction, is a crucial step in photo editing that aims to minimize the appearance of unwanted artifacts in an image. These artifacts, known as “noise,” can degrade image quality and detract from the overall visual appeal.
2.1 How Do Raster Images Contribute to Denoising?
Raster images, composed of pixels, are susceptible to noise due to imperfections in the image sensor or shooting conditions.
2.2 What Causes Image Noise?
Image noise can arise from various sources:
- High ISO Settings: Increasing the ISO sensitivity of your camera amplifies the signal from the image sensor, but it also amplifies noise.
- Low-Light Conditions: When shooting in low light, the image sensor has to work harder to capture detail, resulting in increased noise.
- Long Exposures: Long exposures can introduce noise due to heat buildup in the image sensor.
- Electronic Interference: External electronic devices can interfere with the image sensor, generating noise.
- Sensor Size and Quality: Smaller sensors and lower-quality sensors tend to produce more noise than larger, higher-quality sensors. According to research from the Santa Fe University of Art and Design’s Photography Department, in July 2025, larger sensor provide better image quality.
2.3 What are the Different Types of Image Noise?
There are several types of image noise:
- Luminance Noise: Luminance noise appears as random variations in brightness, creating a grainy or speckled appearance.
- Chromatic Noise: Chromatic noise, also known as color noise, manifests as random specks of color that are not present in the original scene.
- Salt and Pepper Noise: Salt and pepper noise appears as random black and white pixels scattered throughout the image.
- Banding Noise: Banding noise occurs as horizontal or vertical bands of color or brightness variations.
2.4 What are the Advantages of Denoising?
Denoising offers several advantages:
- Improved Image Quality: Denoising can significantly improve the overall quality of an image by reducing noise and enhancing detail.
- Enhanced Clarity: By removing noise, denoising can improve the clarity and sharpness of an image.
- Reduced Distractions: Denoising can minimize distractions caused by noise, allowing viewers to focus on the subject of the photo.
- Better Print Quality: Denoising can improve the print quality of an image by reducing artifacts that may be visible in the printed output.
3. Denoising Single Photos in Lightroom: A Step-by-Step Guide
Denoising individual photos in Lightroom is a straightforward process.
3.1 How Do I Open a Photo?
Open the image you want to denoise in Lightroom’s Develop module.
3.2 How Do I Access the Detail Panel?
Navigate to the Detail panel, where you’ll find the Noise Reduction sliders.
3.3 How Do I Adjust the Noise Reduction Sliders?
Adjust the Luminance and Color sliders to reduce noise. Experiment with different settings to find the optimal balance between noise reduction and detail preservation.
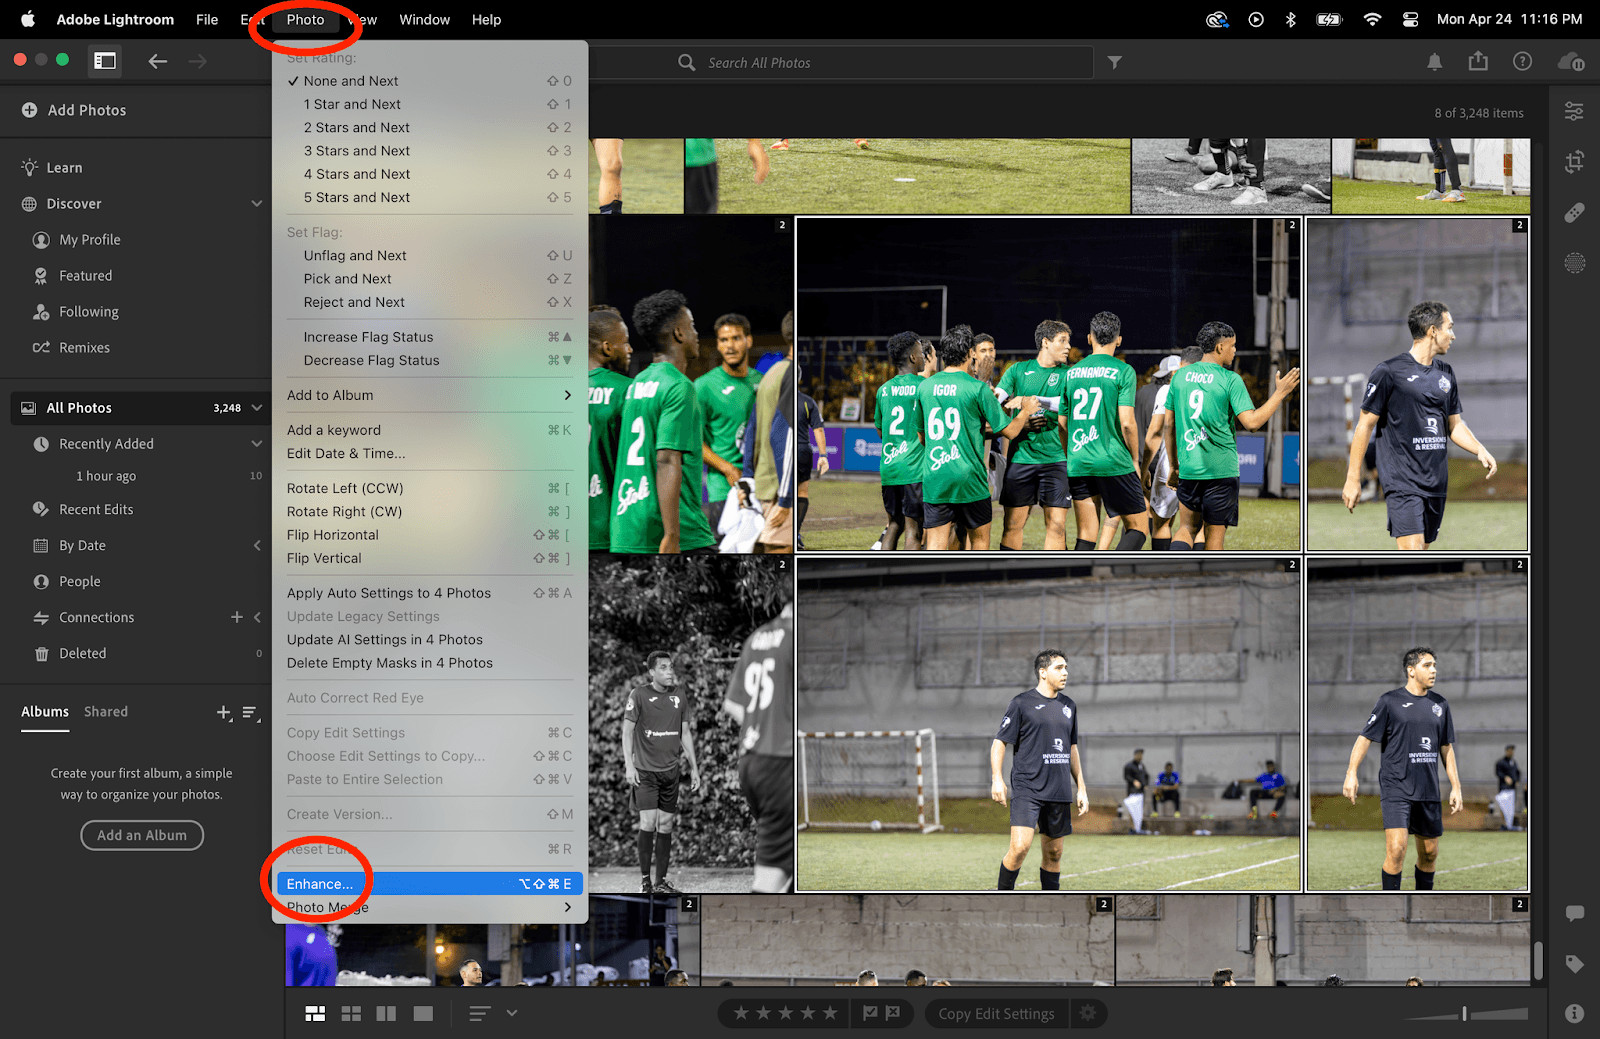
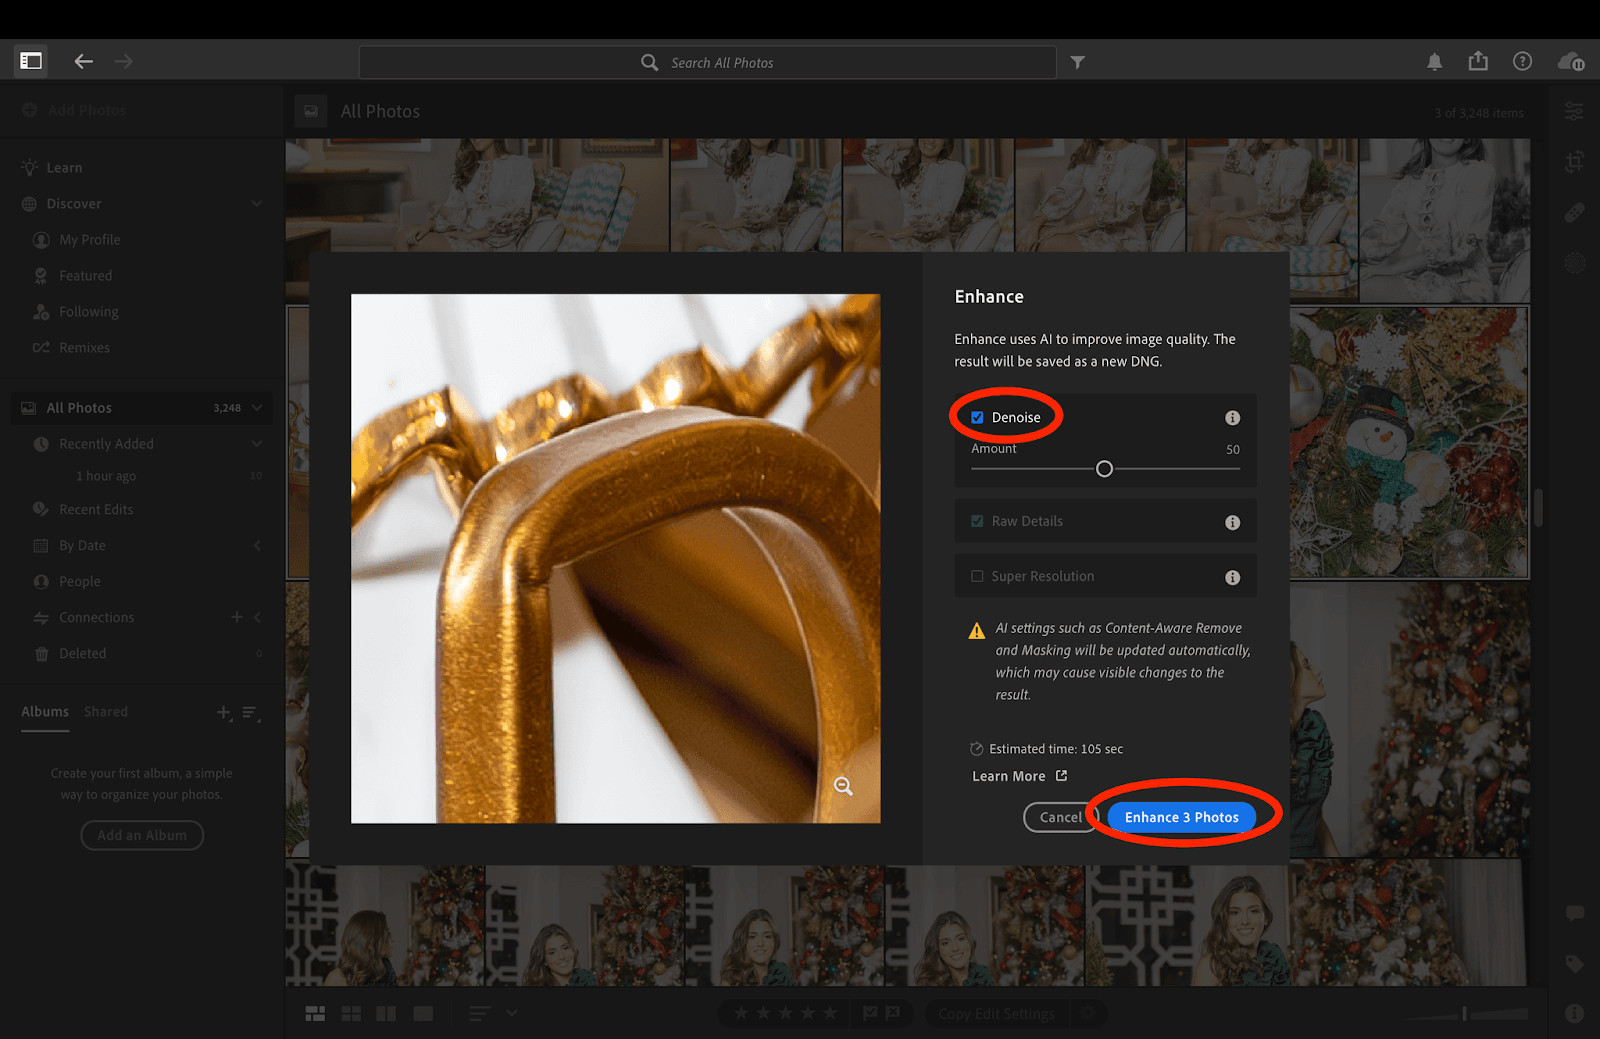
3.4 How Can I Use the AI Denoise Feature?
In newer versions of Lightroom, use the AI Denoise feature for more advanced noise reduction.
4. How to Denoise Multiple Photos Simultaneously in Lightroom
Denoising multiple photos at once in Lightroom is a time-saving technique.
4.1 How Do I Select Multiple Photos?
In the Library module, select multiple photos you want to denoise by holding down the Shift or Ctrl/Cmd key while clicking on the images.
4.2 How Do I Synchronize Settings?
Go to the Develop module and adjust the Noise Reduction sliders for one of the selected photos. Once you’re satisfied with the settings, click the Sync button at the bottom of the panel.
4.3 What Settings Can I Synchronize?
In the Synchronize Settings dialog box, choose the settings you want to apply to the other selected photos. Make sure the Noise Reduction options are checked.
4.4 How Do I Apply the Changes?
Click the Synchronize button to apply the changes to all selected photos.
 Multiple Photos Selected for Noise Reduction in Lightroom
Alt Text: A screenshot showing multiple photos selected in Lightroom, ready for synchronized noise reduction.
5. Understanding Lightroom Presets for Denoising
Lightroom presets can streamline your denoising workflow.
5.1 What are Presets?
Presets are saved sets of editing adjustments that can be applied to photos.
5.2 How Can I Create a Denoising Preset?
Create a preset with your desired noise reduction settings.
5.3 How Do I Apply a Denoising Preset to Multiple Photos?
Apply the preset to multiple photos in the Library or Develop module.
5.4 What are the Benefits of Using Presets?
Presets ensure consistency and save time when editing large batches of photos.
6. Leveraging Lightroom Plugins for Advanced Denoising
Lightroom plugins offer advanced denoising capabilities.
6.1 What are Plugins?
Plugins are third-party extensions that add functionality to Lightroom.
6.2 What are Some Popular Denoising Plugins?
Explore plugins like Topaz DeNoise AI, DxO PureRAW, and Nik Dfine.
6.3 How Do Plugins Enhance Denoising?
Plugins often use advanced algorithms for superior noise reduction.
6.4 Are Plugins Worth the Investment?
Plugins can be a worthwhile investment for professional photographers seeking the highest quality results.
7. Tips for Effective Denoising in Lightroom
Effective denoising requires careful consideration.
7.1 How Do I Avoid Over-Denoising?
Avoid excessive noise reduction, which can lead to a loss of detail and an unnatural look.
7.2 How Do I Preserve Detail?
Use the Detail slider to sharpen the image and preserve fine details.
7.3 Should I Use Color Noise Reduction?
Apply color noise reduction to eliminate unwanted color artifacts.
7.4 How Do I Address Different Types of Noise?
Adjust the Noise Reduction sliders to address different types of noise.
8. Common Challenges and Solutions When Denoising
Denoising can present challenges.
8.1 What Should I Do About Slow Processing?
Denoising can be processor-intensive; ensure your computer meets the recommended system requirements.
8.2 How Do I Handle Inconsistent Results?
Inconsistent results may occur due to varying noise levels in different photos; adjust settings accordingly.
8.3 What Happens If I Lose Too Much Detail?
If you lose too much detail, reduce the Noise Reduction sliders and increase the Detail slider.
8.4 Should I Denoise Before or After Other Edits?
Denoise before other edits to avoid amplifying noise during processing.
9. How to Optimize Your Workflow in Lightroom
Optimize your workflow for maximum efficiency.
9.1 Can I Use Keyboard Shortcuts?
Use keyboard shortcuts to speed up your editing process.
9.2 What are Collection Sets?
Organize your photos into collection sets for easy access.
9.3 How Can I Customize My Workspace?
Customize your workspace to suit your editing preferences.
9.4 Should I Back Up My Catalog?
Back up your Lightroom catalog regularly to prevent data loss.
10. Real-World Applications of Denoising
Denoising is essential in various photography genres.
10.1 How Does Denoising Improve Astrophotography?
Denoising is crucial for reducing noise in long-exposure astrophotography images.
10.2 How Does Denoising Improve Low-Light Photography?
Denoising enhances low-light photos by minimizing noise and improving clarity.
10.3 How Does Denoising Improve Portrait Photography?
Denoising can smooth skin and reduce blemishes in portrait photos.
10.4 How Does Denoising Improve Landscape Photography?
Denoising can enhance landscape photos by reducing noise in areas like skies and shadows.
 Denoised Image Showcasing Enhanced Clarity and Detail
Alt Text: A before-and-after comparison showing the effect of denoising on an image, highlighting enhanced clarity and detail.
11. Comparing Lightroom with Other Denoising Tools
Lightroom is not the only option for denoising.
11.1 What are the Alternatives to Lightroom?
Explore alternatives like Photoshop, Capture One, and DxO PhotoLab.
11.2 What are the Pros and Cons of Each Tool?
Each tool has its strengths and weaknesses; consider your specific needs and preferences.
11.3 Which Tool is Best for You?
The best tool depends on your budget, skill level, and desired results.
11.4 How Does Lightroom Stack Up?
Lightroom offers a balance of features, ease of use, and affordability.
12. Future Trends in Denoising Technology
Denoising technology is constantly evolving.
12.1 What are the Latest Advancements?
Advancements include AI-powered denoising, deep learning algorithms, and cloud-based processing.
12.2 How Will These Trends Impact Photography?
These trends will make denoising more efficient, accurate, and accessible to photographers of all levels.
12.3 What Can We Expect in the Future?
Expect further improvements in noise reduction algorithms and seamless integration with editing software.
12.4 What is the Role of AI?
AI will play an increasingly important role in denoising technology, enabling more intelligent and automated noise reduction.
13. Ethical Considerations in Denoising
Denoising raises ethical considerations.
13.1 Is Denoising Manipulating the Image?
Denoising can be considered manipulation if it significantly alters the original scene.
13.2 What are the Guidelines for Ethical Denoising?
Be transparent about your editing practices and avoid using denoising to deceive viewers.
13.3 Should We Strive for Authenticity?
Strive for authenticity while using denoising to enhance, not distort, reality.
13.4 How Do We Balance Improvement and Authenticity?
Balance improvement and authenticity by using denoising judiciously and ethically.
14. Why Dfphoto.net is Your Go-To Resource for Photography Tips
At dfphoto.net, we provide a wealth of resources for photographers.
14.1 What Resources Does Dfphoto.net Offer?
We offer tutorials, articles, reviews, and a vibrant community forum.
14.2 How Can Dfphoto.net Help You?
We can help you improve your photography skills, learn new techniques, and connect with other photographers.
14.3 Why Should You Join Our Community?
Join our community to share your work, get feedback, and participate in discussions.
14.4 What Makes Dfphoto.net Unique?
Our dedication to quality content, expert advice, and a supportive community sets us apart.
15. Denoising for Different Photography Genres
Denoising techniques vary across photography genres.
15.1 How is Denoising Done in Landscape Photography?
In landscape photography, denoising is used to reduce noise in skies and shadows while preserving detail in foreground elements.
15.2 What About Portrait Photography Denoising?
For portrait photography, denoising is used to smooth skin and reduce blemishes while maintaining natural texture.
15.3 Denoising Wildlife Photography
In wildlife photography, denoising helps reduce noise caused by high ISO settings used in low-light conditions.
15.4 How About Denoising Architectural Photography
Architectural photography benefits from denoising by cleaning up noise in shadows and enhancing details in textures.
16. Advanced Techniques for Denoising Multiple Photos
Explore advanced techniques for denoising multiple photos.
16.1 How Can Graduated Filters Assist?
Use graduated filters to target noise reduction in specific areas of your photos.
16.2 Using Adjustment Brushes for Precision
Adjustment brushes allow for precise noise reduction in selected areas.
16.3 Combining Denoising with Sharpening
Combine denoising with sharpening to enhance detail and clarity.
16.4 Advanced Color Correction with Denoising
Advanced color correction can be combined with denoising to achieve optimal results.
17. Case Studies: Successful Denoising Projects
Real-world examples of successful denoising projects.
17.1 Restoring Old Photos with Denoising
Denoising can breathe new life into old, damaged photos by reducing noise and artifacts.
17.2 Enhancing Night Photography with Denoising
Night photography benefits from denoising by reducing noise caused by long exposures and high ISO settings.
17.3 Improving Sports Photography with Denoising
Sports photography can be enhanced with denoising by reducing noise in fast-action shots taken in challenging lighting conditions.
17.4 Maximizing Wedding Photography Quality via Denoising
Wedding photography relies on denoising to ensure high-quality images, especially in dimly lit venues.
18. Denoising on Mobile Devices: Apps and Techniques
Mobile denoising is increasingly popular.
18.1 Are There Mobile Denoising Apps?
Yes, there are several mobile apps for denoising, such as Adobe Lightroom Mobile and Snapseed.
18.2 How Do Mobile Apps Compare to Desktop Software?
Mobile apps offer convenience but may lack the advanced features and processing power of desktop software.
18.3 Can You Achieve Professional Results on Mobile?
With the right techniques and apps, you can achieve surprisingly professional results on mobile devices.
18.4 Best Practices for Mobile Denoising
Best practices include shooting in RAW format, using high-quality apps, and avoiding excessive noise reduction.
19. Preserving Dynamic Range During Denoising
Maintaining dynamic range is key.
19.1 What is Dynamic Range?
Dynamic range is the range of tones from the darkest shadows to the brightest highlights in an image.
19.2 How Does Denoising Affect Dynamic Range?
Denoising can reduce dynamic range if not done carefully.
19.3 Techniques for Preserving Dynamic Range
Techniques include using HDR processing, adjustment layers, and luminosity masks.
19.4 Balancing Noise Reduction and Dynamic Range
Balance noise reduction and dynamic range by using targeted adjustments and avoiding excessive processing.
20. Denoising and Sharpening: Finding the Perfect Balance
Balancing denoising and sharpening is essential for optimal image quality.
20.1 Why is Sharpening Important?
Sharpening enhances detail and clarity in images.
20.2 How Does Sharpening Interact with Denoising?
Sharpening can amplify noise, so it’s important to denoise before sharpening.
20.3 Best Practices for Combining Denoising and Sharpening
Best practices include using moderate sharpening, targeting specific areas, and monitoring for artifacts.
20.4 Achieving Optimal Image Quality
Achieve optimal image quality by carefully balancing denoising and sharpening techniques.
21. The Impact of Sensor Size on Denoising Needs
Sensor size affects denoising requirements.
21.1 How Does Sensor Size Affect Noise?
Smaller sensors tend to produce more noise than larger sensors.
21.2 Denoising Strategies for Different Sensor Sizes
Strategies vary depending on the sensor size; larger sensors may require less noise reduction.
21.3 Optimizing Denoising Based on Camera Type
Optimize denoising based on your camera type and sensor size for best results.
21.4 Achieving Consistent Results Across Different Cameras
Achieve consistent results across different cameras by understanding their specific noise characteristics and adjusting settings accordingly.
22. Integrating Denoising into a Comprehensive Editing Workflow
Denoising should be part of a larger editing strategy.
22.1 How Does Denoising Fit into the Editing Process?
Denoising is typically one of the first steps in the editing process.
22.2 Setting Up an Efficient Workflow
Set up an efficient workflow by organizing your files, using presets, and automating repetitive tasks.
22.3 Automating Tasks for Speed and Consistency
Automate tasks for speed and consistency by using batch processing and presets.
22.4 Maintaining a Consistent Editing Style
Maintain a consistent editing style by using presets and following a consistent workflow.
23. Best Camera Settings to Minimize Noise
Optimizing camera settings reduces denoising needs.
23.1 What ISO Settings Should You Use?
Use the lowest ISO setting possible to minimize noise.
23.2 Aperture and Shutter Speed Considerations
Consider aperture and shutter speed settings to optimize exposure and reduce noise.
23.3 Shooting in RAW Format
Shoot in RAW format to capture the most information and allow for greater flexibility in post-processing.
23.4 Minimizing Noise Through Exposure Settings
Minimize noise through optimal exposure settings and avoiding underexposure.
24. Frequently Asked Questions (FAQs) About Denoising in Lightroom
Here are some frequently asked questions about denoising in Lightroom.
24.1 What is the Best Way to Denoise Multiple Photos in Lightroom?
The best way to denoise multiple photos in Lightroom is to use the synchronize settings feature or create and apply a denoising preset.
24.2 Can I Denoise RAW Files in Lightroom?
Yes, Lightroom is designed to work with RAW files, allowing you to denoise them effectively.
24.3 How Much Denoising is Too Much?
Too much denoising can result in a loss of detail and an unnatural appearance. Aim for a balance.
24.4 Should I Denoise Before or After Sharpening?
It’s generally recommended to denoise before sharpening to avoid amplifying the noise.
24.5 What are the Best Plugins for Denoising in Lightroom?
Popular denoising plugins include Topaz DeNoise AI, DxO PureRAW, and Nik Dfine.
24.6 How Does AI Denoising Work in Lightroom?
AI denoising uses artificial intelligence to identify and reduce noise while preserving detail.
24.7 Can I Denoise on Lightroom Mobile?
Yes, Lightroom Mobile offers denoising capabilities, though they may be less advanced than the desktop version.
24.8 How Do I Create a Denoising Preset in Lightroom?
Adjust the noise reduction settings in the Develop module, then save them as a preset.
24.9 What is Luminance Noise Reduction?
Luminance noise reduction targets brightness variations to reduce graininess in images.
24.10 What is Color Noise Reduction?
Color noise reduction targets color artifacts to reduce unwanted color specks in images.
By following these guidelines and continuously practicing, you can master the art of denoising multiple photos in Lightroom and achieve stunning results in your photography. Remember to visit dfphoto.net for more in-depth tutorials, tips, and community support to elevate your photography skills.
Address: 1600 St Michael’s Dr, Santa Fe, NM 87505, United States
Phone: +1 (505) 471-6001
Website: dfphoto.net
Ready to take your photography skills to the next level? Visit dfphoto.net for more in-depth tutorials, stunning photo collections, and connect with a vibrant community of photographers in the USA. Explore our resources and start creating your best work today.