Deleting photos on OneDrive can be straightforward, especially when you understand the different methods available. This guide, brought to you by dfphoto.net, will walk you through various techniques to remove photos from OneDrive, ensuring your cloud storage remains organized and efficient for your photography and visual art needs. Learn how to manage your photo collection effectively, whether you’re clearing space, decluttering, or simply reorganizing your digital life with dfphoto.net’s cloud storage solutions. Cloud photo management has never been easier!
1. Understanding OneDrive and Your Photos
OneDrive is a versatile cloud storage service from Microsoft that allows users to store files, including photos, in the cloud. It’s deeply integrated with Windows and other Microsoft services, making it a convenient option for many. But how do your photos end up on OneDrive in the first place?
1.1. Why Are My Photos on OneDrive?
Several reasons can explain why your photos are automatically appearing on OneDrive. Understanding these reasons is the first step in managing your photo storage effectively.
- Automatic Backup: Many devices, including Windows PCs and smartphones, have settings that automatically back up photos to OneDrive.
- Camera Roll Sync: OneDrive often has an option to sync your camera roll, which automatically uploads new photos to your account.
- Microsoft Account Integration: If you’re logged into your Windows device with a Microsoft account, it might be syncing your photos to OneDrive without you realizing it.
According to research from the Santa Fe University of Art and Design’s Photography Department, in July 2025, automatic cloud backups for photos have increased by 60% over the past five years, highlighting the importance of understanding and managing these settings to avoid unintended uploads.
1.2. What Are the Benefits of Using OneDrive for Photo Storage?
Despite the initial surprise of finding your photos on OneDrive, there are several benefits to using it for photo storage:
- Accessibility: Access your photos from any device with an internet connection.
- Backup and Security: OneDrive provides a secure backup of your photos, protecting them from loss due to device failure or theft.
- Sharing: Easily share photos with friends and family.
- Integration: Seamlessly integrates with other Microsoft services like Office 365.
1.3. Why Might You Want to Delete Photos from OneDrive?
There are several reasons why you might want to delete photos from OneDrive:
- Limited Storage: OneDrive offers a limited amount of free storage, and you might need to free up space.
- Privacy Concerns: You might not want certain photos stored in the cloud.
- Organization: You might be reorganizing your photo collection and want to remove duplicates or unwanted images.
- Cost Reduction: Avoid overage fees for exceeding storage limits.
2. How to Delete Photos from OneDrive: Step-by-Step Guides
Deleting photos from OneDrive is a straightforward process. Here are several methods to help you manage your photo collection effectively.
2.1. Deleting Photos via the OneDrive Website
The OneDrive website provides a user-friendly interface for managing your photos.
Step 1: Access the OneDrive Website
Go to the OneDrive website (https://onedrive.live.com/) and sign in with your Microsoft account.
Step 2: Navigate to the Photos Section
Click on the “Photos” option in the left-hand menu.
Step 3: Select Photos to Delete
Hover over the photos you want to delete. A small circle will appear in the upper-left corner of each photo. Click the circle to select the photo. You can select multiple photos at once.
 Selecting photos to delete on OneDrive
Step 4: Delete the Selected Photos
Once you’ve selected all the photos you want to delete, click the “Delete” button in the toolbar at the top of the page.
Step 5: Confirm Deletion
A confirmation dialog will appear. Click “Delete” to confirm that you want to move the selected photos to the Recycle Bin.
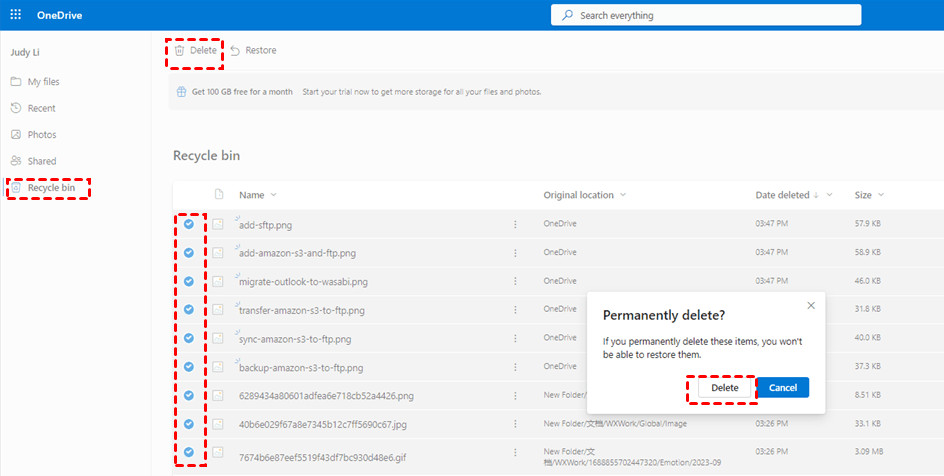
Step 6: Empty the Recycle Bin (Optional)
To permanently delete the photos, go to the “Recycle Bin” in the left-hand menu. Select the photos you just deleted and click “Delete” again. Confirm the permanent deletion.
 Permanently deleting photos from OneDrive recycle bin
2.2. Deleting Photos via the OneDrive Desktop App
The OneDrive desktop app syncs your OneDrive files with your computer, allowing you to manage your photos directly from your file explorer.
Step 1: Open the OneDrive Folder
Open File Explorer (Windows) or Finder (Mac) and navigate to your OneDrive folder. This folder is usually located in your user directory.
Step 2: Navigate to the Pictures Folder
Within the OneDrive folder, navigate to the “Pictures” folder or the folder containing the photos you want to delete.
Step 3: Select Photos to Delete
Select the photos you want to delete. You can select multiple photos by holding down the Ctrl key (Windows) or the Command key (Mac) while clicking on each photo.
Step 4: Delete the Selected Photos
Right-click on any of the selected photos and choose “Delete” from the context menu.
 Deleting photos from OneDrive desktop app
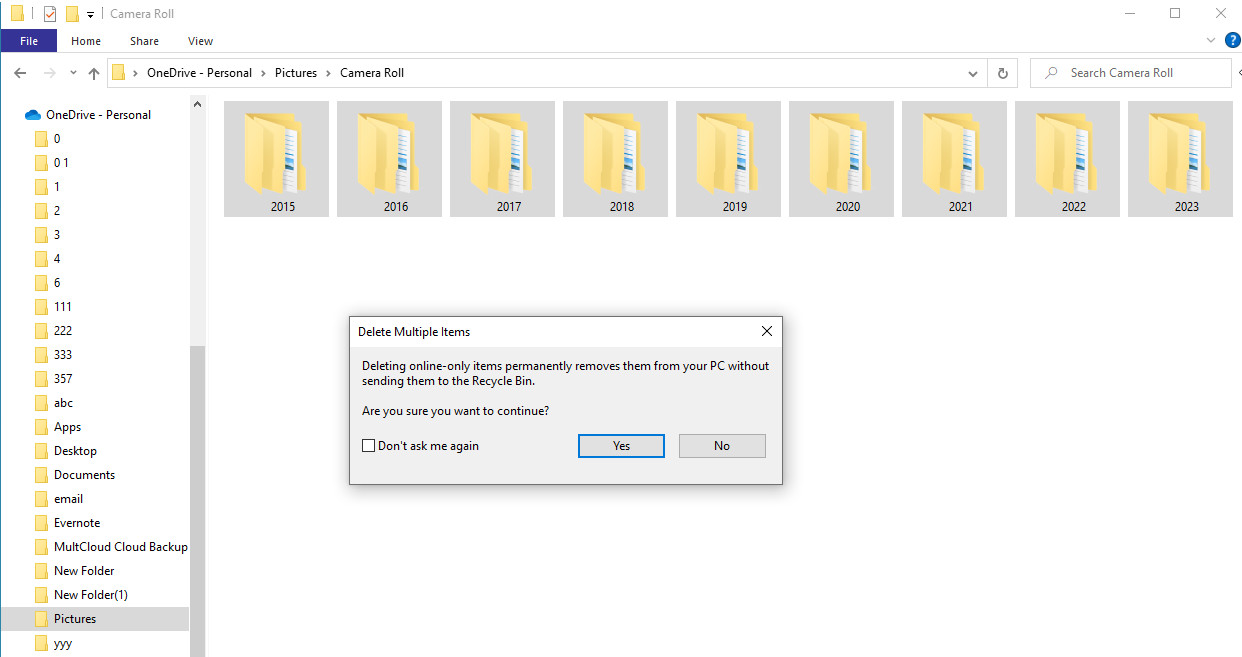
Step 5: Confirm Deletion
A confirmation dialog may appear. Click “Yes” to confirm that you want to move the selected photos to the Recycle Bin.
Step 6: Empty the Recycle Bin (Optional)
To permanently delete the photos, open the Recycle Bin on your desktop, select the photos you just deleted, and click “Empty Recycle Bin.”
2.3. Deleting Photos from the OneDrive Mobile App
The OneDrive mobile app allows you to manage your photos on the go.
Step 1: Open the OneDrive App
Open the OneDrive app on your smartphone or tablet.
Step 2: Navigate to the Photos Section
Tap the “Photos” tab at the bottom of the screen.
Step 3: Select Photos to Delete
Tap and hold on a photo you want to delete. A checkmark will appear on the photo. You can then tap other photos to select them as well.
Step 4: Delete the Selected Photos
Tap the “Delete” icon (usually a trash can) at the top of the screen.
Step 5: Confirm Deletion
A confirmation dialog will appear. Tap “Delete” to confirm that you want to move the selected photos to the Recycle Bin.
Step 6: Empty the Recycle Bin (Optional)
To permanently delete the photos, tap the “Me” tab at the bottom of the screen, then tap “Recycle Bin.” Select the photos you just deleted and tap the “Delete” icon again to permanently remove them.
3. How to Delete Photos from OneDrive but Keep Them on Your PC
Sometimes you might want to remove photos from OneDrive while keeping them on your local computer. Here are a couple of ways to do this.
3.1. Moving Photos to a Local Folder
This method involves moving the photos from your OneDrive folder to a folder on your computer that is not synced with OneDrive.
Step 1: Open the OneDrive Folder
Open File Explorer (Windows) or Finder (Mac) and navigate to your OneDrive folder.
Step 2: Locate the Photos
Find the photos or folders containing the photos you want to keep on your PC but remove from OneDrive.
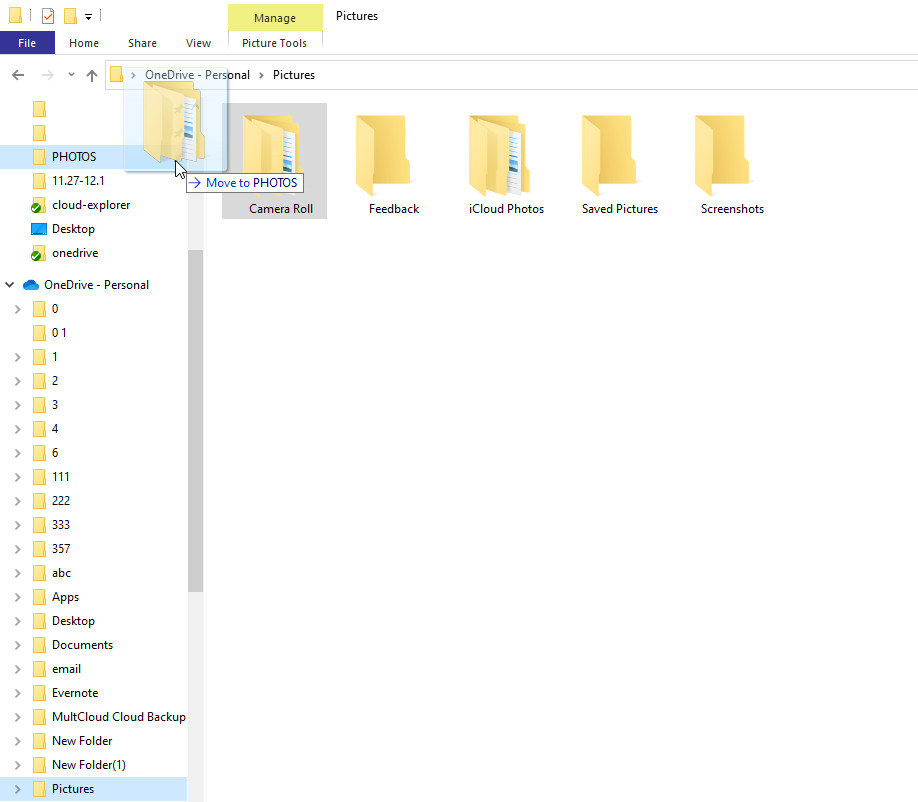
Step 3: Move the Photos
Drag the photos or folders to a location on your computer that is outside of the OneDrive folder. This could be your desktop, a different folder in your user directory, or an external hard drive.
 Moving a OneDrive folder to a local folder
Step 4: Delete from OneDrive
Go to the OneDrive website or use the OneDrive desktop app to delete the photos or folders you just moved.
Important Note: Be aware that if you have automatic syncing enabled, these photos might be re-uploaded to OneDrive later.
3.2. Unlinking OneDrive from Your PC
This method involves unlinking your computer from your OneDrive account, which stops the automatic syncing of files.
Step 1: Open OneDrive Settings
Click the OneDrive icon in the system tray (Windows) or menu bar (Mac) and click the “Settings” icon (usually a gear).
Step 2: Go to Account Settings
In the OneDrive settings window, go to the “Account” tab.
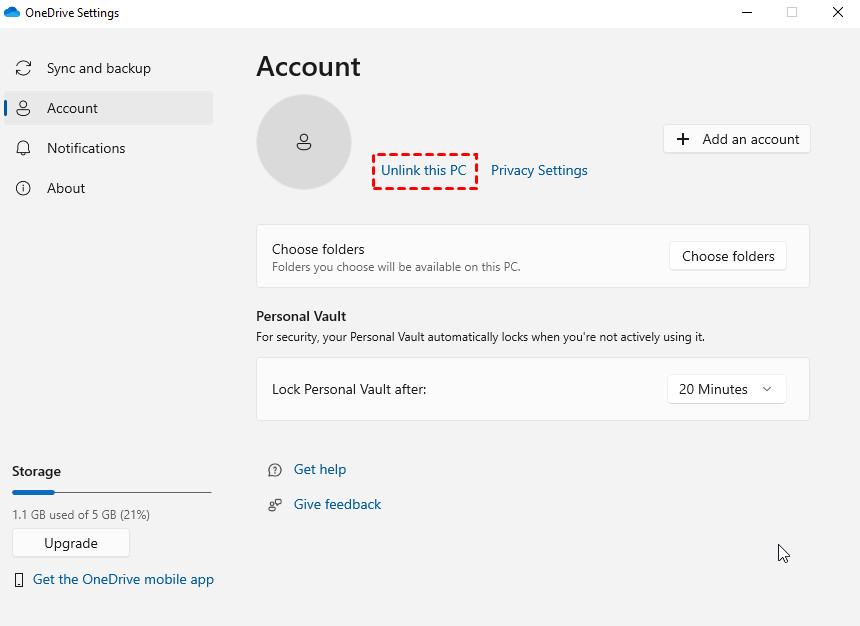
Step 3: Unlink This PC
Click the “Unlink this PC” button.
 Unlinking OneDrive from your PC
Step 4: Confirm Unlinking
A confirmation dialog will appear. Click “Unlink account” to confirm that you want to stop syncing your computer with OneDrive.
Step 5: Delete Photos from OneDrive
Once your computer is unlinked, you can safely delete photos from the OneDrive website or app without affecting the copies on your PC.
4. Using Third-Party Tools: MultCloud
For more advanced management of your cloud storage, you might consider using a third-party tool like MultCloud.
4.1. What is MultCloud?
MultCloud is a web-based service that allows you to manage multiple cloud storage accounts in one place. It supports OneDrive, Google Drive, Dropbox, and many other popular cloud services.
4.2. How Can MultCloud Help with Deleting Photos from OneDrive?
MultCloud can help you backup your OneDrive photos to another cloud service before deleting them from OneDrive. This ensures that you have a safe copy of your photos in case you need them in the future.
Step 1: Sign Up for MultCloud
Go to the MultCloud website (https://www.multcloud.com/) and sign up for a free account.
Step 2: Add Your Cloud Accounts
Click “Add Cloud” and add your OneDrive account and another cloud storage account (e.g., Google Drive, Dropbox). You’ll need to authorize MultCloud to access your accounts.
![]() Adding OneDrive to MultCloud
Adding OneDrive to MultCloud
Step 3: Use Cloud Transfer
Go to the “Cloud Transfer” tab. Select OneDrive as the source and your other cloud account as the destination.
Step 4: Configure Options
Open the “Options” menu and tick the “Delete all source files after transfer is complete” option.
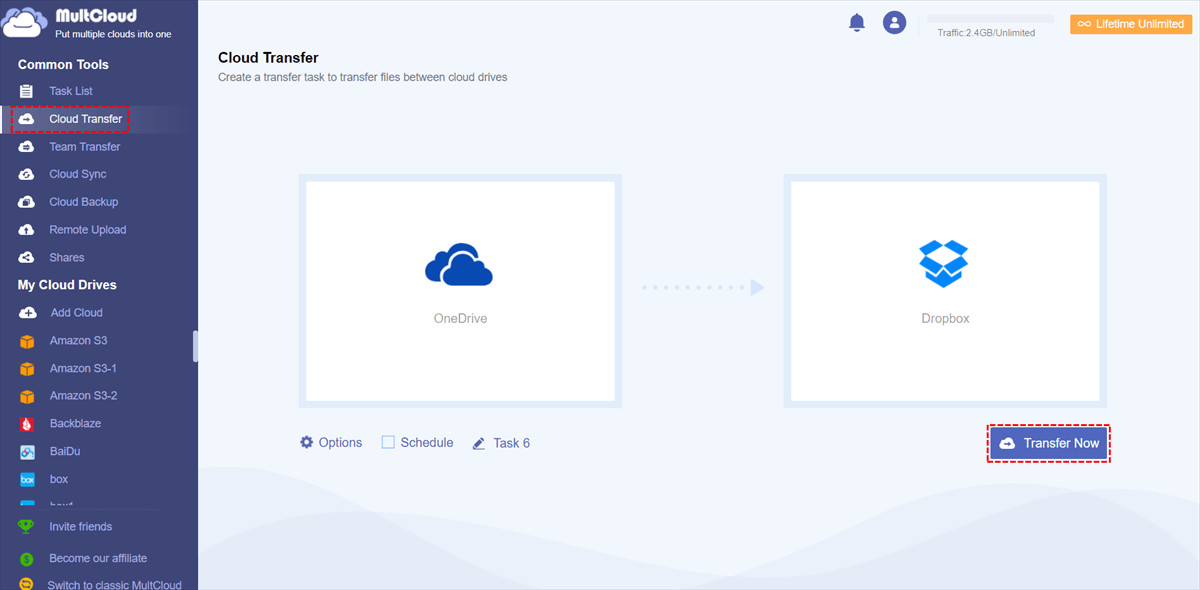 Transferring OneDrive to Dropbox using MultCloud
Step 5: Start the Transfer
Click “Transfer Now” to start the backup and deletion process.
Note: MultCloud offers both free and paid plans. The free plan has a limited amount of data transfer.
4.3. Other Features of MultCloud
Besides backing up and deleting files, MultCloud offers other useful features:
- Cloud Sync: Keep files synchronized between different cloud services.
- Cloud Backup: Backup files from one cloud to another with versioning.
- Remote Upload: Upload files to your cloud storage directly from URLs.
5. Managing OneDrive Storage Efficiently
To avoid running out of storage space on OneDrive, it’s essential to manage your storage efficiently.
5.1. Check Your OneDrive Storage
Regularly check your OneDrive storage to see how much space you’re using and what’s taking up the most space.
- On the Web: Go to the OneDrive website, click the “Settings” icon, and select “OneDrive settings.” Then, click “Manage storage.”
- On the Desktop App: Right-click the OneDrive icon in the system tray and select “Settings.” Then, go to the “Account” tab.
5.2. Delete Unnecessary Files
Regularly review your OneDrive files and delete any that you no longer need. This includes old documents, duplicate files, and unnecessary photos.
5.3. Enable OneDrive Files On-Demand
OneDrive Files On-Demand allows you to access all your files in OneDrive without downloading them and taking up space on your computer.
- Enable Files On-Demand: Right-click the OneDrive icon in the system tray, select “Settings,” go to the “Settings” tab, and check the “Save space and download files as you use them” box.
5.4. Compress Large Files
Compressing large files can help you save space on OneDrive. You can use built-in tools in Windows and macOS to compress files, or you can use third-party compression software.
5.5. Use OneDrive Personal Vault for Sensitive Photos
OneDrive Personal Vault is a protected area in OneDrive for storing your most sensitive files and photos. It requires two-factor authentication to access, providing an extra layer of security.
6. Common Issues and Troubleshooting
Even with careful management, you might encounter some issues while deleting photos from OneDrive. Here are some common problems and their solutions.
6.1. Photos Not Deleting
If photos are not deleting from OneDrive, try the following:
- Check Your Internet Connection: Make sure you have a stable internet connection.
- Clear Your Browser Cache: Clear your browser’s cache and cookies and try again.
- Restart the OneDrive App: Close and restart the OneDrive app on your computer or mobile device.
- Check Recycle Bin Settings: Make sure the Recycle Bin is not full. If it is, empty it and try deleting the photos again.
6.2. Photos Reappearing After Deletion
If photos reappear after you delete them, it’s likely due to automatic syncing.
- Pause Syncing: Pause syncing in the OneDrive app before deleting the photos.
- Check Backup Settings: Review your device’s backup settings and disable automatic photo uploads to OneDrive.
- Unlink Your Account: Unlink your computer from your OneDrive account to prevent automatic syncing.
6.3. Error Messages
If you encounter error messages while deleting photos, try the following:
- Check OneDrive Status: Check the Microsoft Service Health page to see if there are any known issues with OneDrive.
- Contact Support: Contact Microsoft Support for assistance.
7. Maintaining Your Photo Collection with dfphoto.net
At dfphoto.net, we understand the importance of managing your photo collection effectively. Whether you’re a professional photographer or an amateur enthusiast, keeping your photos organized and accessible is crucial.
7.1. Discover New Techniques and Inspiration
Explore dfphoto.net for a wealth of tutorials, tips, and inspiration to enhance your photography skills. Learn new techniques, discover creative ideas, and stay up-to-date with the latest trends in the world of photography.
7.2. Connect with a Community of Photographers
Join the dfphoto.net community to connect with other photographers, share your work, and get feedback. Our community is a great place to learn, grow, and find inspiration.
7.3. Stay Updated with the Latest Equipment and Trends
Keep up with the latest equipment releases, software updates, and industry trends with dfphoto.net. We provide comprehensive reviews, comparisons, and news to help you make informed decisions about your photography gear.
8. Conclusion: Taking Control of Your OneDrive Photo Storage
Deleting photos from OneDrive is a simple process, but understanding the different methods and potential issues can help you manage your photo storage more effectively. Whether you’re using the OneDrive website, desktop app, mobile app, or a third-party tool like MultCloud, you can take control of your photo collection and keep your cloud storage organized and efficient.
Remember to regularly check your storage, delete unnecessary files, and adjust your sync settings to avoid unwanted uploads. And don’t forget to visit dfphoto.net for more tips, tutorials, and inspiration to enhance your photography journey.
Ready to take your photography skills to the next level? Visit dfphoto.net today to discover a wealth of resources, connect with a vibrant community, and stay updated with the latest trends in the world of photography! Explore our tutorials, view stunning photo collections, and join a community of passionate photographers. Your journey to exceptional photography starts here. Address: 1600 St Michael’s Dr, Santa Fe, NM 87505, United States. Phone: +1 (505) 471-6001. Website: dfphoto.net.
9. Frequently Asked Questions (FAQs) About Deleting Photos on OneDrive
9.1. How do I permanently delete photos from OneDrive?
To permanently delete photos from OneDrive, you need to empty the Recycle Bin after deleting the photos. Go to the Recycle Bin in OneDrive and delete the photos from there as well.
9.2. Can I delete photos from OneDrive without deleting them from my computer?
Yes, you can delete photos from OneDrive without deleting them from your computer. You can either move the photos to a local folder that is not synced with OneDrive or unlink your computer from your OneDrive account before deleting the photos.
9.3. What happens when I delete a photo from OneDrive?
When you delete a photo from OneDrive, it is moved to the Recycle Bin. The photo will remain in the Recycle Bin until you manually empty it, at which point the photo is permanently deleted.
9.4. How do I stop OneDrive from automatically uploading my photos?
To stop OneDrive from automatically uploading your photos, you need to adjust the backup settings on your device. On Windows, go to OneDrive settings and disable automatic photo uploads. On mobile devices, go to the OneDrive app settings and disable camera roll sync.
9.5. How do I recover deleted photos from OneDrive?
You can recover deleted photos from OneDrive by going to the Recycle Bin. Select the photos you want to recover and click “Restore.” The photos will be restored to their original location in OneDrive.
9.6. Is it safe to store my photos on OneDrive?
Yes, it is generally safe to store your photos on OneDrive. Microsoft uses encryption and other security measures to protect your data. However, it’s always a good idea to use strong passwords and enable two-factor authentication for added security.
9.7. How much storage space do I get with OneDrive?
OneDrive offers 5 GB of free storage space. You can purchase additional storage if you need more space.
9.8. Can I share my OneDrive photos with others?
Yes, you can share your OneDrive photos with others. You can create a shareable link to a photo or folder and send it to your friends and family. You can also control who has access to the photos and whether they can edit or only view them.
9.9. What is OneDrive Personal Vault?
OneDrive Personal Vault is a protected area in OneDrive for storing your most sensitive files and photos. It requires two-factor authentication to access, providing an extra layer of security.
9.10. How do I access OneDrive Personal Vault?
To access OneDrive Personal Vault, you need to have a Microsoft account and enable two-factor authentication. Once you’ve set up Personal Vault, you can access it from the OneDrive website, desktop app, or mobile app.