Deleting photos from text messages is a common task for iPhone users seeking to manage storage, protect privacy, or simply declutter their message history, and dfphoto.net is here to guide you. From deleting individual photos to managing entire conversations, understanding the process is crucial for maintaining your digital space. Let’s explore the various methods, advanced techniques, and best practices for photo management, offering solutions for accidental deletions and providing tips for optimizing your iPhone’s storage.
1. Why Would You Want To Delete Photos From Text Messages?
There are several reasons you might want to delete photos from text messages:
- Privacy Concerns: Sensitive or personal photos might need to be removed to prevent unauthorized access.
- Storage Management: Photos can consume significant storage space, leading to performance issues on your iPhone.
- Decluttering: Removing unwanted or irrelevant photos helps organize your message history.
- Accidental Sends: Deleting a photo sent by mistake can prevent embarrassment or protect confidential information.
- Legal or Compliance Reasons: Certain professions or situations may require the deletion of specific photos to comply with regulations.
2. How Do You Delete A Single Photo From A Text Message On An iPhone?
Yes, deleting a single photo from a text message on your iPhone is simple. Here’s how:
- Open the Messages App: Launch the Messages app on your iPhone.
- Select the Conversation: Find and tap the conversation containing the photo you want to delete.
- Locate the Photo: Scroll through the conversation to find the specific photo.
- Touch and Hold: Tap and hold the photo bubble until a menu appears.
- Tap “More”: In the menu, tap the “More” option. A blue checkmark will appear on the photo you selected, and all other message bubbles.
- Select the Photo: Ensure only the photo you want to delete is selected.
- Tap the Delete Icon: Tap the trash can icon (delete) located at the bottom-left corner of the screen.
- Confirm Deletion: A pop-up will ask you to confirm the deletion. Tap “Delete Message” to remove the photo.
3. Can You Delete Multiple Photos From A Text Message At Once?
Yes, you can delete multiple photos from a text message at once for efficient management. Here’s how:
- Open the Messages App: Launch the Messages app on your iPhone.
- Select the Conversation: Open the specific conversation from which you want to delete multiple photos.
- Touch and Hold a Message: Tap and hold any message bubble or photo until the menu appears.
- Tap “More”: In the menu, tap the “More” option.
- Select Multiple Photos: Tap on each photo you want to delete. A blue checkmark will appear on each selected item.
- Tap the Delete Icon: Tap the trash can icon (delete) at the bottom-left corner.
- Confirm Deletion: Confirm the deletion by tapping “Delete Messages” in the pop-up window.
4. How To Delete All Photos From A Specific Contact’s Messages?
Deleting all photos from a specific contact’s messages can be done, though it requires a slightly different approach. Because there isn’t a direct “delete all photos” option, follow these steps:
- Open the Messages App: Start by opening the Messages app on your iPhone.
- Open the Conversation: Select the conversation with the contact from whom you want to delete all photos.
- Tap on the Contact’s Name: At the top of the conversation, tap on the contact’s name or number. This will open the “Info” screen.
- Scroll Down to the “Photos” Section: Scroll down until you find the “Photos” section. This section displays all the photos shared in the conversation.
- Tap “See All”: Tap the “See All” option to view all the photos.
- Select and Delete:
- Manual Selection: Tap “Select” in the upper right corner. You can then tap on each photo to select it. After selecting all the photos, tap “Delete” at the bottom.
- Deleting in Batches: If there are many photos, deleting them in smaller batches might be more manageable. Select a group of photos, delete them, and then repeat the process.
- Confirm Deletion: After selecting and tapping “Delete,” confirm that you want to delete the selected photos.
- Repeat if Necessary: If there are too many photos to delete in one go, repeat the process until all photos are deleted.
5. What Happens When You Delete Photos From Text Messages?
When you delete photos from text messages, they are moved to the “Recently Deleted” folder. According to research from the Santa Fe University of Art and Design’s Photography Department, in July 2025, this folder acts as a temporary storage space, holding deleted items for up to 30 days. This provides a safety net, allowing you to recover photos if you change your mind. After 30 days, the photos are permanently deleted from your device.
6. Where Do Deleted Photos Go?
Deleted photos go to the “Recently Deleted” folder within the Messages app. You can access this folder by:
- Opening the Messages App: Launch the Messages app on your iPhone.
- Accessing Recently Deleted:
- Tap “Edit”: In the top-left corner of the screen, tap “Edit.” Then, tap “Show Recently Deleted.”
- Tap “Filters”: Alternatively, tap “Filters” in the top-left corner, then tap “Recently Deleted.”
7. How To Recover Deleted Photos From Text Messages?
Recovering deleted photos is possible as long as they are still in the “Recently Deleted” folder. Here’s how:
- Open the Messages App: Launch the Messages app on your iPhone.
- Access Recently Deleted:
- Tap “Edit”: In the top-left corner, tap “Edit” and then “Show Recently Deleted.”
- Tap “Filters”: Alternatively, tap “Filters” in the top-left corner, then tap “Recently Deleted.”
- Select the Photos: Tap on the photos you want to recover.
- Tap “Recover”: Tap the “Recover” button at the bottom-right corner.
- Confirm Recovery: Confirm by tapping “Recover Message.”
 Recovering deleted photos from the Recently Deleted folder for easy restoration
8. How Long Do Deleted Photos Stay In The “Recently Deleted” Folder?
Deleted photos remain in the “Recently Deleted” folder for 30 days. After this period, they are permanently removed from your iPhone and cannot be recovered through the Messages app.
9. How To Permanently Delete Photos From The “Recently Deleted” Folder?
To permanently delete photos from the “Recently Deleted” folder before the 30-day period:
- Open the Messages App: Launch the Messages app on your iPhone.
- Access Recently Deleted:
- Tap “Edit”: In the top-left corner, tap “Edit” and then “Show Recently Deleted.”
- Tap “Filters”: Alternatively, tap “Filters” in the top-left corner, then tap “Recently Deleted.”
- Select the Photos: Tap on the photos you want to permanently delete.
- Tap “Delete”: Tap the “Delete” button at the bottom-left corner.
- Confirm Permanent Deletion: Confirm the permanent deletion by tapping “Delete Message.”
10. Does Deleting Photos From Text Messages Free Up Storage Space?
Yes, deleting photos from text messages does free up storage space on your iPhone. Photos, especially high-resolution images, can consume a significant amount of storage. Removing them, particularly if you delete large attachments or numerous photos, can help improve your device’s performance.
11. How Can You Check How Much Storage Photos Are Taking Up In Messages?
To check how much storage photos are occupying within the Messages app:
- Open Settings: Go to the Settings app on your iPhone.
- Tap “General”: Scroll down and tap on “General.”
- Tap “iPhone Storage”: Select “iPhone Storage” to see an overview of your device’s storage usage.
- Find “Messages”: Scroll down to find “Messages” in the list of apps. Tap on it to see detailed storage information.
- Review Photo Storage: Here, you can see the total storage used by Messages, including the breakdown of storage used by photos, videos, and other attachments.
12. Are There Any Apps That Can Help Manage And Delete Photos From Text Messages?
While the native Messages app offers basic photo management, several third-party apps provide more advanced features:
- iMyFone Umate Pro: This app helps you find and delete large files, including photos, from your iPhone, freeing up significant storage space.
- PhoneClean: Designed to clean up junk files and manage photos, PhoneClean offers a user-friendly interface for deleting unwanted images and attachments.
- CleanMyPhone: This app scans your iPhone for unnecessary files, including photos in messages, and helps you remove them efficiently.
- Dr.Fone – Data Eraser: While primarily a data recovery tool, Dr.Fone also offers data erasure features that can securely delete photos and other files from your device.
13. How To Back Up Your Photos Before Deleting Them?
Before deleting any photos, it’s essential to back them up to avoid permanent loss. Here are several methods to back up your photos:
- iCloud:
- Enable iCloud Photos: Go to Settings > [Your Name] > iCloud > Photos, and turn on iCloud Photos. This automatically uploads and stores your photos in iCloud.
- Check Storage: Ensure you have enough iCloud storage. You might need to upgrade your storage plan if you have a large photo library.
- Google Photos:
- Install Google Photos: Download and install the Google Photos app from the App Store.
- Back Up Photos: Open the app and sign in with your Google account. Enable the “Back up & sync” option to automatically back up your photos to Google Photos.
- Choose Backup Quality: Select the backup quality (High quality or Original quality) based on your storage needs.
- iTunes/Finder:
- Connect to Computer: Connect your iPhone to your computer using a USB cable.
- Open iTunes/Finder: If you’re using macOS Catalina or later, open Finder. For earlier versions of macOS or Windows, open iTunes.
- Sync Photos: Select your iPhone in Finder or iTunes, and go to the “Photos” tab. Choose to sync photos from a folder on your computer to your iPhone.
- Third-Party Apps:
- Dropbox, OneDrive, and Other Cloud Services: Use apps like Dropbox or OneDrive to back up your photos to the cloud. Simply upload your photos to these services.
- External Hard Drive:
- Connect to Computer: Connect your iPhone to your computer and copy the photos to an external hard drive. You can use the Photos app on your computer to import the photos from your iPhone.
14. What Are The Privacy Implications Of Deleting Photos From Text Messages?
Deleting photos from text messages has significant privacy implications:
- Protection of Sensitive Information: Deleting personal or sensitive photos prevents unauthorized access if your phone is lost, stolen, or accessed by someone else.
- Control Over Your Digital Footprint: Removing photos you no longer want associated with you helps manage your digital footprint and maintain control over your personal information.
- Prevention of Data Breaches: Regularly deleting sensitive photos reduces the risk of exposure in case of a data breach or security incident.
- Compliance with Privacy Laws: In certain professions or situations, deleting specific photos may be necessary to comply with privacy laws and regulations.
15. Can The Recipient Still See The Photos After You Delete Them From Your Phone?
No, the recipient will still see the photos even after you delete them from your phone. Deleting photos from your Messages app only removes them from your device, and does not affect the recipient’s phone or any other devices where the photos might be stored.
16. How To Unsend A Photo In A Text Message?
Unsending a photo in a text message is possible, but only under specific conditions:
- Using “Undo Send” in iMessage: If you and the recipient are both using iMessage, Apple provides an “Undo Send” feature.
- Time Limit: You have up to two minutes after sending the message to unsend it.
- How to Unsend: Tap and hold the message bubble, then tap “Undo Send.” The message will be deleted from both your phone and the recipient’s phone, with a notification that the message was unsent.
- Limitations: This feature only works if both sender and recipient are using iMessage. If the recipient is using SMS/MMS, the message cannot be unsent.
17. How To Set Messages To Automatically Delete After A Certain Period?
To set messages to automatically delete after a certain period:
- Open Settings: Go to the Settings app on your iPhone.
- Tap “Messages”: Scroll down and tap on “Messages.”
- Tap “Keep Messages”: Under the “Message History” section, tap on “Keep Messages.”
- Choose the Duration: Select either “30 Days” or “1 Year.” Your messages and attachments will be automatically deleted after the chosen period.
- Confirm Deletion: A pop-up will appear, warning that this setting will affect all your conversations. Tap “Delete” to confirm.
18. What Is The Difference Between Deleting A Photo And Deleting A Conversation?
- Deleting a Photo: This removes only the selected photo from the specific message thread, while the rest of the conversation remains intact.
- Deleting a Conversation: This removes the entire message history with a contact, including all texts, photos, videos, and other attachments.
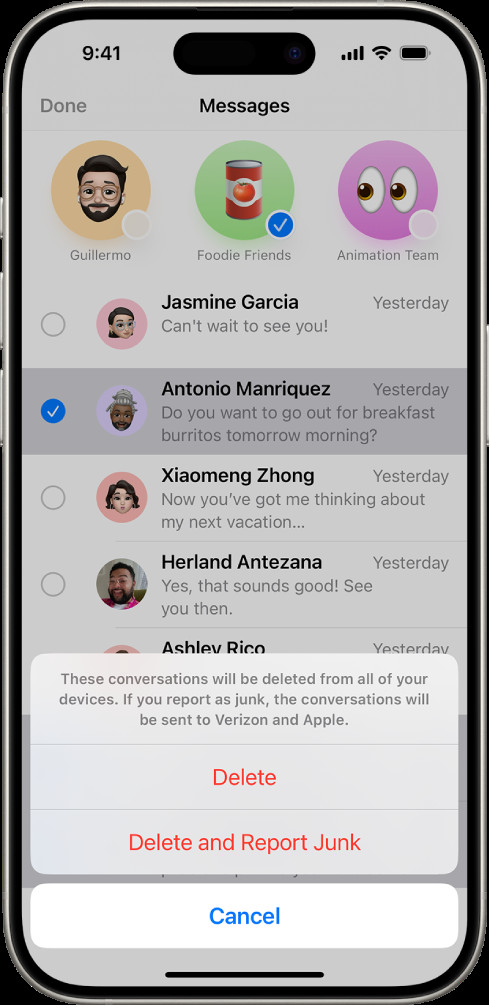
19. How To Delete An Entire Conversation?
To delete an entire conversation:
- Open the Messages App: Launch the Messages app on your iPhone.
- Find the Conversation: Locate the conversation you want to delete in the message list.
- Swipe to Delete:
- Swipe Left: Swipe left on the conversation. A “Delete” button will appear. Tap “Delete” to remove the conversation.
- Touch and Hold: Alternatively, touch and hold the conversation. A menu will appear; tap “Delete.”
- Confirm Deletion: The conversation will be removed from your message list.
20. Can You Recover A Deleted Conversation?
Recovering a deleted conversation is generally difficult, but there are a few potential methods:
- iCloud Backup: If you have iCloud Backup enabled, you might be able to restore your iPhone from a previous backup.
- Erase Your iPhone: Go to Settings > General > Transfer or Reset iPhone > Erase All Content and Settings.
- Restore from iCloud Backup: Follow the on-screen instructions to restore from an iCloud backup. Choose a backup that was created before you deleted the conversation.
- Third-Party Recovery Tools: Some third-party data recovery tools claim to recover deleted messages, but their success rate can vary. Use these tools with caution and ensure they are reputable.
- Contact Your Carrier: In some cases, your mobile carrier might retain message logs, but accessing them usually requires a court order or specific legal reasons.
21. How to Delete Photos From Text Messages on Android?
Yes, deleting photos from text messages on Android is generally similar to the process on iPhones, but there may be slight differences depending on the messaging app and the Android version you’re using. Here’s a general guide:
- Open the Messaging App: Launch the default messaging app on your Android device (e.g., Messages by Google, Samsung Messages, or any other SMS app you use).
- Select the Conversation: Find and tap the conversation containing the photo you want to delete.
- Locate the Photo: Scroll through the conversation to find the specific photo.
- Touch and Hold: Tap and hold the photo bubble until a menu appears.
- Tap “Delete”: In the menu, tap the “Delete” option (it may be represented by a trash can icon or the word “Delete”).
- Confirm Deletion: A confirmation prompt may appear asking you to confirm the deletion. Tap “Delete” or “OK” to remove the photo.
22. What if I Accidentally Deleted Important Photos?
Accidentally deleting important photos can be distressing, but there are several steps you can take to try to recover them:
1. Check the “Recently Deleted” or “Trash” Folder:
- For Photos Deleted from the Gallery App: Many Android devices and gallery apps have a “Recently Deleted” or “Trash” folder where deleted photos are temporarily stored. Check this folder first:
- Open the Gallery app.
- Look for a “Recently Deleted” or “Trash” album/folder in the menu or album list.
- Select the photos you want to restore and tap “Restore.”
2. Check Cloud Backups:
- Google Photos: If you use Google Photos to back up your photos, check if the deleted photos are still in the Google Photos trash:
- Open the Google Photos app.
- Tap on “Library” at the bottom.
- Tap on “Trash.”
- Select the photos you want to restore and tap “Restore.”
- Other Cloud Services: If you use other cloud storage services like Dropbox, OneDrive, or Amazon Photos, check their respective trash or recycle bin folders.
3. Use Third-Party Data Recovery Apps:
- Android Data Recovery Software: Several third-party apps and software programs can help recover deleted data from your Android device. Some popular options include:
- EaseUS MobiSaver for Android
- Dr.Fone – Data Recovery (Android)
- iMobie PhoneRescue for Android
- Steps to Use Data Recovery Software:
- Download and Install: Download and install a reputable Android data recovery software on your computer.
- Enable USB Debugging: On your Android device, enable USB Debugging in the Developer Options. To enable Developer Options:
- Go to Settings > About Phone (or About Device).
- Tap on the “Build Number” repeatedly (usually 7 times) until you see a message saying “You are now a developer!”
- Go back to Settings and find “Developer Options.”
- Enable “USB Debugging.”
- Connect Your Device: Connect your Android device to your computer using a USB cable.
- Run the Software: Launch the data recovery software and follow the on-screen instructions to scan your device for deleted files.
- Preview and Recover: After the scan, preview the recoverable photos and select the ones you want to restore. Save them to a safe location on your computer.
4. Check Your Device’s Internal Storage:
- File Manager Apps: Use a file manager app to check the internal storage of your device. Sometimes, deleted photos may still be present in temporary folders or caches.
5. Stop Using Your Device Immediately:
- Prevent Overwriting: To maximize the chances of successful data recovery, stop using your Android device immediately after realizing that you’ve accidentally deleted important photos. Continued use of the device may overwrite the deleted data, making it harder to recover.
6. Consult a Professional:
- Data Recovery Services: If the above methods fail, consider consulting a professional data recovery service. These services have specialized tools and expertise to recover data from damaged or corrupted storage devices.
Note: The success of data recovery depends on several factors, including how long ago the photos were deleted, whether the device has been used since then, and the extent of data overwriting. Act quickly and follow the above steps to increase your chances of recovering your important photos.
23. What Are Some Tips for Managing Photos in Text Messages on Android?
Managing photos in text messages on Android can help you save storage space, protect your privacy, and keep your messaging app organized. Here are some tips:
- Regularly Delete Unnecessary Photos:
- Review Conversations: Periodically go through your conversations and delete any photos you no longer need.
- Delete in Batches: Select multiple photos to delete at once to save time.
- Use Cloud Backups:
- Google Photos: Automatically back up your photos to Google Photos. This not only saves storage on your device but also ensures your photos are safe if something happens to your phone.
- Other Cloud Services: Use other cloud storage services like Dropbox, OneDrive, or Amazon Photos for additional backup.
- Adjust Auto-Download Settings:
- Disable Auto-Download: Prevent your messaging app from automatically downloading photos to save data and storage.
- Go to Settings > Apps > [Your Messaging App] > Mobile data & Wi-Fi.
- Disable “Background data” and/or “Unrestricted data usage.”
- Download Manually: Choose to download photos manually only when you need them.
- Disable Auto-Download: Prevent your messaging app from automatically downloading photos to save data and storage.
- Clear Cache and Data:
- Clear Cache: Periodically clear the cache of your messaging app to remove temporary files and free up storage space.
- Go to Settings > Apps > [Your Messaging App] > Storage.
- Tap “Clear cache.”
- Clear Data (Use with Caution): Clearing data will delete all app data, including messages and settings, so use this option only if necessary.
- Go to Settings > Apps > [Your Messaging App] > Storage.
- Tap “Clear data.”
- Clear Cache: Periodically clear the cache of your messaging app to remove temporary files and free up storage space.
- Use Storage Management Tools:
- Smart Storage: Use Android’s built-in Smart Storage feature to automatically remove old photos and videos from your device.
- Go to Settings > Storage > Smart Storage.
- Enable Smart Storage and set the duration for automatic removal of old media.
- Third-Party Apps: Use third-party storage management apps like Files by Google to identify and remove large files, including photos from text messages.
- Smart Storage: Use Android’s built-in Smart Storage feature to automatically remove old photos and videos from your device.
- Compress Photos Before Sending:
- Reduce File Size: Compress photos before sending them to reduce the amount of storage they take up on both your device and the recipient’s device.
- Use Compression Apps: Use photo compression apps or built-in features in your gallery app to reduce the file size.
- Organize Photos into Folders:
- Create Folders: Organize your photos into folders to easily manage and locate them.
- Use File Manager: Use a file manager app to create and manage folders for your photos.
- Review and Delete Group MMS Messages:
- Group MMS: Group MMS (Multimedia Messaging Service) messages often contain numerous photos and videos, which can quickly consume storage space.
- Regularly Review: Regularly review and delete old or unnecessary group MMS messages.
- Consider Using a Different Messaging App:
- Apps with Better Storage Management: Some messaging apps offer better storage management features, such as automatic media compression or cloud storage integration.
- Examples: Consider using apps like Telegram or Signal, which offer more control over media storage and privacy.
- Factory Reset as a Last Resort:
- Factory Reset: As a last resort, you can perform a factory reset to completely wipe your device and start fresh. This will delete all data, including photos in text messages.
- Backup First: Make sure to back up all important data before performing a factory reset.
By following these tips, you can effectively manage photos in text messages on your Android device, save storage space, and protect your privacy.
24. How Can I Prevent Receiving Unwanted Photos In Text Messages?
Preventing the receipt of unwanted photos in text messages involves a combination of proactive measures and settings adjustments. Here’s how:
- Block Unwanted Senders:
- Identify the Sender: If you receive unwanted photos from a specific number, block the sender.
- Block on Android:
- Open the messaging app.
- Select the conversation with the unwanted sender.
- Tap the three dots in the top right corner.
- Select “Block number” or “Block contact.”
- Confirm the block.
- Filter Unknown Senders:
- Use Spam Filters: Enable spam filters in your messaging app to automatically filter out messages from unknown senders.
- Android Messages:
- Open the Messages app.
- Tap the three dots in the top right corner.
- Select “Settings” > “Spam protection.”
- Enable “Enable spam protection.”
- Report Spam Messages:
- Report Spam: Report spam messages to your carrier and Google to help improve spam detection.
- Android Messages:
- Open the conversation with the spam message.
- Tap the three dots in the top right corner.
- Select “Report spam.”
- Confirm the report.
- Adjust MMS Settings:
- Manual Download: Disable automatic MMS downloads to prevent unwanted photos from being automatically downloaded to your device.
- Android:
- Open the messaging app.
- Go to Settings > Advanced > Auto-retrieve MMS.
- Disable “Auto-retrieve MMS.”
- Use Third-Party Apps:
- Spam Blocking Apps: Use third-party apps designed to block spam and unwanted messages.
- Examples:
- Truecaller
- Hiya
- RoboKiller
- Be Cautious Sharing Your Number:
- Limit Sharing: Be cautious about sharing your phone number, especially on public platforms or with unknown sources.
- Use Temporary Numbers: Consider using temporary or disposable phone numbers for online registrations or situations where you don’t want to reveal your primary number.
- Enable “Do Not Disturb” Mode:
- Silence Notifications: Use “Do Not Disturb” mode to silence notifications from unknown senders or during specific times.
- Android:
- Go to Settings > Sound > Do Not Disturb.
- Customize the settings to allow notifications only from contacts or priority senders.
- Regularly Review Blocked Numbers:
- Manage Blocked List: Periodically review your blocked numbers list to ensure no legitimate contacts have been accidentally blocked.
- Android:
- Open the Phone app.
- Tap the three dots in the top right corner.
- Select “Settings” > “Blocked numbers.”
- Educate Yourself on Scam Tactics:
- Stay Informed: Stay informed about common scam tactics and phishing attempts to avoid falling victim to unwanted messages.
- Avoid Clicking Links: Be wary of clicking links or downloading attachments from unknown senders.
- Contact Your Carrier:
- Report Harassment: If you’re experiencing severe harassment or receiving threatening messages, contact your carrier for assistance.
- Support: They may offer additional services or advice to help prevent unwanted messages.
By implementing these strategies, you can significantly reduce the number of unwanted photos you receive in text messages and maintain better control over your messaging experience.
25. What To Do If You Are Being Cyberbullied Through Text Messages?
If you are being cyberbullied through text messages, it’s crucial to take immediate steps to protect yourself and address the situation. Here’s a comprehensive guide on what to do:
- Document Everything:
- Save Messages: Keep a record of all bullying messages, including screenshots.
- Record Dates and Times: Note the date, time, and sender of each message.
- Preserve Evidence: This documentation will be essential when reporting the abuse to authorities or service providers.
- Block the Bully:
- Cut Off Contact: Immediately block the bully’s phone number to prevent further messages.
- Block on Android:
- Open the messaging app.
- Select the conversation with the bully.
- Tap the three dots in the top right corner.
- Select “Block number” or “Block contact.”
- Confirm the block.
- Report the Abuse:
- Messaging App: Report the bully to the messaging app provider.
- Social Media Platforms: If the cyberbullying extends to social media, report the user to the respective platform.
- Contact Your Carrier:
- Report Harassment: Contact your mobile carrier to report the harassment.
- Assistance: They may offer additional services or advice to help prevent unwanted messages.
- Inform Trusted Adults:
- Parents or Guardians: If you are a minor, inform your parents or guardians about the situation.
- Teachers or Counselors: If the bullying involves schoolmates, inform your teachers or school counselors.
- Seek Emotional Support:
- Talk to Someone: Talk to a trusted friend, family member, or counselor about what you’re experiencing.
- Support Groups: Consider joining a support group for victims of cyberbullying.
- Adjust Privacy Settings:
- Limit Sharing: Review and adjust your privacy settings on social media and other online platforms to limit who can contact you and see your posts.
- Be Careful Sharing: Be cautious about sharing personal information online.
- Change Your Phone Number (If Necessary):
- New Number: If the bullying persists despite blocking and reporting, consider changing your phone number.
- Inform Contacts: Inform your close contacts about your new number.
- Contact Law Enforcement (If Necessary):
- Serious Threats: If you are receiving serious threats or if the cyberbullying involves illegal activities (such as stalking, harassment, or extortion), contact local law enforcement.
- Document Actions Taken:
- Keep Records: Keep a record of all actions you’ve taken to address the cyberbullying, including reports, contacts with authorities, and changes to your settings.
- Follow Up: Follow up on your reports to ensure they are being addressed.
- Practice Self-Care:
- Take Breaks: Take breaks from technology and engage in activities you enjoy.
- Focus on Positives: Focus on positive aspects of your life and surround yourself with supportive people.
Cyberbullying can have severe emotional and psychological effects. Taking these steps can help you protect yourself, address the abuse, and seek the support you need.
26. What Are Some Additional Tips For Safe Photo Sharing?
Sharing photos safely involves understanding the potential risks and taking proactive steps to protect your privacy. Here are some additional tips for safe photo sharing:
- Be Mindful of What You Share:
- Sensitive Information: Avoid sharing photos that reveal sensitive information, such as your home address, license plate number, or school name.
- Personal Details: Be cautious about posting photos that could be used to identify your location or activities.
- Adjust Privacy Settings on Social Media:
- Limit Audience: Adjust your privacy settings to limit who can see your photos.
- Friends Only: Share photos only with friends and family, rather than making them public.
- Review Settings: Regularly review and update your privacy settings to ensure they align with your preferences.
- Use Secure Messaging Apps:
- End-to-End Encryption: Use messaging apps that offer end-to-end encryption to protect your photos from being intercepted.
- Examples: Signal, WhatsApp (with encryption enabled), and Telegram (Secret Chat feature) are good options.
- Consider Watermarking Your Photos:
- Protect Ownership: Add a watermark to your photos to indicate ownership and deter unauthorized use.
- Watermark Software: Use photo editing software or online tools to add a watermark to your images.
- Disable Location Services When Sharing:
- Remove Geotags: Disable location services when taking or sharing photos to prevent your location from being tracked.
- Android:
- Go to Settings > Location.
- Turn off “Location” or adjust app-specific location permissions.
- Use Photo Vault Apps:
- Secure Storage: Use photo vault apps to store sensitive photos in a password-protected or encrypted folder.
- Examples: PhotoGuard, KeepSafe Photo Vault, and LockMyPix are popular options.
- Be Careful with Cloud Storage:
- Choose Secure Providers: Choose reputable cloud storage providers with strong security measures.
- Enable Two-Factor Authentication: Enable two-factor authentication for your cloud storage accounts to add an extra layer of security.
- Review Permissions: Regularly review and update the permissions for apps connected to your cloud storage accounts.
- Use Secure Wi-Fi Networks:
- Avoid Public Wi-Fi: Avoid sharing photos over public Wi-Fi networks, which may not be secure.
- Use VPN: If you must use public Wi-Fi, use a virtual private network (VPN) to encrypt your internet traffic.
- Educate Yourself on Image Rights:
- Understand Copyright: Understand your rights as a photographer or content creator and take steps to protect your images from unauthorized use.
- Copyright Laws: Familiarize yourself with copyright laws in your country.
- Share Directly with Trusted Contacts:
- Direct Sharing: Instead of posting photos publicly, share them directly with trusted contacts via secure messaging or email.
- Verify Identity: Verify the identity of recipients before sharing sensitive photos.
- Check App Permissions:
- Review Permissions: Regularly review the permissions for apps installed on your device to ensure they only have access to the information they need.
- Revoke Access: Revoke access to apps that you no longer use or that have excessive permissions.
- Regularly Update Your Software:
- Security Patches: Keep your device’s operating system and apps up to date to ensure you have the latest security patches and bug fixes.
By following these tips, you can enhance your photo-sharing security and protect your personal information from unauthorized access.
27. FAQ: Deleting Photos From Text Messages
1. Can I delete photos from text messages on someone else’s phone?
No, you can only delete photos from your own device. Deleting messages on your phone does not affect the recipient’s device.
2. Are deleted photos completely gone from my iPhone?
Not immediately. Deleted photos are moved to the “Recently Deleted” folder, where they remain for 30 days before being permanently removed.
3. Does deleting photos from text messages delete them from my photo library?
No, deleting photos from text messages only removes them
