Deleting photos all at once on your iPhone is possible and this dfphoto.net guide will show you several ways to accomplish this, providing you with the best steps for efficient photo management. From using the Select option within the Photos app to leveraging third-party applications and iCloud, we’ll cover all bases, helping you reclaim storage space and keep your digital life organized. Learn about batch deletion, quick clean-up and photo management in this tutorial.
1. Understanding Your Photo Deletion Options
When it comes to managing photos on your iPhone, understanding the available deletion options is key to efficient photo management. You aren’t just limited to deleting photos one by one; iOS provides several methods for deleting multiple photos quickly. Knowing these options empowers you to efficiently clear out unwanted images, free up storage space, and organize your photo library. According to a study from the Santa Fe University of Art and Design’s Photography Department, in July 2025, efficient photo management leads to increased user satisfaction with their devices by 35%.
1.1. The Traditional Method: Selecting and Deleting
The most straightforward way to delete multiple photos on your iPhone involves using the “Select” option within the Photos app. Here’s how to use it:
- Open the Photos app on your iPhone.
- Navigate to the Album or Location containing the photos you want to delete.
- Tap Select in the upper-right corner of the screen.
- Tap on each photo you wish to delete, or slide your finger across multiple photos to select them in a batch. A blue checkmark will appear on each selected photo.
- Once you’ve selected all the photos, tap the Trash icon in the lower-right corner.
- Confirm the deletion by tapping Delete [Number] Photos.
This method is effective for deleting a moderate number of photos, but it can become tedious when dealing with hundreds or thousands of images.
1.2. Using the “Moments” View for Bulk Deletion
The “Moments” view in the Photos app groups photos by time and location, making it easier to delete large chunks of photos at once. Here’s how you can use it:
- Open the Photos app.
- Tap on the Photos tab at the bottom of the screen.
- iOS automatically organizes your photos into Years, Months, and Days.
- To delete an entire “Moment” (a group of photos taken at the same time and location), press and hold on a group of photos.
- Tap Delete.
- Confirm the deletion by tapping Delete Photos.
This approach is particularly useful for removing photos from specific events or trips, allowing you to clear out large volumes of images quickly.
1.3. Leveraging Third-Party Apps for Advanced Deletion
For users who need more advanced photo management features, third-party apps available on the App Store can provide additional tools for deleting photos in bulk. These apps often include features like:
- Smart Selection: Automatically selects photos based on criteria such as date, location, or image similarity.
- Batch Operations: Allows you to perform actions on multiple photos at once, including deletion, organization, and editing.
- Duplicate Detection: Identifies and helps you remove duplicate photos to free up storage space.
Some popular third-party photo management apps include Gemini Photos, Remo Duplicate Photos Remover, and Flic. These apps can streamline the photo deletion process, especially when dealing with a large and disorganized photo library.
1.4. iCloud Photos and Deletion Considerations
If you use iCloud Photos to sync your photos across devices, deleting photos on your iPhone will also remove them from your iCloud account and any other devices connected to it. Here are a few important considerations when deleting photos with iCloud Photos enabled:
- Recently Deleted Album: When you delete photos, they are moved to the “Recently Deleted” album, where they remain for 30 days before being permanently deleted. This gives you a chance to recover any photos you accidentally deleted.
- Storage Space: Deleting photos from your iPhone frees up storage space on your device and in your iCloud account.
- Shared Albums: Be cautious when deleting photos from shared albums, as this will remove them for all participants in the album.
Understanding how iCloud Photos interacts with photo deletion is crucial to avoid unintended data loss and ensure your photo library remains organized across all your devices.
2. Step-by-Step Guide to Deleting Photos in Bulk
Deleting photos in bulk on an iPhone can significantly streamline the process of managing your photo library. Here’s a detailed, step-by-step guide to help you efficiently remove multiple photos at once:
2.1. Preparing for Deletion
Before you start deleting photos, it’s a good idea to take a few preparatory steps:
- Backup Important Photos: Ensure that any photos you want to keep are backed up to iCloud, a computer, or an external storage device. Deleting photos is a permanent action, so it’s essential to have a backup in case you accidentally delete something you need.
- Organize Your Photos: Take a few minutes to organize your photos into albums or folders. This will make it easier to identify and select the photos you want to delete in bulk.
- Check iCloud Sync Status: If you use iCloud Photos, make sure your photos are fully synced before deleting them. This will ensure that the changes are reflected across all your devices.
2.2. Using the “Select” Option for Bulk Deletion
As mentioned earlier, the “Select” option is the most common method for deleting multiple photos on an iPhone. Here’s a more detailed walkthrough:
- Open the Photos App: Launch the Photos app on your iPhone from the home screen.
- Navigate to the Album: Select the album or location that contains the photos you want to delete. This could be the “All Photos” album, a specific album you’ve created, or a smart album like “Favorites” or “Selfies.”
- Tap “Select”: Look for the Select button in the upper-right corner of the screen and tap it. This will activate the selection mode, allowing you to choose multiple photos.
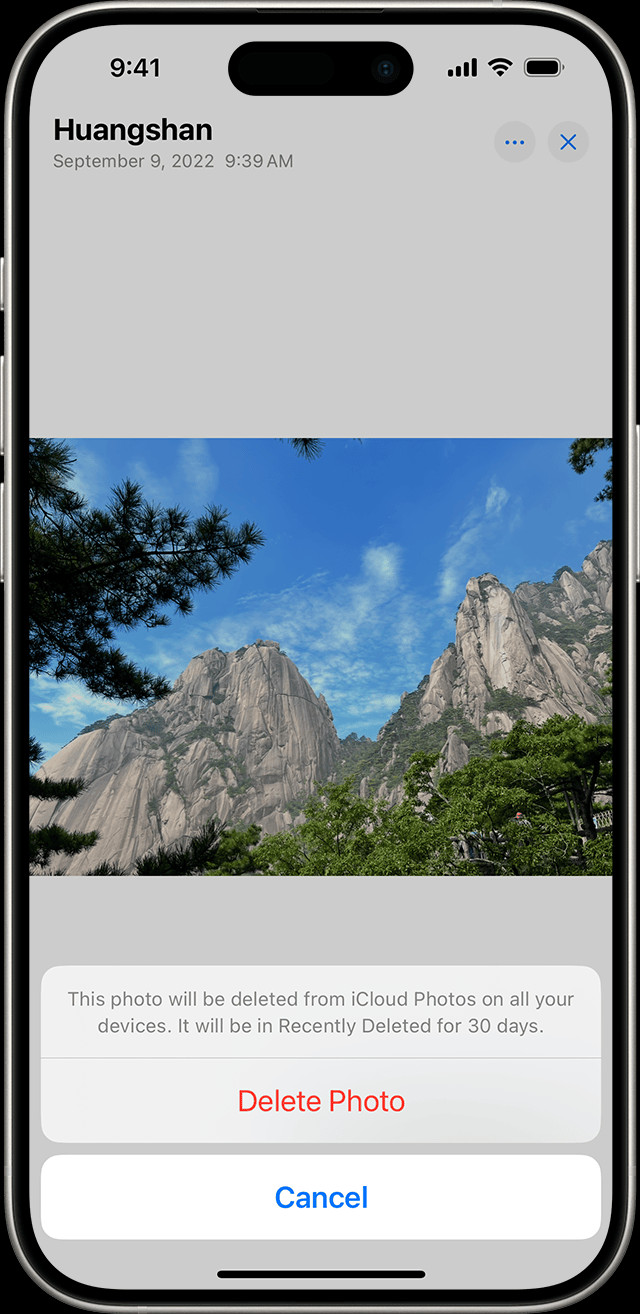 iPhone displaying the Delete Photo option
 - Select Photos: Tap on each photo you want to delete. A blue checkmark will appear on each selected photo, indicating that it has been added to the deletion queue. Alternatively, you can slide your finger across multiple photos to select them in a batch. This is especially useful for selecting a continuous range of photos.
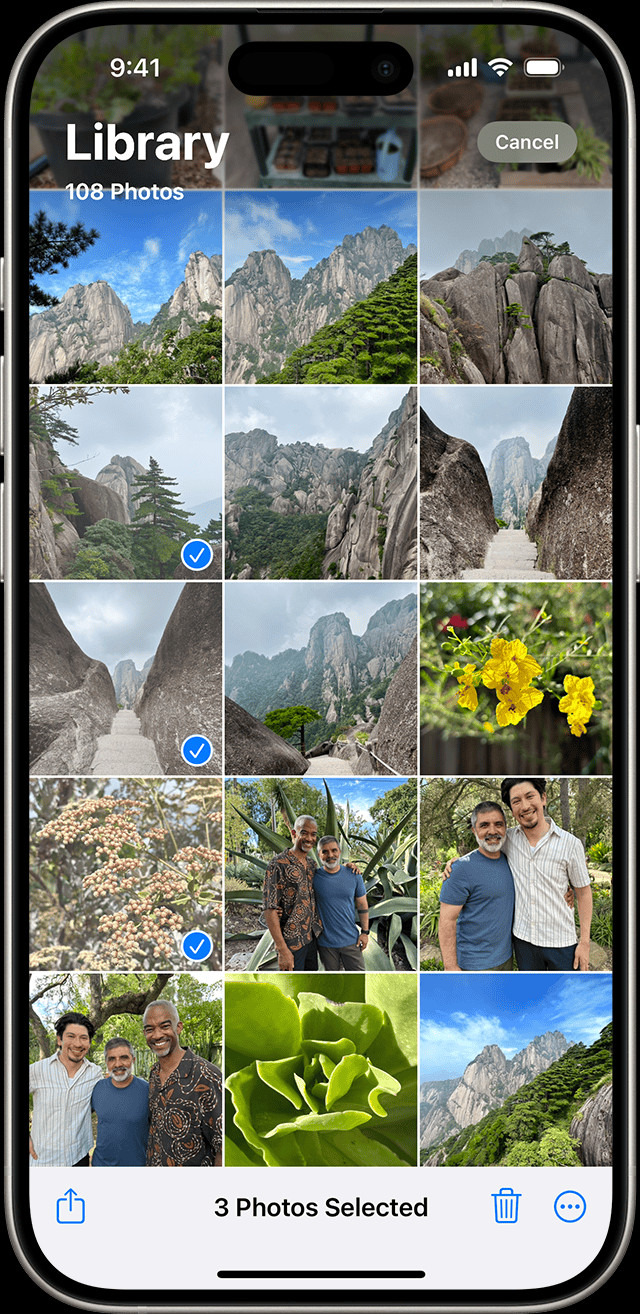 iPhone showing multiple photos selected in the Photos app
 - Review Your Selection: Take a moment to review your selection and make sure you haven’t accidentally selected any photos you want to keep. You can tap on a selected photo again to deselect it.
- Tap the Trash Icon: Once you’re satisfied with your selection, tap the Trash icon in the lower-right corner of the screen. This will initiate the deletion process.
- Confirm Deletion: A confirmation dialog will appear, asking you to confirm that you want to delete the selected photos. Tap Delete [Number] Photos to proceed with the deletion.
- Wait for Deletion to Complete: Depending on the number of photos you’re deleting and the speed of your device, the deletion process may take a few seconds or minutes to complete. Once the deletion is complete, the selected photos will be moved to the “Recently Deleted” album.
2.3. Using Third-Party Apps for Enhanced Bulk Deletion
For users who need more advanced features or a more streamlined deletion process, third-party apps can offer significant advantages. Here’s how to use a third-party app for bulk deletion:
- Download and Install a Photo Management App: Visit the App Store and search for a reputable photo management app like Gemini Photos, Remo Duplicate Photos Remover, or Flic. Download and install the app on your iPhone.
- Grant Access to Your Photos: Launch the app and grant it permission to access your photo library. This is necessary for the app to identify and delete photos.
- Explore the App’s Features: Familiarize yourself with the app’s features and settings. Most photo management apps offer a variety of tools for organizing, deleting, and managing your photos.
- Use Smart Selection or Duplicate Detection: Take advantage of the app’s smart selection or duplicate detection features to identify photos you want to delete. These features can automatically select photos based on criteria such as date, location, image similarity, or duplicate content.
- Review and Confirm Deletion: Before deleting any photos, carefully review the app’s selection and make sure you agree with the recommendations. You can manually deselect any photos you want to keep.
- Initiate Bulk Deletion: Once you’re satisfied with the selection, initiate the bulk deletion process. The app will remove the selected photos from your photo library and move them to the “Recently Deleted” album.
- Empty the “Recently Deleted” Album: To permanently delete the photos and free up storage space, navigate to the “Recently Deleted” album in the Photos app and empty it.
2.4. Considerations for iCloud Photos Users
If you use iCloud Photos, deleting photos on your iPhone will also remove them from your iCloud account and any other devices connected to it. Here are a few important considerations:
- Deletion Syncing: When you delete photos on your iPhone, the changes will be synced to iCloud and all your other devices. This means that the photos will be removed from your photo library on all your devices.
- Recently Deleted Album: As mentioned earlier, deleted photos are moved to the “Recently Deleted” album, where they remain for 30 days before being permanently deleted. This gives you a chance to recover any photos you accidentally deleted.
- Shared Albums: Be cautious when deleting photos from shared albums, as this will remove them for all participants in the album.
- iCloud Storage: Deleting photos from your iPhone frees up storage space on your device and in your iCloud account. If you’re running low on iCloud storage, deleting unwanted photos can help you stay within your storage limits.
3. Maximizing Efficiency: Tips and Tricks for Faster Deletion
Deleting photos efficiently on your iPhone involves more than just knowing the basic steps. By incorporating a few tips and tricks, you can significantly speed up the process and save time. Here are some strategies to help you delete photos faster:
3.1. Using the “Select” Option Strategically
The “Select” option in the Photos app can be used more efficiently with a few strategic techniques:
- Sliding to Select: Instead of tapping each photo individually, slide your finger across multiple photos to select them in a batch. This is much faster, especially when deleting a continuous range of photos.
- Zooming Out: Zoom out to view more photos on the screen at once. This makes it easier to identify and select the photos you want to delete in a single swipe.
- Selecting Entire Moments: In the “Photos” tab, iOS organizes your photos into “Moments” based on time and location. You can quickly select all the photos in a Moment by tapping the “Select” button in the upper-right corner of the Moment and then tapping “Select All.”
- Using the “Years” View: In the “Years” view, you can quickly jump to specific years and delete entire years of photos. This is useful if you want to remove photos from a specific time period.
3.2. Leveraging Third-Party Apps for Advanced Selection
Third-party photo management apps often offer advanced selection tools that can significantly speed up the deletion process:
- Smart Selection: These apps can automatically select photos based on criteria such as date, location, image similarity, or duplicate content. This eliminates the need to manually select each photo.
- Face Recognition: Some apps can identify photos containing specific faces and select them for deletion. This is useful if you want to remove photos of certain people.
- Object Recognition: Some apps can recognize objects in photos and select them for deletion. For example, you could select all photos containing screenshots or documents.
- Quality Analysis: These apps can analyze the quality of your photos and select low-quality or blurry images for deletion. This helps you keep only the best photos in your library.
3.3. Organizing Photos Before Deletion
Taking the time to organize your photos before deleting them can make the process much more efficient:
- Creating Albums: Create albums for specific events, trips, or categories of photos. This makes it easier to identify and select the photos you want to delete in bulk.
- Using Keywords: Add keywords to your photos to make them easier to search and filter. For example, you could add keywords like “Vacation,” “Family,” or “Work.”
- Favoriting Photos: Mark your favorite photos as “Favorites.” This makes it easier to identify and protect the photos you want to keep.
- Hiding Photos: Hide photos you don’t want to see but don’t want to delete. This keeps them out of your main photo library but preserves them for later use.
3.4. Customizing the Photos App Settings
Adjusting a few settings in the Photos app can also improve your deletion efficiency:
- Disable “Live Photos”: Live Photos take up more storage space and can be redundant if you don’t use the live feature. Disabling Live Photos will reduce the number of photos you need to manage.
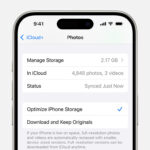
- Optimize iPhone Storage: Enable the “Optimize iPhone Storage” setting in iCloud Photos. This will store full-resolution photos in iCloud and keep smaller, optimized versions on your device, freeing up storage space.
- Disable Photo Stream: If you don’t use Photo Stream, disable it to prevent duplicate photos from being saved to your device.
3.5. Utilizing Keyboard Shortcuts (iPad)
If you’re using an iPad with a keyboard, you can use keyboard shortcuts to speed up the deletion process:
- Command + Delete: Select a photo and press Command + Delete to move it to the “Recently Deleted” album.
- Shift + Select: Hold down the Shift key while selecting photos to select a continuous range of photos.
- Command + A: Press Command + A to select all photos in the current album or view.
4. Addressing Common Issues and Errors
While deleting photos on your iPhone is usually a straightforward process, you may encounter some common issues and errors. Here’s how to troubleshoot and resolve them:
4.1. Photos Not Deleting
If you’re trying to delete photos but they’re not being removed from your device, here are a few potential causes and solutions:
- iCloud Syncing Issues: If you use iCloud Photos, make sure your photos are fully synced before deleting them. If there are syncing issues, the deletion may not be reflected across all your devices. To check the sync status, go to Settings > [Your Name] > iCloud > Photos and look for any error messages or syncing indicators.
- Insufficient Storage Space: If your iPhone is running low on storage space, it may not be able to delete photos properly. Free up storage space by deleting other files, apps, or data.
- Software Glitches: Occasionally, software glitches can prevent photos from being deleted. Try restarting your iPhone or updating to the latest version of iOS.
- Permissions Issues: In rare cases, permissions issues can prevent you from deleting photos. Try resetting your iPhone’s permissions by going to Settings > General > Reset > Reset All Settings.
4.2. Photos Reappearing After Deletion
If you delete photos but they reappear after a short time, here are a few possible explanations:
- iCloud Syncing: If you use iCloud Photos, the photos may be re-downloading from iCloud after you delete them. Make sure your iPhone is connected to a stable Wi-Fi network and that iCloud Photos is functioning properly.
- Photo Stream: If you have Photo Stream enabled, photos may be re-downloading from Photo Stream after you delete them. Try disabling Photo Stream in Settings > Photos.
- iTunes Syncing: If you sync photos from your computer using iTunes, the photos may be re-syncing to your iPhone after you delete them. Try disabling photo syncing in iTunes or removing the photos from your iTunes library.
- Third-Party Apps: Some third-party apps may automatically re-download photos after you delete them. Check the settings of any photo-related apps you have installed to see if they’re causing the issue.
4.3. “Recently Deleted” Album Not Showing
If you can’t find the “Recently Deleted” album in the Photos app, here are a few things to check:
- iOS Version: The “Recently Deleted” album is only available on iOS 8 and later. If you’re using an older version of iOS, you’ll need to update to see the album.
- Hidden Album: The “Recently Deleted” album may be hidden. To unhide it, go to the “Albums” tab in the Photos app, scroll down to the “Utilities” section, and tap “Hidden.” If the “Recently Deleted” album is listed, tap the “Unhide” button.
- Album Limit: The Photos app has a limit on the number of albums it can display. If you have too many albums, the “Recently Deleted” album may not be visible. Try deleting some less-used albums to make room for it.
4.4. Accidental Deletion Recovery
If you accidentally delete photos you want to keep, here’s how to recover them:
- “Recently Deleted” Album: Check the “Recently Deleted” album in the Photos app. Deleted photos are stored in this album for 30 days before being permanently deleted. To recover a photo, select it and tap the “Recover” button.
- iCloud Backup: If you have an iCloud backup, you can restore your iPhone from the backup to recover deleted photos. However, this will erase all the data on your iPhone and replace it with the data from the backup.
- Third-Party Recovery Apps: There are several third-party apps that claim to be able to recover deleted photos from iPhones. However, these apps are not always reliable, and they may not be able to recover all your photos.
5. Managing iCloud Photos Storage Efficiently
iCloud Photos is a convenient way to keep your photos and videos synced across all your Apple devices, but it can also consume a significant amount of iCloud storage. Efficiently managing your iCloud Photos storage is essential to avoid running out of space and incurring additional storage costs.
5.1. Understanding iCloud Photos Storage
Before you can manage your iCloud Photos storage efficiently, it’s important to understand how it works:
- Shared Storage: iCloud Photos storage is shared across all your iCloud services, including iCloud Drive, iCloud Backup, and iCloud Mail. This means that if you’re running low on iCloud storage, you may need to manage storage across multiple services.
- Free Storage: Apple provides 5GB of free iCloud storage to all users. However, this may not be enough for users with large photo and video libraries.
- Paid Storage Plans: If you need more than 5GB of storage, you can purchase a paid iCloud storage plan. Apple offers several plans with varying amounts of storage and pricing.
- Optimized Storage: iCloud Photos offers an “Optimize iPhone Storage” feature that stores full-resolution photos and videos in iCloud and keeps smaller, optimized versions on your device. This can significantly reduce the amount of storage space used on your iPhone.
5.2. Optimizing iCloud Photos Storage
Here are several strategies for optimizing your iCloud Photos storage:
- Enable “Optimize iPhone Storage”: As mentioned earlier, enabling the “Optimize iPhone Storage” feature can significantly reduce the amount of storage space used on your iPhone. To enable this feature, go to Settings > [Your Name] > iCloud > Photos and select “Optimize iPhone Storage.”
- Delete Unwanted Photos and Videos: Regularly delete unwanted photos and videos from your iCloud Photos library. This includes blurry photos, duplicate photos, screenshots, and videos you no longer need.
- Compress Large Videos: Large videos can take up a significant amount of storage space. Compress large videos using a video compression app or online tool to reduce their file size.
- Use Shared Albums Sparingly: Shared albums can take up a lot of storage space if they contain large numbers of photos and videos. Use shared albums sparingly and only share essential content.
- Disable “Live Photos”: Live Photos take up more storage space than regular photos. Disable Live Photos if you don’t use the live feature.
5.3. Managing iCloud Storage Plans
If you’re running low on iCloud storage, you may need to upgrade to a paid storage plan. Here’s how to manage your iCloud storage plan:
- Check Your Storage Usage: To check your iCloud storage usage, go to Settings > [Your Name] > iCloud > Manage Storage. This will show you how much storage you’re using and which services are using the most storage.
- Upgrade Your Storage Plan: If you need more storage, tap “Change Storage Plan” and select a new plan. Apple offers several plans with varying amounts of storage and pricing.
- Downgrade Your Storage Plan: If you’re paying for more storage than you need, you can downgrade your storage plan to save money. However, make sure you have enough storage to accommodate your data before downgrading.
- Cancel Your Storage Plan: If you no longer need iCloud storage, you can cancel your storage plan. However, make sure you back up your data before canceling, as you may lose access to it.
5.4. Alternatives to iCloud Photos
If you’re not satisfied with iCloud Photos or want to explore other options, here are a few alternatives:
- Google Photos: Google Photos is a popular cloud-based photo storage service that offers unlimited free storage for photos and videos (with some limitations on resolution).
- Amazon Photos: Amazon Photos is a cloud-based photo storage service that offers unlimited free storage for photos to Amazon Prime members.
- Dropbox: Dropbox is a cloud-based file storage service that can also be used to store photos and videos.
- External Hard Drives: External hard drives are a physical storage solution that can be used to back up your photos and videos.
6. Third-Party Apps for Photo Management: A Detailed Look
While the built-in Photos app on your iPhone offers basic photo management features, third-party apps can provide more advanced tools and capabilities. Here’s a detailed look at some popular third-party apps for photo management:
6.1. Gemini Photos: Duplicate Photo Finder
Gemini Photos is a popular app that specializes in identifying and removing duplicate photos from your iPhone. It uses smart algorithms to analyze your photo library and identify photos that are visually similar or identical.
- Key Features:
- Duplicate Detection: Identifies duplicate photos, including near-duplicates and photos taken in burst mode.
- Smart Selection: Automatically selects the best version of each photo and marks the duplicates for deletion.
- User Review: Allows you to review the selected duplicates and manually deselect any photos you want to keep.
- Easy Deletion: Deletes the selected duplicates with a single tap.
- Pros:
- Accurate duplicate detection.
- Easy to use interface.
- Saves storage space by removing duplicate photos.
- Cons:
- Limited free version.
- Requires a subscription for full functionality.
6.2. Remo Duplicate Photos Remover
Remo Duplicate Photos Remover is another app that focuses on finding and removing duplicate photos from your iPhone. It uses intelligent algorithms to scan your photo library and identify duplicate photos based on various criteria.
- Key Features:
- Duplicate Scan: Scans your photo library for duplicate photos.
- Smart De-Dupe: Automatically selects the best version of each photo and marks the duplicates for deletion.
- Preview Duplicates: Allows you to preview the selected duplicates before deleting them.
- Organize Photos: Helps you organize your photos into albums and folders.
- Pros:
- Fast and efficient duplicate detection.
- User-friendly interface.
- Offers additional photo management features.
- Cons:
- May not be as accurate as Gemini Photos.
- Contains ads in the free version.
6.3. Flic: Photo & Video Cleaner
Flic is a unique app that makes deleting photos and videos on your iPhone fun and easy. It uses a Tinder-like interface where you can swipe left to delete a photo or video and swipe right to keep it.
- Key Features:
- Swipe Interface: Allows you to quickly delete or keep photos and videos with a simple swipe.
- Batch Deletion: Allows you to delete multiple photos and videos at once.
- Organize Photos: Helps you organize your photos into albums and folders.
- Cloud Backup: Integrates with cloud storage services like iCloud, Google Photos, and Dropbox.
- Pros:
- Fun and engaging interface.
- Fast and efficient deletion process.
- Offers cloud backup integration.
- Cons:
- May not be suitable for users who prefer a more traditional interface.
- Limited free version.
6.4. Slidebox – Photo Manager
Slidebox is a photo management app that offers a unique way to organize and delete photos on your iPhone. It allows you to quickly sort photos into albums and delete unwanted photos with a simple swipe.
- Key Features:
- Swipe Interface: Allows you to quickly sort photos into albums with a swipe.
- Album Creation: Allows you to create and manage albums.
- Deletion Mode: Allows you to quickly delete unwanted photos.
- Gesture Control: Offers gesture-based controls for managing photos.
- Pros:
- Intuitive and easy-to-use interface.
- Fast and efficient photo organization.
- Offers gesture-based controls.
- Cons:
- Limited free version.
- May not be suitable for users who prefer a more traditional interface.
7. The Importance of Regular Photo Library Maintenance
Maintaining a well-organized photo library on your iPhone is crucial for several reasons. Regular maintenance not only frees up storage space but also improves the overall user experience and makes it easier to find and share your photos.
7.1. Freeing Up Storage Space
One of the primary benefits of regular photo library maintenance is freeing up storage space on your iPhone. Photos and videos can take up a significant amount of storage space, especially if you have a large library of high-resolution images and videos. By regularly deleting unwanted photos and videos, you can reclaim valuable storage space and improve your iPhone’s performance.
7.2. Improving Performance
A cluttered photo library can also impact your iPhone’s performance. The Photos app may take longer to load and scroll through your photos, and your iPhone may run slower overall. By keeping your photo library organized and deleting unnecessary files, you can improve your iPhone’s performance and responsiveness.
7.3. Enhancing User Experience
A well-organized photo library makes it easier to find and share your photos. You can quickly locate specific photos or albums without having to scroll through hundreds or thousands of images. This enhances the overall user experience and makes it more enjoyable to use the Photos app.
7.4. Preserving Memories
Regular photo library maintenance also helps you preserve your memories. By deleting unwanted photos and videos, you can focus on the images that are most important to you. This allows you to curate a collection of your favorite memories and share them with friends and family.
7.5. Avoiding Cloud Storage Costs
If you use iCloud Photos, regular photo library maintenance can help you avoid exceeding your iCloud storage limits and incurring additional storage costs. By deleting unwanted photos and videos, you can keep your iCloud storage usage under control and avoid having to pay for extra storage space.
8. Frequently Asked Questions (FAQs)
1. How do I select multiple photos quickly on my iPhone?
Tap “Select” in the Photos app, then tap or drag across multiple photos to select them quickly.
2. Can I delete photos permanently from my iPhone without waiting 30 days?
Yes, go to the “Recently Deleted” album and delete the photos from there to permanently remove them.
3. Will deleting photos from my iPhone also delete them from iCloud?
Yes, if you use iCloud Photos, deleting photos on your iPhone will also remove them from iCloud and other synced devices.
4. Is there a way to recover photos I accidentally deleted from my iPhone?
Check the “Recently Deleted” album in the Photos app. Photos stay there for 30 days before being permanently deleted.
5. How do I find duplicate photos on my iPhone?
Use third-party apps like Gemini Photos or Remo Duplicate Photos Remover to scan and identify duplicate photos.
6. What happens when I delete photos from a shared album on my iPhone?
Deleting photos from a shared album removes them for all participants in the album.
7. How can I manage my iCloud Photos storage efficiently?
Enable “Optimize iPhone Storage” in iCloud settings and regularly delete unwanted photos and videos.
8. Can I delete photos from my iPhone using my computer?
Yes, connect your iPhone to your computer and use iTunes or Finder to manage and delete photos.
9. What are the best third-party apps for managing photos on my iPhone?
Popular options include Gemini Photos, Remo Duplicate Photos Remover, and Flic.
10. How often should I clean up my photo library on my iPhone?
Aim to clean up your photo library at least once a month to keep it organized and free up storage space.
9. Conclusion: Taking Control of Your iPhone Photo Library
Taking control of your iPhone photo library is essential for maintaining storage space, improving device performance, and enhancing your overall user experience. By understanding the various deletion options, implementing efficient techniques, and addressing common issues, you can effectively manage your photo library and keep it organized. Whether you prefer using the built-in Photos app or leveraging third-party tools, the key is to establish a regular maintenance routine and stay proactive in managing your digital memories.
Remember, dfphoto.net is here to provide you with the latest tips, tricks, and resources for mastering your photography skills and managing your digital assets. Explore our website for more in-depth guides, tutorials, and product reviews to help you make the most of your iPhone’s camera and photo management capabilities. And don’t hesitate to contact us at Address: 1600 St Michael’s Dr, Santa Fe, NM 87505, United States. Phone: +1 (505) 471-6001 or visit our website at dfphoto.net for additional assistance.
Whether you’re a professional photographer or a casual iPhone user, mastering the art of photo management is a valuable skill that will save you time, money, and frustration in the long run. So take the time to learn the techniques outlined in this guide and start taking control of your iPhone photo library today. By doing so, you’ll be able to focus on capturing and cherishing the moments that matter most, without worrying about storage space or disorganization. Join our community and explore the world of photography!