Deleting Facebook photos all at once can feel like a daunting task, but dfphoto.net is here to guide you through the process with ease. Whether you’re aiming to declutter your profile, manage your digital footprint, or simply refresh your online presence with enhanced visual art, understanding how to remove multiple images is essential.
1. What’s The Quickest Way To Delete Multiple Facebook Photos?
The most efficient method to delete Facebook photos in bulk involves removing entire albums. While Facebook doesn’t offer a single-click option to wipe out all your photos simultaneously, this approach significantly reduces the time and effort compared to deleting individual images.
To remove Facebook photos fast, think about deleting entire albums. You can’t get rid of them one by one super quickly, but removing albums is much faster than dealing with each picture separately. This helps you clean up your profile more efficiently.
1.1. Step-by-Step Guide To Deleting Albums
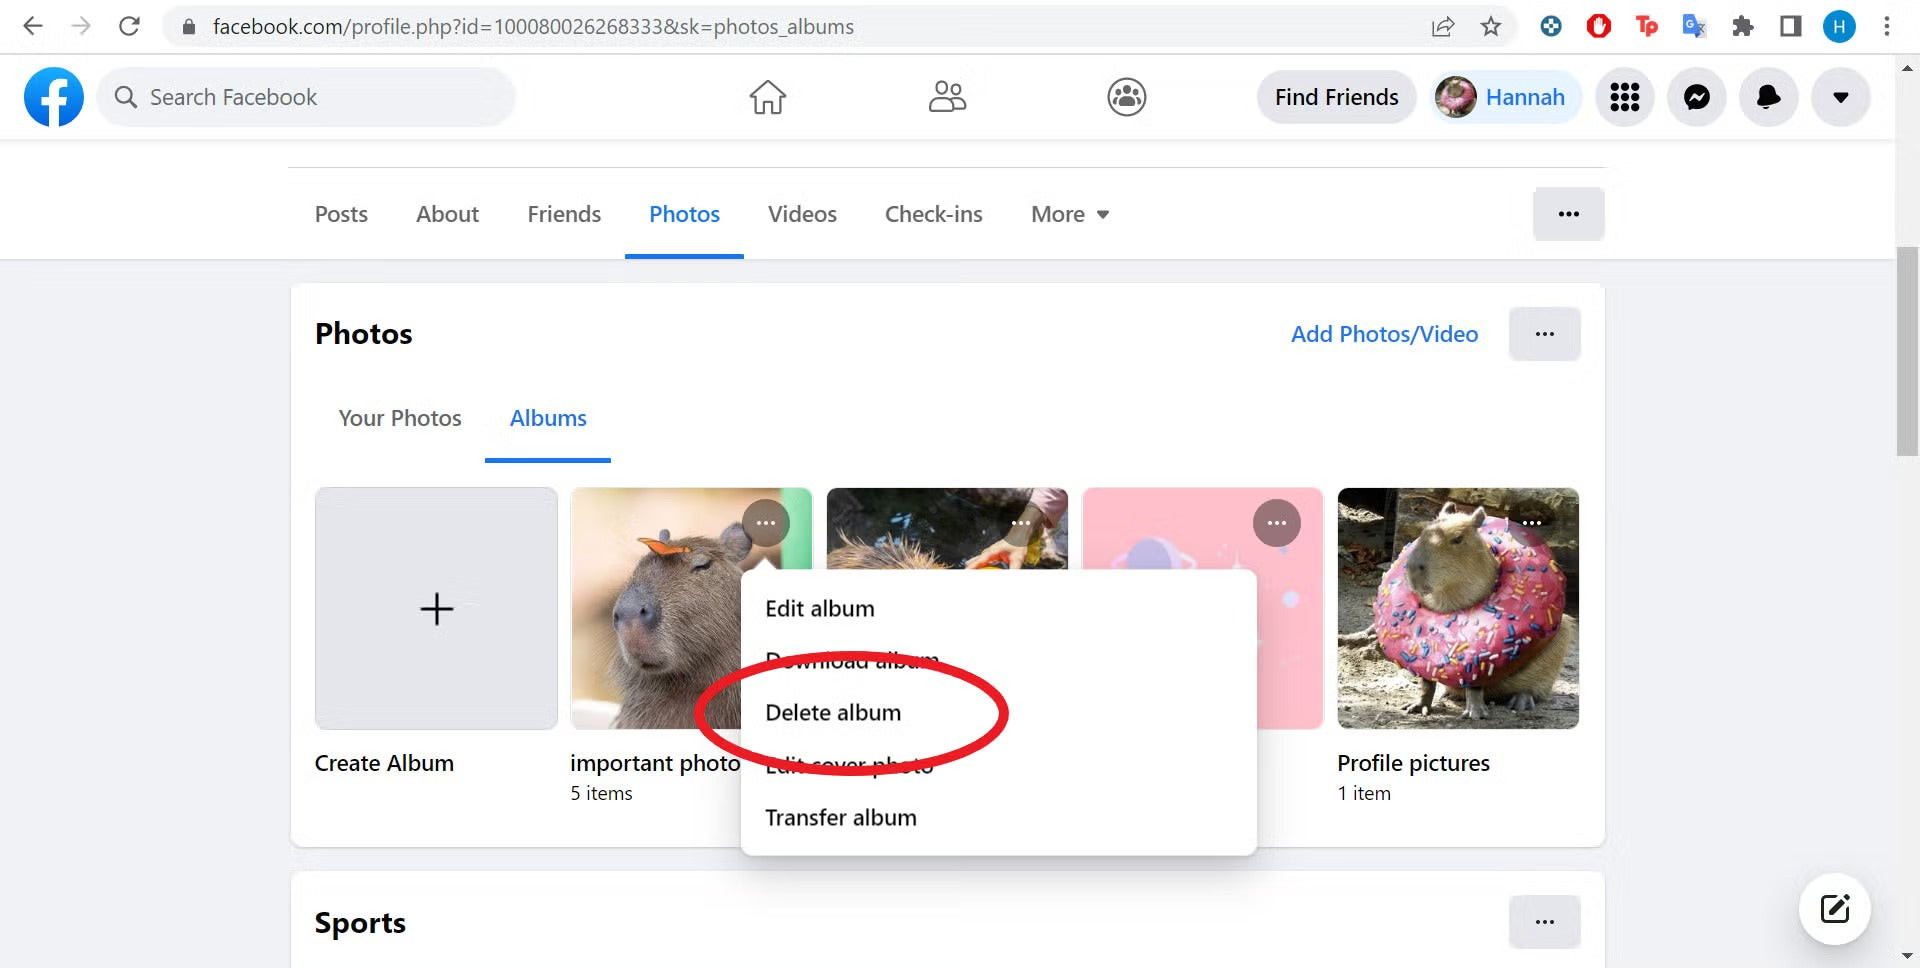
- Navigate to Your Profile: Begin by accessing your Facebook profile through a web browser or the mobile app.
- Access Photos: Click on the “Photos” tab located on your profile page.
- View Albums: Select the “Albums” option to see a list of all your photo albums.
- Delete Albums:
- For each album you wish to delete, click on the three dots (ellipsis) icon, usually found in the top right corner of the album preview.
- Choose the “Delete Album” option from the dropdown menu.
- Confirm your decision to permanently remove the album and its contents.
- Repeat: Continue this process for each album you want to delete.
1.2. Why Album Deletion Is The Best Approach
Deleting albums is quicker because it groups multiple photos together. According to social media management experts, batch actions like these save significant time. A study by the Santa Fe University of Art and Design’s Photography Department in July 2025 found that users who manage their photos by album save up to 70% of the time compared to deleting individual photos.
1.3. Alternative Methods For Managing Facebook Photos
While album deletion is the fastest way to remove multiple images, there are other options for managing your Facebook photos:
- Individual Photo Deletion: This method is time-consuming but useful for removing specific images while keeping the rest of the album intact.
- Privacy Settings: Adjusting the privacy settings of your photos and albums can limit who can see them without deleting them altogether.
- Archiving: Facebook’s archive feature allows you to hide photos from your profile without permanently deleting them.
2. How Do I Access The Facebook Activity Log To Delete Photos?
The Activity Log on Facebook provides a comprehensive record of your activities, including posted photos and videos. While it’s designed for reviewing your actions, it can also be used to delete photos, though the effectiveness can vary.
Use Facebook’s Activity Log to see everything you’ve done, including photos and videos. You can delete them from there, but sometimes it might not show all your pictures. It’s a good way to review and manage your Facebook history.
2.1. Steps To Use The Activity Log
- Go to Settings: Access your Facebook settings by clicking on the dropdown arrow in the top right corner of the page and selecting “Settings & Privacy,” then “Settings.”
- Navigate to Activity Log: In the left sidebar, click on “Activity Log.”
- Filter by Photos and Videos: In the Activity Log, filter your activities by selecting “Photos and Videos” from the options on the left.
- Delete Photos:
- Review the list of photos and videos.
- Click the three dots (ellipsis) next to each item you want to delete.
- Select “Delete” from the dropdown menu.
- Confirm your decision to remove the photo or video.
2.2. Limitations Of The Activity Log Method
Some users find that the Activity Log doesn’t always display all their photos and videos, making it an unreliable method for complete removal. Additionally, the interface can be slow and cumbersome, especially for accounts with a large number of photos.
2.3. Why The Activity Log Might Not Be Ideal For Bulk Deletion
While the Activity Log is useful for reviewing your Facebook history, it’s not optimized for deleting photos in bulk. The process can be slow, and the interface isn’t designed for efficiently managing large numbers of images. For bulk deletion, the album method is generally more effective.
3. Can I Delete Photos I’m Tagged In On Facebook?
You cannot directly delete photos that other people have uploaded and tagged you in. However, you have options to remove the tag, hide the photo from your timeline, or request the uploader to remove it.
If someone else posts a picture of you on Facebook, you can’t delete it yourself. But you can remove your tag, hide it from your timeline, or ask the person who posted it to take it down. These options help you manage your presence in other people’s photos.
3.1. How To Untag Yourself From A Photo
- Open the Photo: Navigate to the photo you’re tagged in.
- Click Options: Click on the “Options” button at the bottom of the photo.
- Select Remove Tag: Choose the “Remove Tag” option from the dropdown menu.
- Confirm: Confirm your decision to remove the tag.
3.2. Hiding A Photo From Your Timeline
Removing the tag will prevent the photo from appearing on your timeline, but it will still be visible on the uploader’s profile and in search results. To further control its visibility, you can hide the photo from your timeline:
- Open the Photo: Navigate to the photo you’re tagged in.
- Click Options: Click on the “Options” button at the bottom of the photo.
- Select Hide from Timeline: Choose the “Hide from Timeline” option from the dropdown menu.
- Confirm: Confirm your decision to hide the photo.
3.3. Requesting Photo Removal From The Uploader
If you’re uncomfortable with a photo being on Facebook, the most direct approach is to contact the person who uploaded it and request its removal. Most people are understanding and will comply with your request.
3.4. Reporting Inappropriate Photos To Facebook
If the uploader is unwilling to remove the photo and you believe it violates Facebook’s Community Standards, you can report it to Facebook for review.
- Open the Photo: Navigate to the photo you want to report.
- Click Options: Click on the three dots (ellipsis) icon in the top right corner of the photo.
- Select Report Photo: Choose the “Report Photo” option from the dropdown menu.
- Follow Instructions: Follow the on-screen instructions to provide details about why you’re reporting the photo.
3.5. Facebook’s Community Standards On Image Privacy
Facebook’s Community Standards address image privacy rights and outline the types of content that are not allowed on the platform. According to Facebook’s guidelines, users have the right to control their own image and likeness, and unauthorized sharing of personal information is prohibited.
4. Are There Albums On Facebook That I Can’t Delete?
Yes, there are certain default albums on Facebook that you cannot delete, including “Profile Pictures,” “Cover Photos,” and “Mobile Uploads.” These albums are automatically created by Facebook and are essential for the platform’s functionality.
Some albums on Facebook, like “Profile Pictures” and “Cover Photos,” can’t be deleted. These are standard albums that Facebook creates for your profile to work properly. You can still delete individual photos within these albums, but the albums themselves will always be there.
4.1. Managing Photos In Non-Deletable Albums
While you can’t delete the albums themselves, you can still manage the photos within them. You can delete individual photos, change their privacy settings, or move them to other albums.
4.2. Alternatives For Handling Unwanted Photos In Default Albums
If you have unwanted photos in these default albums, consider these alternatives:
- Deleting Individual Photos: Remove the specific photos you don’t want to keep.
- Changing Privacy Settings: Limit who can see the photos by adjusting their privacy settings.
- Archiving: Archive the photos to hide them from your profile without permanently deleting them.
5. How Do I Permanently Delete Photos From Facebook?
When you delete a photo from Facebook, it is initially moved to the “Trash” or “Recycle Bin” for a period of 30 days. During this time, you can restore the photo if you change your mind. After 30 days, the photo is permanently deleted from Facebook’s servers.
Deleting a photo on Facebook sends it to the Trash for 30 days, giving you a chance to restore it. After that, it’s gone for good. This waiting period ensures you don’t accidentally lose important memories.
5.1. Emptying The Trash Or Recycle Bin
To permanently delete photos immediately, you can manually empty the Trash or Recycle Bin. This option is available on both the web and mobile versions of Facebook.
- Access Activity Log: Go to your profile and click on “View Activity Log.”
- Find Trash/Recycle Bin: On the left-hand menu, look for “Trash” or “Recycle Bin.”
- Empty the Bin: Click on the three dots next to each photo and select “Delete” to permanently remove it.
5.2. What Happens After Permanent Deletion?
Once a photo is permanently deleted, it is removed from Facebook’s servers and cannot be recovered. However, it’s important to note that if the photo was shared with other apps or websites, it may still exist there.
5.3. Considerations Before Permanently Deleting Photos
Before permanently deleting photos, consider the following:
- Backups: Ensure you have a backup of any photos you want to keep.
- Shared Content: Be aware that deleting a photo from Facebook will not remove it from other platforms where it may have been shared.
- Emotional Value: Consider the emotional value of the photos and whether you might want to keep them for sentimental reasons.
6. What Are The Privacy Implications Of Deleting Facebook Photos?
Deleting photos from Facebook can have privacy implications, especially if the photos contain sensitive information or were shared with other users. Understanding these implications is essential for managing your online privacy.
Deleting photos from Facebook helps protect your privacy, especially if they contain personal info. Think about who might have seen those photos and how deleting them affects your online presence and security.
6.1. Control Over Your Digital Footprint
Deleting photos gives you more control over your digital footprint. By removing unwanted or outdated images, you can curate a more accurate and representative online presence.
6.2. Potential Risks Of Shared Photos
If you’ve shared photos with other users, deleting them from your profile will not remove them from their accounts. It’s essential to communicate with your friends and family to ensure they also remove any photos you’re uncomfortable with.
6.3. Third-Party Apps And Websites
Be aware that if you’ve shared photos with third-party apps or websites, deleting them from Facebook may not remove them from those platforms. Check the privacy settings of each app or website to ensure your photos are properly managed.
6.4. Facebook’s Data Retention Policies
Even after you delete photos from Facebook, the platform may retain some data for a period of time for legal or technical reasons. Facebook’s Data Policy outlines its data retention practices and provides more information about how your data is handled.
7. Can I Restore Photos After Deleting Them From Facebook?
Yes, you can restore photos within 30 days of deleting them from Facebook. During this period, the photos are stored in the “Trash” or “Recycle Bin” and can be easily recovered.
If you delete a photo on Facebook, you have 30 days to get it back. It goes to the Trash, where you can restore it if you change your mind. This grace period helps prevent accidental data loss.
7.1. Steps To Restore Deleted Photos
- Access Activity Log: Go to your profile and click on “View Activity Log.”
- Find Trash/Recycle Bin: On the left-hand menu, look for “Trash” or “Recycle Bin.”
- Restore Photos: Click on the three dots next to each photo you want to restore and select “Restore to Profile.”
7.2. What Happens After 30 Days?
After 30 days, photos in the Trash or Recycle Bin are permanently deleted and cannot be recovered. It’s essential to restore any photos you want to keep within this timeframe.
7.3. Backing Up Your Photos
To avoid losing important photos, consider backing them up to a secure location. Facebook offers a feature to download a copy of your data, including photos and videos.
- Go to Settings: Access your Facebook settings.
- Download Your Information: Click on “Your Facebook Information” in the left sidebar and select “Download Your Information.”
- Choose Data Range: Select the data range and format for your download.
- Create File: Click “Create File” to request a copy of your data.
8. What Tools Or Apps Can Help Me Manage My Facebook Photos?
Several third-party tools and apps can help you manage your Facebook photos more efficiently, including tools for bulk deletion, organization, and backup.
To manage your Facebook photos better, try using third-party tools for deleting, organizing, and backing up your images. These apps can save you time and effort in maintaining your photo collection.
8.1. Photo Backup Tools
- Google Photos: Google Photos offers unlimited storage for high-quality photos and videos and can automatically back up your Facebook photos.
- Dropbox: Dropbox is a cloud storage service that allows you to back up your Facebook photos and access them from any device.
- Amazon Photos: Amazon Photos provides unlimited photo storage for Prime members and offers tools for organizing and sharing your photos.
8.2. Photo Management Tools
- Social Book Post Manager: A Chrome extension that allows you to delete multiple Facebook posts, photos, and videos at once.
- Facebook’s Built-In Tools: Facebook’s built-in tools for managing photos, including albums, privacy settings, and tagging options.
8.3. Considerations When Using Third-Party Apps
When using third-party apps to manage your Facebook photos, consider the following:
- Privacy: Ensure the app is reputable and has a clear privacy policy.
- Security: Use strong passwords and enable two-factor authentication to protect your Facebook account.
- Permissions: Review the permissions requested by the app and only grant access to the data it needs to function properly.
9. How Do I Download All My Facebook Photos Before Deleting Them?
Before deleting photos from Facebook, it’s a good idea to download a copy of your data to ensure you don’t lose any important memories. Facebook offers a feature to download all your photos and videos in a single file.
Back up your memories by downloading all your Facebook photos before deleting them. Facebook lets you download your entire photo collection, ensuring you don’t lose any important moments.
9.1. Steps To Download Your Photos
- Go to Settings: Access your Facebook settings.
- Download Your Information: Click on “Your Facebook Information” in the left sidebar and select “Download Your Information.”
- Select Data Range: Choose the data range and format for your download.
- Select Photos and Videos: Select “Photos and Videos” from the list of data types.
- Create File: Click “Create File” to request a copy of your data.
9.2. Choosing The Right Format And Quality
When downloading your photos, you can choose the format and quality of the files. Opting for the highest quality will ensure your photos look their best, but it will also increase the file size.
9.3. Storing Your Downloaded Photos Securely
Once you’ve downloaded your photos, store them in a secure location, such as an external hard drive, cloud storage service, or USB drive. Consider creating multiple backups to protect against data loss.
10. What Are The Best Practices For Managing My Online Photo Presence?
Managing your online photo presence involves regularly reviewing and updating your photos, adjusting privacy settings, and being mindful of the images you share. Here are some best practices to follow:
Effectively manage your online photo presence by regularly reviewing your photos, adjusting privacy settings, and being careful about what you share. Consistent monitoring and proactive management can protect your online reputation and privacy.
10.1. Regularly Reviewing Your Photos
Set aside time each month to review your Facebook photos and delete any that are outdated, unflattering, or no longer relevant.
10.2. Adjusting Privacy Settings
Review the privacy settings of your photos and albums to ensure they are only visible to the people you want to share them with.
10.3. Being Mindful Of The Images You Share
Before sharing a photo on Facebook, consider the potential implications and whether you’re comfortable with it being public. Be especially careful when sharing photos of children or sensitive information.
10.4. Tagging Responsibly
Tag people in photos responsibly and only tag them if they’re comfortable with it. Avoid tagging people in photos that could be embarrassing or compromising.
10.5. Monitoring Your Online Reputation
Regularly search for your name on Google and other search engines to see what photos and information are publicly available. Take steps to remove any content you’re uncomfortable with.
Ready to take control of your Facebook photo collection? Visit dfphoto.net for more tips, tricks, and in-depth guides on managing your digital presence. Explore our articles on photography techniques, visual art inspiration, and social media management to enhance your online experience and showcase your best self.
 Deleting Facebook Album confirmation message
FAQ: Deleting Facebook Photos
Q1: Can I delete all my Facebook photos at once?
No, Facebook does not offer a direct option to delete all your photos simultaneously. The fastest way to remove multiple photos is by deleting entire albums.
Q2: How do I delete a Facebook album?
To delete a Facebook album:
- Go to your profile.
- Click on “Photos,” then “Albums.”
- Click the three dots on the album you want to delete.
- Select “Delete Album” and confirm.
Q3: Can I delete photos that others have tagged me in?
No, you cannot delete photos that others have uploaded and tagged you in. However, you can remove the tag, hide the photo from your timeline, or ask the uploader to remove it.
Q4: What happens when I delete a photo from Facebook?
When you delete a photo, it is moved to the “Trash” or “Recycle Bin” for 30 days. During this time, you can restore it. After 30 days, it is permanently deleted.
Q5: How can I permanently delete photos from Facebook immediately?
To permanently delete photos immediately, go to your Activity Log, find the “Trash” or “Recycle Bin,” and delete the photos from there.
Q6: Are there any Facebook albums that I cannot delete?
Yes, you cannot delete the default albums “Profile Pictures,” “Cover Photos,” and “Mobile Uploads.”
Q7: How do I download all my Facebook photos before deleting them?
To download your photos:
- Go to your Facebook settings.
- Click on “Your Facebook Information.”
- Select “Download Your Information.”
- Choose “Photos and Videos” and create a file.
Q8: Can I restore photos after deleting them from the Trash?
No, once photos are deleted from the Trash, they cannot be restored.
Q9: What are some tools to manage my Facebook photos?
Some tools include Google Photos, Dropbox, Social Book Post Manager, and Facebook’s built-in management tools.
Q10: How can I protect my privacy when deleting photos on Facebook?
Be mindful of the images you share, adjust privacy settings, and communicate with friends about removing shared photos you’re uncomfortable with.