Is your Facebook profile filled with outdated pictures you’re itching to remove? Don’t worry, dfphoto.net is here to provide a detailed guide on how to delete all photos from Facebook, offering the most efficient methods available. Whether you are decluttering your digital presence or aiming for a fresh start, this guide will help you navigate the process easily, and enhance your photo management skills. Explore effective strategies for picture purge, album deletion, and social media cleanup.
1. Understanding Why You Might Want to Delete All Your Facebook Photos
There are several reasons why you might want to delete all your photos from Facebook:
- Privacy Concerns: You may be concerned about who has access to your photos, especially if you’ve adjusted your privacy settings over time.
- Changing Personal Brand: Perhaps you’re trying to create a more professional online presence, and old, less polished photos don’t fit that image.
- Moving On: Clearing out old memories can be a way to move on from past relationships or experiences.
- Simplifying Your Life: A digital declutter can be as refreshing as cleaning out your physical space.
- Reputation Management: Removing potentially embarrassing or compromising photos can protect your reputation.
2. Facebook’s Photo Deletion Policies: What You Need to Know
Before you start deleting, it’s important to understand Facebook’s policies regarding photo deletion:
- Deletion is Permanent: Once a photo is deleted, it’s gone for good. There’s no “undo” button.
- Third-Party Apps: Be cautious when using third-party apps that claim to delete photos in bulk. Some may violate Facebook’s terms of service or compromise your account security. Always check reviews and permissions before granting access.
- Tagged Photos: You can’t delete photos you’re tagged in that were uploaded by someone else, but you can remove the tag.
- Album Restrictions: Some albums, like “Profile Pictures” and “Cover Photos,” cannot be deleted entirely.
3. Step-by-Step Guide: Manually Deleting Facebook Photos
This is the most straightforward method, but it can be time-consuming if you have a lot of photos.
3.1. Deleting Individual Photos
- Navigate to Your Profile: Click on your name in the top right corner of Facebook.
- Go to Photos: Click on the “Photos” tab.
- Select the Photo: Find the photo you want to delete and click on it.
- Open Options: Click the three dots in the top right corner of the photo.
- Delete Photo: Select “Delete Photo” and confirm.
3.2. Deleting Entire Albums
-
Navigate to Your Profile: Click on your name in the top right corner of Facebook.
-
Go to Photos: Click on the “Photos” tab.
-
Click Albums: Select “Albums.”
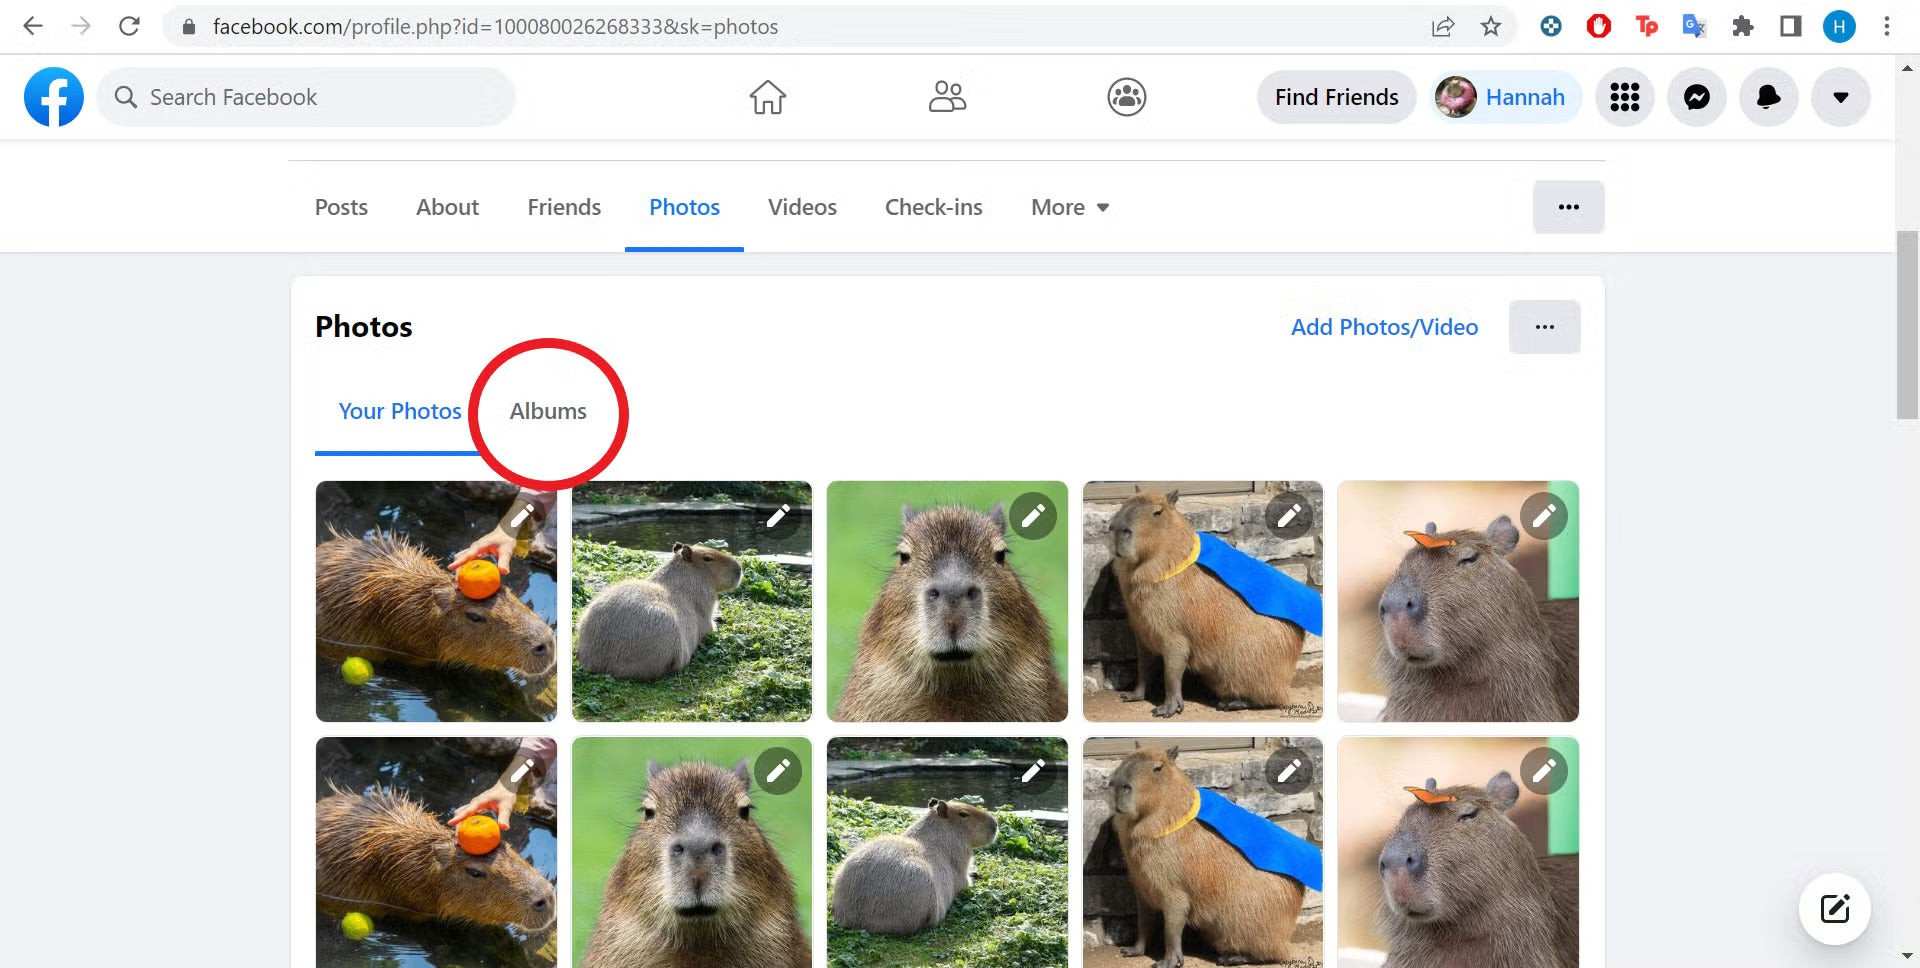 Facebook Photo Albums
 -
Select the Album: Choose the album you want to delete.
-
Open Album Options: Click the three dots in the top right corner of the album.
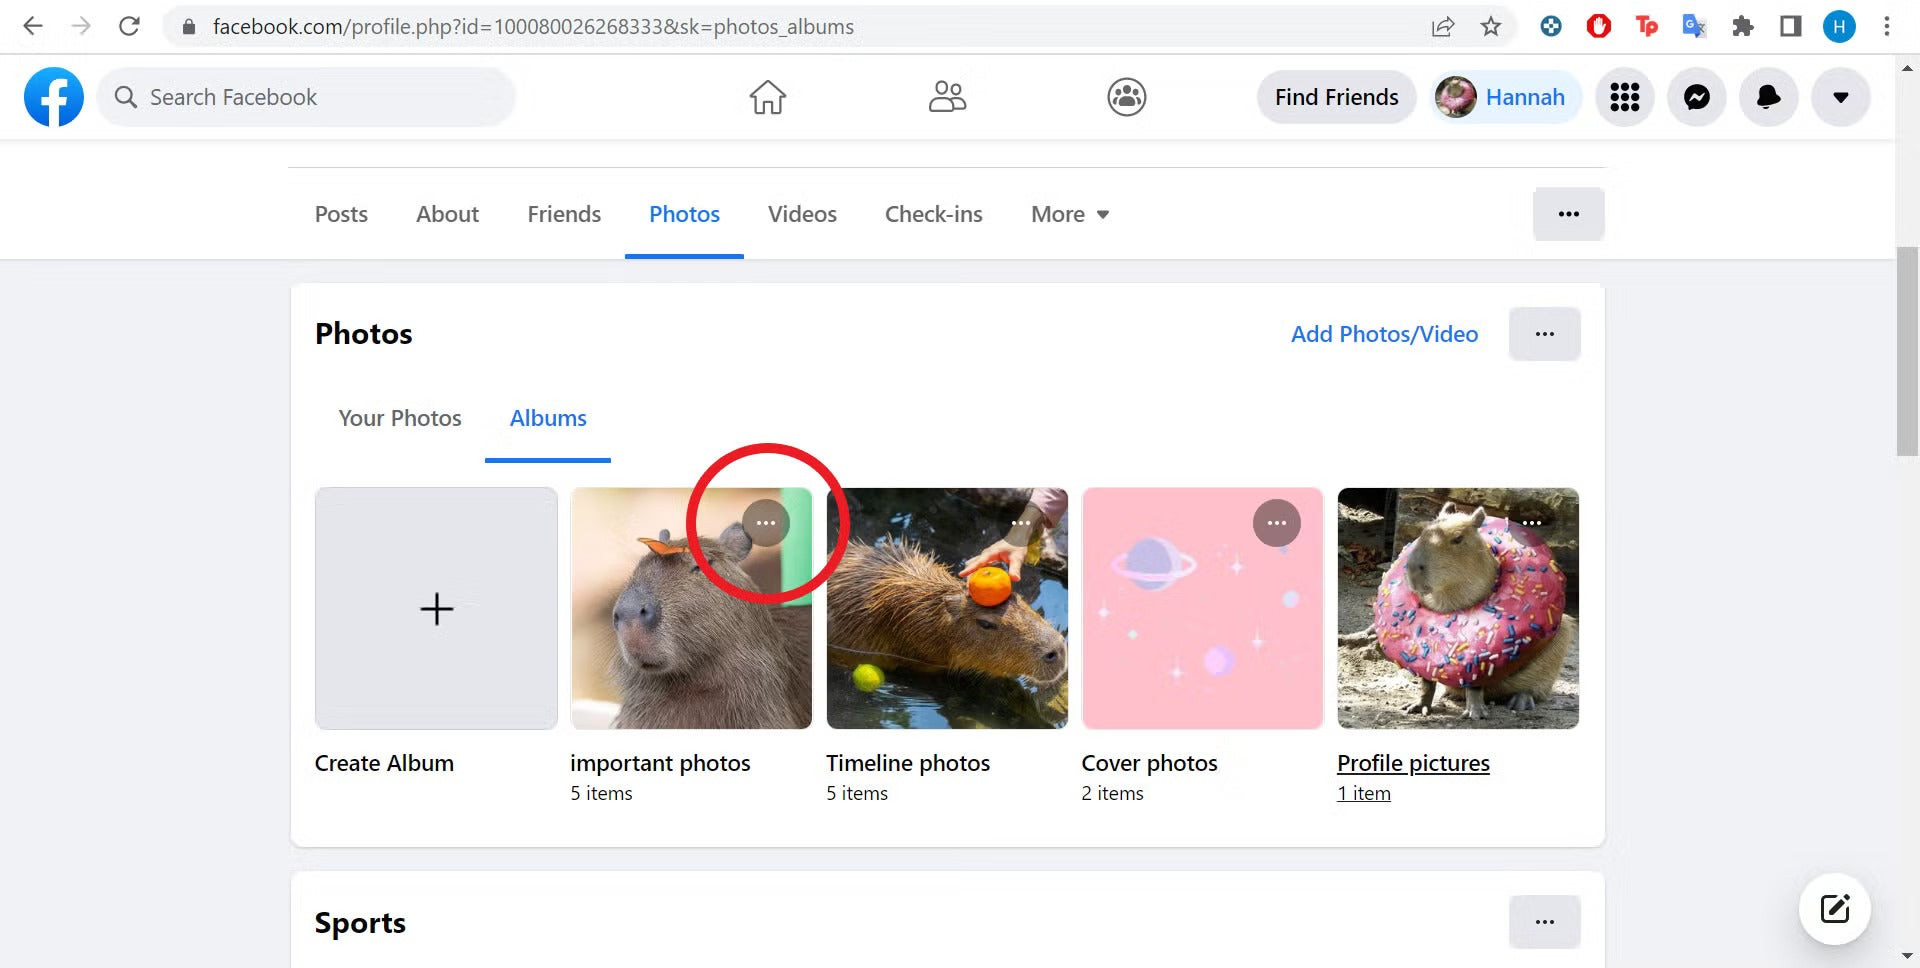 Facebook Album Options
 -
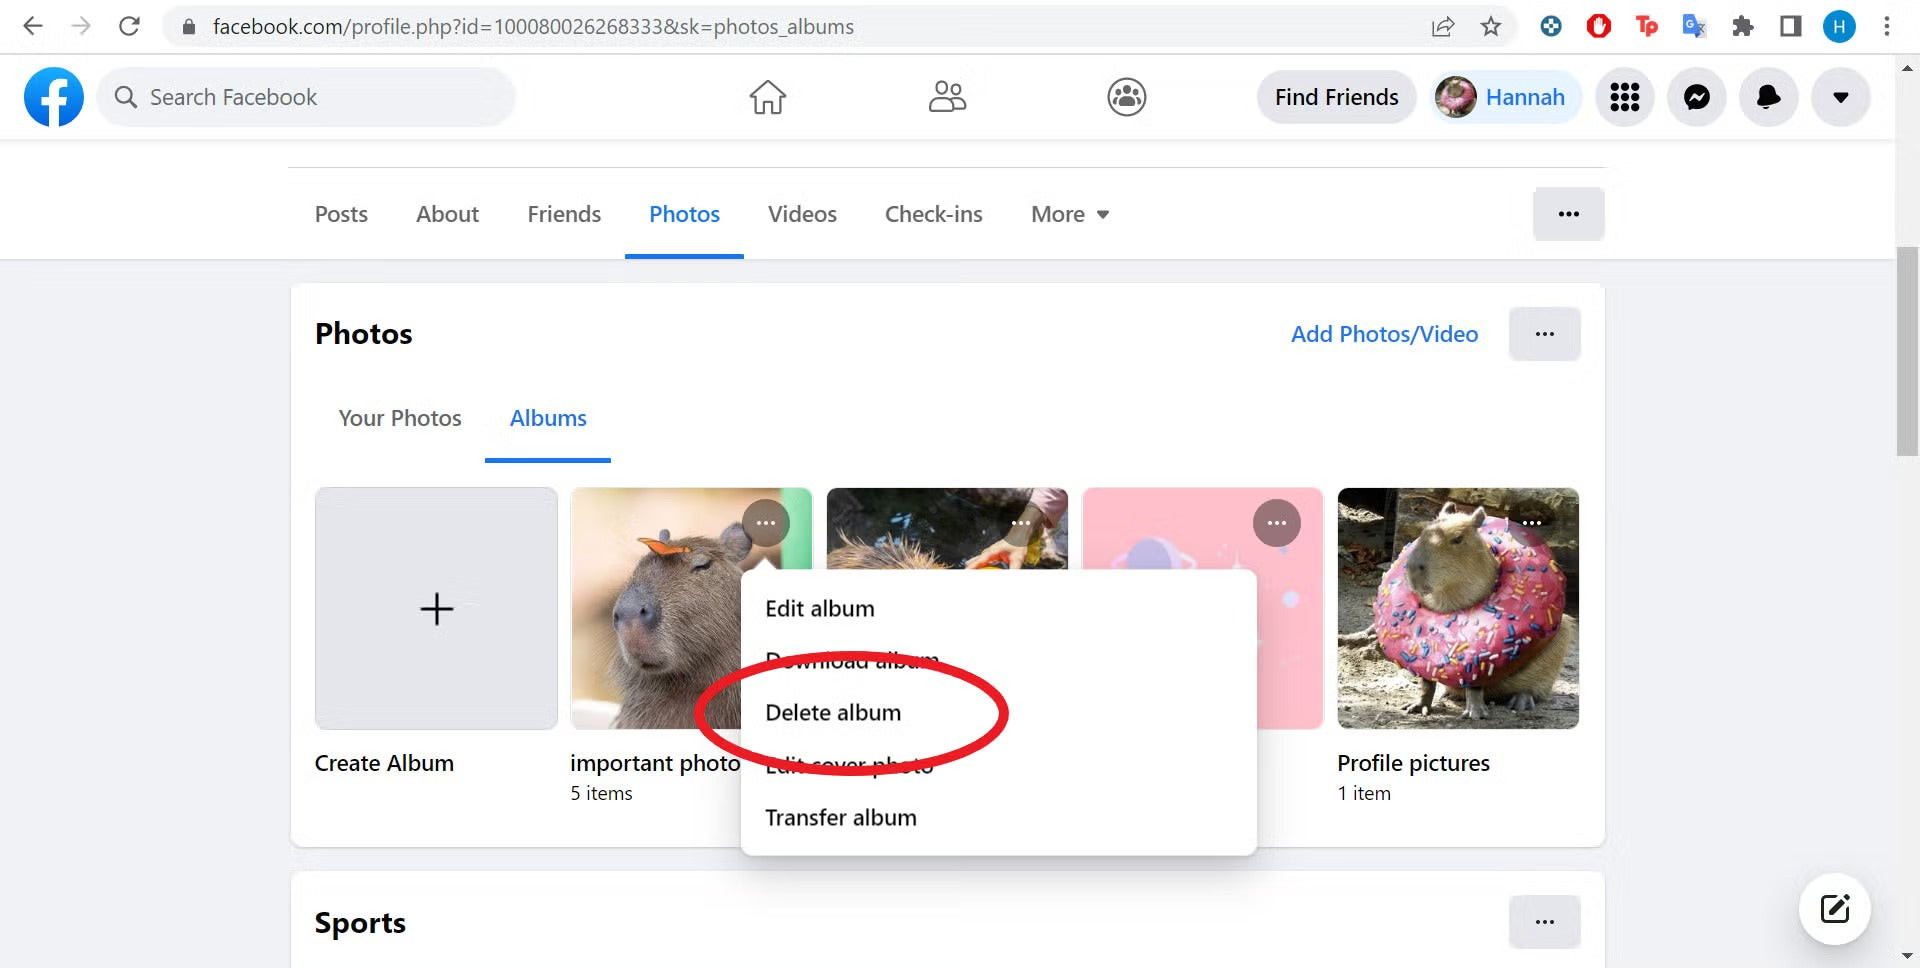
Delete Album: Select “Delete Album” and confirm. Remember that, according to Facebook’s Community Standards, permanently deleting an album will erase all photos within it.
 Confirm Deleting Facebook Album
Note: You can’t delete the “Profile Pictures” or “Cover Photos” albums, but you can delete individual photos within them.
4. Using Facebook’s “Manage Activity” Tool for Bulk Deletion
Facebook’s “Manage Activity” tool offers a way to delete multiple posts, including photos, at once. However, its effectiveness can vary.
4.1. Accessing the Activity Log
- Go to Settings & Privacy: Click the arrow in the top right corner of Facebook and select “Settings & Privacy.”
- Click Activity Log: Choose “Activity Log” from the dropdown menu.
4.2. Filtering for Photos and Videos
- Go to Your Posts: In the left-hand menu, click “Your Posts.”
- Filter by Photos and Videos: Select “Photos and Videos.”
4.3. Selecting and Deleting Photos
- Select Photos: Check the boxes next to the photos you want to delete.
- Click Remove: Click the “Remove” button at the bottom of the screen.
- Confirm Deletion: Confirm that you want to move the selected photos to the trash.
Note: Some users have reported that this method doesn’t always display all photos, so it may not be a complete solution.
5. Third-Party Tools: Proceed with Caution
Several third-party tools claim to help you delete all your Facebook photos quickly. However, these tools come with risks:
- Security Risks: Granting access to your Facebook account to a third-party app can expose your personal information.
- Violation of Terms of Service: Using unauthorized tools may violate Facebook’s terms of service, potentially leading to account suspension.
- Limited Functionality: Some tools may not work as advertised or may not be able to delete all your photos.
If you choose to use a third-party tool, do your research:
- Read Reviews: Look for reviews from reputable sources.
- Check Permissions: Understand what permissions the app is requesting.
- Use a Strong Password: Make sure you have a strong, unique password for your Facebook account.
- Revoke Access: After using the tool, revoke its access to your Facebook account.
6. Removing Tags from Photos You Don’t Want to Appear On
You can’t delete photos that other people have uploaded, but you can remove the tag so that the photo doesn’t appear on your profile.
6.1. Finding Tagged Photos
- Go to Your Profile: Click on your name in the top right corner of Facebook.
- View Activity Log: Click on “View Activity Log.”
- Go to Photos: In the left-hand menu, click “Photos.”
- Select Photos of You: Choose “Photos of You.”
6.2. Removing the Tag
- Select the Photo: Find the photo you want to remove the tag from and click on it.
- Open Options: Click the three dots in the top right corner of the photo.
- Remove Tag: Select “Remove Tag” and confirm.
You can also choose to hide the photo from your timeline:
- Select the Photo: Find the photo you want to hide and click on it.
- Open Options: Click the three dots in the top right corner of the photo.
- Hide from Timeline: Select “Hide from Timeline” and confirm.
7. Archiving Photos Instead of Deleting Them
If you’re not sure you want to delete your photos permanently, you can archive them. Archiving removes the photos from your timeline but keeps them stored in your Facebook account.
7.1. Archiving Individual Photos
- Navigate to the Photo: Find the photo you want to archive and click on it.
- Open Options: Click the three dots in the top right corner of the photo.
- Archive: Select “Archive” and confirm.
7.2. Accessing Archived Photos
- Go to Settings & Privacy: Click the arrow in the top right corner of Facebook and select “Settings & Privacy.”
- Click Activity Log: Choose “Activity Log” from the dropdown menu.
- Click Archived: In the left-hand menu, click “Archived.”
8. Downloading Your Facebook Photos Before Deleting
Before you delete all your photos, you might want to download them to your computer or an external hard drive.
8.1. Downloading All Your Data
- Go to Settings & Privacy: Click the arrow in the top right corner of Facebook and select “Settings & Privacy.”
- Click Settings: Choose “Settings.”
- Click Your Facebook Information: In the left-hand menu, click “Your Facebook Information.”
- Download Your Information: Select “Download Your Information.”
- Select Photos and Videos: Choose the date range and format you want, and make sure “Photos and videos” is selected.
- Create File: Click “Create File.” Facebook will compile your data and notify you when it’s ready to download.
8.2. Downloading Individual Albums
Unfortunately, Facebook doesn’t offer a direct way to download entire albums. You’ll need to download your entire data file to get all your photos.
9. Time-Saving Tips for Deleting Large Numbers of Photos
Deleting a large number of photos can be tedious, but here are some tips to speed up the process:
- Focus on Albums: Deleting entire albums is faster than deleting individual photos.
- Use a Desktop Computer: Deleting photos on a desktop computer is generally faster than on a mobile device.
- Batch Delete: Use the “Manage Activity” tool to delete multiple photos at once.
- Dedicate Time: Set aside a specific time to focus on deleting photos so you can stay focused and efficient.
- Enlist Help: If you have a friend or family member who’s willing to help, you can divide the task.
10. Maintaining Your Photo Privacy Going Forward
Once you’ve deleted your old photos, here are some tips for maintaining your photo privacy going forward:
- Review Privacy Settings: Regularly review your Facebook privacy settings to ensure they’re set to your liking.
- Limit Audience: Choose the audience for each photo you upload. You can choose “Friends,” “Only Me,” or create custom lists.
- Be Mindful of Tags: Be careful about tagging people in photos without their permission.
- Use Photo Review: Enable photo review to approve or reject tags before they appear on your profile.
- Consider Watermarks: Add watermarks to your photos to protect them from unauthorized use.
According to research from the Santa Fe University of Art and Design’s Photography Department, in July 2025, regularly auditing and adjusting your social media photo presence can significantly enhance your online privacy and personal branding.
11. Addressing Common Issues and Errors
- Photos Not Deleting: Try clearing your browser cache and cookies, or try a different browser.
- “Manage Activity” Tool Not Working: This tool can be unreliable. Try deleting photos manually instead.
- Can’t Delete Certain Albums: You can’t delete the “Profile Pictures” or “Cover Photos” albums, but you can delete individual photos within them.
- Photos Reappearing: This is usually a caching issue. Try clearing your browser cache or waiting a few hours.
12. Ethical Considerations When Deleting Photos
When deleting photos from Facebook, consider the following ethical implications:
- Respect for Others: If you’re deleting photos that include other people, consider how it might affect them.
- Preservation of Memories: Think about whether you’re deleting valuable memories that you might regret losing.
- Transparency: Be transparent with your friends and family about why you’re deleting photos.
13. Real-Life Examples of Why People Delete Photos
- Jane, a marketing professional: “I deleted all my old college party photos to create a more professional online image for my job search.”
- Mark, a recent divorcee: “Deleting photos of my ex-wife was a way for me to move on and start fresh.”
- Susan, a privacy advocate: “I deleted all my Facebook photos because I was concerned about how Facebook was using my data.”
14. What Are The Most Common Questions About Deleting Photos on Facebook?
Here are some frequently asked questions about removing photographs on Facebook:
14.1. Can I delete all my Facebook photos at once?
No, Facebook does not offer a one-click solution to delete all your photos. You need to delete them album by album or individually.
14.2. How do I delete multiple photos quickly?
Use Facebook’s “Manage Activity” tool to select and delete multiple photos at once. However, this method may not always display all your photos.
14.3. Can I delete photos I’m tagged in?
No, you can’t delete photos you’re tagged in that were uploaded by someone else. However, you can remove the tag.
14.4. Can I delete my profile picture album?
No, you can’t delete the “Profile Pictures” or “Cover Photos” albums, but you can delete individual photos within them.
14.5. Are there any apps to delete all Facebook photos?
Several third-party apps claim to do this, but use them with caution due to security risks and potential violations of Facebook’s terms of service.
14.6. What happens when I delete a photo on Facebook?
Once a photo is deleted, it’s gone for good. There’s no “undo” button.
14.7. How do I find photos I’ve been tagged in?
Go to your profile, click “View Activity Log,” then click “Photos” and choose “Photos of You.”
14.8. Can I hide photos from my timeline without deleting them?
Yes, you can hide photos from your timeline by clicking the three dots in the top right corner of the photo and selecting “Hide from Timeline.”
14.9. How do I download my photos before deleting them?
Go to “Settings & Privacy,” click “Settings,” then “Your Facebook Information,” and select “Download Your Information.”
14.10. How can I make sure my future photos are private?
Regularly review your Facebook privacy settings, limit the audience for each photo you upload, and be mindful of tags.
15. How to Backup Your Photos Before Deleting Them?
Before you embark on deleting your cherished memories from Facebook, ensuring their safety through a backup is crucial. The platform offers a straightforward way to download your entire photo library, safeguarding your visual history. To initiate this process, navigate to your Facebook settings, typically found under the account menu. Within settings, locate the option to “Download Your Information,” a feature designed to compile all your data, including photos, videos, posts, and messages, into a manageable archive.
Upon selecting this option, you’ll be prompted to specify the type of data you wish to download. Ensure that “Photos and videos” is selected to focus solely on your visual content. Facebook also allows you to customize the format and quality of the download, offering flexibility based on your storage needs and preferences. Once you’ve configured your download settings, Facebook will process your request, compiling your photos into a downloadable file. Depending on the volume of data, this process may take some time, ranging from a few minutes to several hours.
Once the file is ready, you’ll receive a notification from Facebook, prompting you to download the archive to your computer or external storage device. It’s advisable to choose a secure location for your backup, ensuring that your photos are protected from unauthorized access or data loss. This proactive step ensures that even after deleting photos from Facebook, your memories remain preserved and accessible, offering peace of mind and the ability to revisit your visual history whenever you desire.
16. What Are Facebook’s Community Standards for Photo Content?
Facebook’s Community Standards serve as the guiding principles for acceptable content on the platform, including photos. These standards aim to foster a safe and respectful environment for all users, outlining what types of content are prohibited and may be subject to removal. In the context of photos, Facebook’s Community Standards address a range of issues, including but not limited to nudity, hate speech, violence, and harassment. Photos that depict explicit or graphic content, promote violence or incite hatred against individuals or groups based on race, ethnicity, religion, gender, or other protected characteristics are strictly prohibited.
Additionally, photos that contain bullying, harassment, or threats towards others are also in violation of Facebook’s Community Standards. The platform takes a firm stance against content that targets individuals with malicious intent or aims to intimidate, degrade, or abuse them. Furthermore, photos that infringe upon intellectual property rights, such as copyright or trademark, are also subject to removal. Facebook respects the rights of content creators and prohibits the unauthorized use of copyrighted material without permission.
When users encounter photos that they believe violate Facebook’s Community Standards, they are encouraged to report them to the platform’s moderation team for review. Facebook employs a combination of automated systems and human reviewers to assess reported content and take appropriate action, which may include removing the photo, issuing warnings to the uploader, or suspending accounts in cases of repeat violations. By adhering to these Community Standards, Facebook strives to maintain a positive and inclusive environment where users can share and engage with photos responsibly.
17. How to Review Your Tag Settings on Facebook?
Managing your tag settings on Facebook is crucial for maintaining control over your online presence and ensuring that you’re only associated with content that aligns with your personal or professional image. Facebook offers a range of tag settings that allow you to review and approve tags before they appear on your profile, giving you the final say over what content is visible to your friends and followers. To access your tag settings, navigate to the privacy settings menu, typically found under the account settings. Within the privacy settings, locate the section dedicated to “Timeline and Tagging,” where you’ll find options to customize who can post on your timeline, who can see posts that you’re tagged in, and whether you want to review tags before they appear on your timeline.
Enabling the tag review feature is highly recommended, as it allows you to vet each tag before it’s added to your profile, preventing unwanted or inappropriate content from being associated with your name. When someone tags you in a photo or post, you’ll receive a notification prompting you to review the tag. You can then choose to approve the tag, allowing it to appear on your timeline, or reject the tag, preventing it from being visible to others. Additionally, you can adjust the audience for posts that you’re tagged in, limiting who can see the content based on your privacy preferences.
By carefully reviewing and customizing your tag settings, you can effectively manage your online reputation and ensure that your Facebook profile accurately reflects your personal brand and values. Regularly reviewing these settings is advisable, as Facebook may occasionally update its privacy features, and staying informed about these changes can help you maintain control over your online presence.
18. Are There Any Legal Considerations When Deleting Photos?
When deleting photos from Facebook, it’s essential to be aware of potential legal considerations that may arise, particularly concerning copyright, privacy, and defamation. Copyright laws protect original works of authorship, including photographs, granting exclusive rights to the copyright holder, typically the photographer. Deleting photos that you don’t own the copyright to may infringe upon the rights of the copyright holder, potentially leading to legal action. Before deleting any photos, ensure that you have the necessary rights or permissions to do so, especially if the photos were taken by someone else.
Privacy laws govern the collection, use, and disclosure of personal information, including photographs. Deleting photos that contain personal information about others, such as their likeness or identifying details, may raise privacy concerns, particularly if you don’t have their consent. Before deleting any photos, consider the privacy implications and obtain consent from individuals who may be identifiable in the images. Defamation laws protect individuals from false statements that harm their reputation. Deleting photos that contain defamatory content, such as false accusations or malicious statements, may expose you to legal liability.
Before deleting any photos, carefully review the content to ensure that it doesn’t contain defamatory material that could harm the reputation of others. In addition to these legal considerations, it’s also essential to comply with Facebook’s terms of service and community standards when deleting photos. Violating these terms may result in account suspension or other penalties. By being mindful of these legal considerations and adhering to relevant laws and regulations, you can minimize the risk of legal complications when deleting photos from Facebook.
19. Understanding Facebook’s Data Retention Policies
Understanding Facebook’s data retention policies is crucial for users who are concerned about the long-term storage and accessibility of their data, including photos. Facebook retains user data for varying lengths of time, depending on the type of data and the user’s activity on the platform. While deleted photos are typically removed from users’ timelines and profiles, Facebook may retain copies of this data for a period of time for various purposes, including system maintenance, security, and legal compliance. The exact duration of data retention may vary and is subject to change based on Facebook’s evolving policies and practices.
Facebook’s data retention policies are outlined in its privacy policy, which provides detailed information about how user data is collected, used, and stored. Users are encouraged to review the privacy policy to gain a better understanding of Facebook’s data practices and their rights regarding their personal information. While Facebook allows users to delete their accounts and remove their data from the platform, some data may persist in backups or archives for a limited time. Additionally, Facebook may retain data that is necessary for legal compliance or to enforce its terms of service.
Users who have specific concerns about Facebook’s data retention policies or wish to request the deletion of their data can contact Facebook’s support team for assistance. Facebook is committed to transparency and strives to provide users with control over their data and privacy. By understanding Facebook’s data retention policies, users can make informed decisions about their data and take steps to protect their privacy on the platform.
20. How Can dfphoto.net Help You Manage Your Digital Photos?
At dfphoto.net, we understand the importance of managing your digital photos effectively, whether it’s on Facebook or any other platform. Our website offers a wealth of resources and information to help you organize, edit, and share your photos with confidence. From tutorials on photo editing software to tips on creating stunning photo albums, we’ve got you covered.
We also provide guidance on privacy settings and data management, so you can stay in control of your online presence. Plus, our community forum is a great place to connect with other photography enthusiasts, share your work, and get feedback. Visit dfphoto.net today to discover a world of photography resources and inspiration. Address: 1600 St Michael’s Dr, Santa Fe, NM 87505, United States. Phone: +1 (505) 471-6001. Website: dfphoto.net.