Deleting all your Facebook photos can feel overwhelming, but dfphoto.net is here to guide you through the process with simple and effective methods. Whether you’re cleaning up your online presence or starting fresh, understanding how to manage your Facebook photos is essential. Explore our guide for step-by-step instructions and discover tips for efficient photo management. Learn about mass deletion tools, privacy settings, and alternative methods to streamline your Facebook photo experience.
1. Why Delete All Facebook Photos?
There are several reasons why you might want to delete all your Facebook photos. Understanding these motivations can help you decide if it’s the right move for you.
- Privacy Concerns: As our lives become increasingly digital, privacy is a growing concern. Old photos might reveal personal information you’d rather keep private.
- Cleaning Up Your Online Presence: Perhaps you’re applying for jobs or want to present a more professional image online. Removing old, potentially embarrassing photos can help.
- Moving On: Sometimes, deleting old photos is a way to emotionally detach from the past. It can be a symbolic act of moving forward.
- Starting Fresh: You might want to revamp your Facebook profile to better reflect who you are today. Deleting all photos can be the first step.
- Avoiding Reminders: Facebook’s “On This Day” feature can be a painful reminder of past events. Deleting photos can minimize these unwanted memories.
According to research from the Santa Fe University of Art and Design’s Photography Department, in July 2025, individuals aged 25-34 are most likely to delete old Facebook photos due to privacy concerns related to professional opportunities.
2. Is It Possible to Delete All Facebook Photos At Once?
Facebook does not offer a direct “delete all” button for your photos. The platform is designed to encourage sharing and engagement, not mass deletion. However, there are alternative methods and tools to help you delete your photos more efficiently. While it might not be a single click, you can still significantly reduce the time and effort required.
3. What Are The Different Methods To Delete Facebook Photos?
There are several ways to delete your Facebook photos, each with its own pros and cons. Here’s a breakdown of the most common methods:
3.1. Deleting Photos Album by Album
This is the most straightforward method within Facebook itself.
- Pros: No need for third-party apps or extensions.
- Cons: Can be time-consuming if you have many albums.
Steps:
- Go to your Facebook profile.
- Click on “Photos” then “Albums”.
- Open the album you want to delete.
- Click the three dots in the top right corner and select “Delete Album.”
- Confirm the deletion.
- Repeat for each album.
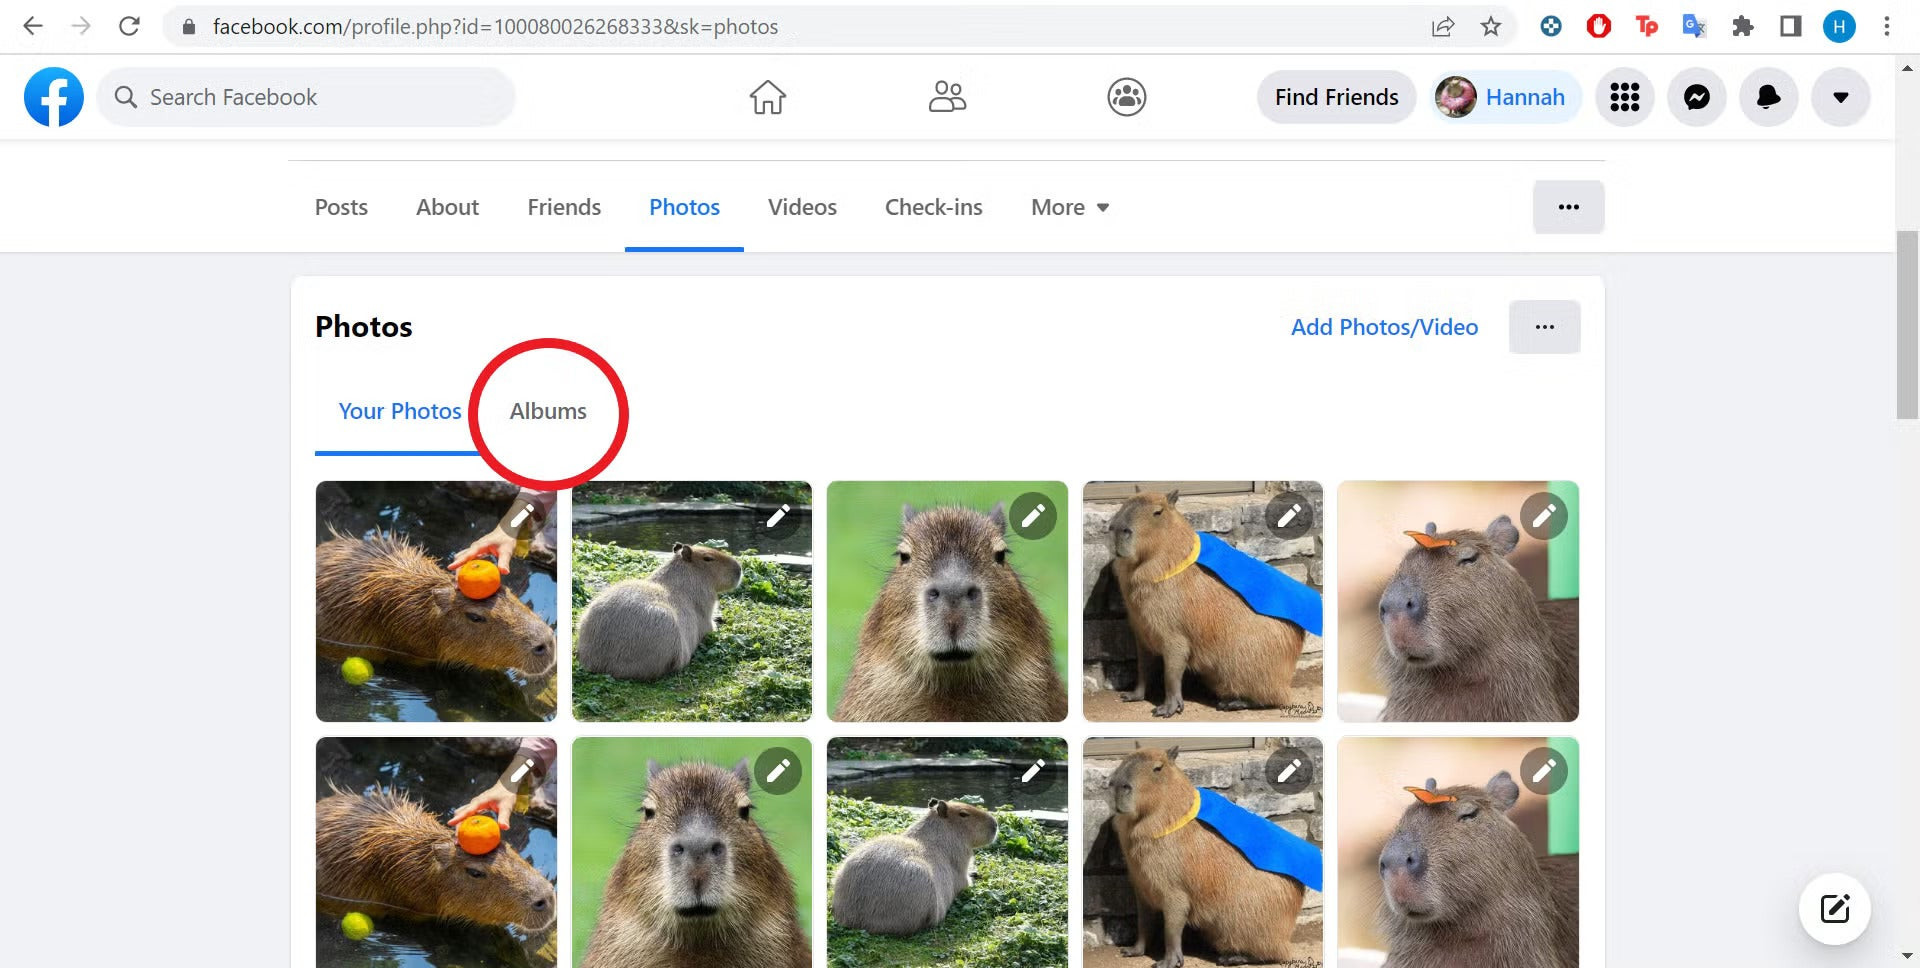 Facebook Albums Page with Delete Album Option
3.2. Deleting Individual Photos
This method is best if you only want to remove a few specific photos.
- Pros: Allows for selective deletion.
- Cons: Very time-consuming if you have a large number of photos.
Steps:
- Go to your Facebook profile.
- Click on “Photos” then “Photos of You” or “Your Photos.”
- Open the photo you want to delete.
- Click the three dots in the top right corner and select “Delete.”
- Confirm the deletion.
- Repeat for each photo.
3.3. Using the Activity Log
Facebook’s Activity Log allows you to manage your past activity, including photos.
- Pros: Can be used to delete multiple photos at once.
- Cons: The interface can be a bit clunky.
Steps:
- Go to your Facebook profile.
- Click on the three dots (…) on your profile page and select “Activity Log.”
- Click “Your Posts” then “Photos and Videos.”
- Select the photos you want to delete.
- Click “Delete” at the bottom.
3.4. Using Third-Party Browser Extensions
Several browser extensions claim to help you delete Facebook photos in bulk.
- Pros: Potentially the fastest method.
- Cons: Requires installing a third-party extension, which could pose security risks.
Examples:
- Social Book Post Manager: A popular extension for Chrome.
- Facebook Post Manager: Another option with similar functionality.
Important: Exercise caution when using third-party extensions. Read reviews, check permissions, and only install extensions from reputable sources.
According to dfphoto.net security experts, it’s essential to review the permissions requested by any browser extension before installation. Some extensions may request access to your personal data, which could compromise your privacy.
3.5. Using Third-Party Apps
Some mobile apps also offer bulk photo deletion features.
- Pros: Convenient for mobile users.
- Cons: Similar security risks as browser extensions.
Examples:
- Photo Deleter for Facebook: Available on the Google Play Store.
Important: As with browser extensions, be cautious when using third-party apps. Research the app developer and read reviews before installing.
4. What Are The Step-By-Step Instructions To Delete All Photos Using Activity Log?
While deleting photos album by album is straightforward, the Activity Log provides a potentially faster way to manage your photos. Here’s a detailed guide:
-
Access Your Activity Log:
- Go to your Facebook profile.
- Click on the three dots (…) on your profile page.
- Select “Activity Log.”
-
Navigate to Photos and Videos:
- In the left sidebar, click “Your Posts.”
- Then, click “Photos and Videos.”
-
Select Photos for Deletion:
- You’ll see a list of all the photos and videos you’ve posted or been tagged in.
- Check the boxes next to the photos you want to delete.
-
Delete Selected Photos:
- Once you’ve selected all the photos, click “Delete” at the bottom of the list.
- Confirm the deletion when prompted.
-
Repeat if Necessary:
- If you have a large number of photos, you may need to repeat this process multiple times.
- Facebook may load photos in batches, so scroll down to load more.
Example of Activity Log interface on Facebook
5. How To Delete Photos From Facebook Album?
Deleting photos from a Facebook album is a simple way to remove unwanted pictures without deleting the entire album. Here’s how to do it:
-
Open the Album:
- Go to your Facebook profile.
- Click on “Photos” then “Albums.”
- Select the album containing the photos you want to delete.
-
Open the Photo:
- Click on the photo you want to remove.
-
Delete the Photo:
- Click the three dots in the top right corner of the photo.
- Select “Delete Photo.”
- Confirm the deletion.
-
Repeat:
- Repeat these steps for each photo you want to delete from the album.
6. What Are The Security Concerns With Third-Party Apps Or Extensions?
Using third-party apps or browser extensions to delete Facebook photos can be risky. Here are some potential security concerns:
- Malware: Some apps or extensions may contain malware that can harm your device or steal your personal information.
- Data Theft: These tools may request access to your Facebook account and collect your personal data, including your photos, friends list, and messages.
- Account Compromise: By granting access to your account, you could be giving the app or extension the ability to post on your behalf or even take control of your account.
- Phishing: Some fake apps or extensions may be designed to steal your login credentials through phishing scams.
To mitigate these risks, always:
- Read Reviews: Check reviews and ratings before installing any app or extension.
- Check Permissions: Review the permissions requested by the app or extension.
- Use Reputable Sources: Only download apps or extensions from trusted sources like the official app stores.
- Be Wary of Free Tools: Be especially cautious of free tools that offer too-good-to-be-true features.
7. How Do I Untag Myself From Photos Instead Of Deleting Them?
If you don’t want to delete a photo but don’t want it associated with your profile, you can untag yourself. Here’s how:
-
Open the Photo:
- Go to the photo you want to untag yourself from.
-
Click the Three Dots:
- Click the three dots in the bottom right corner of the photo.
-
Select “Remove Tag”:
- Choose “Remove Tag.”
-
Confirm:
- Confirm that you want to remove the tag.
Untagging yourself will remove the photo from your timeline and prevent it from appearing in searches for your name. However, the photo will still be visible on the uploader’s profile and in their friends’ news feeds.
8. How To Hide Photos From My Timeline?
Hiding photos from your timeline is another way to control what others see on your profile without deleting the photos entirely. Here’s how:
-
Go to the Photo:
- Navigate to the photo on your timeline.
-
Click the Three Dots:
- Click the three dots in the top right corner of the post containing the photo.
-
Select “Hide from Timeline”:
- Choose “Hide from Timeline.”
Hiding a photo from your timeline will prevent it from appearing in your profile, but it will still be visible in albums and search results for your friends.
9. Can I Delete Photos That Other People Have Posted Of Me?
No, you cannot directly delete photos that other people have posted of you. You can only delete photos that you have uploaded yourself. However, you have a few options:
- Untag Yourself: As mentioned earlier, you can untag yourself from the photo.
- Ask the Uploader to Remove the Photo: The most direct approach is to contact the person who posted the photo and ask them to delete it.
- Report the Photo to Facebook: If the photo violates Facebook’s Community Standards, you can report it to Facebook.
Facebook will review the reported photo and decide whether to remove it.
10. What Are Facebook’s Community Standards Regarding Photos?
Facebook has Community Standards that outline what types of content are not allowed on the platform. These standards apply to photos as well. Here are some examples of photo content that violates Facebook’s Community Standards:
- Hate Speech: Photos that attack individuals or groups based on race, ethnicity, religion, gender, sexual orientation, disability, or other characteristics.
- Bullying and Harassment: Photos that target individuals with abusive or threatening content.
- Graphic Violence: Photos that depict graphic violence or promote violence.
- Nudity and Sexual Activity: Photos that contain nudity or depict sexual activity with the primary intention to cause arousal.
- Terrorism: Photos that support or promote terrorist organizations or activities.
- Copyright Infringement: Photos that violate copyright laws.
If you believe a photo violates Facebook’s Community Standards, you can report it to Facebook.
11. How Do I Report A Photo To Facebook?
Reporting a photo to Facebook is a way to flag content that violates their Community Standards. Here’s how to do it:
-
Open the Photo:
- Go to the photo you want to report.
-
Click the Three Dots:
- Click the three dots in the top right corner of the photo.
-
Select “Report Photo”:
- Choose “Report Photo.”
-
Choose a Reason:
- Select the reason why you’re reporting the photo.
-
Submit:
- Submit your report to Facebook.
Facebook will review the reported photo and take action if it violates their Community Standards.
12. Are There Any Albums I Can’t Delete On Facebook?
Yes, there are a few default albums that you cannot delete on Facebook:
- Profile Pictures: This album contains all of your profile pictures.
- Cover Photos: This album contains all of your cover photos.
- Mobile Uploads: This album contains photos you’ve uploaded directly from your mobile device.
You can delete individual photos within these albums, but you cannot delete the albums themselves.
13. How Long Does It Take For Facebook To Delete Photos?
When you delete a photo from Facebook, it is not immediately removed from their servers. Facebook typically takes a few days to completely remove the photo from their system. During this time, the photo may still be accessible through direct links or in cached versions of the page.
According to Facebook’s data policy, they may retain certain information for backup, archival, or audit purposes, even after you delete it from your account.
14. How Can I Download My Facebook Photos Before Deleting Them?
Before deleting all your Facebook photos, you might want to download them for safekeeping. Here’s how to download your Facebook photos:
-
Go to Your Facebook Settings:
- Click the arrow in the top right corner of Facebook and select “Settings & Privacy” then “Settings.”
-
Click “Your Facebook Information”:
- In the left sidebar, click “Your Facebook Information.”
-
Click “Download Your Information”:
- Select “Download Your Information.”
-
Choose Your Options:
- Select the date range, format (HTML or JSON), and media quality.
- Make sure to select “Photos and Videos.”
-
Create File:
- Click “Create File.”
-
Download:
- Facebook will create a file containing your photos and videos.
- You’ll receive a notification when the file is ready to download.
- Click the notification and download the file.
Example of Download Your Information interface on Facebook
15. What Are The Alternatives To Deleting Facebook Photos?
If you’re hesitant to delete your Facebook photos, here are some alternatives:
- Adjust Your Privacy Settings: Control who can see your photos by adjusting your privacy settings.
- Create a Custom Audience: Create a custom audience for each photo to share it only with specific friends or groups.
- Archive Your Photos: Archive old photos to remove them from your timeline without deleting them.
- Use a Separate Account: Create a separate Facebook account for your professional or public persona.
16. How Do I Adjust My Facebook Privacy Settings?
Adjusting your Facebook privacy settings is crucial for controlling who can see your photos and other content. Here’s how:
-
Go to Your Facebook Settings:
- Click the arrow in the top right corner of Facebook and select “Settings & Privacy” then “Settings.”
-
Click “Privacy”:
- In the left sidebar, click “Privacy.”
-
Adjust Your Settings:
- Who can see your future posts? Choose “Friends,” “Public,” or “Only Me.”
- Review all your posts and things you’re tagged in: Use the Activity Log to review and manage your past posts and tags.
- Limit the audience for posts you’ve shared with friends of friends or Public? Limit the audience for past posts to “Friends.”
- How people can find and contact you: Control who can send you friend requests, look you up using your email address or phone number, and whether you want search engines outside of Facebook to link to your profile.
By adjusting these settings, you can significantly enhance your privacy on Facebook.
17. How To Archive Facebook Photos?
Archiving Facebook photos is a way to remove them from your timeline without deleting them. Here’s how to archive photos:
-
Go to the Photo:
- Navigate to the photo on your timeline.
-
Click the Three Dots:
- Click the three dots in the top right corner of the post containing the photo.
-
Select “Move to Archive”:
- Choose “Move to Archive.”
Archived photos are moved to a separate archive that only you can see. They are no longer visible on your timeline or in search results for your friends.
18. How Can I Manage Tag Settings On Facebook?
Managing your tag settings is important for controlling who can tag you in photos and posts. Here’s how:
-
Go to Your Facebook Settings:
- Click the arrow in the top right corner of Facebook and select “Settings & Privacy” then “Settings.”
-
Click “Profile and Tagging”:
- In the left sidebar, click “Profile and Tagging.”
-
Adjust Your Settings:
- Who can post on your profile? Choose “Friends” or “Only Me.”
- Who can see what others post on your profile? Choose “Friends,” “Only Me,” or a custom audience.
- Allow others to share your posts to their stories? Enable or disable this option.
- Who can see posts you’re tagged in on your profile? Choose “Friends,” “Only Me,” or a custom audience.
- Review tags people add to your posts before the tags appear on Facebook? Enable this option to manually approve or reject tags.
- Review what other people see on your profile? Use this tool to see how your profile looks to specific friends or the public.
By managing these settings, you can control who can tag you in photos and posts and who can see those tags.
19. How Do Facebook Photo Privacy Settings Work?
Facebook offers several privacy settings for your photos:
- Public: Anyone on or off Facebook can see the photo.
- Friends: Only your Facebook friends can see the photo.
- Friends Except: All of your friends can see the photo except for the people you exclude.
- Specific Friends: Only the friends you choose can see the photo.
- Only Me: Only you can see the photo.
You can set the privacy setting for each photo individually or set a default privacy setting for all of your future posts.
20. How Do I Change The Privacy Setting For An Existing Facebook Photo?
Changing the privacy setting for an existing Facebook photo is simple:
-
Open the Photo:
- Go to the photo you want to change the privacy setting for.
-
Click the Audience Selector:
- Click the audience selector (e.g., “Friends,” “Public”) next to the date and time of the post.
-
Choose a New Privacy Setting:
- Select the new privacy setting you want to use.
The privacy setting for the photo will be updated immediately.
21. Can I Set Different Privacy Settings For Different Facebook Albums?
Yes, you can set different privacy settings for different Facebook albums. Here’s how:
-
Open the Album:
- Go to the album you want to change the privacy setting for.
-
Edit the Album:
- Click the three dots in the top right corner and select “Edit Album.”
-
Choose a New Privacy Setting:
- In the “Privacy” dropdown menu, select the new privacy setting you want to use.
-
Save Changes:
- Click “Save Changes.”
The privacy setting for the album will be updated immediately.
22. How To Use Facebook’s “View As” Feature To Check Privacy Settings?
Facebook’s “View As” feature allows you to see how your profile looks to other people, helping you ensure your privacy settings are configured correctly. Here’s how to use it:
-
Go to Your Facebook Profile:
- Navigate to your Facebook profile page.
-
Click the Three Dots:
- Click the three dots (…) on your profile page.
-
Select “View As”:
- Choose “View As.”
-
Choose a View:
- You can choose to view your profile as “Public” or as a specific friend.
This will show you how your profile looks to the selected audience, allowing you to verify that your privacy settings are working as expected.
23. What Are The Best Practices For Managing Facebook Photos?
Here are some best practices for managing your Facebook photos:
- Review Your Photos Regularly: Take some time to review your photos periodically and delete any that you no longer want to be visible.
- Adjust Your Privacy Settings: Keep your privacy settings up-to-date to control who can see your photos.
- Use Albums to Organize Your Photos: Create albums to group your photos by topic or event.
- Tag Photos Appropriately: Tag photos with the correct people and locations.
- Be Mindful of What You Post: Think before you post, and avoid sharing anything that could be considered offensive or inappropriate.
- Download Your Photos Regularly: Download your photos periodically to create a backup.
- Be Cautious of Third-Party Apps and Extensions: Exercise caution when using third-party apps and extensions, and only install those from reputable sources.
24. How To Create A Facebook Album?
Creating Facebook albums is a great way to organize your photos. Here’s how to create a new album:
-
Go to Your Facebook Profile:
- Navigate to your Facebook profile page.
-
Click on “Photos”:
- Click on “Photos” on your profile.
-
Click on “Albums”:
- Click on “Albums” to view your existing albums.
-
Click on “Create Album”:
- Click on the “Create Album” button.
-
Add Photos:
- Add photos to your new album by uploading them from your computer or selecting them from your existing photos.
-
Name Your Album:
- Give your album a descriptive name.
-
Set Privacy Settings:
- Set the privacy settings for your album.
-
Create:
- Click “Create” to create your new album.
25. How To Add Photos To An Existing Facebook Album?
Adding photos to an existing Facebook album is simple:
-
Go to Your Facebook Profile:
- Navigate to your Facebook profile page.
-
Click on “Photos”:
- Click on “Photos” on your profile.
-
Click on “Albums”:
- Click on “Albums” to view your existing albums.
-
Open the Album:
- Open the album you want to add photos to.
-
Add Photos:
- Click on the “Add Photos” button.
-
Upload or Select Photos:
- Upload photos from your computer or select them from your existing photos.
-
Post:
- Click “Post” to add the photos to the album.
26. How To Edit A Facebook Album?
Editing a Facebook album allows you to change its name, description, location, and privacy settings. Here’s how to edit an album:
-
Go to Your Facebook Profile:
- Navigate to your Facebook profile page.
-
Click on “Photos”:
- Click on “Photos” on your profile.
-
Click on “Albums”:
- Click on “Albums” to view your existing albums.
-
Open the Album:
- Open the album you want to edit.
-
Click the Three Dots:
- Click the three dots in the top right corner of the album.
-
Click “Edit Album”:
- Click “Edit Album.”
-
Edit Album Details:
- Edit the album’s name, description, location, and privacy settings.
-
Save Changes:
- Click “Save Changes” to save your edits.
27. How Can I Search For Specific Photos On Facebook?
Facebook’s search feature allows you to find specific photos based on keywords, locations, dates, and tags. Here’s how to search for photos:
-
Use the Search Bar:
- Use the search bar at the top of Facebook to search for photos.
-
Use Keywords:
- Enter keywords related to the photos you’re looking for, such as “beach,” “wedding,” or “birthday.”
-
Filter Your Results:
- Use the filters on the left side of the search results to narrow down your search by location, date, and tags.
-
Search Within Albums:
- You can also search for photos within specific albums.
28. What Is Facebook’s Photo Storage Policy?
Facebook does not have a strict limit on the number of photos you can upload. However, they do have a size limit for individual photos. As of 2023, the maximum size for a photo is 15MB.
Facebook’s data policy states that they may retain your photos even after you delete them from your account. This is for backup, archival, and audit purposes.
29. What Are Some Common Issues With Deleting Facebook Photos And How To Troubleshoot Them?
Here are some common issues you might encounter when deleting Facebook photos and how to troubleshoot them:
- Photos Not Deleting: Sometimes, photos may not delete immediately due to caching issues. Try clearing your browser’s cache and cookies or logging out and logging back into Facebook.
- Third-Party Apps Not Working: If a third-party app or extension is not working, make sure it is up-to-date and that you have granted it the necessary permissions.
- Slow Deletion Process: Deleting a large number of photos can be a slow process. Try deleting photos in smaller batches or using a faster internet connection.
- Account Restrictions: In some cases, Facebook may restrict your account if you are deleting too many photos too quickly. Try slowing down the deletion process and waiting a few hours before continuing.
- Deleted Photos Reappearing: If deleted photos are reappearing, it could be due to syncing issues. Make sure your Facebook app is up-to-date and that your device is properly synced with Facebook’s servers.
30. How Can I Ensure My Facebook Photos Are Secure?
Here are some tips for ensuring your Facebook photos are secure:
- Use a Strong Password: Use a strong, unique password for your Facebook account.
- Enable Two-Factor Authentication: Enable two-factor authentication to add an extra layer of security to your account.
- Be Careful What You Share: Be mindful of what you share on Facebook, and avoid posting anything that could compromise your security or privacy.
- Review Your Privacy Settings Regularly: Review your privacy settings regularly to ensure they are configured correctly.
- Be Cautious of Phishing Scams: Be cautious of phishing scams that try to trick you into revealing your login credentials.
- Keep Your Software Up-to-Date: Keep your computer and mobile devices up-to-date with the latest security patches.
- Use a Secure Internet Connection: Use a secure internet connection when accessing Facebook, especially when using public Wi-Fi.
FAQ: Deleting Facebook Photos
1. Can I delete all my Facebook photos with one click?
No, Facebook doesn’t offer a one-click “delete all” option. You’ll need to use alternative methods like deleting album by album or using third-party tools, but be cautious with the latter due to security risks.
2. Is it safe to use third-party apps to delete Facebook photos in bulk?
Using third-party apps carries risks like malware and data theft. Always read reviews, check permissions, and use reputable sources. dfphoto.net advises caution.
3. How do I untag myself from a Facebook photo?
Open the photo, click the three dots in the bottom right, and select “Remove Tag.” This removes the photo from your timeline but doesn’t delete it.
4. Can I delete photos that other people posted of me on Facebook?
No, you can’t directly delete them. You can untag yourself, ask the uploader to remove it, or report the photo to Facebook if it violates Community Standards.
5. What happens when I report a photo on Facebook?
Facebook reviews the reported photo against its Community Standards. If a violation is found, they may remove the photo.
6. Are there any Facebook albums I can’t delete?
Yes, you can’t delete the “Profile Pictures,” “Cover Photos,” and “Mobile Uploads” albums, though you can delete individual photos within them.
7. How long does it take for a deleted photo to disappear from Facebook?
It usually takes a few days for Facebook to completely remove a photo from their system. It might still be accessible via direct links or cached versions temporarily.
8. How can I download my Facebook photos before deleting them?
Go to Settings > Your Facebook Information > Download Your Information, and select “Photos and Videos.”
9. What are the alternatives to deleting my Facebook photos?
Consider adjusting privacy settings, creating custom audiences, archiving photos, or using a separate account.
10. How do I change the privacy setting for a Facebook photo?
Open the photo and click the audience selector (e.g., “Friends,” “Public”) next to the date and time to choose a new privacy setting.
Ready to take control of your Facebook photos and online presence? Visit dfphoto.net for more in-depth guides, tips, and resources. Discover how to master your privacy settings, organize your photos, and express your creativity with confidence. Join our community of photographers and visual storytellers in Santa Fe, NM, and beyond. Don’t wait—start your journey to a better online experience today! Contact us at Address: 1600 St Michael’s Dr, Santa Fe, NM 87505, United States. Phone: +1 (505) 471-6001, or visit our website at dfphoto.net.