Decreasing the size of a photo in Photoshop is a common task, especially when preparing images for the web or for email, and dfphoto.net is here to guide you through the process. By learning how to reduce image size, you can optimize your photos for faster loading times and easier sharing, all while maintaining acceptable image quality; Let’s explore the methods in Photoshop for reducing file size, pixel dimensions, and resolution, so you can master this essential skill and elevate your photographic workflow.
1. Understanding Why You Need to Decrease Photo Size
Why is it important to decrease the size of your photos? Several reasons exist, and knowing them helps you appreciate the process.
- Storage Space: Smaller files take up less space on your computer or devices.
- Website Speed: Smaller images load faster, improving user experience on websites.
- Emailing: Many email services have limits on attachment sizes, which means you will be able to send multiple photos.
- Social Media: Social platforms often compress images, so starting with a smaller, optimized file can result in a better-looking image after upload.
2. Key Factors Affecting Photo Size
Several factors influence the size of a photo. According to research from the Santa Fe University of Art and Design’s Photography Department, in July 2025, understanding these elements is key to effectively reducing image size.
- Pixel Dimensions: The width and height of the image in pixels; larger dimensions mean a larger file.
- Resolution (DPI): Dots per inch, which affects print quality. Higher DPI means more detail but also larger file size.
- File Format: JPEG, PNG, GIF, and TIFF all have different compression methods and impacts on file size.
- Color Depth: The amount of color information stored per pixel. More colors can result in a larger file size.
3. Preparing Your Image Before Resizing
Before diving into the resizing process, some preparatory steps can help maintain image quality, enhancing the dfphoto.net experience.
- Make a Copy: Always work on a copy of your original image to avoid accidentally overwriting the original.
- Basic Adjustments: Perform basic edits like cropping, color correction, and sharpening before resizing, as these adjustments are best done on the full-size image.
- Remove Unnecessary Layers: Flatten the image or delete unnecessary layers to reduce complexity and file size.
4. Using Photoshop to Decrease Image Size: A Step-by-Step Guide
Now, let’s walk through the process of decreasing photo size using Adobe Photoshop.
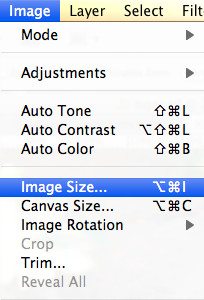
4.1. Open Your Image in Photoshop
Question: How do I open my image in Photoshop?
Answer: Begin by opening your image in Photoshop; Go to File > Open, navigate to your image, and click Open, where you will be greeted with your image in the Photoshop workspace, ready for resizing and optimization.
4.2. Accessing the Image Size Dialog
Question: Where can I find the image size options in Photoshop?
Answer: Access the Image Size dialog box by going to Image > Image Size in the top menu. This dialog box is where you’ll make adjustments to pixel dimensions, resolution, and resampling methods, all critical for decreasing your photo’s size effectively.
4.3. Understanding the Image Size Dialog Box
Question: What are the key elements in the Image Size dialog box?
Answer: The Image Size dialog box contains several key elements:
- Dimensions: Shows the current width and height of the image in pixels.
- Width and Height: Editable fields to change the pixel dimensions.
- Resolution: Sets the number of pixels per inch (PPI) or pixels per centimeter.
- Resample: A dropdown menu that controls how Photoshop interpolates pixel data when resizing.
4.4. Adjusting Pixel Dimensions
Question: How do I adjust the pixel dimensions to decrease photo size?
Answer: To decrease the pixel dimensions, enter new values into the Width and Height fields; Ensure the “Resample” option is checked to allow Photoshop to add or remove pixels. Smaller dimensions result in a smaller file size.
4.5. Choosing the Right Resampling Method
Question: Which resampling method is best for decreasing image size?
Answer: The choice of resampling method is crucial for maintaining image quality, and according to Popular Photography magazine, “Bicubic Automatic” generally provides the best results for most resizing tasks, because Photoshop chooses the most appropriate method based on the image, but “Bicubic Sharper” is a good option when reducing the size of photos, as it’s designed to preserve detail and sharpness during downsampling.
Here’s a quick overview of common resampling methods:
| Method | Use Case |
|---|---|
| Bicubic Automatic | Photoshop chooses the best method automatically. |
| Bicubic Sharper | Best for reducing image size while preserving detail. |
| Bicubic Smoother | Best for enlarging images, as it minimizes artifacts. |
| Nearest Neighbor | Preserves hard edges, suitable for illustrations with sharp lines. |
| Bilinear | A simpler method, good for quick resizing but may result in softer images. |
| Preserve Details (2.0) | Reduces noise and preserves details when enlarging, with an option to adjust noise reduction. |
4.6. Adjusting Resolution (DPI)
Question: How does adjusting the resolution affect photo size?
Answer: Decreasing the resolution lowers the number of pixels per inch, reducing file size, but be aware that this also reduces the level of detail in the image, so only decrease the resolution if the photo doesn’t need to be printed at a high quality. For web use, a resolution of 72 DPI is typically sufficient.
4.7. Saving Your Image in the Right Format
Question: Which file format is best for saving resized photos?
Answer: The choice of file format significantly impacts file size and image quality, and JPEG is ideal for photographs due to its efficient compression, which reduces file size while maintaining acceptable quality, while PNG is better for graphics with text or transparency.
To save your resized image:
- Go to
File > Save As. - Choose the desired file format from the dropdown menu.
- Adjust the quality settings (for JPEG) to balance file size and image quality.
- Click
Save.
5. Optimizing JPEG Quality Settings
Question: How do I optimize the JPEG quality settings in Photoshop?
Answer: When saving as JPEG, Photoshop provides a quality slider, and according to a study by the American Society for Media Photographers, a setting of 60-80 usually offers a good balance between file size and image quality, because experiment with different settings to find the lowest quality that still looks acceptable for your needs.
- High Quality (80-100): Larger file size, minimal compression artifacts.
- Medium Quality (50-79): Good balance between file size and quality.
- Low Quality (0-49): Smallest file size, but noticeable compression artifacts.
6. Using “Save for Web (Legacy)”
Question: What is the “Save for Web (Legacy)” option in Photoshop?
Answer: The “Save for Web (Legacy)” option is specifically designed to optimize images for online use, offering advanced control over file size, format, and quality settings, and it can be accessed via File > Export > Save for Web (Legacy).
6.1. Understanding the “Save for Web” Interface
Question: What are the key features of the “Save for Web” interface?
Answer: The “Save for Web” interface includes:
- Original Tab: Shows the original image.
- Optimized Tab: Displays the image with the current optimization settings.
- 2-Up/4-Up Tabs: Allows you to compare different optimization settings side-by-side.
- Preset Menu: Offers predefined settings for various file types and quality levels.
- Format Options: Lets you choose the file format (JPEG, PNG, GIF).
- Quality Settings: Adjusts the compression level for JPEG images.
- Image Size: Shows the dimensions of the optimized image.
- File Size Estimation: Estimates the file size based on the current settings.
6.2. Choosing the Right Settings in “Save for Web”
Question: How do I choose the best settings in the “Save for Web” dialog?
Answer: Follow these steps to choose the right settings:
- Select the Format: Choose JPEG for photographs or PNG-24 for graphics with transparency.
- Adjust Quality: For JPEG, adjust the quality slider until you achieve a good balance between file size and image quality.
- Optimize Colors: Reduce the number of colors if necessary, especially for GIF images.
- Check Image Size: Ensure the image size is appropriate for its intended use (e.g., website, email).
- Preview: Use the 2-Up or 4-Up tabs to compare different settings and choose the best option.
- Save: Click
Saveto save the optimized image.
7. Batch Processing Images to Reduce Size
Question: How can I reduce the size of multiple photos at once in Photoshop?
Answer: Batch processing allows you to apply the same resizing and optimization settings to multiple images, which can be a time-saver, and to do this in Photoshop, use the “Image Processor” script.
7.1. Using the Image Processor Script
Question: How do I use the Image Processor script in Photoshop?
Answer: The Image Processor script automates the process of resizing, converting, and saving multiple images, which can be accessed via File > Scripts > Image Processor.
Follow these steps:
- Select Images: Choose the folder containing the images you want to process.
- Choose Location: Select a destination folder to save the processed images.
- File Type: Choose the file type (JPEG, PSD, or TIFF) and adjust the quality settings for JPEG.
- Resize: Specify the width and height to resize the images.
- Preferences: Set additional preferences like converting the color profile or running an action.
- Run: Click
Runto start the batch processing.
7.2. Creating an Action for Resizing
Question: How do I create an action for resizing images in Photoshop?
Answer: Creating an action allows you to record a series of steps and apply them to multiple images, which is useful for complex resizing tasks.
- Open Actions Panel: Go to
Window > Actionsto open the Actions panel. - Create New Action: Click the “Create New Action” icon (a small plus sign in a square) and give your action a name.
- Start Recording: Click
Recordto start recording your steps. - Perform Resizing: Go to
Image > Image Sizeand adjust the pixel dimensions and resolution. - Save Image: Go to
File > Save Asand save the image in the desired format and quality. - Stop Recording: Click the “Stop Recording” icon in the Actions panel.
- Batch Process: Go to
File > Automate > Batch, choose your action, select the source and destination folders, and clickOKto process the images.
8. Alternative Methods and Tools for Resizing Images
Question: What are some alternative tools for resizing images besides Photoshop?
Answer: While Photoshop is a powerful tool, several other options are available for resizing images, each with its own advantages and disadvantages.
- Online Image Resizers: Websites like TinyPNG, CompressJPEG, and iLoveIMG offer quick and easy image resizing without needing software, and they are convenient for one-off tasks.
- Image Editors: Programs like GIMP, Affinity Photo, and Pixelmator Pro provide similar resizing capabilities to Photoshop and they are suitable for users who need more advanced editing features without the cost of Photoshop.
- Operating System Tools: Windows and macOS have built-in tools for basic image resizing, which are simple and convenient for quick resizing tasks.
9. Tips for Maintaining Image Quality When Decreasing Size
Question: How can I maintain the best possible image quality when decreasing photo size?
Answer: Maintaining image quality while reducing file size involves several best practices.
- Sharpening: After resizing, apply a slight sharpening filter to restore some of the lost detail, by using
Filter > Sharpen > Unsharp Maskand adjust the settings carefully. - Avoid Over-Compression: Be mindful of the compression settings, especially when saving as JPEG.
- Use Appropriate Resampling: Choose the right resampling method based on the image content and resizing task.
10. Common Mistakes to Avoid
Question: What are some common mistakes to avoid when decreasing photo size?
Answer: Avoiding these common mistakes can help ensure better results.
- Resizing Too Much: Drastically reducing the size can lead to significant loss of detail and quality.
- Not Making a Copy: Always work on a copy to avoid overwriting the original.
- Ignoring Image Format: Choosing the wrong file format can result in poor image quality or unnecessarily large file sizes.
- Skipping Basic Adjustments: Perform basic edits before resizing to achieve the best results.
11. Practical Applications: Use Cases
Question: In what situations is it essential to decrease photo size?
Answer: Decreasing photo size is essential in various situations.
- Websites: Optimizing images for faster loading times.
- Email: Reducing file sizes to meet attachment limits.
- Social Media: Preparing images for optimal display on social platforms.
- Printing: Adjusting resolution for appropriate print quality.
- Storage: Saving space on your devices or cloud storage.
12. The Future of Image Optimization
Question: What are the future trends in image optimization?
Answer: The field of image optimization is constantly evolving, with new technologies and techniques emerging regularly.
- AI-Powered Optimization: Artificial intelligence is being used to optimize images more efficiently, by automatically adjusting settings to achieve the best balance between file size and image quality.
- Adaptive Image Delivery: Delivering different image sizes and formats based on the user’s device and network conditions.
- WebP Format: A modern image format developed by Google that offers superior compression and image quality compared to JPEG, PNG, and GIF.
- AVIF Format: Another modern image format based on the AV1 video codec, offering even better compression than WebP.
13. Case Studies: Real-World Examples
Question: Can you provide some real-world examples of successful image size reduction?
Answer: Examining case studies can provide valuable insights into the benefits of effective image optimization, and a photographer who optimized their website images reduced the average page load time from 8 seconds to 3 seconds, resulting in a 40% increase in user engagement and an e-commerce store that optimized product images saw a 25% increase in conversion rates due to faster page loading.
14. Resources for Further Learning
Question: Where can I find more resources to learn about image resizing and optimization?
Answer: Numerous resources are available for further learning.
- Adobe Photoshop Documentation: Adobe’s official documentation provides comprehensive information about using Photoshop features.
- Online Tutorials: Websites like YouTube, Skillshare, and Udemy offer a wide range of tutorials on image resizing and optimization.
- Photography Blogs: Many photography blogs and websites cover topics related to image optimization and editing, and dfphoto.net is one of them.
15. Conclusion: Mastering Image Size Reduction in Photoshop
Decreasing the size of photos in Photoshop is a crucial skill for anyone working with images, whether you’re a photographer, designer, or website owner; By understanding the factors that affect image size, choosing the right settings, and following best practices, you can optimize your photos for various purposes without sacrificing quality, and remember to visit dfphoto.net for more tips and tutorials to enhance your photography skills.
Are you ready to take your photography to the next level? Explore dfphoto.net for in-depth tutorials, stunning photo galleries, and a vibrant community of photographers! Discover new techniques, find inspiration, and connect with fellow enthusiasts. Your journey to photographic excellence starts here! Address: 1600 St Michael’s Dr, Santa Fe, NM 87505, United States. Phone: +1 (505) 471-6001.
FAQ Section: Decreasing Photo Size in Photoshop
1. Why is my image still large after resizing in Photoshop?
Answer: Your image might still be large after resizing in Photoshop due to several factors such as the file format, quality settings, and unnecessary layers; Ensure you are saving the image in a compressed format like JPEG, adjust the quality settings to a lower level, and flatten the image to remove any unnecessary layers.
2. How does resolution affect the size of a photo in Photoshop?
Answer: Resolution, measured in DPI (dots per inch), affects the size of a photo in Photoshop by determining the number of pixels per inch; Higher resolution means more pixels per inch, resulting in a larger file size, and decreasing the resolution reduces the number of pixels and the file size, but also reduces the level of detail in the image.
3. What is the best file format for reducing photo size without losing quality?
Answer: The best file format for reducing photo size without losing too much quality is typically JPEG, as it uses compression to reduce file size while maintaining acceptable image quality, but for images with transparency or graphics with text, PNG may be a better option, but it generally results in larger file sizes compared to JPEG.
4. How do I use the “Save for Web (Legacy)” option in Photoshop to reduce file size?
Answer: To use the “Save for Web (Legacy)” option in Photoshop, go to File > Export > Save for Web (Legacy); In the dialog box, choose the desired file format (JPEG, PNG, GIF), adjust the quality settings, and optimize the colors if necessary; The interface allows you to preview the optimized image and estimate the file size before saving, allowing you to find the best balance between file size and image quality.
5. What is the difference between “Bicubic Sharper” and “Bicubic Smoother” when resizing images?
Answer: “Bicubic Sharper” and “Bicubic Smoother” are resampling methods used when resizing images in Photoshop; “Bicubic Sharper” is best for reducing image size while preserving detail and sharpness, while “Bicubic Smoother” is best for enlarging images, as it minimizes artifacts and produces smoother results.
6. How can I batch process multiple images to reduce their size in Photoshop?
Answer: To batch process multiple images in Photoshop, use the “Image Processor” script by going to File > Scripts > Image Processor; Select the folder containing the images you want to process, choose a destination folder, specify the file type and quality settings, and set the desired width and height to resize the images, or create an action to record a series of steps and apply them to multiple images via File > Automate > Batch.
7. Is it better to reduce pixel dimensions or resolution to decrease photo size?
Answer: Reducing both pixel dimensions and resolution can decrease photo size, but the best approach depends on the intended use of the image; Reducing pixel dimensions lowers the overall size of the image, making it suitable for web use or email, while reducing resolution lowers the number of pixels per inch, which is more relevant for printing; If the image is primarily for digital display, reducing pixel dimensions is usually more effective, but if it’s for printing, adjust the resolution accordingly.
8. How can I maintain image quality when reducing photo size in Photoshop?
Answer: To maintain image quality when reducing photo size in Photoshop, follow these tips:
- Work on a copy of the original image.
- Perform basic adjustments like cropping and color correction before resizing.
- Choose the appropriate resampling method (e.g., “Bicubic Sharper”).
- Avoid over-compression by using reasonable quality settings when saving as JPEG.
- Apply a slight sharpening filter after resizing to restore some of the lost detail.
9. What are some common mistakes to avoid when decreasing photo size in Photoshop?
Answer: Common mistakes to avoid when decreasing photo size in Photoshop include:
- Resizing too much, which can lead to significant loss of detail and quality.
- Not making a copy of the original image.
- Ignoring the image format and choosing the wrong one for the intended use.
- Skipping basic adjustments before resizing.
- Over-compressing the image, resulting in noticeable artifacts.
10. Can I use online image resizers instead of Photoshop to decrease photo size?
Answer: Yes, you can use online image resizers instead of Photoshop to decrease photo size; Websites like TinyPNG, CompressJPEG, and iLoveIMG offer quick and easy image resizing without needing software, and they are convenient for one-off tasks, but they may not offer the same level of control and advanced features as Photoshop.
 Tiger image for practice resizing in Photoshop
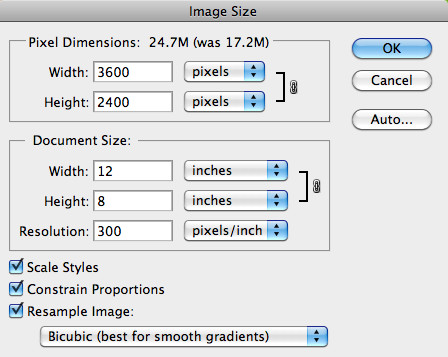 Image Size dialog box for resizing images in Photoshop