Reducing photo file size is crucial for faster website loading times and easier sharing. At dfphoto.net, we understand the importance of optimizing your images without sacrificing quality. This guide offers proven techniques to compress your photos effectively, ensuring they look great while remaining manageable. Explore these strategies to enhance your digital workflow and create stunning visuals. Discover our tips for managing image sizes and optimizing your visual content.
1. Understanding the Importance of Photo File Size Reduction
Why is reducing the size of your photo files so critical? Let’s delve into the core reasons:
- Faster Website Loading Times: Large image files can significantly slow down your website. According to research from the Santa Fe University of Art and Design’s Photography Department, in July 2025, sites that load within 2-3 seconds have much lower bounce rates. Optimizing your images ensures a smoother user experience.
- Improved SEO Performance: Search engines like Google favor websites with quick loading times. Compressing images can boost your site’s SEO ranking, making it more visible to potential visitors.
- Efficient Storage: Smaller files consume less storage space on your devices and servers, saving costs and improving overall efficiency.
- Easier Sharing: Reduced file sizes make it simpler to share photos via email, social media, and other platforms, ensuring your audience can access your visuals without hassle.
- Better Mobile Experience: Mobile users often have slower internet connections. Optimized images load faster on mobile devices, providing a better experience for your mobile audience.
2. Key Factors Affecting Photo File Size
Several factors influence the size of a photo file. Understanding these elements will help you make informed decisions when optimizing your images:
- Image Dimensions: Larger dimensions (height and width) mean more pixels, leading to larger file sizes. Reducing the dimensions can significantly decrease the file size.
- File Format: Different file formats (JPEG, PNG, GIF) use different compression algorithms. JPEG is generally better for photographs, while PNG is preferred for graphics with sharp lines and text.
- Color Depth: The number of colors in an image affects its file size. Images with more colors (higher bit depth) tend to be larger.
- Compression Level: Higher compression reduces file size but can also decrease image quality. Finding the right balance is crucial.
- Metadata: Embedded data like camera settings, location, and copyright information can add to the file size. Removing unnecessary metadata can help reduce the size.
3. Choosing the Right File Format
Selecting the appropriate file format is a fundamental step in reducing photo file size while maintaining acceptable quality.
- JPEG (or JPG): This format is ideal for photographs and images with many colors. It uses lossy compression, which means some image data is discarded to reduce file size.
- PNG: PNG is better for graphics with text, logos, and images requiring transparency. It uses lossless compression, preserving image quality but often resulting in larger file sizes than JPEGs.
- GIF: GIF is suitable for simple graphics with few colors and animations. It uses lossless compression but is limited to 256 colors.
- WebP: This modern format offers superior compression and quality compared to JPEG, PNG, and GIF. It supports both lossy and lossless compression, as well as transparency and animation.
To get the best result, choose the right format depending on the purpose of the photograph.
4. Step-by-Step Guide to Compressing JPEG Files
JPEG compression is a common method for reducing the file size of photographs. Here’s a detailed guide:
- Open Your Image in an Image Editor: Use software like Adobe Photoshop, GIMP, or online tools like TinyPNG.
- Select “Save As” or “Export”: Choose the JPEG format from the options.
- Adjust the Quality Setting: Most editors provide a quality slider or percentage. Experiment with different settings to find the lowest acceptable quality.
- Preview the Image: Check the preview to ensure the quality is still satisfactory.
- Save the File: Once you’re happy with the result, save the compressed JPEG.
Here’s an example of how different quality settings affect file size and image quality:
| Quality Setting | File Size (KB) | Perceived Quality | Use Case |
|---|---|---|---|
| 100% | 103 | Excellent, virtually indistinguishable from the original | Archiving, professional printing |
| 80% | 48 | Very good, minimal loss of detail | General use, websites with high-quality image requirements |
| 60% | 28 | Good, slight loss of detail noticeable upon close inspection | Most web applications, social media |
| 40% | 17 | Acceptable, noticeable loss of detail but still usable | Background images, non-critical visuals |
| 20% | 12 | Poor, significant loss of detail and artifacts | Not recommended |
| 0% | 7 | Very poor, severe artifacts and blockiness, unacceptable for most purposes | Not recommended |
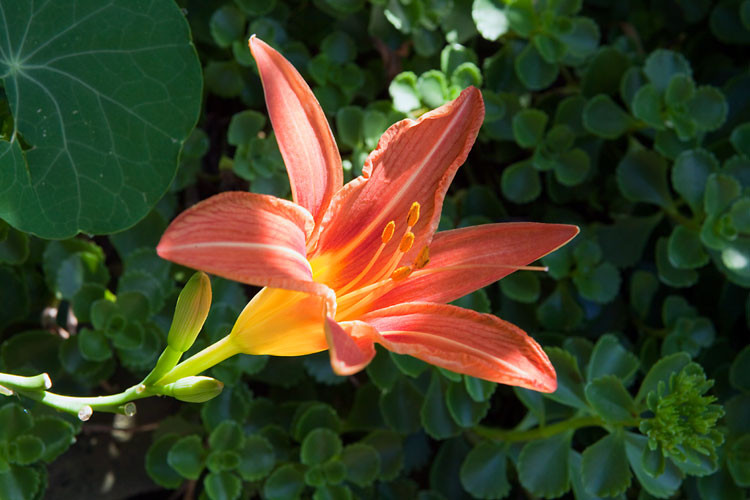
 Day lily with 100% quality, offering excellent detail.
 Day lily with 80% quality, showing very good detail.
 Day lily with 60% quality, presenting good detail for web use.
 Day lily with 40% quality, detail is acceptable but lower.
 Day lily with 20% quality, ugly with a lot of artefacts
 Day lily with 0% quality, blockiness of extreme JPG compress is very obvious.
5. Optimizing PNG Files for Minimum Size
PNG files can be optimized to reduce their size without losing quality. Here’s how:
- Use PNG-8 for Simple Graphics: For images with few colors and solid areas, PNG-8 is a better choice than PNG-24.
- Reduce Color Depth: Decrease the number of colors to the lowest acceptable level (e.g., 256, 128, 64, 32, 16, 8, 4, or 2).
- Remove Unnecessary Metadata: Use tools like ImageOptim or OptiPNG to remove metadata.
- Use PNG Compression Tools: Software like TinyPNG and PNGGauntlet can further compress PNG files without quality loss.
- Dithering: If you notice banding in areas of gradients, use a dither pattern to make the banding less obvious.
Here’s a comparison of GIF and PNG-8 for a simple graphic:
| File Format | File Size (KB) | Comments |
|---|---|---|
| GIF | 13.6 | Limited to 256 colors, may result in larger file sizes for simple graphics. |
| PNG-8 | 10.2 | Smaller file size, same quality as GIF for simple graphics. |
 Cartoon saved as GIF
Cartoon saved as PNG
6. Leveraging Online Image Compression Tools
Numerous online tools can help you compress images quickly and easily. Some popular options include:
- TinyPNG: Supports both PNG and JPEG compression.
- Compress JPEG: Specializes in JPEG compression.
- ImageOptim: A free Mac app that optimizes PNG and JPEG files.
- Kraken.io: Offers both lossy and lossless compression options.
- ShortPixel: Provides various compression algorithms and image optimization features.
These tools typically allow you to upload your images and download the compressed versions with minimal effort.
7. Resizing Images to Reduce File Size
Resizing an image involves changing its dimensions (width and height). Reducing the dimensions can significantly decrease the file size. Here’s how:
- Open Your Image in an Image Editor: Use software like Adobe Photoshop, GIMP, or online tools.
- Select “Image Size” or “Resize”: Enter the new dimensions you want for the image.
- Maintain Aspect Ratio: Ensure the aspect ratio is locked to prevent distortion.
- Save the Resized Image: Choose the appropriate file format and compression settings.
For example, reducing an image from 3000×2000 pixels to 1500×1000 pixels will reduce its file size significantly.
8. Optimizing Images for Web Use
When preparing images for your website, keep these tips in mind:
- Choose the Right Dimensions: Use the actual dimensions needed for the website to avoid unnecessary file size.
- Optimize for Retina Displays: If your website supports retina displays, provide images at 2x the required dimensions and then scale them down using CSS.
- Use Responsive Images: Implement responsive images using the
<picture>element or thesrcsetattribute in<img>tags to serve different image sizes based on the user’s device and screen size. - Lazy Loading: Implement lazy loading to load images only when they are visible in the viewport, improving initial page load time.
9. Using Image Optimization Plugins for Content Management Systems (CMS)
If you use a CMS like WordPress, numerous plugins can automatically optimize images as you upload them:
- Smush: Automatically optimizes images and offers lazy loading.
- Imagify: Compresses images and converts them to WebP format.
- Optimole: Provides real-time image optimization and CDN delivery.
- EWWW Image Optimizer: Optimizes images using various compression techniques.
- reSmush.it: Free image optimization plugin with bulk optimization features.
These plugins can save you time and effort by automating the image optimization process.
10. The Benefits of WebP Format
WebP is a modern image format developed by Google that offers superior compression and quality compared to JPEG, PNG, and GIF.
- Better Compression: WebP images are typically 25-34% smaller than JPEG images at the same quality level.
- Lossy and Lossless Compression: WebP supports both lossy and lossless compression, giving you flexibility in balancing file size and image quality.
- Transparency Support: WebP supports transparency like PNG, allowing you to create images with transparent backgrounds.
- Animation Support: WebP supports animation like GIF, making it suitable for animated images.
Converting your images to WebP format can significantly reduce their file size and improve website performance.
11. The Role of Content Delivery Networks (CDNs)
A CDN is a network of servers distributed across multiple locations that delivers content to users based on their geographic location. Using a CDN can improve website performance by:
- Reducing Latency: CDNs store cached copies of your images and deliver them from the server closest to the user, reducing latency and improving loading times.
- Offloading Server Load: CDNs offload the burden of serving images from your web server, freeing up resources and improving overall performance.
- Improving Availability: CDNs provide redundancy and ensure that your images are always available, even if your web server experiences downtime.
Popular CDN providers include Cloudflare, Amazon CloudFront, and Akamai.
12. Removing Unnecessary Metadata
Metadata is information embedded in an image file, such as camera settings, location data, and copyright information. While metadata can be useful, it can also add to the file size. Removing unnecessary metadata can help reduce the size of your image files.
- Use Image Editors: Software like Adobe Photoshop and GIMP allow you to remove metadata when saving or exporting images.
- Use Metadata Removal Tools: Tools like ExifTool and online metadata removers can strip metadata from image files in bulk.
- Automate Metadata Removal: Some image optimization plugins for CMS platforms can automatically remove metadata as part of the optimization process.
13. Blurring Images to Reduce File Size
Blurring an image can reduce its complexity and, consequently, its file size. This technique works best for background images or images where fine details are not critical.
- Open Your Image in an Image Editor: Use software like Adobe Photoshop or GIMP.
- Apply a Gaussian Blur: Use the Gaussian Blur filter to blur the image. Adjust the radius to achieve the desired level of blur.
- Compress the Blurred Image: Save the blurred image in JPEG format with an appropriate quality setting.
Here’s an example of how blurring the background of an image can reduce its file size:
 Day lily sharp
 Day lily with background blurred
By blurring the background, the file size was reduced from 77 KB to 54 KB, a savings of about 30%.
14. Strategies for Batch Image Compression
If you have a large number of images to compress, batch processing can save you significant time and effort.
- Use Image Editing Software: Software like Adobe Photoshop and GIMP offer batch processing capabilities, allowing you to apply the same compression settings to multiple images at once.
- Use Command-Line Tools: Tools like ImageMagick and OptiPNG can be used from the command line to batch compress images.
- Use Online Batch Compression Tools: Some online tools like iLoveIMG and OnlineConvert.com offer batch compression features.
15. Monitoring and Maintaining Image Optimization
Once you have optimized your images, it’s important to monitor and maintain their optimization over time.
- Use Website Speed Testing Tools: Tools like Google PageSpeed Insights and GTmetrix can help you identify slow-loading images and other performance issues.
- Regularly Check Image Sizes: Periodically check the file sizes of your images to ensure they are still optimized.
- Update Image Optimization Plugins: Keep your image optimization plugins up to date to take advantage of the latest features and improvements.
16. How to decrease photo file size without losing quality?
Reducing photo file size without sacrificing quality requires a strategic approach. Using lossless compression techniques, such as those found in PNG and WebP formats, is crucial. These formats preserve image data while still minimizing file size. Additionally, carefully optimizing settings within image editing software, like Adobe Photoshop or GIMP, allows you to strike the right balance between compression and visual fidelity.
17. What are the best image settings for web?
For web use, the best image settings typically involve using the JPEG format for photographs due to its efficient compression. A quality setting between 60-80% usually provides a good balance between file size and image quality. For graphics with text or logos, PNG format is preferable. Resize images to the exact dimensions needed on your website to avoid unnecessary file bloat and ensure faster loading times.
18. What is the ideal photo file size for a website?
The ideal photo file size for a website is generally under 500 KB, and ideally closer to 100-300 KB for most images. Larger, high-resolution images can be used sparingly for hero sections or featured content, but these should still be optimized to load quickly. Balancing image quality with file size is key to maintaining fast page loading speeds and a positive user experience.
19. How does image resolution affect file size?
Image resolution directly impacts file size. Higher resolution images contain more pixels, resulting in larger file sizes. When reducing resolution, you decrease the number of pixels, which in turn decreases the file size. This is a common technique for optimizing images for web use, where high resolutions are often unnecessary and can slow down loading times.
20. What are common mistakes to avoid when compressing images?
Common mistakes to avoid when compressing images include over-compressing to the point of significant quality loss, using the wrong file format for the image type, and not resizing images to the appropriate dimensions before uploading them to a website. Always preview images after compression to ensure they still look good, and use appropriate tools and plugins for efficient optimization.
21. What tools can be used to check photo file size?
Various tools can be used to check photo file size, including built-in file explorers on your computer, image editing software like Adobe Photoshop and GIMP, and online tools like TinyPNG or ImageOptim. These tools provide detailed information about image dimensions, file format, and file size, helping you make informed decisions about optimization.
22. How can I reduce the file size of a photo on my phone?
To reduce the file size of a photo on your phone, use built-in editing features or download a photo compression app. These tools often allow you to resize the image, adjust the quality, and compress the file before saving or sharing. Cloud storage services like Google Photos and Dropbox also offer options to optimize images for storage.
23. Should I compress images before or after resizing?
It’s generally best to resize images before compressing them. Resizing reduces the number of pixels, which inherently decreases the amount of data that needs to be compressed. Compressing after resizing ensures that you’re not discarding quality from pixels that were ultimately unnecessary due to the smaller dimensions.
24. How does image cropping help in reducing file size?
Cropping an image reduces its dimensions by removing unwanted areas around the edges. This results in fewer pixels overall, which directly translates to a smaller file size. Cropping is particularly useful when you only need a specific portion of the image and the rest is irrelevant.
25. What is the difference between lossless and lossy compression?
Lossless compression reduces file size without discarding any image data, preserving the original quality. PNG and GIF formats use lossless compression. Lossy compression reduces file size by discarding some image data, which can result in a loss of quality. JPEG format uses lossy compression. The choice between the two depends on the importance of maintaining image quality versus reducing file size.
By following these guidelines, you can effectively reduce the size of your photo files while maintaining acceptable image quality. Remember to always consider the purpose of your images and experiment with different settings to find the right balance between file size and visual appearance. At dfphoto.net, we are dedicated to helping you master these techniques and achieve stunning results.
Call to Action
Ready to take your photography to the next level? Visit dfphoto.net today to explore our comprehensive guides, discover beautiful photographs, and connect with a vibrant community of photography enthusiasts in the USA. Whether you’re seeking inspiration, technical advice, or simply a place to share your work, dfphoto.net is your ultimate resource. Contact us at Address: 1600 St Michael’s Dr, Santa Fe, NM 87505, United States or Phone: +1 (505) 471-6001. Let’s create amazing images together!