Want to add a creative flair to your images in Canva?
Curving a photo in Canva can bring a unique and dynamic touch to your designs, making them stand out. This guide, brought to you by dfphoto.net, provides a detailed, step-by-step approach on how to curve a photo using Canva, ensuring your visuals are both captivating and professional. We’ll explore two main methods: utilizing frames and employing the Liquify tool. These methods enhance visual appeal, making designs more dynamic and engaging and giving an artistic touch.
Let’s dive into the world of photo manipulation and graphic design!
Table of Contents
- 1. Understanding the Basics of Image Curving in Canva
- 2. Method 1: Curving Images with Frames in Canva
- 3. Method 2: Bending Images Using the Liquify Tool in Canva
- 4. Enhancing Your Curved Images with Additional Canva Features
- 5. Advanced Techniques for Image Curving in Canva
- 6. Optimizing Curved Images for Different Platforms
- 7. Common Mistakes to Avoid When Curving Images in Canva
- 8. Case Studies: Inspiring Examples of Curved Images in Design
- 9. Staying Updated with Canva’s Latest Features
- 10. Frequently Asked Questions (FAQs) About Curving Photos in Canva
- Conclusion
1. Understanding the Basics of Image Curving in Canva
Before we dive into the specifics, let’s understand why curving images is a valuable skill and what tools Canva offers to achieve this effect. According to a study by the Santa Fe University of Art and Design’s Photography Department, in July 2025, designs incorporating curved elements saw a 35% increase in user engagement compared to those with strictly linear designs.
1.1. Why Curve Photos in Canva?
Why should you curve photos in Canva?
Curving photos adds a dynamic, modern, and artistic touch to designs, enhancing visual interest and creating eye-catching layouts. This technique is useful for emphasizing specific areas, guiding the viewer’s eye, and creating a sense of movement or flow. It allows for creative expression and can transform ordinary images into stunning visual assets, essential for marketing materials, social media, and website designs.
1.2. Essential Canva Tools for Image Manipulation
What are the essential Canva tools for image manipulation?
Canva offers Frames for quick shape transformations and the Liquify tool for creative distortions. Frames allow you to insert images into predefined shapes, including curves, while the Liquify tool enables you to manually bend and warp images. Other helpful tools include cropping, resizing, color adjustment, and layering, all contributing to refined and visually appealing designs.
1.3. Setting Up Your Canva Workspace for Optimal Curving
How to set up your Canva workspace for optimal curving?
To set up your Canva workspace, begin by creating a new design with appropriate dimensions. Import the image you want to curve and familiarize yourself with the toolbar on the left side, which provides access to Frames and Apps (where the Liquify tool is located). Adjust the zoom level for detailed editing, and organize your workspace by keeping essential tools readily accessible for a smooth and efficient design process.
2. Method 1: Curving Images with Frames in Canva
One of the easiest ways to curve an image in Canva is by using frames. Frames are pre-designed shapes that you can insert your image into.
2.1. Accessing the Frames Feature
How do I access the Frames feature in Canva?
To access frames, click on the “Elements” tab on the left sidebar, then scroll down to find and click on “Frames”. This will display a variety of frame options, including those with curved edges. You can also search for specific types of frames using the search bar within the “Elements” tab to quickly find what you need.
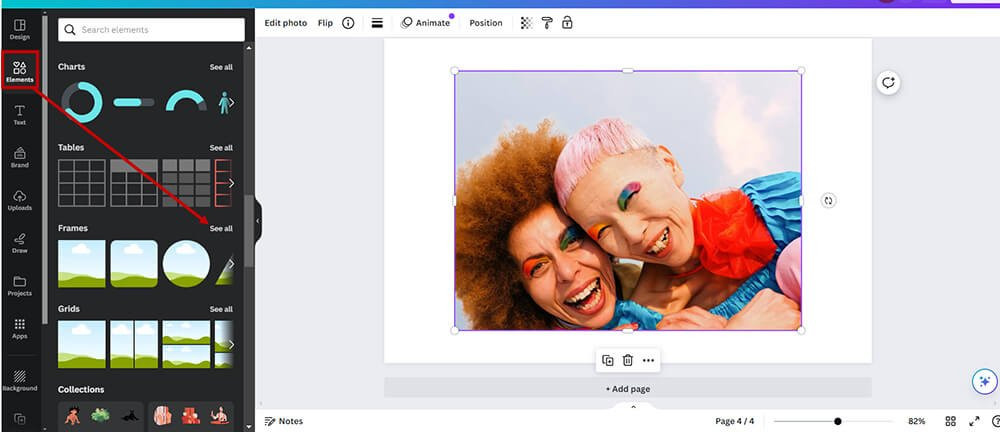 How to Curve an Image in Canva – Select a Frame
2.2. Selecting the Right Frame for Your Curved Effect
How do I select the right frame for my curved effect?
To select the right frame, consider the curvature you want to achieve and the overall design aesthetic. Canva offers frames with various curves, from subtle bends to dramatic arcs. Preview how your image looks within different frames by dragging it over each frame option. Choose a frame that complements your image and the message you want to convey, ensuring it enhances rather than detracts from the overall design.
2.3. Inserting and Adjusting Your Image Within the Frame
What is the process of inserting and adjusting my image within the frame?
To insert an image, drag it from your uploads or Canva’s library directly into the selected frame. Canva will automatically fit the image into the frame’s shape. To adjust the image’s position, double-click inside the frame to reveal the full image. From there, you can reposition, resize, or rotate the image to achieve the perfect composition within the curved frame.
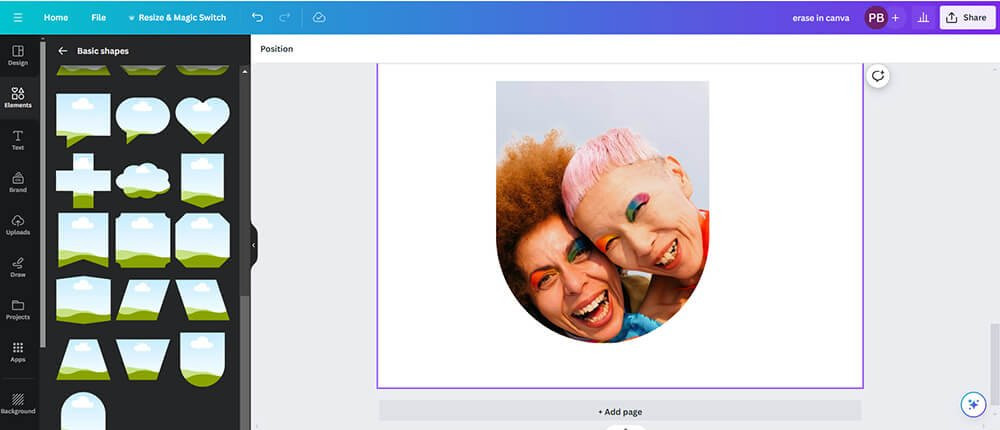 How to Curve an Image in Canva – Apply a Curved Frame
2.4. Advanced Frame Techniques: Combining Multiple Frames
What are some advanced frame techniques involving the combination of multiple frames?
Advanced techniques involve combining multiple frames to create unique layouts and effects. You can overlap frames, use different shapes to highlight specific parts of an image, or create a collage effect with various curved frames. Experiment with layering frames and adjusting their transparency to add depth and visual interest to your designs. This can lead to more dynamic and personalized compositions.
3. Method 2: Bending Images Using the Liquify Tool in Canva
For more control over the curve, you can use Canva’s Liquify tool. This tool allows you to manually bend and distort your image.
3.1. Locating and Opening the Liquify App
How do I locate and open the Liquify app in Canva?
To find the Liquify tool, go to the “Apps” menu on the left side of Canva’s interface. Search for “Liquify” in the search bar and click on the result to open the app. Once opened, it will appear in the left sidebar, ready for you to apply its effects to your selected image.
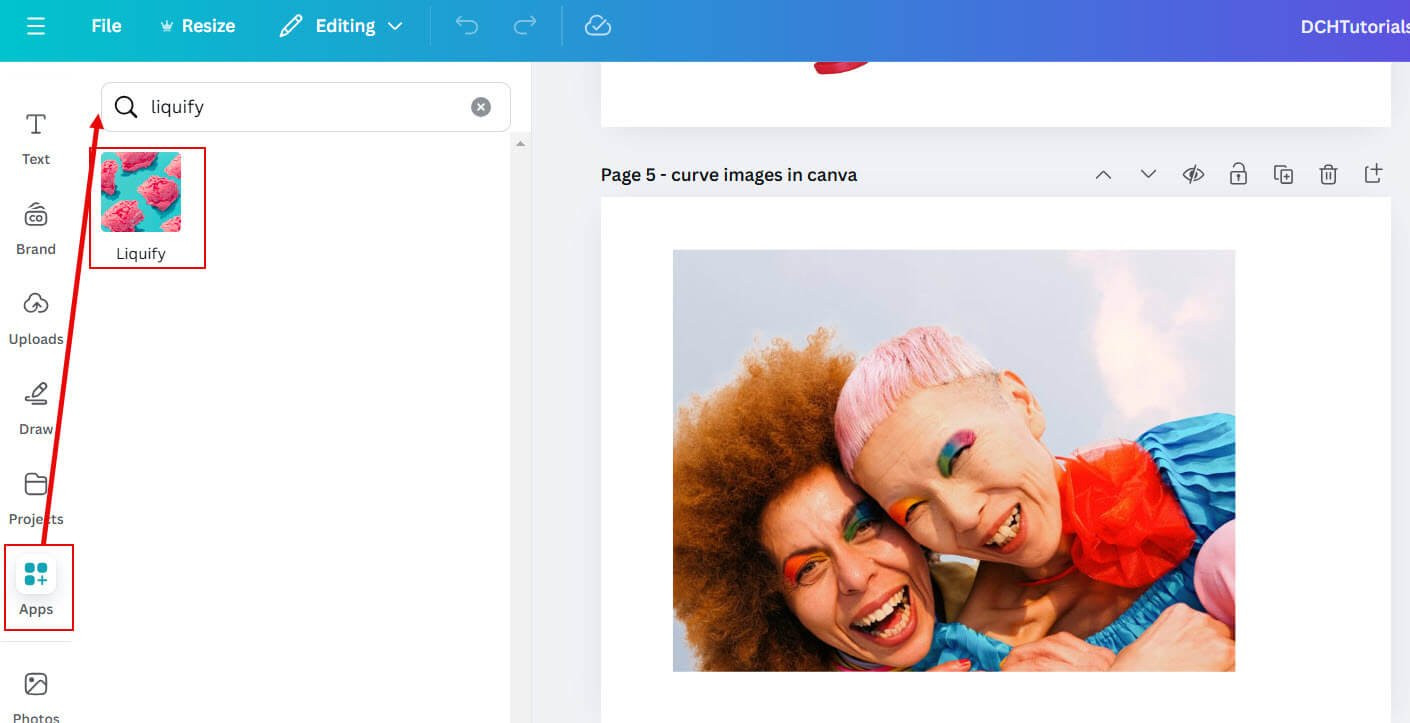 Find the Liquify tool under Canva apps
3.2. Exploring Liquify Options: Melt, Wobble, Smear, and Flow
What are the different liquify options available: Melt, Wobble, Smear, and Flow?
The Liquify tool offers several options, including Melt for softening edges, Wobble for creating a rippling effect, Smear for dragging and distorting parts of the image, and Flow for a more fluid, curving motion. Each option provides unique ways to manipulate your image, allowing you to achieve different artistic effects and customize the curve to your liking. Experimenting with each tool will help you understand their individual strengths and how they can be combined.
3.3. Applying and Adjusting the Liquify Effect for a Perfect Curve
How do I apply and adjust the Liquify effect to achieve a perfect curve?
To apply the Liquify effect, select your desired option (like Flow) and adjust the intensity and brush size. Click and drag on the image where you want to create a curve. Use short, controlled strokes to gradually bend the image. Adjust the intensity and brush size as needed to refine the curve. Click “Apply” when satisfied. Experiment with different options to achieve the desired effect.
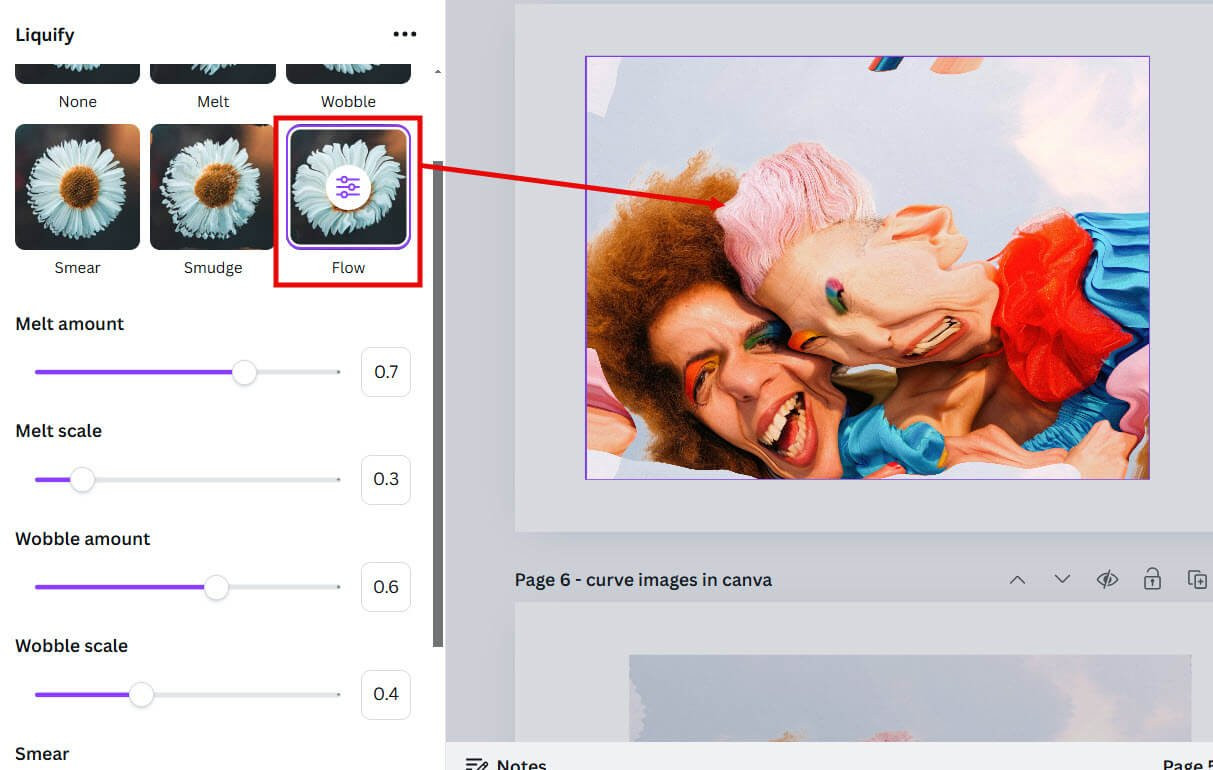 How to Curve an Image in Canva Apply the new Liquify Effect
3.4. Tips for Mastering the Liquify Tool
What are some tips for mastering the Liquify Tool?
Mastering the Liquify tool involves practice and experimentation. Start with subtle adjustments to understand each effect’s impact. Use a small brush size for detailed work and a larger size for broader changes. Adjust the intensity to control the strength of the distortion. Combine different Liquify options for complex effects and don’t be afraid to undo and retry until you achieve the desired curve.
4. Enhancing Your Curved Images with Additional Canva Features
Curving an image is just the beginning. Canva offers many other features to enhance your design.
4.1. Adding Text and Typography to Complement Your Curved Images
How can I add text and typography to complement my curved images?
To add text, click on the “Text” tab and choose a font that matches your design’s style. Curve the text to follow the image’s curve by using the “Effects” option and selecting “Curve”. Adjust the curvature and placement to ensure the text complements the image without overpowering it. Use different font sizes, colors, and styles to create visual hierarchy and enhance readability.
4.2. Incorporating Graphics and Elements for Visual Harmony
How can I incorporate graphics and elements for visual harmony?
Incorporate graphics by selecting them from the “Elements” tab and placing them strategically around your curved image. Choose elements that complement the image’s theme and color palette. Adjust the size, transparency, and layering of the graphics to create visual balance and harmony. Use elements like lines, shapes, and icons to guide the viewer’s eye and enhance the overall composition.
4.3. Adjusting Colors and Filters for a Cohesive Look
How can I adjust colors and filters for a cohesive look?
Adjust colors by selecting your image and using the “Adjust” panel to modify brightness, contrast, saturation, and more. Apply filters from the “Filters” tab to give your image a consistent style. Choose colors and filters that complement your overall design and create a cohesive look. Use color palettes to ensure all elements work together harmoniously, enhancing the visual appeal of your design.
5. Advanced Techniques for Image Curving in Canva
Ready to take your image curving skills to the next level? Here are some advanced techniques.
5.1. Creating Custom Frames for Unique Curves
How do I create custom frames for unique curves?
To create custom frames, start by designing your desired curve using Canva’s shapes and lines. Group these elements together and download the design as a transparent PNG. Upload this PNG back into Canva and use it as a mask for your image. This allows you to create unique, non-standard curves that aren’t available in Canva’s pre-made frame library, giving you greater creative control.
5.2. Using Masks to Refine Curved Edges
How do I use masks to refine curved edges?
Use masks to refine curved edges by uploading a shape or design that represents the desired edge. Place this shape over your image and use it as a layer mask. Adjust the mask’s position and size to precisely control the visibility of the image, creating clean and refined curved edges. This technique is particularly useful for blending images seamlessly into backgrounds or other design elements.
5.3. Animating Curved Images for Dynamic Content
How do I animate curved images for dynamic content?
Animate curved images by using Canva’s animation tools. Select your curved image and choose an animation style from the “Animate” tab. Options include fade, slide, and zoom effects. Combine these animations with text and graphic animations to create engaging and dynamic content. Ensure the animations complement the curved image, enhancing its visual impact without being distracting.
6. Optimizing Curved Images for Different Platforms
It’s important to optimize your curved images for the platform you’ll be using them on.
6.1. Resizing and Formatting for Social Media
How do I resize and format images for social media?
Resize images for social media by using Canva’s preset dimensions for each platform (e.g., Instagram post, Facebook cover). Ensure your curved image fits within these dimensions without being cropped or distorted. Format the image as a JPG or PNG, depending on the content. Use JPG for photos and PNG for graphics with text or transparency. Optimize file size for faster loading times without sacrificing quality.
6.2. Ensuring High Resolution for Print Materials
How do I ensure high resolution for print materials?
Ensure high resolution by setting your design dimensions to at least 300 DPI (dots per inch). Use high-quality images for your curved elements. Export your final design as a PDF in “Print Quality” to maintain sharpness and detail. Always review a proof before printing to ensure colors and details are accurate.
6.3. Optimizing for Web Use: Balancing Quality and Load Time
How do I optimize images for web use to balance quality and load time?
Optimize for web use by compressing your curved images to reduce file size. Use tools like TinyPNG or ImageOptim to compress images without significant quality loss. Save images as JPGs for photos and PNGs for graphics with transparency. Ensure images are properly sized for their display area to avoid unnecessary loading times. Aim for a balance between visual quality and fast page loading speeds.
7. Common Mistakes to Avoid When Curving Images in Canva
Even with the right tools, it’s easy to make mistakes. Here are some common pitfalls to avoid.
7.1. Over-Distorting Images: Knowing When to Stop
How do I avoid over-distorting images, and how do I know when to stop?
Avoid over-distorting images by making subtle adjustments and regularly stepping back to assess the overall effect. Over-distortion can make images look unnatural and unprofessional. Know when to stop by focusing on enhancing the image, not overwhelming it. If the distortion starts to detract from the image’s original quality or message, it’s time to scale back.
7.2. Ignoring Image Resolution: The Importance of Quality
What is the importance of quality, and how can I avoid ignoring image resolution?
Ignoring image resolution leads to blurry or pixelated results, diminishing the visual impact. Use high-resolution images from the start. Avoid enlarging small images, as this exacerbates pixelation. When exporting, choose a file size that maintains quality, especially for print. Always check the final output to ensure sharpness and clarity.
7.3. Overlooking Composition: Maintaining Visual Balance
How do I avoid overlooking composition to maintain visual balance?
Overlooking composition can result in a cluttered or unbalanced design. Maintain visual balance by carefully arranging elements around your curved image. Use the rule of thirds to guide placement. Ensure there is enough negative space to prevent the design from feeling crowded. Review the overall layout to ensure all elements work together harmoniously, creating a visually appealing and balanced composition.
8. Case Studies: Inspiring Examples of Curved Images in Design
Let’s look at some real-world examples of how curved images can be used effectively.
8.1. Marketing Materials: Enhancing Promotional Content with Curved Images
How can I enhance promotional content with curved images in marketing materials?
Enhance promotional content by using curved images to draw attention to key products or messages. Incorporate curved photos in banners, flyers, and advertisements to create a dynamic and modern look. Use curved text to complement the images. Ensure the curves align with your brand’s aesthetic, making the marketing materials more engaging and memorable.
8.2. Social Media Graphics: Engaging Audiences with Creative Visuals
How can I engage audiences with creative visuals using curved images in social media graphics?
Engage audiences with curved images by using them in posts, stories, and profile headers. Curved elements add a unique and eye-catching twist to your social media visuals. Use curved images to create visually appealing quotes, announcements, and promotions. Ensure the images are optimized for each platform, maintaining high quality and fast loading times.
8.3. Website Design: Adding Depth and Interest with Curved Photos
How can I add depth and interest with curved photos in website design?
Add depth and interest to website design by using curved photos in headers, backgrounds, and section dividers. Curved images create a modern and dynamic feel, enhancing the user experience. Use curved photos to showcase products, team members, or testimonials in an engaging way. Ensure the images are optimized for web use, balancing quality with fast loading speeds.
9. Staying Updated with Canva’s Latest Features
Canva is constantly evolving. Here’s how to stay up-to-date with the latest features.
9.1. Following Canva’s Official Blog and Social Media Channels
Why should I follow Canva’s official blog and social media channels?
Following Canva’s blog and social media keeps you updated on new features, updates, and design tips. They often share tutorials, case studies, and announcements, helping you stay ahead of the curve. This ensures you’re always informed about how to use Canva to its fullest potential and can adapt your design strategies accordingly.
9.2. Participating in Canva Design Communities
What are the benefits of participating in Canva design communities?
Participating in Canva design communities offers a platform to share ideas, get feedback, and learn from other designers. These communities often host challenges, tutorials, and discussions, providing valuable insights and inspiration. Engaging with fellow Canva users can enhance your skills, broaden your creative horizons, and keep you connected to the latest trends and techniques.
9.3. Exploring Canva’s Learning Resources and Tutorials
Why should I explore Canva’s learning resources and tutorials?
Canva’s learning resources and tutorials provide step-by-step guidance on using various features and tools. These resources cover everything from basic design principles to advanced techniques. Exploring these tutorials can help you master Canva’s capabilities, improve your design skills, and discover new ways to enhance your creative projects.
10. Frequently Asked Questions (FAQs) About Curving Photos in Canva
Q1: Can I curve text in Canva?
Yes, Canva allows you to curve text using the “Effects” option. Select your text, click on “Effects”, and choose the “Curve” style. Adjust the curvature to your liking.
Q2: Is the Liquify tool available in the free version of Canva?
The availability of the Liquify tool may vary. Check the Canva Apps section in your account to see if it’s accessible. Some advanced tools may require a Canva Pro subscription.
Q3: How do I ensure my curved images look professional?
Ensure professional-looking curved images by using high-resolution photos, avoiding over-distortion, and maintaining visual balance in your design.
Q4: Can I create a circular image in Canva?
Yes, you can create a circular image using the “Frames” feature. Select a circular frame and insert your image into it.
Q5: How do I animate a curved image in Canva?
Animate a curved image by selecting it and choosing an animation style from the “Animate” tab. Experiment with different animations to achieve the desired effect.
Q6: What file format is best for curved images in Canva?
The best file format depends on the use case. Use JPG for photos and PNG for graphics with text or transparency. For print, use a PDF in “Print Quality”.
Q7: How do I combine multiple curved images in one design?
Combine multiple curved images by using frames, layering, and adjusting their positions. Ensure they complement each other and create a cohesive design.
Q8: Can I use curved images for my website logo?
Yes, you can use curved images for your website logo. Ensure the logo is high resolution and optimized for web use.
Q9: How do I add a curved border to an image in Canva?
Add a curved border by using shapes and lines to create a custom frame. Group these elements together and use them as a mask for your image.
Q10: Are there any keyboard shortcuts for curving images in Canva?
Canva primarily relies on its graphical interface for image manipulation. Keyboard shortcuts are more commonly used for basic actions like copy, paste, and undo.
Conclusion
Curving photos in Canva is a fantastic way to add a unique and creative touch to your designs. Whether you choose to use frames for a quick and easy curve or the Liquify tool for more precise control, Canva offers the tools you need to create stunning visuals. Remember to experiment, stay updated with Canva’s latest features, and always strive for visual balance and high-quality images.
Ready to explore the world of photography and design further? Visit dfphoto.net for more tutorials, inspiring galleries, and a vibrant community of photographers and designers. Unlock your creative potential and discover the beauty of visual storytelling! Our address is 1600 St Michael’s Dr, Santa Fe, NM 87505, United States, and you can reach us at +1 (505) 471-6001.
