Need to trim the edges of a picture, focus on a key part, or get the perfect size for printing? Windows offers several built-in tools to easily crop your photos. You don’t need to download any extra software to get the job done. Windows 10 and Windows 11 include handy applications like Photos, Paint 3D, Snip & Sketch, and even the classic Paint, all equipped with cropping features.
While each of these tools lets you quickly crop images, they have slightly different options and workflows. This guide will walk you through four straightforward methods to crop photos on Windows using only the tools already on your system.
Method 1: Cropping Photos Using the Windows Photos App
The Photos app is a default image viewer and editor in Windows, and it includes a simple yet effective cropping tool. Here’s how to crop a photo using the Photos app:
- Open Start Menu.
- Type Photos in the search bar and select Photos to launch the app.
- Find and open the image you want to crop within the Photos app. Alternatively, you can right-click on the image file in File Explorer, choose Open with, and then select Photos.
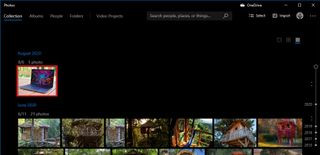 Open picture in Photos app Windows
- In the Photos app, click the Crop icon located in the top-center toolbar.
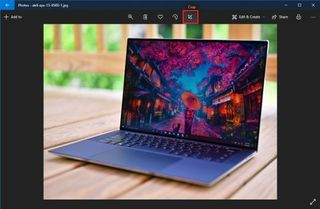 Crop tool in Photos app Windows
- Adjust the crop area by dragging the pins at the corners of the image. This will define the new boundaries of your photo.
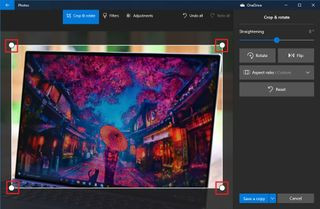 Adjust crop area Photos app Windows
- Reposition the image within the crop frame by clicking and dragging the photo itself. This helps you center the important part of the image in the cropped area.
- (Optional) Select an Aspect Ratio: In the “Crop & rotate” panel on the right, you can use the Aspect ratio dropdown menu. This allows you to crop your image to predefined ratios like:
- Square (1:1)
- 3:2 (common for prints)
- 4:3 (older screen ratio)
- 10:8
- Portrait (vertical orientation)
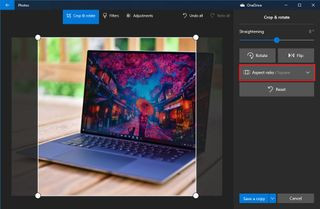 Aspect ratio crop Photos app Windows
- (Optional) Straighten the Image: Use the Straightening slider in the “Crop & rotate” panel to slightly rotate the image and correct any crooked horizons.
- (Optional) Rotate the Image: The Rotate button in the “Crop & rotate” panel lets you rotate the image in 90-degree increments if needed.
- Click Save a copy at the top right to save your cropped image as a new file, leaving the original untouched.
Once you’ve completed these steps, the Photos app will save a cropped version of your image based on your selected area and settings.
Method 2: Cropping Photos Using Paint 3D in Windows
Paint 3D is a more feature-rich image editing tool that comes with Windows. While known for its 3D capabilities, it also works perfectly for 2D image editing tasks like cropping. Here’s how to crop in Paint 3D:
- Open Start Menu.
- Search for Paint 3D and click on Paint 3D to open the application.
- Click on Menu in the top left corner of the Paint 3D window.
- Select Open from the menu options.
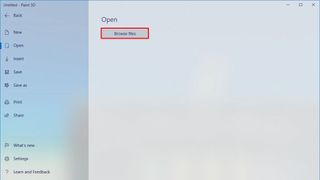
- Click Browse files to locate your image.
 Open image in Paint 3D Windows
- Choose the image you want to crop from your files.
- Click Open to load the image into Paint 3D.
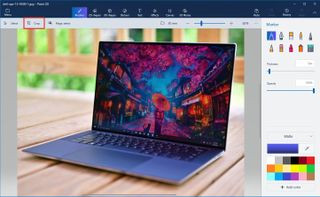
- Select the Crop tool from the top toolbar, usually located on the left side.
 Crop tool in Paint 3D Windows
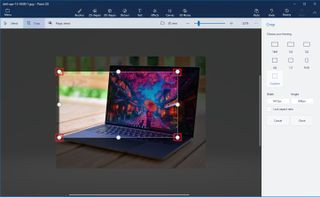
- Define the crop area by dragging the handles around the image edges. A rectangle will appear, showing the portion of the image that will be kept.
 Adjust crop area Paint 3D Windows
- Center the subject by clicking and dragging inside the cropping rectangle to reposition it over the desired part of the image.
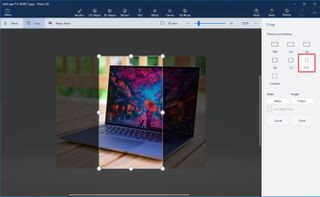
- (Optional) Choose a Framing Aspect Ratio: On the right panel, you’ll find preset Framing options to crop to common aspect ratios:
- 16:9 (widescreen)
- 5:3
- 3:2
- 4:3
- 1:1 (square)
- 9:16 (vertical widescreen)
 Aspect ratio crop Paint 3D Windows
- (Optional) Set Exact Dimensions: Use the Width and Height fields in the right panel to specify precise pixel dimensions for your cropped image. Tick the Lock aspect ratio box to maintain the current proportions while adjusting size.
- Click the Done button to apply the crop.
- Open the Menu again.
- Select Save as.
- Choose Image from the Save as options.
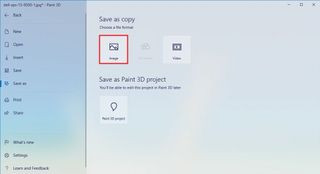 Save as image in Paint 3D Windows
- Enter a name for your cropped image.
- Click Save.
Paint 3D will then save your cropped image as a new file with the specified name.
Method 3: Cropping Photos Using Snip & Sketch on Windows
Snip & Sketch is primarily known for taking screenshots, but it also has a handy image cropping feature. This tool is great for quick and easy crops. Here’s how to crop with Snip & Sketch:
- Open Start Menu.
- Type Snip & Sketch and select Snip & Sketch to open the tool.
- Click the Open button (folder icon) usually in the top-left corner.
- Locate and select the image you intend to crop.
- Click Open to load the image.
- Click the Crop icon in the top-center toolbar.
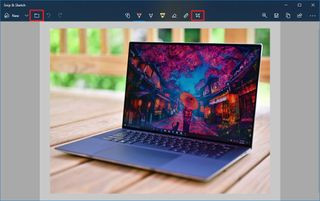 Crop tool in Snip & Sketch Windows
- Adjust the crop boundaries by dragging the handles that appear around the image.
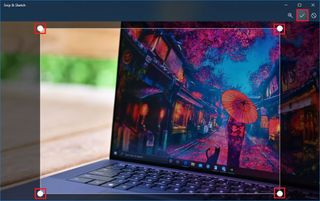 Adjust crop area Snip & Sketch Windows
- Click the Apply button (check mark icon) located at the top-right to finalize the crop.
- Click the Save As button (floppy disk icon) in the top-right corner.
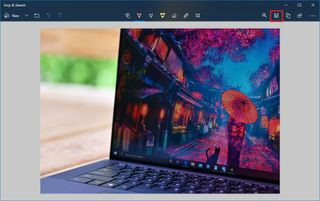 Save As in Snip & Sketch Windows
- Choose a name for the cropped image.
- Click Save.
Snip & Sketch will save a cropped copy of your photo to your chosen location.
Method 4: Cropping Photos Using Classic Paint on Windows
The classic Paint application, a long-time staple of Windows, is still available and perfectly capable of cropping images. If you prefer a simpler interface, Paint is a great option. Here’s how to crop in classic Paint:
- Open Start Menu.
- Type Paint and select Paint to open the application.
- Click File in the top-left corner.
- Select Open from the dropdown menu.
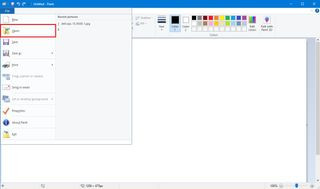 Open image in Paint Windows
- Select the image file you wish to crop.
- Click the Select tool in the “Home” tab, usually the first option in the “Image” group.
- Drag your cursor over the image to select the rectangular area you want to keep.
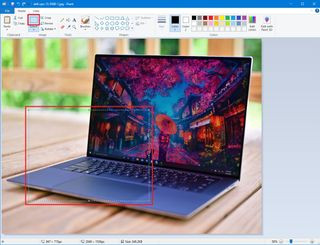 Select crop area in Paint Windows
- Click the Crop button in the “Home” tab, within the “Image” group.
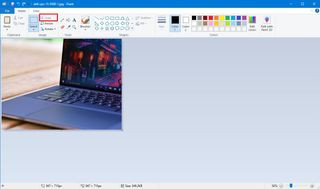 Crop tool in Paint Windows
- Click File again.
- Select Save As to save your cropped image.
- Enter a file name for your cropped photo.
- Click Save.
Paint will crop the image based on your selection and save the result.
With these four methods, you can easily crop photos directly on your Windows computer without needing any additional software. Each tool offers a slightly different approach, so you can choose the one that best suits your needs and workflow.