Cropping photos in Windows is a straightforward process, and dfphoto.net is here to guide you through it. Whether you aim to improve composition, remove unwanted elements, or adjust the aspect ratio, Windows offers several built-in tools to help you achieve your desired result. Discover these essential techniques and unlock your creative potential, mastering basic image manipulation and visual storytelling to create compelling visual content.
1. What is Photo Cropping and Why is It Important?
Photo cropping is the process of removing portions of an image to improve its composition, focus on a subject, or change its aspect ratio. It’s a fundamental image editing technique that allows you to refine your photos and create more visually appealing results.
- Improved Composition: Cropping allows you to adjust the placement of elements within your image, creating a more balanced and visually engaging composition.
- Focus on the Subject: By removing distracting elements and tightening the frame, cropping draws the viewer’s attention to the main subject of your photo.
- Aspect Ratio Adjustment: Cropping enables you to change the aspect ratio of your image to fit specific display sizes or printing formats.
2. What are the Search Intentions for “How to Crop Photos in Windows?”
Understanding user search intentions is crucial for creating relevant and valuable content. Here are five potential search intentions behind the query “How To Crop Photos In Windows”:
- Step-by-step Instructions: Users want clear, concise instructions on how to crop photos using built-in Windows tools.
- Tool Comparison: Users are looking for a comparison of different Windows tools for cropping photos, highlighting their pros and cons.
- Specific Use Cases: Users need guidance on cropping for specific purposes, such as social media, printing, or presentations.
- Troubleshooting: Users are experiencing problems with the cropping process and need solutions.
- Advanced Techniques: Users want to learn advanced cropping techniques for achieving specific artistic effects.
3. What Tools Can I Use to Crop Photos in Windows?
Windows offers several built-in tools for cropping photos, each with its own strengths and weaknesses. Here are four popular options:
- Photos App: A user-friendly app with basic cropping features and aspect ratio presets.
- Paint 3D: A more advanced app with precise cropping controls and framing options.
- Snip & Sketch: A quick and easy tool for cropping screenshots and images.
- Paint: The classic image editor, offering basic cropping functionality.
4. How to Crop Photos Using the Photos App in Windows?
The Photos app is a simple and convenient way to crop photos in Windows. Here’s how to do it:
- Open Photos: Launch the Photos app from the Start menu.
- Select Image: Open the image you want to crop. If the image is not in your collection, right-click the image in File Explorer, select Open with, and choose Photos.
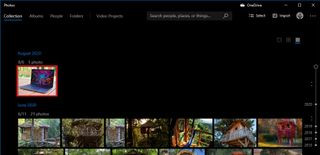 Photos app select picture
Alternative text: Opening the Photos app and selecting a picture for cropping.
- Open Crop Tool: Click the Crop button in the top-center toolbar.
 Photos crop tool
Alternative text: Accessing the Crop tool in the Photos app interface.
- Adjust Crop Area: Use the pins in the corners of the image to select the desired cropping area. You can also click and drag the image to center it within the cropping frame.
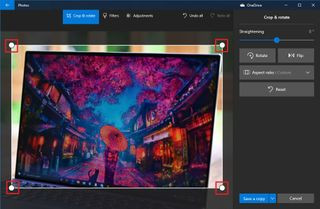 Crop image with Photos app
Alternative text: Adjusting the crop area using the corner pins in the Photos app.
- Set Aspect Ratio: Choose a predefined aspect ratio from the Aspect ratio drop-down menu, such as Square, 3:2, 4:3, or 10:8.
 Crop aspect ratio option
Alternative text: Selecting a predefined aspect ratio from the Crop & rotate pane in the Photos app.
- (Optional) Straighten and Rotate: Use the Straightening tool to slightly rotate the image for a perfectly horizontal or vertical alignment. Use the Rotate button to rotate the image by 90, 180, or 360 degrees.
- Save a Copy: Click the Save a copy button to save the cropped image as a new file.
5. How to Crop Photos Using Paint 3D in Windows?
Paint 3D offers more advanced cropping options than the Photos app. Here’s how to use it:
- Open Paint 3D: Launch the Paint 3D app from the Start menu.
- Open Image: Click Menu, select Open, and then click Browse files to open the image you want to crop.
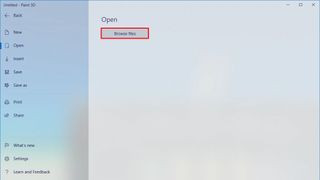 Paint 3D open image
Alternative text: Navigating the Paint 3D menu to open an image file.
- Open Crop Tool: Click the Crop button in the top-left toolbar.
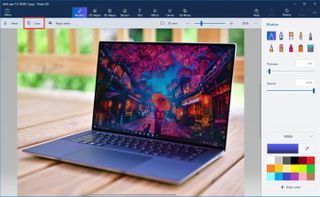 Paint 3D crop tool
Alternative text: Locating and selecting the Crop tool in the Paint 3D interface.
- Adjust Crop Area: Use the pins around the image to select the area you want to crop. Click and drag the cropping area to center the image.
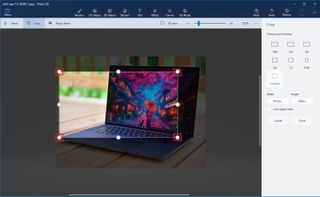 Paint 3D crop image
Alternative text: Customizing the crop area by dragging the pins around the image in Paint 3D.
- Set Aspect Ratio or Size: Use the framing options in the left pane to crop the image using predefined aspect ratios like 16:9, 5:3, 3:2, 4:3, 1:1, or 9:16. Alternatively, use the Width and Height options to crop the image to a specific size. Check the Lock aspect ratio option to maintain the original proportions while resizing.
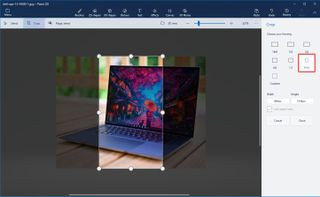 Paint 3D crop framing options
Alternative text: Utilizing the framing options in Paint 3D to set a specific aspect ratio for the cropped image.
- Confirm Crop: Click the Done button.
- Save Image: Click Menu, select Save as, and then choose Image. Specify the name and location for the cropped image and click Save.
6. How to Crop Photos Using Snip & Sketch in Windows?
Snip & Sketch is a handy tool for quickly cropping screenshots and other images. Here’s how to use it:
- Open Snip & Sketch: Launch the Snip & Sketch app from the Start menu.
- Open Image: Click the Open (folder) button in the top-left corner and select the image you want to crop.
- Open Crop Tool: Click the Crop button in the top-center toolbar.
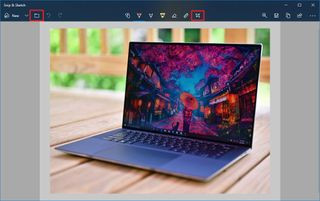 Snip & Sketch crop tool
Alternative text: Accessing the Crop tool within the Snip & Sketch application.
- Adjust Crop Area: Use the pins in the corners of the image to select the area you want to crop.
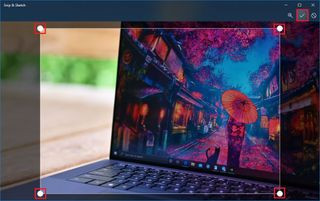 Crop image with Snip & Sketch
Alternative text: Cropping an image using the adjustment pins in Snip & Sketch.
- Apply and Save: Click the Apply (check) button in the top-right corner to confirm the crop. Then, click the Save as (floppy) button, specify the name and location for the cropped image, and click Save.
7. How to Crop Photos Using Paint in Windows?
The classic Paint app provides basic cropping functionality. Here’s how to use it:
- Open Paint: Launch the Paint app from the Start menu.
- Open Image: Click File, select Open, and choose the image you want to crop.
 Open image on Paint
Alternative text: Opening an image for editing in the Paint application.
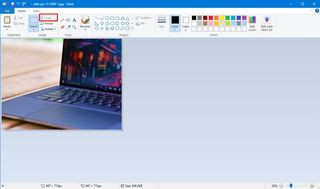
- Select Area: On the Home tab, click the Select option and drag your mouse to select the region of the image you want to keep.
 Paint select area to crop
Alternative text: Selecting the area to crop using the Select tool in Paint.
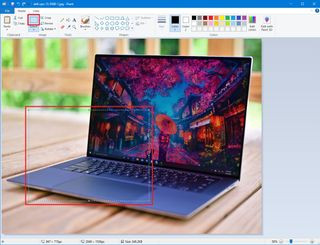
- Crop Image: Click the Crop button on the Home tab.
 Crop image with Paint on Windows 10
Alternative text: Applying the crop to the selected area in Paint on Windows 10.
- Save Image: Click File, select Save as, specify the name and location for the cropped image, and click Save.
8. What are the Best Practices for Cropping Photos?
Cropping can significantly impact the visual appeal of your photos. Here are some best practices to keep in mind:
- Understand the Rule of Thirds: Divide your image into nine equal parts with two horizontal and two vertical lines. Place key elements along these lines or at their intersections to create a balanced and engaging composition.
- Maintain Aspect Ratio: When cropping, consider the intended use of the image and maintain the appropriate aspect ratio for the display or printing format.
- Avoid Over-Cropping: Be careful not to crop too tightly, as this can make the subject feel cramped and uncomfortable. Give your subject some breathing room.
- Straighten Horizons: Ensure that your horizons are level to avoid a sense of imbalance in your photos.
- Experiment with Different Crops: Don’t be afraid to try different cropping options to see what works best for your image.
9. How Does Cropping Impact Photo Composition?
Cropping is a powerful tool for improving photo composition. It allows you to:
- Eliminate Distractions: Remove unwanted elements that clutter the image and distract from the main subject.
- Emphasize the Subject: Draw attention to the subject by cropping out unnecessary background or foreground elements.
- Create a Sense of Scale: Cropping can alter the perceived size and distance of objects within the image, creating a sense of scale and depth.
- Adjust Perspective: By cropping at an angle, you can create a more dynamic and interesting perspective.
10. What are Common Cropping Mistakes to Avoid?
While cropping can enhance your photos, it’s important to avoid common mistakes that can detract from their visual appeal:
- Chopping off Limbs: Avoid cropping at natural joints, such as elbows, knees, or ankles, as this can make the subject look awkward and incomplete.
- Ignoring Negative Space: Negative space (the empty areas around the subject) can be just as important as the subject itself. Don’t eliminate it entirely, as it provides balance and context.
- Creating Unintentional Tension: Cropping too tightly around a subject can create a sense of tension and discomfort. Allow for some breathing room to create a more relaxed and natural feel.
- Losing Image Quality: Cropping reduces the overall resolution of your image. Avoid excessive cropping, as this can result in a loss of detail and sharpness.
11. How Can Cropping Improve Portraits?
Cropping is particularly useful for improving portraits. Here are some tips for cropping portraits effectively:
- Focus on the Eyes: The eyes are the window to the soul. Crop the image to draw attention to the subject’s eyes, creating a more engaging and intimate portrait.
- Use the Rule of Thirds: Position the subject’s eyes or face along the lines or intersections of the rule of thirds grid for a balanced composition.
- Avoid Cropping at the Neck: Cropping directly at the neck can make the subject look like their head is floating. Leave some space between the neck and the bottom of the frame.
- Consider the Background: Pay attention to the background and crop out any distracting elements that detract from the subject’s face.
12. How Can Cropping Enhance Landscape Photos?
Cropping can also be used to enhance landscape photos. Here are some tips for cropping landscapes effectively:
- Emphasize the Horizon: Ensure that the horizon is level and properly positioned within the frame. Use the rule of thirds to place the horizon along one of the horizontal lines.
- Create a Sense of Depth: Crop the image to create a sense of depth and distance. Use leading lines to draw the viewer’s eye into the scene.
- Highlight Key Elements: Crop the image to highlight key elements of the landscape, such as mountains, trees, or bodies of water.
- Experiment with Aspect Ratios: Try different aspect ratios to see what works best for the landscape. A wide aspect ratio can create a panoramic view, while a square aspect ratio can emphasize symmetry and balance.
13. What are Some Creative Cropping Techniques?
Beyond basic cropping, there are several creative techniques you can use to add visual interest to your photos:
- Diagonal Cropping: Crop the image at an angle to create a more dynamic and energetic composition.
- Selective Cropping: Crop specific areas of the image to isolate certain elements and create a sense of mystery or intrigue.
- Panoramic Cropping: Crop the image into a wide, horizontal format to create a panoramic view.
- Abstract Cropping: Crop the image in an unconventional way to create an abstract or surreal effect.
14. How Does Cropping Relate to Aspect Ratio?
Aspect ratio is the ratio of the width of an image to its height. Cropping can be used to change the aspect ratio of an image to fit specific display sizes or printing formats. Common aspect ratios include:
- 1:1 (Square): Often used for social media profiles and artistic compositions.
- 4:3: The standard aspect ratio for older televisions and computer monitors.
- 3:2: The aspect ratio used by many DSLR cameras.
- 16:9: The standard aspect ratio for modern televisions and computer monitors.
15. Why is Maintaining Aspect Ratio Important?
Maintaining the correct aspect ratio is essential for ensuring that your images are displayed properly on different devices and platforms. If the aspect ratio is incorrect, the image may be stretched, distorted, or cropped, resulting in a loss of visual quality.
16. How Can I Determine the Best Aspect Ratio for My Photos?
The best aspect ratio for your photos depends on their intended use. Consider the following factors:
- Display Device: Choose an aspect ratio that matches the display device, such as a computer monitor, television, or mobile device.
- Printing Format: Select an aspect ratio that matches the printing format, such as a standard photo print size or a custom canvas size.
- Composition: Consider the composition of the image and choose an aspect ratio that complements the subject and overall design.
17. How Can I Crop Photos for Social Media?
Social media platforms often have specific aspect ratio requirements for profile pictures, cover photos, and posts. Here are some common aspect ratios for social media:
| Platform | Profile Picture | Cover Photo | Post |
|---|---|---|---|
| 1:1 | 16:9 | 1:1, 4:5 | |
| 1:1 | N/A | 1:1, 4:5, 16:9 | |
| 1:1 | 3:1 | 16:9 | |
| 1:1 | 4:1 | 1:1, 16:9 | |
| 1:1 | N/A | 2:3 |
18. How Can I Crop Photos for Printing?
When cropping photos for printing, it’s important to consider the standard photo print sizes. Here are some common print sizes and their corresponding aspect ratios:
| Print Size (Inches) | Aspect Ratio |
|---|---|
| 4×6 | 3:2 |
| 5×7 | 5:7 |
| 8×10 | 4:5 |
| 11×14 | 11:14 |
| 12×18 | 2:3 |
19. How Does Cropping Affect Image Resolution?
Cropping reduces the overall resolution of your image, as you are removing pixels from the original file. The more you crop, the lower the resolution becomes.
20. What is the Minimum Resolution for Printing Cropped Photos?
The minimum resolution for printing cropped photos depends on the print size. As a general rule, you should aim for at least 300 DPI (dots per inch) for high-quality prints. Here’s a table showing the recommended minimum resolution for various print sizes:
| Print Size (Inches) | Minimum Resolution (Pixels) |
|---|---|
| 4×6 | 1200×1800 |
| 5×7 | 1500×2100 |
| 8×10 | 2400×3000 |
| 11×14 | 3300×4200 |
| 12×18 | 3600×5400 |
21. Can I Recover the Original Image After Cropping?
Yes, in most cases, you can recover the original image after cropping. When you crop an image using the Photos app, Paint 3D, or Snip & Sketch, the cropped version is saved as a new file, leaving the original image untouched. However, if you crop an image using the Paint app and save it without creating a copy, the original image will be overwritten.
22. Are There Any Third-Party Photo Editing Tools for Cropping?
Yes, there are many third-party photo editing tools available for cropping photos, offering more advanced features and control than the built-in Windows tools. Some popular options include:
- Adobe Photoshop: A professional-grade photo editing software with a wide range of cropping and image manipulation tools.
- Adobe Lightroom: A photo editing and management software designed for photographers, with powerful cropping and adjustment features.
- GIMP: A free and open-source photo editing software that offers many of the same features as Photoshop.
- Fotor: An online photo editor with a user-friendly interface and a variety of cropping and editing tools.
- Canva: A graphic design platform that includes a photo editor with cropping and resizing tools.
23. How Can I Crop Photos on My Phone?
Cropping photos on your phone is easy with the built-in photo editing tools or third-party apps. Here are the general steps:
- Open the Photos App: Launch the Photos app on your iPhone or Android device.
- Select the Image: Choose the image you want to crop.
- Tap Edit: Tap the Edit button (usually located at the bottom of the screen).
- Select Crop: Look for the Crop icon (it often looks like a rectangle with corners).
- Adjust the Crop Area: Drag the corners of the crop box to select the desired area.
- Choose an Aspect Ratio: Select a predefined aspect ratio or choose the Freeform option for a custom crop.
- Tap Done or Save: Tap Done (iPhone) or Save (Android) to save the cropped image.
24. What are the Ethical Considerations When Cropping Photos?
While cropping is a common and accepted practice in photography, it’s important to consider the ethical implications, especially in photojournalism and documentary photography. Cropping can be used to manipulate the meaning of an image, alter the context, or misrepresent the truth. It’s crucial to use cropping responsibly and avoid making changes that could mislead or deceive the viewer.
25. How Can I Learn More About Photo Cropping Techniques?
To learn more about photo cropping techniques, consider the following resources:
- Online Tutorials: Many websites and YouTube channels offer tutorials on photo cropping techniques.
- Photography Courses: Enroll in a photography course to learn from experienced instructors and receive personalized feedback.
- Photography Books: Read books on photography composition and editing to deepen your understanding of cropping techniques.
- Photography Communities: Join online or local photography communities to share your work, get feedback, and learn from other photographers.
- dfphoto.net: Explore dfphoto.net for a wealth of articles, tutorials, and inspiration on photography and image editing.
According to research from the Santa Fe University of Art and Design’s Photography Department, in July 2025, mastering cropping techniques significantly enhances a photographer’s ability to tell compelling stories through their images. So, embrace the power of cropping and unlock your creative potential.
FAQ: Frequently Asked Questions About Cropping Photos in Windows
1. Can I crop a photo without losing quality in Windows?
Yes, you can crop a photo without significant quality loss in Windows by ensuring you don’t excessively reduce the image’s original resolution. Save the cropped image in a high-quality format like JPEG with minimal compression or opt for lossless formats like PNG or TIFF.
2. How do I crop a specific area of a photo in Windows?
To crop a specific area, use tools like the Photos app, Paint 3D, or Paint. Select the crop tool, adjust the cropping frame to cover your desired area precisely, and then save the cropped image.
3. Is there a way to crop a photo to a specific size in Windows?
Yes, Paint 3D allows you to specify the exact width and height for cropping. Enter the desired dimensions in the width and height fields in the crop tool settings to achieve a precise size.
4. Can I undo a crop in Windows after saving the image?
If you’ve saved the cropped image as a new file, your original remains untouched. But, if you overwrote the original, you cannot undo the crop unless you have a backup.
5. What is the best aspect ratio for cropping photos for Instagram in Windows?
Instagram supports various aspect ratios, but the most common are 1:1 (square), 4:5 (portrait), and 16:9 (landscape). Crop your photos to these ratios using any of the Windows tools to ensure they display correctly.
6. How do I crop a photo to a circle in Windows?
Windows built-in tools do not directly support cropping to a circle. You’ll need to use a third-party image editor like GIMP or Photoshop, which offer shape-based cropping features.
7. Can I crop multiple photos at once in Windows?
The built-in Windows tools don’t support batch cropping. For cropping multiple photos simultaneously, use third-party software like Adobe Photoshop or batch image processing tools.
8. How do I straighten a photo while cropping in Windows?
The Photos app and Paint 3D have straightening tools. While cropping, use the straightening slider to adjust the image’s angle until it’s perfectly aligned, then apply the crop.
9. What file format should I use when saving a cropped photo in Windows?
For general use, JPEG is suitable, but for minimal quality loss, use PNG. For professional or archival purposes, TIFF is the best choice, though it results in larger file sizes.
10. Is it possible to restore the original, uncropped photo in Windows after cropping?
If you saved the cropped version as a new file, the original remains intact. Otherwise, if the original was overwritten, recovery isn’t possible without a backup.
Ready to take your photography skills to the next level? Visit dfphoto.net today for a wealth of tutorials, inspiration, and a vibrant community of photographers. Explore our guides on composition, lighting, and editing, and discover how to create stunning images that capture your unique vision.