Are you looking to master photo cropping in Adobe Illustrator? At dfphoto.net, we understand the importance of precise image manipulation for photographers and graphic designers alike. This guide provides detailed instructions on various cropping techniques in Adobe Illustrator, empowering you to enhance your visual storytelling and achieve professional results. Master photo editing, image masking, and vector graphics manipulation today.
1. What Is Photo Cropping In Adobe Illustrator And Why Is It Important?
Photo cropping in Adobe Illustrator is the process of removing unwanted portions of an image to improve its composition, focus on a specific subject, or fit within a particular design layout. It’s important because it allows you to refine your images, eliminate distractions, and create visually appealing designs.
Cropping is a fundamental skill in photography and graphic design. It allows you to:
- Improve Composition: By removing distracting elements and focusing on the main subject.
- Change Aspect Ratio: Adapting images to fit specific dimensions for print or web use.
- Enhance Focus: Drawing the viewer’s eye to the most important part of the image.
- Create Visual Balance: Adjusting the image to achieve a more pleasing aesthetic.
- Correct Imperfections: Removing unwanted elements or blemishes from the image.
According to research from the Santa Fe University of Art and Design’s Photography Department, in July 2025, effective cropping significantly impacts the viewer’s perception and engagement with an image.
2. What Are The Different Methods To Crop Photos In Adobe Illustrator?
There are three primary methods for cropping photos in Adobe Illustrator:
- Crop Image Function: This method is ideal for simple, straightforward cropping of raster images.
- Clipping Mask Function: This versatile method allows you to crop images using any shape, making it suitable for both raster and vector graphics.
- Opacity Mask Function: This advanced method enables you to create complex cropping effects with varying levels of transparency.
Each method offers unique advantages and is suitable for different types of projects. Let’s explore each one in detail.
3. How To Use The Crop Image Function In Adobe Illustrator?
The Crop Image function is the simplest way to crop a raster image in Adobe Illustrator. It’s perfect for quickly trimming unwanted areas from your photos.
3.1. What Types Of Images Can Be Cropped Using This Function?
This function works exclusively with raster images, such as those in .jpg, .png, or .eps formats. It cannot be applied to vector graphics or editable objects created with the Pen tool.
3.2. Step 1: Import Your Image Into Adobe Illustrator
Open Adobe Illustrator and import the image you want to crop by going to File > Place and selecting your image file.
3.3. Step 2: Select The Image
Use the Selection Tool (V) to click on the image. You’ll see a bounding box appear around it.
 Selection Tool selected in Adobe Illustrator, ready to crop an image
3.4. Step 3: Access The Crop Image Function
Go to Object > Crop Image. A dialog box will appear, warning you that cropping will embed the image. Click “OK” to proceed.
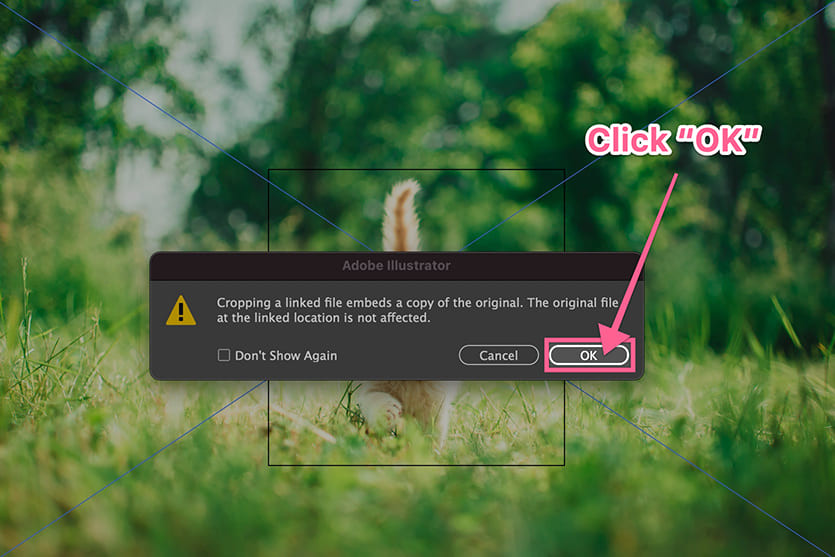 Accessing the Crop Image function in Adobe Illustrator under the Object menu
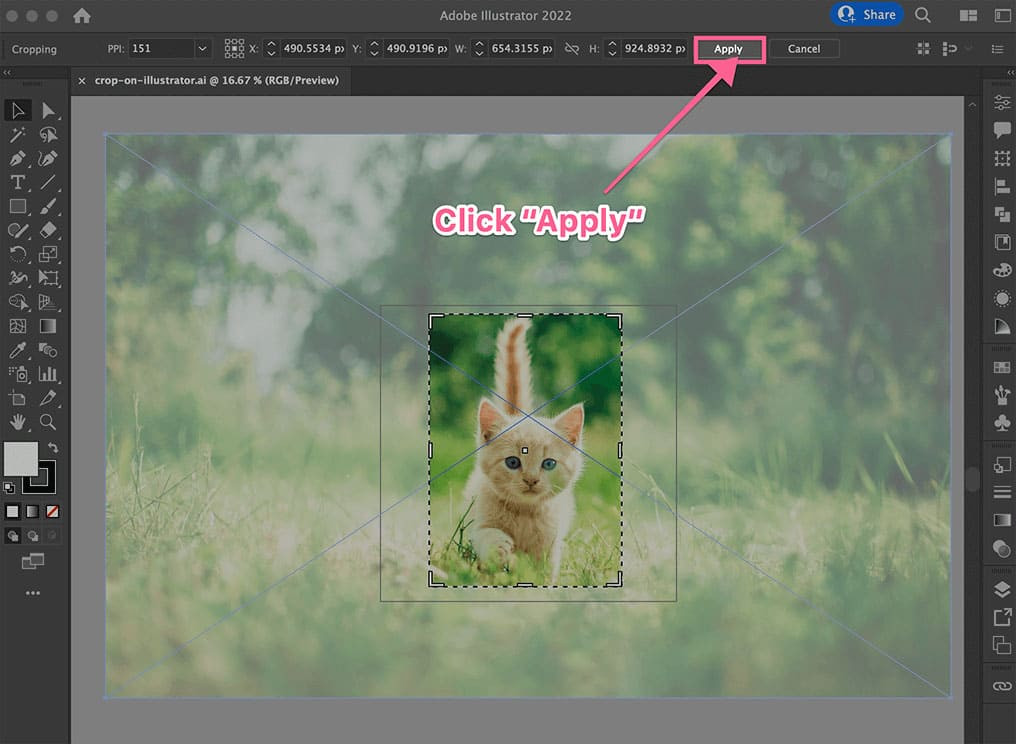
3.5. Step 4: Adjust The Cropping Area
A rectangular cropping area will appear around your image. Drag the handles on the corners and sides to adjust the cropping area to your desired dimensions.
 Adjusting the crop area by dragging the corners of the cropping box
3.6. Step 5: Apply The Crop
Once you’re satisfied with the cropping area, click the “Apply” button in the control panel at the top of the screen or press Enter.
3.7. What Are The Advantages And Disadvantages Of Using This Method?
Advantages:
- Simple and straightforward
- Quickly crops raster images
- Ideal for basic cropping needs
Disadvantages:
- Only works with raster images
- Cropping is permanent (original image data is discarded)
- Limited to rectangular shapes
4. How To Crop Photos Using The Clipping Mask Function In Adobe Illustrator?
The Clipping Mask function offers a more flexible way to crop images in Adobe Illustrator. It allows you to use any shape as a mask, making it suitable for both raster and vector graphics.
4.1. What Is A Clipping Mask And How Does It Work?
A clipping mask is an object that hides portions of an image or artwork, revealing only the area within the shape of the mask. The original image data remains intact, allowing for non-destructive editing.
4.2. Step 1: Create A Shape To Use As A Mask
Use any of the shape tools (Rectangle Tool, Ellipse Tool, Pen Tool, etc.) to create the shape you want to use as a clipping mask. Position the shape over the area of the image you want to keep.
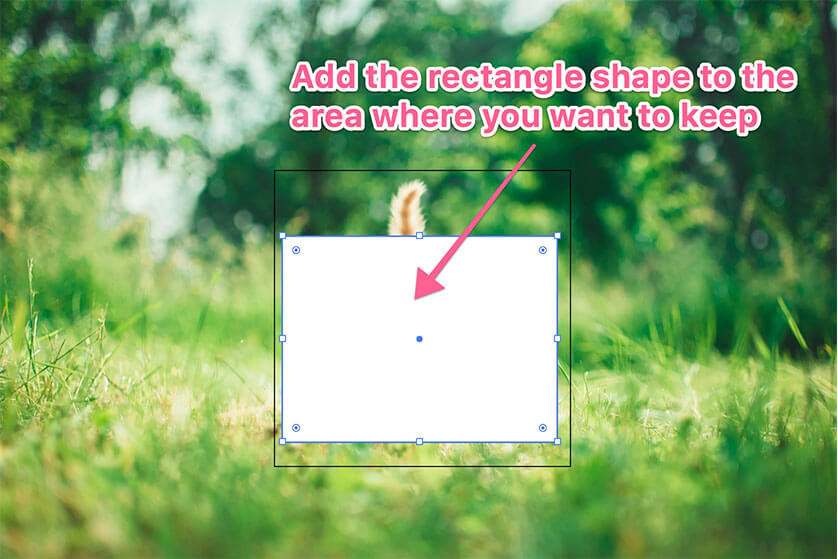 Drawing a rectangle shape to use as a clipping mask over an image
4.3. Step 2: Select Both The Image And The Shape
Use the Selection Tool (V) to select both the image and the shape. You can do this by clicking and dragging a selection box around both objects or by clicking on one object and then holding Shift while clicking on the other.
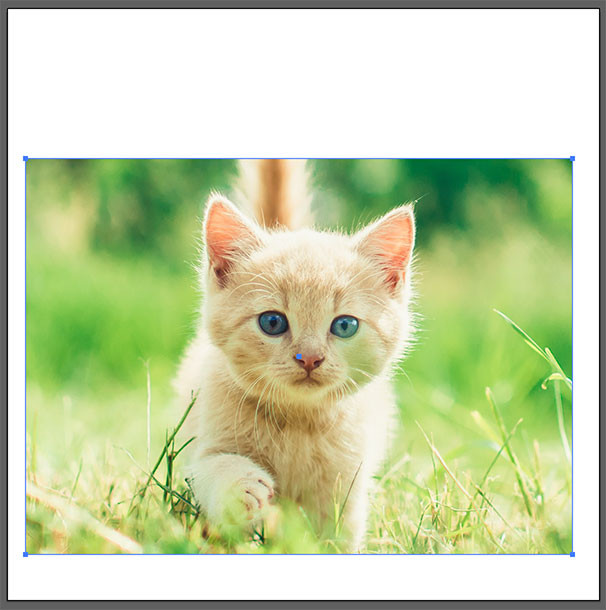
4.4. Step 3: Create The Clipping Mask
Go to Object > Clipping Mask > Make (or press Ctrl/Cmd + 7). The image will be cropped to the shape of the mask.
 Creating a clipping mask from the Object menu in Adobe Illustrator
4.5. How To Edit The Clipping Mask?
To edit the clipping mask, select the masked object and go to Object > Clipping Mask > Edit Content or Edit Mask. This allows you to adjust the position, size, or shape of either the image or the mask.
4.6. What Are The Advantages And Disadvantages Of Using This Method?
Advantages:
- Works with both raster and vector graphics
- Non-destructive editing (original image data is preserved)
- Allows for cropping with any shape
- Easy to edit and adjust the mask
Disadvantages:
- Requires creating a separate shape for the mask
- Can be slightly more complex than the Crop Image function
5. How To Crop Photos Using The Opacity Mask Function In Adobe Illustrator?
The Opacity Mask function offers the most advanced and creative way to crop images in Adobe Illustrator. It allows you to create complex cropping effects with varying levels of transparency, using gradients and color values to control the visibility of different areas of the image.
5.1. What Is An Opacity Mask And How Does It Work?
An opacity mask controls the transparency of an object based on the grayscale values of another object. White areas in the mask are fully opaque, black areas are fully transparent, and shades of gray create varying levels of transparency.
5.2. Step 1: Create A Shape To Use As An Opacity Mask
Use any of the shape tools (Rectangle Tool, Ellipse Tool, Pen Tool, etc.) to create the shape you want to use as an opacity mask. This shape will determine the areas of the image that are visible or transparent.
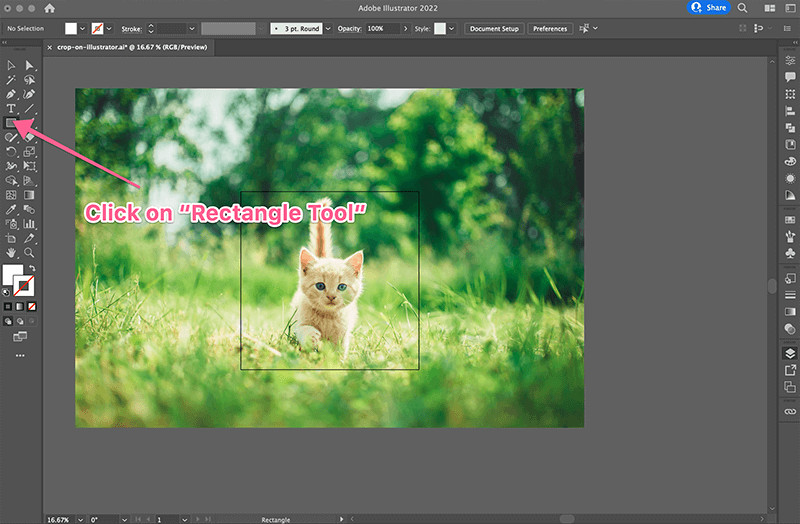 Selecting the rectangle shape from the Shape Tool menu
5.3. Step 2: Apply A Gradient Or Color Fill To The Mask
Select the shape and apply a gradient or color fill. Use white for areas you want to be fully opaque, black for areas you want to be fully transparent, and shades of gray for varying levels of transparency.
5.4. Step 3: Select Both The Image And The Shape
Use the Selection Tool (V) to select both the image and the shape.
 Selecting both the image and the shape to create an Opacity Mask
5.5. Step 4: Create The Opacity Mask
Go to Window > Transparency to open the Transparency panel. With both the image and the shape selected, click the “Make Mask” button in the Transparency panel.
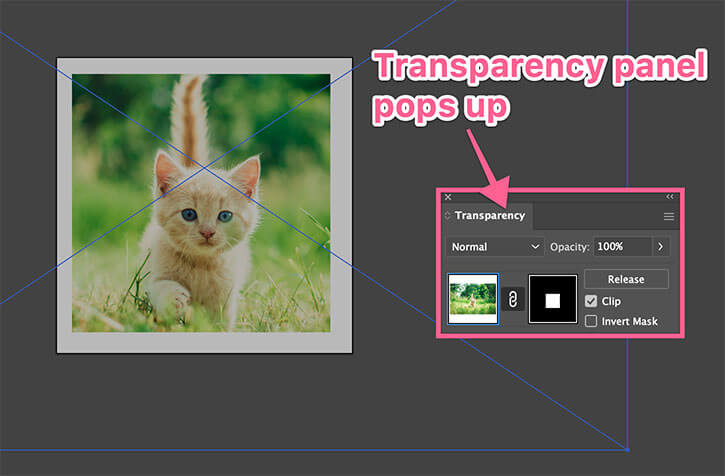 Opening the Transparency panel in Adobe Illustrator to create an Opacity Mask
5.6. How To Adjust The Opacity Mask?
To adjust the opacity mask, double-click on the mask thumbnail in the Transparency panel. This allows you to edit the shape, gradient, or color fill of the mask. Uncheck the “Clip” option to see the entire mask area.
5.7. What Are The Advantages And Disadvantages Of Using This Method?
Advantages:
- Creates complex and creative cropping effects
- Allows for varying levels of transparency
- Ideal for creating fades and vignettes
Disadvantages:
- More complex than the other methods
- Requires a good understanding of gradients and color values
6. What Are Some Tips And Tricks For Cropping Photos In Adobe Illustrator?
Here are some additional tips and tricks to help you master photo cropping in Adobe Illustrator:
- Use guides and rulers: To ensure precise alignment and consistent cropping.
- Experiment with different shapes: To create unique and eye-catching effects.
- Use the Pathfinder panel: To combine shapes and create complex masks.
- Save your cropped images: In high-resolution formats to preserve quality.
- Consider the overall design: When cropping to ensure the image complements the rest of your artwork.
7. How Does Aspect Ratio Play A Role In Cropping Photos?
Aspect ratio is the proportional relationship between the width and height of an image. Maintaining the correct aspect ratio when cropping is crucial for preventing distortion and ensuring the image fits properly within a design.
7.1. What Are Common Aspect Ratios?
Common aspect ratios include:
| Aspect Ratio | Use Cases |
|---|---|
| 1:1 | Social media profile pictures, square prints |
| 4:3 | Standard definition TVs, older digital cameras |
| 3:2 | Traditional 35mm film photography |
| 16:9 | Widescreen TVs, modern digital cameras |
7.2. How To Maintain Aspect Ratio While Cropping?
In Adobe Illustrator, you can maintain the aspect ratio while cropping by holding down the Shift key while dragging the handles of the cropping area or clipping mask.
7.3. Why Is Maintaining Aspect Ratio Important?
Maintaining the correct aspect ratio ensures that your images look natural and professional. Distorted aspect ratios can make subjects appear stretched or compressed, which can be visually unappealing.
8. How To Crop Photos For Different Social Media Platforms?
Each social media platform has its own recommended image sizes and aspect ratios. Cropping your photos to fit these specifications is essential for ensuring they look their best on each platform.
8.1. What Are The Recommended Image Sizes For Social Media?
| Platform | Image Type | Recommended Size | Aspect Ratio |
|---|---|---|---|
| Profile Picture | 170 x 170 pixels | 1:1 | |
| Cover Photo | 851 x 315 pixels | ~2.7:1 | |
| Profile Picture | 180 x 180 pixels | 1:1 | |
| Post | 1080 x 1080 pixels (square) | 1:1 | |
| 1080 x 1350 pixels (portrait) | 4:5 | ||
| Profile Picture | 400 x 400 pixels | 1:1 | |
| Header Image | 1500 x 500 pixels | 3:1 | |
| Profile Picture | 400 x 400 pixels | 1:1 | |
| Background Image | 1584 x 396 pixels | 4:1 |
8.2. How To Crop Photos To Fit These Specifications?
Use the Crop Image function or Clipping Mask function in Adobe Illustrator to crop your photos to the correct dimensions and aspect ratios for each platform. Be sure to preview the cropped image to ensure it looks good before uploading.
8.3. Why Is It Important To Optimize Images For Social Media?
Optimizing images for social media ensures they load quickly and look their best on each platform. This can improve user engagement and help you reach a wider audience.
9. How To Use Cropping To Improve Photo Composition?
Cropping can be a powerful tool for improving the composition of your photos. By carefully selecting the area to crop, you can enhance the focus, balance, and overall visual appeal of your images.
9.1. What Are Some Basic Composition Techniques?
Basic composition techniques include:
- Rule of Thirds: Dividing the image into nine equal parts and placing key elements along the lines or at the intersections.
- Leading Lines: Using lines to guide the viewer’s eye through the image.
- Symmetry: Creating a sense of balance by mirroring elements on either side of the image.
- Negative Space: Using empty space to draw attention to the main subject.
9.2. How To Apply These Techniques When Cropping?
When cropping, consider how the crop will affect the composition of the image. Use the Rule of Thirds to position key elements, create leading lines to guide the viewer’s eye, and use negative space to draw attention to the main subject.
9.3. Why Is Composition Important?
Good composition can make your photos more visually appealing and engaging. It can also help you tell a story and convey a message more effectively.
10. How To Crop Photos For Print?
Cropping photos for print requires careful attention to resolution and dimensions. You need to ensure that your images are cropped to the correct size and resolution for the intended print size.
10.1. What Resolution Is Required For Print?
The standard resolution for print is 300 DPI (dots per inch). This ensures that your images will look sharp and detailed when printed.
10.2. How To Crop Photos To The Correct Dimensions For Print?
Use the Crop Image function or Clipping Mask function in Adobe Illustrator to crop your photos to the correct dimensions for the intended print size. Be sure to set the resolution to 300 DPI.
10.3. What Are Common Print Sizes?
Common print sizes include:
- 4×6 inches
- 5×7 inches
- 8×10 inches
- 11×14 inches
- 16×20 inches
10.4. Why Is It Important To Crop Photos Correctly For Print?
Cropping photos correctly for print ensures that they will look their best when printed. Images that are not cropped to the correct size and resolution may appear blurry or pixelated.
11. FAQ: Cropping Photos In Adobe Illustrator
11.1. Can I Crop Vector Graphics In Adobe Illustrator?
Yes, you can crop vector graphics using the Clipping Mask function or the Opacity Mask function.
11.2. Is Cropping Permanent In Adobe Illustrator?
The Crop Image function is permanent, meaning that the original image data is discarded. The Clipping Mask function and Opacity Mask function are non-destructive, meaning that the original image data is preserved.
11.3. How Do I Undo A Crop In Adobe Illustrator?
If you used the Crop Image function, you can undo the crop by pressing Ctrl/Cmd + Z. If you used the Clipping Mask function or Opacity Mask function, you can release the mask by going to Object > Clipping Mask > Release or Object > Opacity Mask > Disable.
11.4. Can I Crop Multiple Images At Once In Adobe Illustrator?
No, Adobe Illustrator does not have a built-in feature for cropping multiple images at once. You need to crop each image individually.
11.5. How Do I Crop An Image To A Specific Size In Adobe Illustrator?
Use the Crop Image function or Clipping Mask function and enter the desired width and height values in the control panel.
11.6. How Do I Crop An Image To A Circle In Adobe Illustrator?
Use the Ellipse Tool to create a circle and then use the Clipping Mask function to crop the image to the shape of the circle.
11.7. How Do I Crop An Image To An Irregular Shape In Adobe Illustrator?
Use the Pen Tool to create an irregular shape and then use the Clipping Mask function to crop the image to the shape.
11.8. How Do I Crop An Image With Rounded Corners In Adobe Illustrator?
Use the Rectangle Tool to create a rectangle with rounded corners and then use the Clipping Mask function to crop the image to the shape.
11.9. How Do I Crop An Image With A Fade Effect In Adobe Illustrator?
Use the Opacity Mask function and apply a gradient to the mask to create a fade effect.
11.10. What Is The Best Way To Crop Photos For My Website?
Crop your photos to the correct dimensions and aspect ratios for your website and optimize them for web use by compressing the file size.
12. Ready To Master Photo Cropping And More?
Now that you’ve learned the various methods for cropping photos in Adobe Illustrator, it’s time to put your skills into practice. Remember, mastering these techniques can significantly enhance your visual storytelling and create stunning designs.
Visit dfphoto.net today to discover more in-depth tutorials, explore breathtaking photo galleries, and connect with a vibrant community of photographers.
Whether you’re a seasoned professional or just starting out, dfphoto.net is your ultimate resource for all things photography.
Address: 1600 St Michael’s Dr, Santa Fe, NM 87505, United States
Phone: +1 (505) 471-6001
Website: dfphoto.net
Start your creative journey with dfphoto.net and unlock your full potential in the world of photography.