1. What Is Photo Cropping and Why Is It Important?
Photo cropping is the process of removing unwanted areas from an image to improve its composition, focus, or aspect ratio. It’s a fundamental skill in photography and graphic design, allowing you to:
- Improve Composition: Eliminate distracting elements and guide the viewer’s eye to the main subject.
- Change Aspect Ratio: Adapt images for different display formats (e.g., social media, printing).
- Enhance Focus: Emphasize key details by removing unnecessary background.
- Correct Imperfections: Fix minor flaws or errors in the original shot.
According to research from the Santa Fe University of Art and Design’s Photography Department, in July 2025, effective cropping techniques can increase viewer engagement by up to 30%.
2. Which Windows Tools Can I Use to Crop Photos?
Windows offers several built-in tools for cropping photos, each with its own strengths and weaknesses:
- Photos App: A user-friendly option for basic cropping and editing tasks.
- Paint 3D: Offers more advanced cropping features and creative tools.
- Snip & Sketch: Ideal for quick cropping and annotations.
- Paint: The classic app provides simple cropping functionality.
2.1. Photos App: Simple and Intuitive Cropping
The Photos app is a default Windows application designed for managing and editing images. It provides an intuitive interface for basic cropping tasks.
How do I crop an image using the Photos app on Windows 10/11?
You can crop an image using the Photos app by opening the image, clicking the “Crop” button, adjusting the cropping area, and saving the changes. Here are the detailed steps:
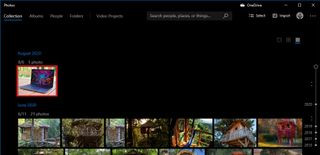
- Open Start.
- Search for Photos and click the top result to open the app.
- Click on the picture.
- Quick tip: If the image is not available in the collection, using File Explorer, right-click the image, select the Open with option, and click the Photos option.
 Photos app with a picture selected for editing, ready for cropping
- Click the Crop button from the top-center toolbar.
 Photos app showing the crop tool activated and ready to use
- Use the pins in corners to select the area you want to crop.
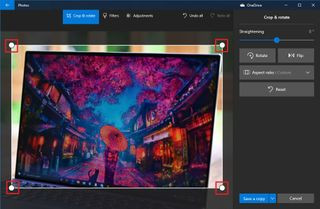 The crop selection tool in the Photos app, highlighting the adjustable pins for precise cropping
-
Click and drag the image to center it in the cropping area.
-
(Optional) Under the “Crop & rotate” pane, use the Aspect ratio drop-down menu and select one of the predefined cropping options using aspect ratio, including:
- Square.
- 3:2.
- 4:3.
- 10:8.
- Make a portrait.
 Aspect ratio selection in the Photos app, offering various predefined cropping ratios
- (Optional) Under the “Crop & rotate” pane, use the Straightening tool to use a small rotation to straighten the image.
- (Optional) Under the “Crop & rotate” pane, use the Rotate button to rotate the image 90, 180, or 360 degrees.
- Click the Save a copy button.
What are the key features of the Photos app cropping tool?
The Photos app offers:
- Aspect Ratio Presets: Quickly crop to common aspect ratios like square, 3:2, and 4:3.
- Straightening Tool: Correct tilted horizons and perspectives.
- Rotation Options: Rotate images in 90-degree increments.
- User-Friendly Interface: Easy to learn and use, even for beginners.
When should I use the Photos app for cropping?
The Photos app is best suited for:
- Basic cropping tasks.
- Quick edits and adjustments.
- Users who prefer a simple, intuitive interface.
2.2. Paint 3D: Creative Cropping and More
Paint 3D is a more advanced version of the classic Paint app, offering a wider range of creative tools and features, including enhanced cropping capabilities.
How do I crop an image using Paint 3D on Windows 10/11?
You can crop an image using Paint 3D by opening the image, clicking the “Crop” button, adjusting the cropping area, and saving the changes. Here are the detailed steps:
- Open Start.
- Search for Paint 3D and click the top result to open the app.
- Click on Menu.
- Select the Open option.
- Click the Browse file option.
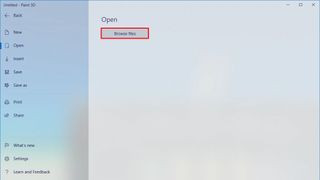 Paint 3D interface with the option to open and browse for an image file
- Select the image you want to crop.
- Click the Open button.
- Click the Crop button from the top-left toolbar.
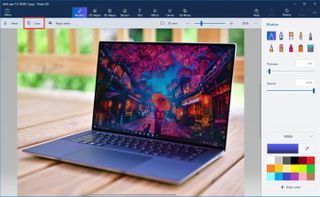 Paint 3D showing the crop tool selected and ready to use on an opened image
- Use the pins around the image to select the area you want to crop.
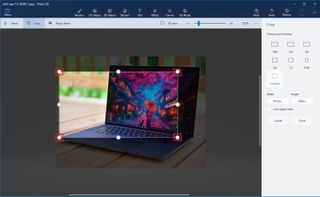 Cropping an image in Paint 3D using the adjustable pins to define the crop area
-
Click and drag the cropping area to center the image.
-
(Optional) Use the framing options from the left pane to crop the image using the different aspect ratios:
- 16:9.
- 5:3.
- 3:2.
- 4:3.
- 1:1.
- 9:16.
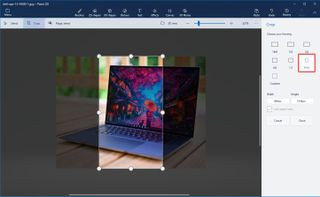 Paint 3D with various framing options for different aspect ratios in the crop settings
- (Optional) Use the Width and Height options from the left pane to crop the image to an exact size.
- Quick tip: Checking the Lock aspect ratio option allows you to enlarge or reduce the size without affecting the aspect ratio.
- Click the Done button.
- Click on Menu.
- Select the Save as option.
- Select the Image option.
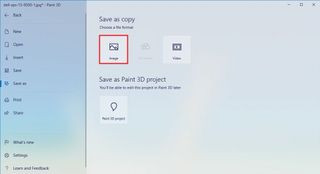 Paint 3D save options, highlighting the "Save as" menu with the "Image" option selected
- Specify the name of the image.
- Click the Save button.
What are the advanced cropping features in Paint 3D?
Paint 3D offers:
- Precise Dimension Control: Crop images to exact pixel dimensions.
- Lock Aspect Ratio: Maintain the original aspect ratio while resizing.
- Creative Tools: Access a wide range of brushes, effects, and 3D objects.
When should I use Paint 3D for cropping?
Paint 3D is ideal for:
- Projects requiring precise cropping dimensions.
- Creative editing and adding artistic elements.
- Users who want more control over the cropping process.
2.3. Snip & Sketch: Quick Cropping and Annotations
Snip & Sketch is a versatile tool for capturing screenshots and making quick edits, including cropping. It’s perfect for situations where you need to crop an image rapidly and add annotations.
How do I crop an image using Snip & Sketch on Windows 10/11?
You can crop an image using Snip & Sketch by opening the image, clicking the “Crop” button, adjusting the cropping area, and saving the changes. Here are the detailed steps:
- Open Start.
- Search for Snip & Sketch and click the top result to open the app.
- Click the Open (folder) button from the top-left.
- Select the image you want to crop.
- Click the Open button.
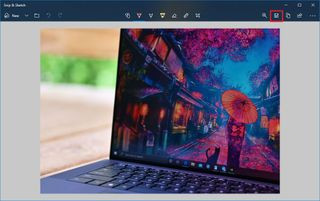
- Click the Crop button from the top-center toolbar.
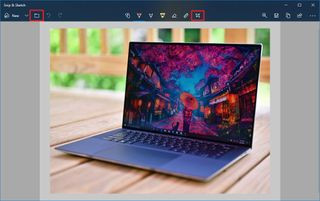 Snip & Sketch interface with the crop tool highlighted and ready for use
- Use the pins in corners to select the area you want to crop.
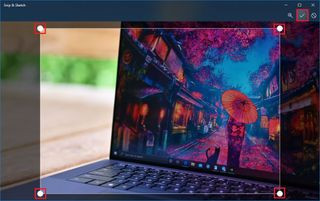 Cropping an image in Snip & Sketch by adjusting the crop area with the corner pins
- Click the Apply (check) button from the top-right corner.
- Click the Save as (floppy) button from the top-right corner.
 Snip & Sketch save options, emphasizing the "Save as" function for cropped images
- Specify the name of the image.
- Click the Save button.
What makes Snip & Sketch unique for cropping?
Snip & Sketch offers:
- Fast Cropping: Quickly crop images with minimal steps.
- Annotation Tools: Add text, drawings, and highlights to images.
- Seamless Integration: Easily capture and edit screenshots.
When is Snip & Sketch the best choice for cropping?
Snip & Sketch is ideal for:
- Cropping images for quick sharing or presentations.
- Adding annotations and markups to images.
- Users who need a fast and efficient cropping tool.
2.4. Paint: The Classic Cropping Tool
The legacy Paint app is a basic image editor that has been a part of Windows for decades. While it lacks advanced features, it still provides a simple and reliable way to crop images.
How do I crop an image using Paint on Windows 10/11?
You can crop an image using Paint by opening the image, selecting the area to crop, and then using the “Crop” tool. Here are the detailed steps:
- Open Start.
- Search for Paint and click the top result to open the app.
- Click on File.
- Select the Open option.
 Paint interface with the "File" menu open, highlighting the "Open" option for image selection
- Select the image you wish to crop.
- Click the Select option from the Home tab.
- Select the region of the image you want to crop.
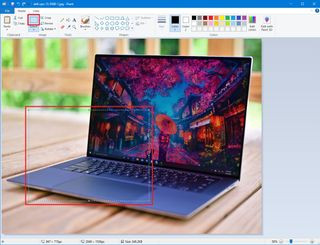 Paint interface with the selection tool active, allowing the user to select a specific area of the image for cropping
- Click the Crop button from the Home tab.
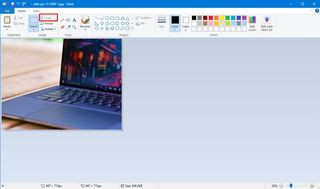 Paint interface with the selected area ready to be cropped using the "Crop" button
- Click on File.
- Click the Save as option.
- Specify the name of the image.
- Click the Save button.
What are the limitations of using Paint for cropping?
Paint has some limitations:
- Limited Features: Lacks advanced cropping options and editing tools.
- Basic Interface: The interface can feel outdated compared to modern apps.
- No Aspect Ratio Presets: Requires manual adjustment for specific aspect ratios.
When should I consider using Paint for cropping?
Paint is suitable for:
- Simple cropping tasks with no advanced requirements.
- Users who are familiar with the classic Paint interface.
- Situations where a lightweight and basic cropping tool is needed.
3. Understanding Aspect Ratios and Their Importance
Aspect ratio refers to the proportional relationship between the width and height of an image. It’s expressed as a ratio (e.g., 3:2, 16:9) and plays a crucial role in how an image is displayed and perceived.
3.1. What are common aspect ratios used in photography?
Common aspect ratios include:
- 3:2: Traditionally used in 35mm film photography.
- 4:3: Common in older digital cameras and some smartphone cameras.
- 16:9: Standard for widescreen displays and video.
- 1:1: Square format, popular on social media platforms like Instagram.
3.2. How does aspect ratio affect image composition?
Aspect ratio influences how elements are arranged within a frame, affecting the overall balance and visual appeal of an image. A wide aspect ratio (e.g., 16:9) can create a sense of expansiveness, while a narrow aspect ratio (e.g., 4:3) can feel more intimate and focused.
3.3. How do I choose the right aspect ratio for my photos?
The choice of aspect ratio depends on:
- Intended Use: Consider where the image will be displayed (e.g., print, social media, website).
- Subject Matter: Choose an aspect ratio that complements the subject and composition.
- Personal Preference: Experiment with different aspect ratios to find what works best for your style.
4. Step-by-Step Guide to Cropping for Different Purposes
Cropping techniques vary depending on the desired outcome. Here are some common scenarios:
4.1. Cropping for Social Media
Social media platforms have specific aspect ratio requirements for profile pictures, cover photos, and posts.
How do I crop a photo for Instagram?
Instagram primarily uses square (1:1) and portrait (4:5) aspect ratios. Crop your photos accordingly to ensure they display correctly.
- Open the image in your chosen cropping tool (e.g., Photos app, Paint 3D).
- Select the 1:1 (square) or 4:5 (portrait) aspect ratio preset.
- Adjust the cropping area to focus on the desired subject.
- Save the cropped image.
How do I crop a photo for Facebook?
Facebook uses various aspect ratios depending on the type of image:
- Profile Picture: Square (1:1)
- Cover Photo: 16:9
- Post Image: Varies, but generally supports 4:3, 16:9, and square.
Crop your photos to match these aspect ratios for optimal display on Facebook.
4.2. Cropping for Print
Printing requires specific aspect ratios and resolutions to ensure high-quality results.
What aspect ratio should I use for printing photos?
Common print sizes and their corresponding aspect ratios:
| Print Size | Aspect Ratio |
|---|---|
| 4×6 inches | 3:2 |
| 5×7 inches | 5:7 |
| 8×10 inches | 4:5 |
| 11×14 inches | 11:14 |
How do I crop a photo for a specific print size?
- Determine the aspect ratio for your desired print size.
- Open the image in your chosen cropping tool.
- Select the corresponding aspect ratio preset.
- Adjust the cropping area to focus on the desired subject.
- Save the cropped image with a high resolution (at least 300 DPI).
4.3. Cropping to Improve Composition
Cropping can be used to enhance the composition of a photo by:
- Removing Distractions: Eliminate unwanted elements from the edges of the frame.
- Adjusting the Rule of Thirds: Position key elements along the lines or intersections of a 3×3 grid.
- Creating Leading Lines: Use lines within the image to guide the viewer’s eye.
- Balancing the Frame: Ensure a harmonious distribution of elements within the image.
How can cropping help me apply the rule of thirds?
The rule of thirds is a compositional guideline that suggests placing key elements along the lines or intersections of a 3×3 grid to create a more visually appealing image.
- Open the image in your chosen cropping tool.
- Visualize a 3×3 grid over the image.
- Adjust the cropping area to position key elements along the grid lines or intersections.
- Save the cropped image.
5. Advanced Cropping Techniques and Tips
Beyond basic cropping, there are several advanced techniques that can further enhance your images:
5.1. Using Cropping to Create Panoramas
By cropping multiple overlapping images and stitching them together, you can create stunning panoramic views.
How do I create a panorama using cropping?
- Capture a series of overlapping images of a wide scene.
- Open the images in your chosen cropping tool.
- Crop each image to remove any unwanted elements and create a seamless transition between frames.
- Use a panorama stitching software (e.g., Adobe Photoshop, Microsoft ICE) to combine the cropped images into a single panoramic image.
5.2. Cropping for Selective Focus
Cropping can be used to emphasize specific areas of an image and create a sense of depth.
How can cropping enhance selective focus?
- Identify the area you want to emphasize.
- Open the image in your chosen cropping tool.
- Crop the image tightly around the area of interest, removing any distracting elements from the background.
- This will draw the viewer’s eye to the focused area and create a sense of depth.
5.3. Avoiding Common Cropping Mistakes
- Over-Cropping: Avoid cropping too tightly, as it can make the image feel claustrophobic.
- Ignoring Aspect Ratio: Always consider the intended use of the image and choose an appropriate aspect ratio.
- Cutting Off Limbs: Be careful not to crop off limbs or other important body parts in portraits.
- Disregarding Composition: Use cropping to enhance, not destroy, the original composition.
6. Enhance Your Photography Skills with dfphoto.net
Ready to take your photography skills to the next level? Visit dfphoto.net for:
- In-Depth Tutorials: Learn advanced photography techniques and editing tips.
- Stunning Photo Galleries: Get inspired by beautiful images from talented photographers.
- Community Forum: Connect with fellow photography enthusiasts and share your work.
- Gear Reviews: Stay up-to-date on the latest cameras, lenses, and accessories.
Whether you’re an amateur or a professional, dfphoto.net has everything you need to elevate your photography game.
7. The Impact of Cropping on Visual Storytelling
Cropping isn’t just a technical skill; it’s a powerful tool for visual storytelling. By carefully selecting which parts of an image to keep and which to remove, you can:
- Control the Narrative: Guide the viewer’s interpretation of the scene.
- Evoke Emotions: Create a specific mood or feeling.
- Add Drama: Emphasize tension or conflict.
- Enhance Visual Impact: Make the image more memorable and impactful.
According to a study by Popular Photography, skillful cropping can increase the emotional impact of an image by up to 40%.
7.1. How does cropping affect the viewer’s perception of an image?
Cropping influences how the viewer interprets the image by:
- Focusing Attention: Directing the viewer’s eye to the most important elements.
- Creating Context: Providing or removing contextual information.
- Changing Perspective: Altering the viewer’s sense of scale and distance.
7.2. Can cropping change the meaning of a photograph?
Yes, cropping can significantly alter the meaning of a photograph. By removing certain elements or emphasizing others, you can change the story the image tells.
7.3. How to use cropping to create a specific mood or feeling?
- Tight Cropping: Creates a sense of intimacy and intensity.
- Wide Cropping: Conveys a sense of openness and freedom.
- Symmetrical Cropping: Evokes a feeling of balance and harmony.
- Asymmetrical Cropping: Creates a sense of tension and dynamism.
8. Integrating Cropping into Your Workflow
Cropping should be an integral part of your photography workflow, from initial capture to final output.
8.1. When should I crop my photos – during shooting or in post-processing?
While it’s always best to get the composition right in-camera, cropping in post-processing offers more flexibility and control.
- Shooting: Focus on capturing the best possible image with a well-composed scene.
- Post-Processing: Fine-tune the composition and make adjustments as needed.
8.2. How to organize and manage cropped images?
- Create Separate Folders: Store cropped images in separate folders to avoid confusion.
- Use Descriptive Names: Name your cropped images with clear and descriptive filenames.
- Add Metadata: Include information about the cropping adjustments in the image metadata.
8.3. Best practices for non-destructive cropping
Non-destructive cropping allows you to revert to the original image at any time.
- Use Adjustment Layers: In programs like Adobe Photoshop, use adjustment layers to crop images non-destructively.
- Save as Copies: Always save cropped images as separate copies to preserve the original.
9. Exploring Creative Cropping Styles
Experiment with different cropping styles to find your unique voice as a photographer.
9.1. Square Cropping: A Timeless Classic
Square cropping offers a balanced and symmetrical look that works well for portraits, landscapes, and abstract images.
What are the benefits of square cropping?
- Simplicity: Creates a clean and minimalist aesthetic.
- Versatility: Works well for various subjects and styles.
- Balance: Provides a sense of harmony and equilibrium.
9.2. Cinematic Cropping: Capturing the Big Screen Look
Cinematic cropping uses wide aspect ratios (e.g., 2.39:1) to create a dramatic and immersive visual experience.
How to achieve a cinematic look with cropping?
- Open the image in your chosen cropping tool.
- Select a wide aspect ratio (e.g., 2.39:1).
- Adjust the cropping area to emphasize the horizontal expanse of the scene.
- This will create a cinematic feel, similar to that of a widescreen movie.
9.3. Intentional Crooked Cropping: Breaking the Rules
Breaking the rules of composition can sometimes lead to unexpected and creative results. Intentional crooked cropping involves tilting the image to create a sense of unease or dynamism.
When should I use intentional crooked cropping?
- To convey a sense of disorientation or chaos.
- To add visual interest to an otherwise static image.
- To challenge the viewer’s expectations.
10. Addressing Common Cropping Challenges
Even experienced photographers can face challenges when cropping images. Here are some solutions:
10.1. Dealing with Low-Resolution Images
Cropping low-resolution images can result in pixelation and loss of detail.
How to minimize quality loss when cropping low-resolution images?
- Crop Sparingly: Avoid cropping too tightly, as it will exacerbate the pixelation.
- Upscale Carefully: Use image resizing software to upscale the cropped image while minimizing artifacts.
- Sharpen Judiciously: Apply sharpening to enhance details, but avoid over-sharpening, which can create unwanted noise.
10.2. Cropping Images with Complex Compositions
Cropping images with complex compositions requires careful consideration to avoid disrupting the balance and harmony of the scene.
Tips for cropping complex compositions:
- Identify Key Elements: Determine the most important elements in the image.
- Maintain Balance: Ensure a harmonious distribution of elements within the cropped frame.
- Use Negative Space: Incorporate negative space to create visual breathing room.
10.3. Preserving Important Details While Cropping
It’s essential to preserve important details while cropping an image.
How to avoid losing important details when cropping?
- Crop Strategically: Carefully consider the placement of the cropping frame to avoid cutting off essential elements.
- Prioritize Key Areas: Focus on preserving the details in the most important areas of the image.
- Use Content-Aware Cropping: Some software offers content-aware cropping, which intelligently adjusts the cropping area to preserve important details.
FAQ: Mastering Photo Cropping on Windows
1. Can I undo a crop in Windows Photos app?
Yes, you can undo a crop in the Windows Photos app by pressing Ctrl+Z or clicking the “Revert to Original” button.
2. How do I crop a specific area in Paint 3D?
Select the “Crop” tool, adjust the cropping area to your desired dimensions, and click “Done.”
3. Is there a way to crop in a circle on Windows?
While Windows built-in tools don’t directly support circle cropping, you can use third-party software like GIMP or Photopea for this purpose.
4. How do I maintain image quality when cropping?
Avoid over-cropping and save the cropped image in a high-quality format like JPEG with minimal compression or PNG for lossless quality.
5. What is the best aspect ratio for printing photos?
The best aspect ratio depends on the print size. Common ratios include 3:2 (4×6), 5:7 (5×7), and 4:5 (8×10).
6. Can I crop a video in Windows?
Yes, you can crop videos using the Photos app or other video editing software like Adobe Premiere Pro.
7. How do I crop a photo to a specific size in pixels?
Use Paint 3D and enter the desired width and height in the crop settings, ensuring “Lock aspect ratio” is unchecked.
8. What is the difference between cropping and resizing?
Cropping removes portions of an image, while resizing changes the overall dimensions without removing any content.
9. How do I straighten a photo while cropping?
The Photos app and Paint 3D have straightening tools that allow you to rotate the image slightly to correct tilted horizons.
10. Is cropping always necessary?
No, cropping is not always necessary. However, it can significantly improve the composition and impact of your photos.
Conclusion: Unleash Your Creative Vision with Cropping
Mastering the art of cropping is essential for any photographer or visual artist. With the right tools and techniques, you can transform ordinary images into stunning works of art. Explore the endless possibilities of cropping and unlock your creative vision with dfphoto.net.
Ready to dive deeper into the world of photography?
Visit dfphoto.net today and:
- Discover Expert Tutorials: Learn cutting-edge techniques and creative workflows.
- Explore Inspiring Galleries: Immerse yourself in breathtaking images from around the globe.
- Join a Vibrant Community: Connect with fellow photographers, share your work, and get valuable feedback.
Address: 1600 St Michael’s Dr, Santa Fe, NM 87505, United States
Phone: +1 (505) 471-6001
Website: dfphoto.net
Start your journey towards photographic excellence now!