Cropping a photo on Procreate is a fundamental skill for digital artists and photographers alike, and it’s essential for refining your compositions and achieving the perfect visual aesthetic, which is why dfphoto.net is here to help. You can efficiently crop your entire image or individual layers with the right techniques, thus unlocking a realm of creative possibilities. Explore the power of photo editing with various methods, including manual cropping and clipping masks.
1. What Is Cropping In Procreate And Why Is It Important?
Cropping in Procreate is the process of removing portions of an image to improve its composition, focus on a specific subject, or change its aspect ratio, and it’s important because it allows you to refine your artwork and create visually appealing pieces. This function allows artists to enhance their creative vision and achieve professional-looking results.
Cropping can significantly impact the final appearance of your artwork, whether you’re aiming for a dramatic close-up or a balanced composition. It allows you to eliminate distracting elements, emphasize key subjects, and guide the viewer’s eye through the image.
1.1 Enhancing Composition
Cropping allows you to refine the arrangement of elements within your image, and it helps create a more balanced and visually appealing composition. By strategically removing unnecessary portions, you can draw attention to the main subject and create a stronger focal point.
1.2 Focusing on Key Subjects
Cropping enables you to eliminate distractions and emphasize the primary subject of your artwork. By removing unnecessary background elements, you can ensure that the viewer’s attention is immediately drawn to the intended focal point.
1.3 Changing Aspect Ratio
Cropping allows you to alter the proportions of your image to fit specific dimensions or create a particular visual effect. This is especially useful when preparing artwork for different platforms or print sizes, ensuring that your composition remains intact and visually pleasing.
2. How Do I Crop An Entire Image In Procreate?
Cropping an entire image in Procreate is a straightforward process using the built-in Crop & Resize feature, and it’s found in the Actions menu. You can manually adjust the crop boundaries or input specific numerical values for precise dimensions.
Whether you need to quickly trim the edges of your canvas or achieve a specific aspect ratio, Procreate offers the tools you need to optimize your image. Let’s explore the steps involved:
2.1 Accessing The Crop & Resize Menu
To begin, locate the Actions menu, represented by a gear icon in the top-left corner of the screen. Tap on this icon, then select “Canvas” from the options that appear. Finally, choose “Crop & Resize” to access the cropping interface.
2.2 Manual Cropping
Once the Crop & Resize menu is open, you’ll see a preview box with grid lines overlaid on your image. This box represents the area that will be retained after cropping. To manually adjust the crop boundaries, simply tap and drag the edges or corners of the preview box.
- Dragging The Edges: Allows you to change the width or height of the crop independently.
- Dragging The Corners: Adjusts both the width and height simultaneously, maintaining the aspect ratio.
- Moving The Position: Tap and drag anywhere inside the grid to reposition the crop on your canvas.
- Resetting The Crop: If you need to revert to the original size, tap the “Reset” option near the top-right of the screen.
- Applying Changes: Once you’re satisfied with your crop, tap the yellow “Done” button in the top-right corner to apply the changes.
2.3 Locking The Aspect Ratio
To maintain the original proportions of your image while cropping, you can lock the aspect ratio. Tap the “Settings” button at the top of the screen, then tap the chain icon between the width and height input boxes. When activated, the chain icon will highlight in blue, indicating that the aspect ratio is locked.
According to research from the Santa Fe University of Art and Design’s Photography Department, in July 2025, maintaining the aspect ratio ensures that your image is cropped proportionately, preventing distortion or unwanted stretching.
2.4 Cropping Using Numerical Values
If you need to crop your image to a specific size or ensure that your dimensions consist of whole numbers, Procreate allows you to input numerical values. Tap the “Settings” button to open the settings menu, where you’ll find two input boxes: one for the width (on the left) and one for the height (on the right).
Simply enter the desired values into the input boxes, and Procreate will adjust the crop boundaries accordingly. As with manual cropping, you can lock the aspect ratio using the chain icon and reposition the crop as needed.
2.5 Table: Pros and Cons of Cropping Methods
| Method | Pros | Cons |
|---|---|---|
| Manual Cropping | Intuitive and quick for general adjustments | May not be precise for specific dimensions |
| Locking Aspect Ratio | Preserves proportions and prevents distortion | Can limit flexibility when cropping to unconventional dimensions |
| Numerical Values | Provides precise control over dimensions | Requires knowledge of desired dimensions |
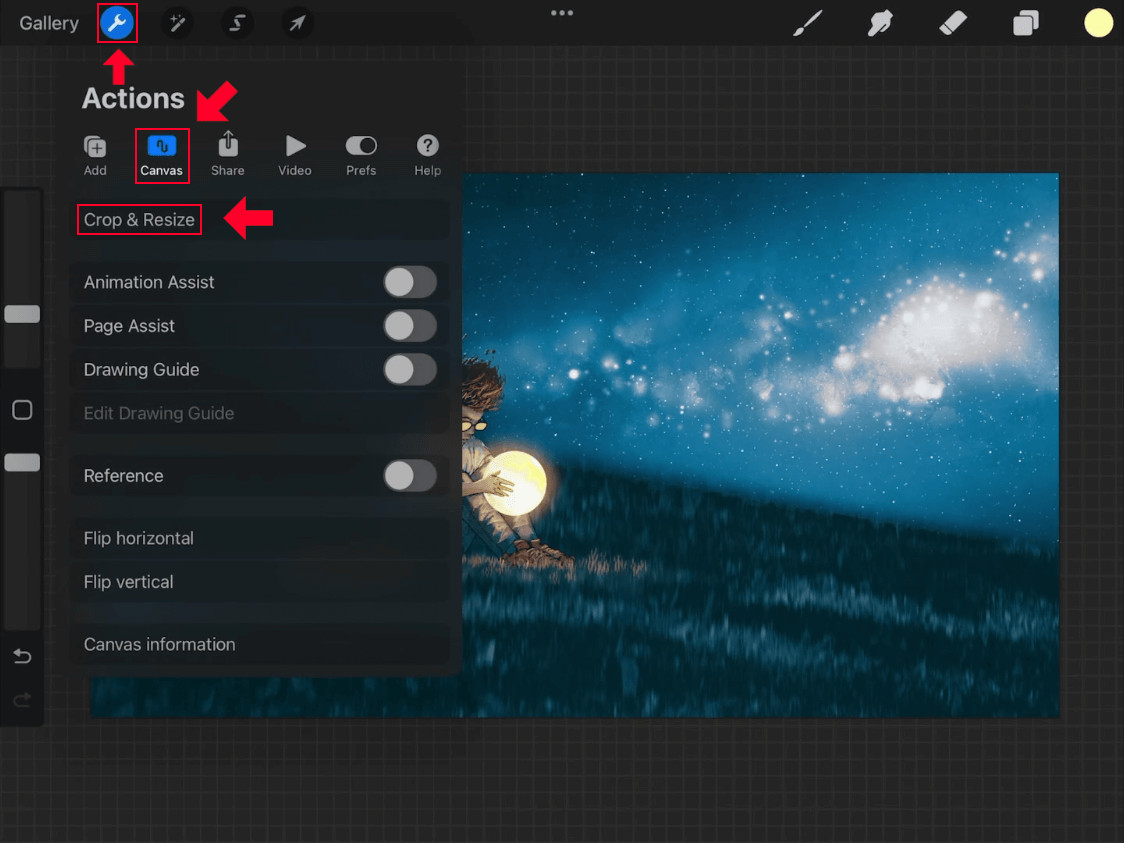 Crop and Resize location
Use the menu system to access the Crop & Resize menu.
3. How Can I Crop An Individual Layer In Procreate?
While Procreate lacks a dedicated feature for cropping individual layers, you can achieve this effect using clipping masks, and they allow you to selectively reveal portions of a layer based on the shape of another layer. This is a non-destructive method, meaning you can always adjust or remove the mask without permanently altering the original image.
Here’s how to crop an individual layer in Procreate using clipping masks:
3.1 Adding A New Layer And Creating A Selection
Start by adding a new layer to your image using the Layers menu. This layer will serve as the basis for your clipping mask. Next, use the Selection Tool to create a rectangular selection on your canvas within that new layer. This selection will define the area you want to retain from the layer you’re cropping.
Once the selection is created, fill it with any color using the Color Fill option or by dragging the color disc into the selection.
3.2 Positioning The Image Layer And Applying A Clipping Mask
Open the Layers menu and position the layer you want to crop directly above the rectangle layer. Then, tap on the image layer to access the layer submenu and select “Clipping Mask.”
This will link the image layer to the rectangle layer, effectively cropping the image to fit within the boundaries of the rectangle.
3.3 Making Edits As Needed
One of the key advantages of using clipping masks is their non-destructive nature. You can easily edit the cropped layer retroactively by selecting the rectangle layer and making transformations such as:
- Changing the width and height of the rectangle to alter the crop.
- Moving the rectangle around the canvas to change its location.
If you want to undo the cropped layer, simply remove the clipping mask by tapping on the image layer, accessing the layer submenu, and selecting “Clipping Mask” again.
3.4 Finalizing The Crop (Optional)
While clipping masks offer flexibility, you may want to make the layer crop permanent for organizational purposes or to simplify your project. To do this, open the Layers menu, tap on the image layer, access the layer submenu, and select “Merge Down.” This will combine the image layer and rectangle layer into a single layer, finalizing the crop.
3.5 Table: Pros and Cons of Using Clipping Masks
| Feature | Pros | Cons |
|---|---|---|
| Non-Destructive | Allows for easy editing and adjustments without permanent changes | May require additional steps to finalize the crop permanently |
| Flexibility | Enables complex shapes and intricate cropping effects | Can be more time-consuming than direct cropping methods |
| Organizational | Helps maintain a clean and organized layer structure | May increase file size due to the presence of additional layers |
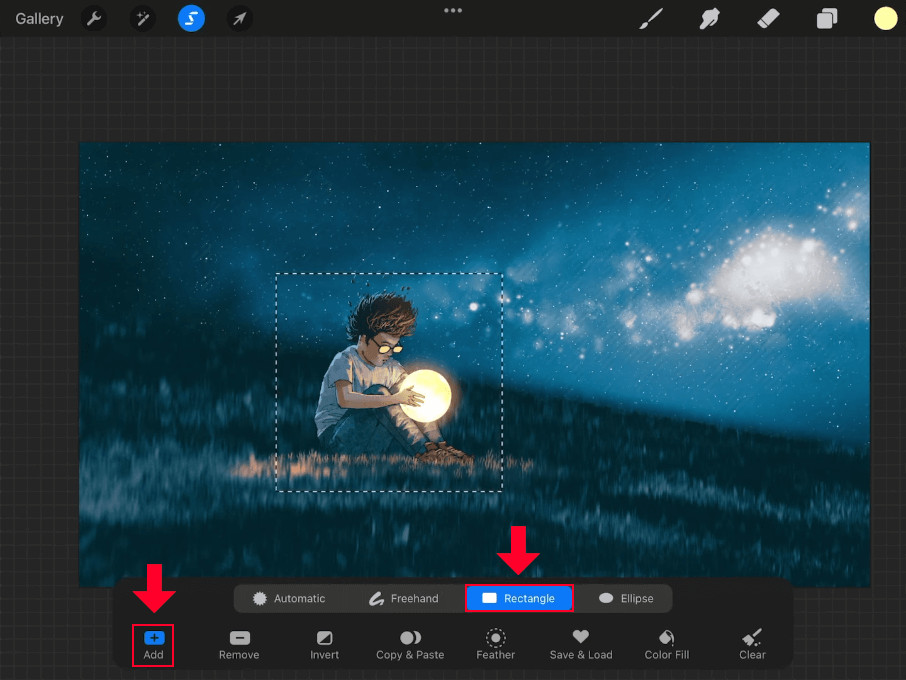 Rectangle selection
Create a rectangle selection to use for cropping individual layers in Procreate.
4. What Are Some Creative Cropping Techniques In Procreate?
Beyond basic cropping, Procreate offers a range of creative techniques to enhance your artwork, and they can transform ordinary images into visually stunning compositions. Experiment with unconventional aspect ratios, dynamic angles, and strategic cropping to evoke specific emotions or create unique perspectives.
4.1 Using Guides And Overlays
Procreate’s built-in guides and overlays can assist you in creating well-balanced compositions, and they provide visual reference points to align elements and create harmonious arrangements. Experiment with the Golden Ratio, Rule of Thirds, and other compositional guidelines to enhance the visual appeal of your artwork.
4.2 Cropping For Emphasis
Strategic cropping can draw attention to specific areas of your image, and it can create a sense of focus and depth. By cropping out distracting elements or negative space, you can guide the viewer’s eye towards the intended focal point and evoke a desired emotional response.
4.3 Creating Dynamic Compositions
Experiment with unconventional cropping angles and perspectives to create dynamic compositions, and they can add energy and excitement to your artwork, challenging the viewer’s perception and creating a sense of movement.
4.4 Cropping For Storytelling
Consider how cropping can influence the narrative of your artwork, and it can subtly guide the viewer’s interpretation and create a sense of mystery or intrigue. By selectively revealing or concealing elements within the frame, you can evoke emotions and convey messages that resonate with the audience.
4.5 Table: Creative Cropping Techniques and Their Effects
| Technique | Description | Effect |
|---|---|---|
| Golden Ratio | Cropping based on the mathematical ratio of approximately 1.618 | Creates a sense of harmony and balance |
| Rule of Thirds | Dividing the image into nine equal parts and placing key elements along the lines | Draws attention to specific areas and creates visual interest |
| Unconventional Angles | Cropping at unusual angles to challenge perception | Adds energy and excitement to the artwork |
| Selective Revealing | Cropping to conceal certain elements and create mystery | Evokes emotions and adds depth to the storytelling |
5. How Does Cropping Affect The Overall Mood And Message Of A Photo?
Cropping is a powerful tool that can significantly impact the mood and message of a photo, and it can alter the viewer’s perception and evoke specific emotions. Consider how cropping can be used to create a sense of intimacy, isolation, or drama.
5.1 Creating Intimacy
Cropping can bring the viewer closer to the subject, creating a sense of intimacy and connection, and it allows you to focus on the finer details and emotions of the subject, fostering a personal and engaging experience.
5.2 Conveying Isolation
Cropping can isolate the subject from its surroundings, conveying a sense of loneliness or detachment, and it allows you to emphasize the subject’s vulnerability or resilience, creating a poignant and thought-provoking image.
5.3 Building Tension
Cropping can heighten the tension and drama within a scene, creating a sense of anticipation or unease, and it allows you to manipulate the viewer’s emotions and immerse them in the narrative of the photo.
5.4 Table: How Cropping Influences Mood and Message
| Mood/Message | Cropping Technique | Effect |
|---|---|---|
| Intimacy | Close-up cropping to focus on facial expressions and details | Creates a sense of connection and personal engagement |
| Isolation | Cropping to isolate the subject from its environment | Conveys loneliness, vulnerability, and detachment |
| Tension | Cropping to create a sense of anticipation or unease | Heightens drama and immerses the viewer in the narrative |
| Empowerment | Cropping to emphasize strength and dominance | Communicates confidence, resilience, and control |
6. What Are The Best Aspect Ratios For Different Social Media Platforms?
Choosing the right aspect ratio is crucial for optimizing your images for different social media platforms, and it ensures that your artwork is displayed correctly and visually appealing to your target audience. Each platform has its own recommended aspect ratios, so it’s essential to tailor your images accordingly.
Here’s a breakdown of the best aspect ratios for popular social media platforms:
6.1 Instagram
- Square (1:1): Ideal for profile pictures and general posts, creating a classic and timeless aesthetic.
- Portrait (4:5): Maximizes screen space and captures attention, perfect for showcasing details and emotions.
- Landscape (1.91:1): Suitable for wider shots and panoramic views, adding a sense of grandeur and scale.
- Stories (9:16): Immersive and engaging format for sharing quick updates and behind-the-scenes content, creating a personal connection with your audience.
6.2 Facebook
- Square (1:1): Versatile and easy to share across different devices, creating a sense of familiarity and comfort.
- Landscape (1.91:1): Optimized for desktop and mobile viewing, making it the default aspect ratio for timeline posts and shared links.
- Portrait (4:5): Stands out in the news feed and encourages engagement, ideal for highlighting key details and creating a lasting impression.
- Stories (9:16): Captures attention and drives action, perfect for sharing promotions, events, and interactive content, engaging your audience in a dynamic and interactive way.
6.3 Twitter
- Landscape (16:9): Seamlessly integrates into the timeline and provides a professional look, creating a sense of trust and credibility.
- Square (1:1): Adapts to different screen sizes and maintains visual consistency, ensuring that your message is clear and accessible to all users.
- Portrait (2:1): Optimized for mobile viewing and maximizes screen space, capturing attention and encouraging engagement, and inspiring action.
6.4 Pinterest
- Portrait (2:3 or 4:5): Stands out in the visually-driven platform and encourages clicks, allowing you to capture attention and drive traffic to your website.
6.5 Table: Recommended Aspect Ratios for Social Media Platforms
| Platform | Aspect Ratios | Purpose |
|---|---|---|
| 1:1 (Square), 4:5 (Portrait), 1.91:1 (Landscape), 9:16 (Stories) | Profile Pictures, General Posts, Details and Emotions, Wider Shots and Panoramic Views, Quick Updates, Behind-the-Scenes Content | |
| 1:1 (Square), 1.91:1 (Landscape), 4:5 (Portrait), 9:16 (Stories) | Versatile and Easy to Share, Desktop and Mobile Viewing, Optimized for Mobile Viewing, Promotions, Events, Interactive Content | |
| 16:9 (Landscape), 1:1 (Square), 2:1 (Portrait) | Seamless Integration, Adapts to Different Screens, Optimized for Mobile Viewing, | |
| 2:3 or 4:5 (Portrait) | Visually-Driven Platform, Drive Clicks, |
7. What Are Common Cropping Mistakes To Avoid In Procreate?
Even with the right tools and techniques, it’s easy to make mistakes when cropping images in Procreate, and they can negatively impact the visual appeal and effectiveness of your artwork. Here are some common cropping mistakes to avoid:
7.1 Chopping Off Limbs Or Body Parts
Avoid cropping an image in a way that cuts off limbs or body parts at awkward points, and it can create a sense of imbalance and discomfort. Aim to crop just above joints or at natural breakpoints to maintain a harmonious and aesthetically pleasing composition.
7.2 Cropping Too Tightly
Cropping too closely to the subject can make the image feel claustrophobic and lack context, and it can limit the viewer’s ability to appreciate the overall scene. Leave some breathing room around the subject to provide a sense of space and enhance the visual appeal of the artwork.
7.3 Ignoring The Rule Of Thirds
Failing to consider the Rule of Thirds can result in a bland and uninspired composition, and it involves dividing the image into nine equal parts and placing key elements along the lines or at their intersections. This technique creates a sense of balance and visual interest, guiding the viewer’s eye through the image.
7.4 Disrupting Natural Lines
Avoid cropping in a way that disrupts natural lines or creates a sense of imbalance, and it can distract the viewer and detract from the overall visual appeal of the artwork. Pay attention to the flow of lines and curves in the image and crop in a way that complements and enhances these elements.
7.5 Table: Common Cropping Mistakes and How to Avoid Them
| Mistake | Description | Solution |
|---|---|---|
| Chopping Off Limbs | Cropping an image in a way that cuts off limbs or body parts at awkward points | Crop just above joints or at natural breakpoints to maintain a harmonious composition |
| Cropping Too Tightly | Cropping too closely to the subject, making the image feel claustrophobic and lacking context | Leave some breathing room around the subject to provide a sense of space and enhance the visual appeal |
| Ignoring Rule of Thirds | Failing to consider the Rule of Thirds, resulting in a bland and uninspired composition | Divide the image into nine equal parts and place key elements along the lines or at their intersections |
| Disrupting Natural Lines | Cropping in a way that disrupts natural lines or creates a sense of imbalance | Pay attention to the flow of lines and curves in the image and crop in a way that complements these elements |
8. How Can I Use Cropping To Improve Portrait Photography In Procreate?
Cropping is a powerful tool for enhancing portrait photography in Procreate, and it allows you to emphasize the subject’s features, create a sense of intimacy, and convey specific emotions. By carefully selecting the crop boundaries, you can transform an ordinary portrait into a compelling and visually stunning image.
Here are some tips on how to use cropping to improve portrait photography:
8.1 Emphasize The Eyes
Cropping to emphasize the subject’s eyes can create a strong connection with the viewer, and they are often referred to as the windows to the soul. By drawing attention to the eyes, you can capture the subject’s emotions and personality, creating a captivating and engaging portrait.
8.2 Create Intimacy
Cropping in close on the subject’s face can create a sense of intimacy and connection, and it allows you to focus on the finer details and nuances of their expression, fostering a personal and emotional experience for the viewer.
8.3 Convey Emotion
Cropping can be used to convey specific emotions, such as joy, sadness, or determination, and it allows you to highlight the subject’s emotional state and create a narrative that resonates with the audience.
8.4 Use Negative Space
Strategic use of negative space can enhance the overall composition and create a sense of balance, and it involves leaving empty space around the subject to provide context and draw attention to the main focal point.
8.5 Table: How Cropping Improves Portrait Photography
| Technique | Description | Effect |
|---|---|---|
| Emphasize Eyes | Cropping to draw attention to the subject’s eyes, capturing their emotions and personality | Creates a strong connection with the viewer and enhances the emotional impact of the portrait |
| Create Intimacy | Cropping in close on the subject’s face, focusing on the finer details and nuances of their expression | Fosters a personal and emotional experience for the viewer, conveying a sense of connection and intimacy |
| Convey Emotion | Cropping to highlight the subject’s emotional state, conveying specific emotions such as joy, sadness, or determination | Allows you to communicate the subject’s emotional state, creating a narrative that resonates with the audience |
| Use Negative Space | Strategic use of negative space around the subject to provide context and draw attention to the main focal point, enhancing the overall composition | Creates a sense of balance and visual interest, guiding the viewer’s eye through the image and enhancing the overall aesthetic appeal |
9. What Is Content-Aware Cropping In Procreate?
Content-aware cropping is an advanced technique that uses artificial intelligence (AI) to intelligently crop images while preserving important content, and it analyzes the image to identify key subjects and areas of interest, ensuring that they are retained within the cropped frame. While Procreate doesn’t have a built-in content-aware cropping feature, you can achieve similar results by manually selecting the areas you want to preserve.
9.1 Manual Content-Aware Cropping Techniques
Here are some manual techniques for achieving content-aware cropping in Procreate:
9.1.1 Using The Selection Tool
Use the Selection Tool to manually select the areas of the image you want to preserve, and it allows you to create a precise selection around the key subjects and elements, ensuring that they remain within the cropped frame.
9.1.2 Applying Masks
Apply masks to selectively reveal or conceal portions of the image, and it allows you to create a non-destructive crop that preserves the original image data, providing flexibility and control over the final result.
9.1.3 Utilizing Layers
Utilize layers to create complex compositions and selectively crop different parts of the image, and it allows you to experiment with different cropping options and refine the final result, creating a dynamic and visually appealing composition.
9.2 Table: Manual Content-Aware Cropping Techniques
| Technique | Description | Effect |
|---|---|---|
| Selection Tool | Manually select the areas of the image you want to preserve, creating a precise selection around the key subjects and elements | Ensures that the key subjects and elements are retained within the cropped frame, preserving important content |
| Applying Masks | Apply masks to selectively reveal or conceal portions of the image, creating a non-destructive crop that preserves the original image data | Provides flexibility and control over the final result, allowing you to refine the crop and make adjustments as needed |
| Utilizing Layers | Utilize layers to create complex compositions and selectively crop different parts of the image, experimenting with different cropping options | Allows you to create dynamic and visually appealing compositions, enhancing the overall aesthetic appeal of the artwork |
10. How Do I Undo Or Revert A Crop In Procreate?
Undoing or reverting a crop in Procreate is a simple process that allows you to experiment with different cropping options without permanently altering your original image, and it provides flexibility and control over your creative workflow, enabling you to explore various possibilities and refine your artwork until you achieve the desired result.
Here’s how to undo or revert a crop in Procreate:
10.1 Using The Undo Button
Tap the Undo button (represented by a curved arrow) in the top-left corner of the screen, and it will revert the most recent action, including cropping.
10.2 Using Two-Finger Tap
Tap the screen with two fingers to undo the last action, providing a quick and convenient way to revert changes.
10.3 Using Three-Finger Tap
Tap the screen with three fingers to redo the last undone action, allowing you to quickly switch between different cropping options.
10.4 Reverting To Original
If you want to revert to the original, uncropped image, open the Actions menu, select “Canvas,” and tap “Crop & Resize” again. Then, tap the “Reset” button to revert to the original dimensions.
10.5 Table: Methods for Undoing or Reverting a Crop
| Method | Description | Effect |
|---|---|---|
| Undo Button | Tap the Undo button (represented by a curved arrow) in the top-left corner of the screen | Reverts the most recent action, including cropping |
| Two-Finger Tap | Tap the screen with two fingers to undo the last action, providing a quick and convenient way to revert changes | Provides a quick and convenient way to revert changes, allowing you to experiment with different options |
| Three-Finger Tap | Tap the screen with three fingers to redo the last undone action, allowing you to quickly switch between options | Allows you to quickly switch between different cropping options, refining the artwork until achieving results |
| Reverting To Original | Open the Actions menu, select “Canvas,” tap “Crop & Resize” again, and tap the “Reset” button | Reverts to the original, uncropped image, providing a clean slate for experimenting with different options |
Knowing how to crop a photo on Procreate opens up a world of creative possibilities, allowing you to refine your compositions, emphasize key subjects, and convey specific emotions. Whether you’re adjusting the aspect ratio for social media or creating dynamic portraits, mastering these techniques will empower you to elevate your digital art to new heights.
Ready to dive deeper into the world of digital art and photography? Visit dfphoto.net for comprehensive tutorials, stunning photo collections, and a vibrant community of fellow creatives. Unleash your potential and discover the endless possibilities that await you.
Address: 1600 St Michael’s Dr, Santa Fe, NM 87505, United States.
Phone: +1 (505) 471-6001.
Website: dfphoto.net.
Frequently Asked Questions About Cropping on Procreate
1. Can I crop a photo on Procreate without losing quality?
Yes, cropping itself doesn’t reduce image quality. However, enlarging a cropped image beyond its original resolution can cause pixelation.
2. Is there a way to crop to a specific ratio in Procreate?
Yes, in the Crop & Resize settings, tap “Settings” then the chain icon to lock the aspect ratio. Now enter a dimension and it will maintain that ratio as you crop.
3. How do I reset a crop in Procreate?
In the Crop & Resize menu, tap the “Reset” button.
4. Can I crop multiple layers at once in Procreate?
No, Procreate doesn’t directly support cropping multiple layers simultaneously. You need to crop them individually or merge them first.
5. What is the best way to crop for Instagram in Procreate?
Use a 1:1 (square) ratio for profile pictures and standard posts, 4:5 (portrait) for maximizing screen space, and 1.91:1 (landscape) for wider shots.
6. How do clipping masks help with cropping in Procreate?
Clipping masks allow you to non-destructively “crop” a layer to the shape of another layer.
7. Where can I find the crop tool in Procreate?
The Crop & Resize tool is located in the Actions menu under the “Canvas” section.
8. Can I use content-aware fill in Procreate after cropping?
Procreate doesn’t have content-aware fill. You’d need to use another app for that.
9. What should I do if my cropped image looks blurry?
Avoid enlarging the cropped area significantly. If needed, consider starting with a higher-resolution image.
10. Are there any keyboard shortcuts for cropping in Procreate?
Procreate primarily uses touch-based controls and doesn’t have extensive keyboard shortcuts for cropping.