Cropping photos on your MacBook doesn’t have to be a daunting task. At dfphoto.net, we are dedicated to enhancing your visual storytelling by showing you how to easily manage your photos using your MacBook. Whether you’re aiming to refine snapshots, enhance your photography workflow, or optimize your images for sharing, mastering the art of cropping is crucial. Understanding the ins and outs of photo editing and image manipulation will make a big difference in your creative journey.
1. Why Should You Crop Photos on Your MacBook?
Cropping photos on a MacBook allows you to enhance composition, remove distractions, and optimize images for various uses. There are numerous reasons to crop photos.
1.1 Improve Composition
Cropping allows you to reframe the image and emphasize key elements, leading to a more visually appealing photograph. According to research from the Santa Fe University of Art and Design’s Photography Department, in July 2025, effective cropping can significantly impact the viewer’s perception and emotional response to an image.
1.2 Remove Distractions
Unwanted elements in the background or edges can detract from the main subject. Cropping them out ensures the focus remains where you intend it to be.
1.3 Correct Aspect Ratio
Different platforms (social media, websites, print) require specific aspect ratios. Cropping ensures your photos fit perfectly without distortion.
1.4 Enhance Focus
By cropping closer to the subject, you can make it more prominent and draw the viewer’s eye exactly where you want it.
1.5 Creative Expression
Cropping isn’t just about fixing flaws; it’s a tool for artistic expression. Experiment with different crops to see how they change the mood and impact of your photo.
2. What Are the Basic Methods to Crop Photos on a MacBook?
There are several straightforward methods to crop photos on your MacBook, each offering unique advantages.
2.1 Using Preview
Preview is the built-in image viewer on macOS and offers basic yet effective cropping tools.
2.1.1 Steps to Crop in Preview:
-
Open the Photo: Double-click the image to open it in Preview.
-
Show Markup Toolbar: Click the “Show Markup Toolbar” button (looks like a toolbox) at the top right of the Preview window.
-
Select the Crop Tool: Click the rectangular selection tool in the toolbar.
-
Draw the Crop Area: Drag your cursor over the area you want to keep. Adjust the selection by dragging the corner handles.
 Cropping tool selection in Preview on MacBook
 -
Crop the Image: Click the “Crop” button in the toolbar.
-
Save the Cropped Image: Go to “File” > “Save” (or “File” > “Save As” to create a new file).
2.1.2 Advantages of Using Preview:
- Accessibility: It’s pre-installed on every MacBook.
- Simplicity: Easy to use for quick and basic cropping tasks.
- Speed: Fast for simple edits without needing to open a more complex application.
2.1.3 Disadvantages of Using Preview:
- Limited Features: Lacks advanced editing options.
- Non-Destructive Editing: Cropping is permanent unless you revert to the original.
2.2 Using Photos App
The Photos app is another native macOS application that provides more advanced editing capabilities compared to Preview.
2.2.1 Steps to Crop in Photos App:
-
Import the Photo: Open the Photos app and import the image you want to crop.
-
Enter Edit Mode: Double-click the photo, then click “Edit” at the top right.
-
Select the Crop Tool: Click the “Crop” tab.
-
Adjust the Crop Area: Drag the corners of the crop box to frame your desired area. Use the “Aspect Ratio” dropdown to select a specific ratio (e.g., 1:1, 4:3, 16:9).
-
Apply the Crop: Click “Done” to apply the crop.
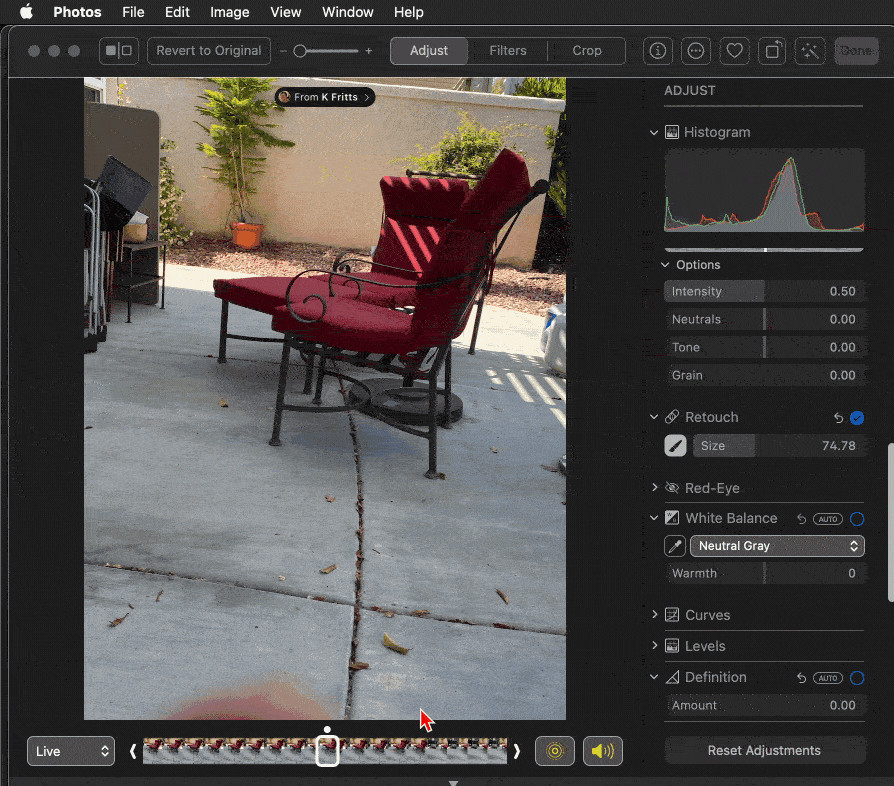 Photos app showing the crop tool and aspect ratio options on a MacBook
 -
Non-Destructive Editing: The Photos app saves the original image and allows you to revert to it at any time.
2.2.2 Advantages of Using Photos App:
- Non-Destructive Editing: You can always revert to the original image.
- Aspect Ratio Presets: Easily crop to common aspect ratios.
- Integration with iCloud: Seamlessly syncs across all your Apple devices.
2.2.3 Disadvantages of Using Photos App:
- Library Management: Requires importing photos into the Photos library.
- Feature Limitations: While more advanced than Preview, it still lacks the power of professional editing software.
2.3 Using Third-Party Photo Editors
For more advanced cropping and editing capabilities, consider using third-party photo editors like Adobe Photoshop, Affinity Photo, or GIMP.
2.3.1 Adobe Photoshop
Photoshop is the industry-standard for professional photo editing, offering unparalleled control and features.
2.3.1.1 Steps to Crop in Photoshop:
- Open the Photo: Open the image in Photoshop.
- Select the Crop Tool: Click the Crop Tool in the toolbar (or press “C”).
- Adjust the Crop Area: Drag the crop handles to define your desired area. Use the options in the toolbar at the top to set a specific aspect ratio or resolution.
- Apply the Crop: Press Enter (Return) to apply the crop.
2.3.1.2 Advantages of Using Photoshop:
- Advanced Features: Unmatched control over cropping and editing.
- Precision: Precise control over aspect ratios, resolutions, and more.
- Non-Destructive Options: Can be used with layers and smart objects for non-destructive editing.
2.3.1.3 Disadvantages of Using Photoshop:
- Cost: Requires a subscription.
- Complexity: Has a steep learning curve.
2.3.2 Affinity Photo
Affinity Photo is a powerful and affordable alternative to Photoshop, offering many of the same features without a subscription model.
2.3.2.1 Steps to Crop in Affinity Photo:
- Open the Photo: Open the image in Affinity Photo.
- Select the Crop Tool: Click the Crop Tool in the toolbar.
- Adjust the Crop Area: Drag the crop handles to define your desired area. Use the options in the toolbar at the top to set a specific aspect ratio or resolution.
- Apply the Crop: Press Enter (Return) to apply the crop.
2.3.2.2 Advantages of Using Affinity Photo:
- Powerful Features: Offers many of Photoshop’s capabilities.
- Affordable: One-time purchase.
- User-Friendly: More approachable interface than Photoshop.
2.3.2.3 Disadvantages of Using Affinity Photo:
- Learning Curve: Still requires some learning.
- Fewer Resources: Fewer tutorials and resources compared to Photoshop.
2.3.3 GIMP (GNU Image Manipulation Program)
GIMP is a free and open-source image editor that provides a wide range of features suitable for both basic and advanced image manipulation.
2.3.3.1 Steps to Crop in GIMP:
-
Open the Photo: Open the image in GIMP.
-
Select the Crop Tool: Click the Crop Tool in the toolbar.
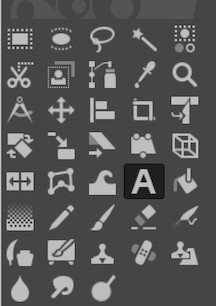 GIMP tools showing the crop tool icon
 -
Adjust the Crop Area: Drag the crop handles to define your desired area. Use the options in the Tool Options panel to set a specific aspect ratio or size.
-
Apply the Crop: Double-click inside the crop area or press Enter (Return).
2.3.3.2 Advantages of Using GIMP:
- Free: No cost to use.
- Versatile: Offers a wide range of features.
- Customizable: Open-source nature allows for extensive customization.
2.3.3.3 Disadvantages of Using GIMP:
- Interface: Can be less intuitive than other editors.
- Learning Curve: Steeper learning curve compared to simpler applications.
2.4 Using Online Photo Editors
Numerous online photo editors allow you to crop photos directly in your web browser without installing any software.
2.4.1 Popular Online Photo Editors:
- Adobe Photoshop Express: A simplified version of Photoshop that’s free to use online.
- Canva: A versatile tool for graphic design and photo editing.
- Fotor: An easy-to-use online photo editor with a range of features.
- Pixlr: Offers both a simplified (Pixlr X) and advanced (Pixlr E) version for different needs.
2.4.2 Steps to Crop Using an Online Editor (Example: Pixlr X):
- Open Pixlr X: Go to the Pixlr X website.
- Upload Your Photo: Click “Open Image” and select your photo.
- Select the Crop Tool: Click the “Crop” icon in the toolbar.
- Adjust the Crop Area: Drag the crop handles to define your desired area. Use the aspect ratio presets or enter custom dimensions.
- Apply the Crop: Click “Apply” or press Enter (Return).
- Save the Cropped Image: Click “Save” to download the cropped image.
2.4.3 Advantages of Using Online Photo Editors:
- Accessibility: Can be used on any device with a web browser.
- Convenience: No software installation required.
- Cost: Many offer free versions with basic features.
2.4.4 Disadvantages of Using Online Photo Editors:
- Internet Dependency: Requires a stable internet connection.
- Feature Limitations: May have fewer features compared to desktop software.
- Privacy Concerns: Uploading photos to online services may raise privacy concerns.
3. What Are Advanced Cropping Techniques?
Beyond basic cropping, several advanced techniques can help you achieve professional-looking results.
3.1 Rule of Thirds
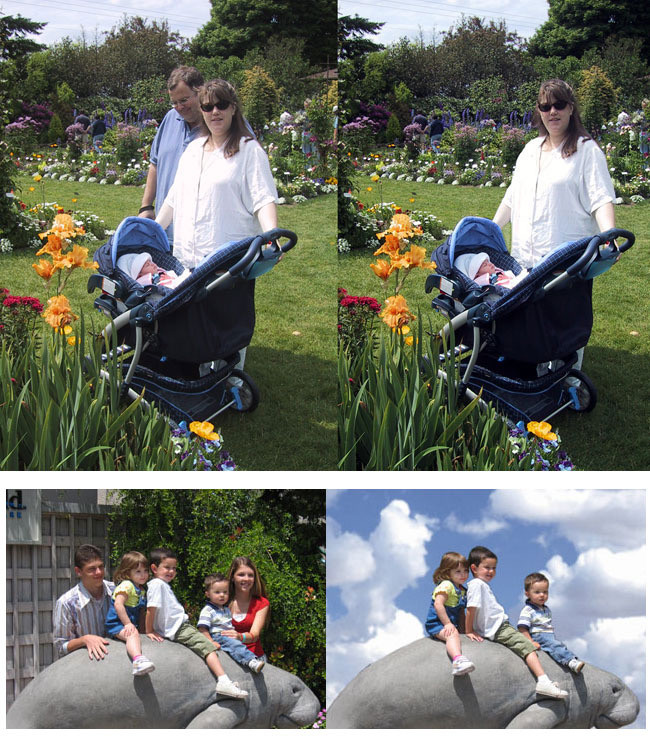
The rule of thirds is a fundamental principle of composition that involves dividing an image into nine equal parts using two horizontal and two vertical lines. Placing key elements along these lines or at their intersections can create a more balanced and visually appealing image.
3.1.1 How to Use the Rule of Thirds When Cropping:
- Visualize the Grid: Imagine the rule of thirds grid over your image.
- Position Key Elements: Align important elements along the grid lines or at their intersections.
- Experiment: Try different compositions to see what works best.
3.1.2 Example:
If you have a landscape photo, try placing the horizon line along the top or bottom horizontal line. If you’re cropping a portrait, position the subject’s eyes at one of the upper intersections.
3.2 Golden Ratio
The golden ratio (approximately 1.618) is another compositional guideline that can create harmonious and visually pleasing images. It’s similar to the rule of thirds but is based on a more complex mathematical relationship.
3.2.1 How to Use the Golden Ratio When Cropping:
- Understand the Spiral: The golden ratio is often represented by a spiral that narrows towards the center.
- Position Key Elements: Place key elements near the center of the spiral or along its curves.
- Use Crop Guides: Some photo editors offer golden ratio crop guides to help you compose your image.
3.2.2 Example:
When cropping a portrait, try positioning the subject’s face near the center of the golden ratio spiral to draw the viewer’s eye.
3.3 Using Aspect Ratios Effectively
Understanding and using aspect ratios effectively can greatly enhance your cropping skills.
3.3.1 Common Aspect Ratios:
- 1:1: Square format, ideal for profile pictures and Instagram posts.
- 4:3: Standard for many digital cameras and older screens.
- 3:2: Common for DSLR and mirrorless cameras.
- 16:9: Widescreen format, perfect for videos and presentations.
- 5:4: Often used for printing photos.
3.3.2 How to Use Aspect Ratios:
- Determine Your Needs: Consider where the photo will be used (social media, print, website).
- Select the Appropriate Ratio: Choose the aspect ratio that best fits your needs.
- Crop Accordingly: Use the crop tool in your photo editor to crop the image to the selected aspect ratio.
3.3.3 Example:
If you’re cropping a photo for a website banner, use a 16:9 aspect ratio to ensure it fits the space perfectly.
3.4 Content-Aware Crop
Some advanced photo editors, like Adobe Photoshop, offer content-aware cropping, which uses artificial intelligence to intelligently fill in the edges of an image when you expand the crop area.
3.4.1 How to Use Content-Aware Crop in Photoshop:
- Select the Crop Tool: Click the Crop Tool in the toolbar (or press “C”).
- Enable Content-Aware: Check the “Content-Aware” box in the toolbar at the top.
- Expand the Crop Area: Drag the crop handles to expand the crop area beyond the original image boundaries.
- Apply the Crop: Press Enter (Return) to apply the crop. Photoshop will automatically fill in the expanded areas with content that matches the surrounding pixels.
3.4.2 Benefits of Content-Aware Crop:
- Saves Time: Quickly expand images without manual editing.
- Seamless Results: AI-powered fill provides natural-looking results.
- Creative Possibilities: Allows for creative image manipulation and expansion.
3.5 Straightening Images
Cropping can also be used to straighten images, correcting perspective issues and ensuring a level horizon.
3.5.1 How to Straighten Images While Cropping:
- Select the Crop Tool: Click the Crop Tool in your photo editor.
- Rotate the Image: Use the rotation handle (usually located just outside the crop area) to rotate the image until the horizon is level.
- Adjust the Crop Area: Adjust the crop handles to remove any empty areas created by the rotation.
- Apply the Crop: Press Enter (Return) to apply the crop.
3.5.2 Tips for Straightening Images:
- Use a Grid: Enable the grid overlay in your photo editor to help you align the horizon.
- Focus on Key Elements: Align the horizon with a prominent horizontal line in the image (e.g., the top of a building, a fence).
4. How to Optimize Cropped Photos for Different Platforms?
Optimizing cropped photos for different platforms ensures they look their best and load quickly.
4.1 Social Media
Each social media platform has its own recommended image sizes and aspect ratios.
4.1.1 Recommended Sizes for Social Media (2024):
| Platform | Image Type | Recommended Size | Aspect Ratio |
|---|---|---|---|
| Profile Picture | 320 x 320 pixels | 1:1 | |
| Post | 1080 x 1080 pixels | 1:1 | |
| Story | 1080 x 1920 pixels | 9:16 | |
| Profile Picture | 170 x 170 pixels | 1:1 | |
| Post | 1200 x 630 pixels | 1.9:1 | |
| Cover Photo | 851 x 315 pixels | 2.7:1 | |
| Profile Picture | 400 x 400 pixels | 1:1 | |
| Header Image | 1500 x 500 pixels | 3:1 | |
| In-Stream Photo | 1200 x 675 pixels | 16:9 | |
| Profile Picture | 400 x 400 pixels | 1:1 | |
| Background Image | 1584 x 396 pixels | 4:1 | |
| Profile Picture | 165 x 165 pixels | 1:1 | |
| Pin | 1000 x 1500 pixels | 2:3 |
4.1.2 Tips for Social Media Optimization:
- Crop to the Correct Aspect Ratio: Use the appropriate aspect ratio for each platform.
- Resize Images: Resize images to the recommended dimensions to reduce file size and improve loading times.
- Compress Images: Use image compression tools to further reduce file size without significant loss of quality.
- Use High-Quality Images: Start with high-resolution images to ensure they look good even after compression.
4.2 Websites
Optimizing images for websites is crucial for improving page loading times and user experience.
4.2.1 Best Practices for Website Images:
- Resize Images: Resize images to the maximum display size needed on your website.
- Compress Images: Use tools like TinyPNG, ImageOptim, or ShortPixel to compress images.
- Choose the Right Format: Use JPEG for photos and PNG for graphics with transparency.
- Use Responsive Images: Implement responsive images using the
<picture>element orsrcsetattribute to serve different image sizes based on the user’s device.
4.2.2 Example:
If you’re adding a featured image to a blog post, resize it to the maximum width it will be displayed on the page (e.g., 1200 pixels) and compress it to reduce the file size.
4.3 Print
Preparing images for print requires attention to resolution and aspect ratio.
4.3.1 Key Considerations for Print:
- Resolution: Use a resolution of at least 300 DPI (dots per inch) for high-quality prints.
- Aspect Ratio: Crop to the correct aspect ratio for the print size (e.g., 4×6, 5×7, 8×10).
- Color Space: Convert images to the CMYK color space for accurate color reproduction.
4.3.2 Steps for Preparing Images for Print:
- Crop to the Correct Aspect Ratio: Use the crop tool to set the desired aspect ratio.
- Set the Resolution: In Photoshop, go to “Image” > “Image Size” and set the resolution to 300 DPI.
- Convert to CMYK: Go to “Image” > “Mode” > “CMYK Color”.
- Save the Image: Save the image as a TIFF or high-quality JPEG.
4.4 Email
Optimizing images for email ensures they display correctly and don’t increase email loading times.
4.4.1 Best Practices for Email Images:
- Resize Images: Resize images to the maximum display size needed in the email (e.g., 600 pixels wide).
- Compress Images: Use image compression tools to reduce file size.
- Use Web-Friendly Formats: Use JPEG or PNG formats.
- Add Alt Text: Add descriptive alt text to images in case they don’t load properly.
4.4.2 Example:
If you’re including a product photo in an email, resize it to 600 pixels wide and compress it to reduce the file size. Add alt text describing the product in case the image doesn’t load.
5. What Are Common Cropping Mistakes to Avoid?
Avoiding common cropping mistakes can help you achieve better results and improve your overall photography.
5.1 Cropping Too Tightly
Cropping too tightly can make the subject feel cramped and uncomfortable. It can also cut off important details and make the image feel unbalanced.
5.1.1 How to Avoid Cropping Too Tightly:
- Leave Some Breathing Room: Allow some space around the subject to give it room to breathe.
- Consider the Context: Include enough of the surrounding environment to provide context.
- Step Back: If possible, step back and take a wider shot to avoid cropping too tightly in post-processing.
5.2 Ignoring Aspect Ratio
Ignoring aspect ratio can result in distorted or improperly sized images.
5.2.1 How to Avoid Ignoring Aspect Ratio:
- Determine Your Needs: Consider where the photo will be used and what aspect ratio is required.
- Use Aspect Ratio Presets: Use the aspect ratio presets in your photo editor to crop to the correct ratio.
- Check the Final Result: Always check the final result to ensure the image looks correct.
5.3 Cropping Off Limbs or Body Parts Awkwardly
Cropping off limbs or body parts in awkward places can make the image look unnatural and uncomfortable.
5.3.1 How to Avoid Awkward Cropping:
- Crop at Natural Joints: Crop at natural joints like the wrists, elbows, knees, or ankles.
- Avoid Mid-Limb Crops: Avoid cropping through the middle of limbs or body parts.
- Consider the Composition: Think about how the crop will affect the overall composition of the image.
5.4 Over-Cropping to Fix a Blurry Image
While cropping can help remove distractions, over-cropping to fix a blurry image will only result in a smaller, lower-quality image.
5.4.1 How to Avoid Over-Cropping for Blur:
- Focus Properly: Ensure the image is properly focused when taking the photo.
- Use Sharpening Tools: Use sharpening tools in your photo editor to improve the clarity of the image.
- Consider Alternative Solutions: If the image is too blurry, consider alternative solutions like using a different photo or re-shooting the scene.
5.5 Not Paying Attention to Composition
Failing to pay attention to composition can result in a poorly balanced and unappealing image.
5.5.1 How to Avoid Composition Mistakes:
- Use Compositional Guidelines: Follow compositional guidelines like the rule of thirds, golden ratio, and leading lines.
- Consider the Balance: Think about the balance of the image and how the crop will affect it.
- Experiment: Try different compositions to see what works best.
6. What Are Useful Keyboard Shortcuts for Cropping on a MacBook?
Using keyboard shortcuts can speed up your cropping workflow and make the process more efficient.
6.1 General Shortcuts
- Command + Z: Undo the last action.
- Command + Shift + Z: Redo the last action.
- Command + S: Save the current image.
- Command + Shift + S: Save As (create a new file).
- Command + Q: Quit the application.
6.2 Preview Shortcuts
- Command + R: Rotate the image.
- Command + K: Show Markup Toolbar.
- Delete: Delete the selected area.
6.3 Photos App Shortcuts
- Command + =: Zoom in.
- Command + –: Zoom out.
- M: Enter Edit mode.
- Command + Y: Revert to original.
6.4 Photoshop Shortcuts
- C: Select the Crop Tool.
- Enter: Apply the crop.
- Esc: Cancel the crop.
- Command + +: Zoom in.
- Command + –: Zoom out.
6.5 GIMP Shortcuts
- Shift + C: Select the Crop Tool.
- Enter: Apply the crop.
- Esc: Cancel the crop.
- Command + +: Zoom in.
- Command + –: Zoom out.
7. How Does Cropping Affect Image Quality?
Cropping can affect image quality depending on how it’s done and the quality of the original image.
7.1 Resolution
Cropping reduces the overall resolution of the image, as you are discarding pixels.
7.1.1 Impact of Resolution Reduction:
- Smaller File Size: Cropped images have smaller file sizes, which can be beneficial for web use.
- Loss of Detail: Excessive cropping can result in a loss of detail and sharpness.
- Print Quality: Cropping too much can make the image unsuitable for printing at larger sizes.
7.1.2 Best Practices for Maintaining Resolution:
- Start with High-Resolution Images: Begin with the highest resolution possible to allow for more flexibility when cropping.
- Avoid Excessive Cropping: Crop only as much as necessary to achieve the desired composition.
- Check the Final Resolution: Ensure the final resolution is sufficient for its intended use.
7.2 Sharpness
Cropping can indirectly affect sharpness by reducing the number of pixels used to represent the image.
7.2.1 Impact on Sharpness:
- Reduced Detail: Cropping can reduce the level of detail in the image, making it appear less sharp.
- Enlargement Issues: Enlarging a heavily cropped image can exacerbate sharpness issues.
7.2.2 Best Practices for Maintaining Sharpness:
- Use Sharpening Tools: Apply sharpening tools in your photo editor to compensate for any loss of sharpness.
- Avoid Over-Sharpening: Over-sharpening can create unwanted artifacts and make the image look unnatural.
- Crop Wisely: Crop only as much as necessary to avoid excessive loss of detail.
7.3 Pixelation
Excessive cropping can lead to pixelation, where individual pixels become visible, resulting in a blocky and low-quality image.
7.3.1 Causes of Pixelation:
- Enlarging Cropped Images: Enlarging a heavily cropped image stretches the remaining pixels, making them more visible.
- Low-Resolution Originals: Starting with a low-resolution image and then cropping it can quickly lead to pixelation.
7.3.2 How to Avoid Pixelation:
- Start with High-Resolution Images: Use high-resolution images to ensure there are enough pixels to maintain quality after cropping.
- Avoid Excessive Cropping: Crop only as much as necessary to avoid reducing the pixel count too much.
- Resize Appropriately: Resize the image to the appropriate dimensions for its intended use without excessive enlargement.
8. Can You Recover a Photo After Cropping?
The ability to recover a photo after cropping depends on the software you used and whether you saved the changes.
8.1 Non-Destructive Editing
Some photo editors, like the Photos app and Adobe Lightroom, use non-destructive editing, which means the original image is preserved, and all edits are stored separately.
8.1.1 How to Recover a Photo in Photos App:
- Open the Photo: Open the cropped photo in the Photos app.
- Enter Edit Mode: Click “Edit” at the top right.
- Revert to Original: Click “Revert to Original” at the bottom.
8.1.2 How to Recover a Photo in Lightroom:
- Open the Photo: Open the cropped photo in Lightroom.
- Go to History: Go to the “History” panel on the left.
- Select the Original State: Select the state before the crop was applied.
8.2 Destructive Editing
If you used a photo editor that employs destructive editing (e.g., Preview, Photoshop with direct saving), the changes are applied directly to the image file.
8.2.1 Recovery Options:
- Check for Backups: If you have a backup of your files (e.g., using Time Machine), you may be able to recover the original image.
- Undo Immediately: If you haven’t saved the changes, you may be able to undo the crop by pressing Command + Z.
- Revert (If Available): Some programs may have a “Revert” option to go back to the last saved version.
8.3 Prevention Tips:
- Save a Copy: Always save a copy of the original image before making any edits.
- Use Non-Destructive Editors: Opt for photo editors that use non-destructive editing.
- Backup Regularly: Regularly back up your files to ensure you can recover them if needed.
9. What Are Best Practices for Cropping Portraits?
Cropping portraits requires special attention to ensure the subject is framed in a flattering and visually appealing way.
9.1 Avoid Cropping at Joints
As mentioned earlier, avoid cropping at joints like the elbows, wrists, knees, or ankles.
9.1.1 Why Avoid Cropping at Joints?
- Unnatural Look: Cropping at joints can make the subject look awkward and disjointed.
- Disrupts Flow: It disrupts the natural flow of the body and can be visually distracting.
9.1.2 Where to Crop Portraits:
- Mid-Thigh or Mid-Calf: These are generally safe areas to crop for full-body or three-quarter portraits.
- Above the Elbow or Wrist: For close-up shots, crop above the elbow or wrist rather than directly at the joint.
9.2 Focus on the Eyes
The eyes are the most important part of a portrait, so ensure they are sharp and well-positioned in the frame.
9.2.1 How to Focus on the Eyes:
- Position in the Frame: Place the eyes along the rule of thirds lines or at their intersections to draw the viewer’s attention.
- Ensure Sharpness: Make sure the eyes are the sharpest part of the image.
- Avoid Obstructions: Ensure the eyes are not obstructed by hair or shadows.
9.3 Consider the Headroom
Headroom is the space between the top of the subject’s head and the top edge of the frame.
9.3.1 How Much Headroom to Use:
- Sufficient Space: Leave enough headroom to avoid making the subject feel cramped.
- Avoid Too Much Space: Avoid leaving too much headroom, as it can make the subject feel small and insignificant.
- Adjust Based on Pose: Adjust the amount of headroom based on the subject’s pose and expression.
9.4 Use Leading Lines
Leading lines can be used to guide the viewer’s eye towards the subject’s face and create a more dynamic composition.
9.4.1 How to Use Leading Lines:
- Natural Lines: Look for natural lines in the scene, such as fences, roads, or architectural elements.
- Position the Subject: Position the subject so that the leading lines converge towards their face.
- Crop to Emphasize Lines: Crop the image to emphasize the leading lines and guide the viewer’s eye.
9.5 Pay Attention to Background
The background should complement the subject and not distract from them.
9.5.1 How to Manage the Background:
- Simplify: Simplify the background by blurring it or removing distracting elements.
- Use Color: Use color to create contrast between the subject and the background.
- Avoid Clutter: Avoid cluttered or busy backgrounds that can distract from the subject.
10. FAQ About Cropping Photos on a MacBook
10.1 Can I crop a photo without losing quality?
You can minimize quality loss by starting with a high-resolution image and cropping only as much as necessary. Using non-destructive editing tools also helps preserve the original image quality.
10.2 What is the best app for cropping photos on a MacBook?
The best app depends on your needs. Preview is great for basic cropping, Photos app offers more features, and Adobe Photoshop or Affinity Photo are ideal for professional-level editing.
10.3 How do I crop a photo to a specific size on a MacBook?
Use the crop tool in your photo editor and enter the desired dimensions or aspect ratio. Most apps allow you to specify the exact size in pixels or inches.
10.4 How can I revert to the original photo after cropping in the Photos app?
Open the photo in the Photos app, click “Edit,” and then click “Revert to Original” at the bottom.
10.5 How do I crop a photo for Instagram on my MacBook?
Crop the photo to a 1:1 aspect ratio for square posts, a 4:5 aspect ratio for vertical posts, or a 16:9 aspect ratio for stories.
10.6 Is it better to crop a photo or resize it?
It depends on your goal. Cropping changes the composition, while resizing changes the dimensions without altering the composition. If you want to remove parts of the image, crop it. If you want to make the image smaller or larger, resize it.
10.7 How do I straighten a photo while cropping on a MacBook?
Use the rotation handle in the crop tool to rotate the image until the horizon is level. Adjust the crop area to remove any empty spaces created by the rotation.
10.8 Can I crop a live photo on my MacBook?
Yes, you can crop live photos in the Photos app just like regular photos. The cropping will only affect the still frame, not the video portion.
10.9 How do I crop multiple photos at once on my MacBook?
Some photo editors, like Adobe Lightroom, allow you to batch crop photos by applying the same crop settings to multiple images.
10.10 What is content-aware crop, and how do I use it?
Content-aware crop uses AI to intelligently fill in the edges of an image when you expand the crop area. It’s available in Adobe Photoshop. Select the Crop Tool, check the “Content-Aware” box, and expand the crop area.
Mastering how to crop photos on your MacBook can significantly enhance your visual storytelling and improve your photography workflow. Whether you’re using the built-in tools or professional software, these techniques will help you achieve the best results.
Ready to explore more advanced techniques and elevate your photography skills? Visit dfphoto.net today to discover a wealth of tutorials, tips, and inspiration. Join our vibrant community of photographers and start creating stunning visuals that capture your unique vision. Don’t forget to check out our comprehensive guides on photo editing, composition, and the latest trends in the photography world. Let dfphoto.net be your go-to resource for all things photography! Our address is 1600 St Michael’s Dr, Santa Fe, NM 87505, United States. Phone: +1 (505) 471-6001.
