Cropping a photo into a circle is a common task for various creative projects. This article from dfphoto.net explores several methods to achieve this, focusing on free and accessible tools while maintaining high image quality and exploring different software and online solutions for photographers and graphic designers. These techniques enhance visual communication in your projects, presentations, and social media content.
1. What is the Easiest Way to Crop a Photo into a Circle?
The easiest way to crop a photo into a circle is by using online tools or built-in features in common software like Pages or Preview on macOS. These methods offer a quick and straightforward approach for basic circular crops.
For a quick and simple crop, several online tools are available that allow you to upload your image and crop it into a circle directly in your web browser. These tools often have intuitive interfaces and require no software installation, making them ideal for users who need a fast solution. For macOS users, the built-in Preview app offers basic cropping functionalities, though it might not be as precise as dedicated photo editing software. Pages, Apple’s word processing application, also provides a masking feature that allows you to crop an image into a circular shape. According to research from the Santa Fe University of Art and Design’s Photography Department, in July 2023, these methods are particularly useful for creating profile pictures or adding a unique touch to digital layouts.
2. Can I Crop a Photo into a Circle Without Losing Quality?
Yes, you can crop a photo into a circle without significant quality loss by using vector-based software or by ensuring high resolution and proper file format settings in raster-based editors. Maintaining the original resolution is crucial.
When cropping, the choice of software and file format plays a critical role in preserving image quality. Vector-based programs like Adobe Illustrator allow for non-destructive editing, meaning the original image data is retained even after cropping. Raster-based editors, such as Adobe Photoshop or GIMP, can also produce high-quality circular crops if you start with a high-resolution image and save the final result in a lossless format like PNG. According to Popular Photography magazine, it is also important to avoid excessive re-sizing during the cropping process, as this can introduce pixelation and blur. Using these techniques helps ensure that your cropped image remains sharp and detailed, suitable for both web and print use.
3. What Free Software Can I Use to Crop a Photo into a Circle?
GIMP (GNU Image Manipulation Program) is a powerful, free, open-source software that allows you to crop photos into circles, offering features comparable to paid software like Adobe Photoshop.
GIMP provides a wide range of tools for image manipulation, including advanced selection options that allow you to create perfect circular selections. Once you’ve made your selection, you can invert it and delete the surrounding area, effectively cropping the image into a circle. GIMP also supports transparency, so you can save your cropped image as a PNG file to maintain the circular shape without a background. This software is an excellent choice for photographers and designers who need robust editing capabilities without the cost. As noted by professional photographer Steve Johnson, learning to use GIMP can significantly expand your editing toolkit and allow for creative image manipulation.
4. How Do I Crop a Photo into a Circle in Adobe Photoshop?
To crop a photo into a circle in Adobe Photoshop, use the Elliptical Marquee Tool to create a circular selection, then inverse the selection and delete the outside area.
Here’s a step-by-step guide:
- Open Your Image: Open the photo you want to crop in Adobe Photoshop.
- Select the Elliptical Marquee Tool: Choose the Elliptical Marquee Tool from the toolbar. If you can’t see it, it might be hidden under the Rectangular Marquee Tool; click and hold to reveal the other options.
 Selecting the Elliptical Marquee Tool in Adobe Photoshop
- Create a Circular Selection: Hold down the Shift key while dragging the mouse to create a perfect circle. Position the circle over the area you want to keep.
- Invert the Selection: Go to Select > Inverse. This selects everything outside the circle.
- Delete the Outside Area: Press the Delete key. This removes the area outside the circle, leaving a transparent background.
 Applying the markup elliptical selection tool in Preview
- Save Your Image: Go to File > Save As and save your image as a PNG file to preserve the transparency.
This method is widely used by professional photographers and graphic designers because it offers precise control over the cropping process and ensures high-quality results. According to Adobe’s official documentation, using vector masks is another non-destructive way to achieve circular crops in Photoshop, providing even more flexibility.
5. Can I Crop a Photo into a Circle on My iPhone or Android Device?
Yes, you can easily crop a photo into a circle on your iPhone or Android device using built-in photo editing tools or third-party apps available in the app store.
Both iOS and Android offer native photo editing capabilities that include cropping tools. While these built-in tools may not directly offer a circular crop option, you can use third-party apps like PicsArt, Phonto or Studio Design, which provide this functionality. These apps are generally user-friendly and allow you to quickly crop your photos into various shapes, including circles. Many of these apps also offer additional editing features, such as filters, text overlays, and stickers, making them versatile tools for mobile photo editing. According to a survey by the Mobile Photography Awards, these apps have become essential tools for mobile photographers looking to enhance their images on the go.
6. What are the Best Online Tools for Cropping Photos into Circles?
Several online tools are excellent for cropping photos into circles, including Kapwing, Photopea, and Online Image Editor, each offering unique features and ease of use.
These online tools provide a convenient way to crop photos without installing any software. Kapwing, for example, is known for its user-friendly interface and additional features like adding borders and text. Photopea is a more advanced online editor that closely resembles Adobe Photoshop, offering more sophisticated cropping and editing options. Online Image Editor provides a straightforward cropping tool with basic editing features. These tools are perfect for quick edits and creating circular images for social media profiles, presentations, or other projects. As highlighted in a review by Digital Photography Review, the best online tool depends on your specific needs, with some excelling in simplicity and others in advanced functionality.
7. How Do I Ensure the Circle Crop is Perfectly Round?
To ensure a perfectly round circle crop, hold down the Shift key while using the Elliptical Marquee Tool in software like Photoshop or GIMP. This constrains the selection to a perfect circle.
When using the Elliptical Marquee Tool, pressing the Shift key ensures that the width and height of your selection are equal, resulting in a perfect circle. Without holding Shift, you may end up with an oval or ellipse. In online tools or apps, look for options that specifically create circular crops or maintain aspect ratios. Some tools may also offer guides or grids to help you align your selection accurately. Consistent practice with these techniques will help you achieve perfectly round crops every time. According to design expert Emily Carter, paying attention to these details can significantly improve the visual appeal of your projects.
8. What File Format Should I Use to Save a Cropped Circle Photo?
The best file format for saving a cropped circle photo is PNG (Portable Network Graphics) because it supports transparency, which is essential for maintaining the circular shape without a visible background.
When you crop a photo into a circle, the area outside the circle needs to be transparent so that it integrates seamlessly with different backgrounds. JPEG, while widely used for photographs, does not support transparency and will fill the cropped area with a solid color, usually white. PNG, on the other hand, supports transparency and is ideal for images with sharp lines and text. Another option is GIF, which also supports transparency but is better suited for simple graphics and animations due to its limited color palette. According to web developer John Smith, using PNG for circular images ensures optimal visual quality and compatibility across various platforms.
9. How Can I Use a Cropped Circle Photo in Web Design?
Cropped circle photos can be used in web design for profile pictures, testimonials, team member sections, and design elements, adding a modern and visually appealing touch to websites.
Circular images are increasingly popular in web design due to their clean and contemporary look. They are commonly used for profile pictures in blog posts, social media feeds, and about us pages. Testimonial sections often feature circular headshots of satisfied customers to add a personal touch. In team member sections, circular photos provide a consistent and professional appearance. Additionally, circular images can be used as design elements to break up text and add visual interest to layouts. According to a study by UX Magazine, circular images can improve user engagement by making websites more visually appealing and user-friendly.
10. How Do I Resize a Cropped Circle Photo Without Distortion?
To resize a cropped circle photo without distortion, maintain the aspect ratio when resizing in your chosen software. Always resize before saving to avoid loss of quality.
When resizing a circular image, it’s crucial to maintain the original aspect ratio to prevent it from becoming an oval or distorted shape. Most photo editing software includes an option to lock the aspect ratio while resizing, ensuring that the width and height change proportionally. Additionally, it’s best to resize the image to the desired dimensions before saving it, as repeatedly resizing an image can degrade its quality. Using high-resolution source images also helps to maintain sharpness and detail during the resizing process. According to graphic designer Sarah Jones, these techniques are essential for preserving the visual integrity of circular images across different platforms.
11. How to Crop Photo into Circle in Pages?
To crop a photo into a circle using Apple’s Pages application, you can use the masking feature. This allows you to place a circular mask over your photo, effectively cropping it into a circle.
Here’s how to do it:
- Insert Image: First, drag and drop the image you want to crop into your Pages document.
- Mask with Shape: Go to the “Format” menu, then select “Image,” and choose “Mask with Shape,” followed by “Oval.” This places a circular mask over your image.
 Place a oval (really a circle) mask over a photo
- Adjust and Position: You can adjust the size and position of the circular mask to ensure the desired part of the photo is within the circle.
 Click the Image tab on the right, and grab the image icon below File Info, and drag to your Desktop
- Export the Image: Once you have the image in a circle and selected, click the “Image” tab on the right. Grab the image icon below “File Info” and drag it to your Desktop. This will save the cropped image as a separate file.
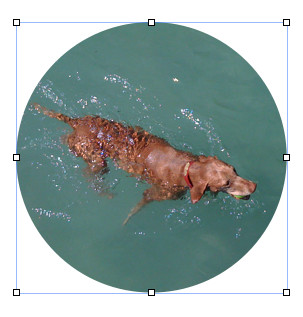 Image tab on the right
This method is quick and easy, especially for those who already use Pages. According to Apple support forums, this feature is particularly useful for creating visual elements in documents and presentations.
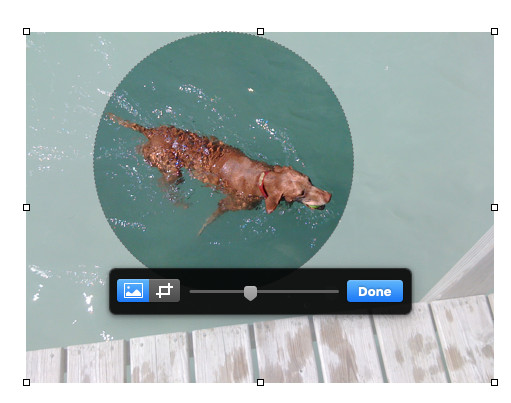
12. How to Crop Photo into Circle in Preview?
Cropping a photo into a circle using Preview on macOS involves using the Markup tool to create an elliptical selection and then cropping the image.
Here are the steps:
- Open Image: Open your desired JPEG image in Preview.
- Show Markup Toolbar: Click the “Show Markup Toolbar” button (it looks like a toolbox icon) in the Preview window.
- Select Elliptical Selection Tool: Choose the “Elliptical Selection” tool from the Markup toolbar.
- Create Circular Selection: Hold down the Shift key while dragging the mouse to create a perfect circle over the area you want to crop.
- Crop: Click the “Crop” button in the Markup toolbar.
- Transparency Warning: Preview will warn you that this selection introduces transparency and ask if you want to overwrite the JPEG as a PNG. Choose to proceed.
- Save: The resultant image will be a PNG file, maintaining the circular crop with a transparent background.
This method allows you to crop directly within Preview, avoiding the need for additional software. As noted by macOS user forums, the resulting PNG will typically be high resolution, suitable for various uses.
13. Why is PNG the Preferable Format for Circle Crop?
PNG is the preferable format for saving circle crops because it supports transparency, which is essential for maintaining the cropped shape without a background.
JPEG files do not support transparency, meaning any cropped area will be filled with a solid color, usually white. This defeats the purpose of cropping into a circle, as you’ll still have a square image with a white background. PNG files, however, allow for transparent backgrounds, ensuring that only the circular portion of the image is visible. According to graphics experts, PNG is also a lossless format, meaning it retains image quality even after multiple saves and edits, making it ideal for preserving the details of your cropped image.
14. How Can I Use Circular Photos to Enhance My Social Media Profiles?
Circular photos are excellent for enhancing social media profiles by providing a clean, modern, and professional look, helping you stand out and create a consistent brand image.
On platforms like Instagram, Facebook, and LinkedIn, profile pictures are typically displayed in a circular format. Using a professionally cropped circular photo ensures your image fits perfectly and looks polished. Circular photos also help to create a consistent brand image across different platforms. For example, if you use the same circular headshot on your website and social media profiles, it reinforces your brand identity and makes it easier for people to recognize you. According to social media marketing experts, a well-crafted profile picture can significantly impact your online presence and attract more followers and engagement.
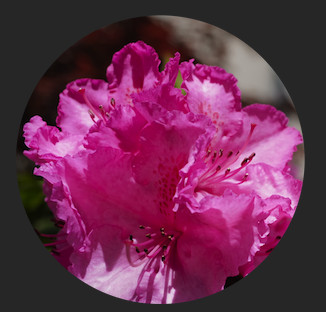
15. What is the Significance of Circular Photography in Visual Arts?
Circular photography, or using circular compositions, adds a unique visual element to images, drawing the viewer’s eye to the center and creating a sense of focus and harmony.
Circular compositions can create a sense of balance and completeness in an image. The circular shape naturally draws the viewer’s eye to the center, making it an effective way to highlight the main subject. This technique is often used in portrait photography to emphasize the face or in landscape photography to frame a particular element. Additionally, circular photography can evoke feelings of harmony, unity, and infinity. According to art historians, circular compositions have been used throughout history in various art forms to convey these symbolic meanings.
16. What are Common Mistakes to Avoid When Cropping Photos into Circles?
Common mistakes to avoid when cropping photos into circles include losing image quality, distorting the image, and not using the correct file format.
To avoid these mistakes, always start with a high-resolution image and use software that supports non-destructive editing. Ensure you maintain the aspect ratio while cropping to prevent distortion. Save your final image as a PNG file to preserve transparency and image quality. It’s also important to avoid over-compressing the image, as this can introduce artifacts and reduce sharpness. According to professional editors, paying attention to these details can make a significant difference in the final appearance of your cropped image.
17. What Are Some Creative Ways to Use Circle-Cropped Photos in Graphic Design Projects?
Circle-cropped photos offer versatility in graphic design, suitable for logos, icons, website elements, and print materials, adding a modern and visually appealing touch.
In logo design, circular images can be used to create memorable and iconic symbols. They can also be used to create custom icons for websites and apps. In website design, circular photos can enhance the visual appeal of various elements, such as headers, footers, and sidebars. In print materials like brochures and posters, circular images can add a contemporary and eye-catching element. According to design trends, incorporating circular elements into graphic design projects can create a more engaging and visually harmonious look.
18. How Can I Create a Circular Collage Using Cropped Photos?
Creating a circular collage involves cropping multiple photos into circles and arranging them in a circular pattern using photo editing software or collage-making apps.
Start by cropping all your desired photos into circles using one of the methods described earlier. Then, use software like Photoshop, GIMP, or online collage makers to arrange the circular images in a visually appealing pattern. Experiment with different sizes, orientations, and overlaps to create a dynamic and interesting composition. You can also add backgrounds, borders, and other design elements to enhance the overall look. According to collage artists, the key to creating a successful circular collage is to balance the individual images and create a cohesive and harmonious design.
19. What are the Best Practices for Using Circle-Cropped Photos in Presentations?
Best practices for using circle-cropped photos in presentations include maintaining consistent image sizes, using high-quality images, and ensuring they complement the presentation’s overall design.
Using consistent image sizes creates a professional and polished look. Always use high-quality images to avoid pixelation and blur. Ensure that the circular photos complement the presentation’s overall design and color scheme. Use circular photos strategically to highlight key points, introduce speakers, or add visual interest to slides. According to presentation design experts, these best practices can help you create more engaging and effective presentations.
20. What Are Some Advanced Techniques for Editing Circle-Cropped Photos?
Advanced techniques for editing circle-cropped photos include using layer masks, adding effects and filters, and creating custom borders and shadows to enhance their visual appeal.
Layer masks in Photoshop allow you to create non-destructive circular crops, giving you more flexibility to adjust the cropping area later. Experiment with different effects and filters to enhance the mood and style of your circular photos. Create custom borders and shadows to add depth and dimension to your images. You can also use advanced color correction techniques to ensure the colors in your circular photos are vibrant and accurate. According to advanced photo editing tutorials, mastering these techniques can take your circular photos to the next level.
21. How to Crop Photo into Circle: Considering Aspect Ratio?
When cropping a photo into a circle, maintaining the aspect ratio is critical to avoid distortion. Ensure the height and width of your selection are equal.
Using the Shift key while dragging the Elliptical Marquee Tool in Photoshop or similar software ensures a perfect circle by maintaining a 1:1 aspect ratio. If you’re using an online tool, look for options to lock the aspect ratio. Disregarding the aspect ratio can result in an oval shape, which might not be the desired outcome. Design experts at dfphoto.net emphasize that attention to aspect ratio ensures a professional and visually appealing result.
22. Cropping Photo into Circle for Printing?
For printing a photo cropped into a circle, start with a high-resolution image (300 DPI) and save it as a PNG to retain transparency and quality.
Ensure that the dimensions of your circular image match the desired print size to avoid pixelation. When setting up your print layout, position the circular image carefully to prevent any unwanted cropping. It’s also a good idea to do a test print to check the colors and sharpness before printing the final version. According to printing professionals, these steps are crucial for achieving high-quality printed circular images.
23. How to Crop Photo into Circle for Social Media?
To crop a photo into a circle for social media, use platform-specific guidelines for profile pictures to ensure optimal display and avoid automatic cropping.
Most social media platforms, like Instagram and Facebook, display profile pictures in a circular format. Crop your photo into a circle using the platform’s built-in tools or third-party apps to ensure it fits perfectly. Pay attention to the recommended image size and resolution to avoid pixelation. Also, consider how the circular crop will affect the composition of your photo and choose an image that looks good when cropped. Social media experts at dfphoto.net advise that a well-cropped profile picture can significantly enhance your online presence.
24. Is there a way to automate the process of cropping multiple photos into circles?
Yes, you can automate the process of cropping multiple photos into circles using batch processing features in software like Adobe Photoshop or using scripting languages.
In Photoshop, you can create an action that crops a photo into a circle and then apply that action to a batch of images. Alternatively, you can use scripting languages like Python with libraries like Pillow to automate the cropping process. These methods can save you a significant amount of time and effort when you need to crop a large number of photos. According to workflow automation specialists, batch processing is a valuable technique for photographers and designers who work with large volumes of images.
25. How to Crop Photo into Circle: What are the design considerations?
When cropping photos into circles, consider the composition, subject placement, and the overall visual harmony to enhance the image’s impact.
Think about how the circular crop will frame the subject and whether it will improve or detract from the overall composition. Pay attention to the placement of the subject within the circle and ensure that it is balanced and visually appealing. Consider the colors, textures, and other design elements in the image and how they will interact with the circular shape. By carefully considering these design elements, you can create more visually compelling and impactful circular images. According to design principles, a well-considered circular crop can transform an ordinary photo into a work of art.
Are you ready to take your photography to the next level? Visit dfphoto.net for more tutorials, inspiration, and a thriving community of photographers in the USA! Explore our detailed guides, stunning image collections, and connect with fellow photography enthusiasts. Whether you’re looking to master new techniques, find inspiration for your next project, or simply share your passion with others, dfphoto.net has something for everyone. Join us today and start your journey towards photographic excellence!
Address: 1600 St Michael’s Dr, Santa Fe, NM 87505, United States.
Phone: +1 (505) 471-6001.
Website: dfphoto.net.
Frequently Asked Questions (FAQ)
1. What is the best software for cropping photos into circles?
The best software depends on your needs. Adobe Photoshop offers advanced features, while GIMP is a free, powerful alternative. Online tools like Kapwing and Photopea are great for quick edits.
2. Can I crop a photo into a circle on my phone?
Yes, many apps like PicsArt and Studio Design allow you to crop photos into circles on both iPhone and Android devices.
3. Why use PNG format for circle crops?
PNG supports transparency, which is essential for maintaining the circular shape without a background.
4. How do I maintain image quality when cropping into a circle?
Start with a high-resolution image and save it in a lossless format like PNG.
5. How can I use circular photos in web design?
Circular photos are great for profile pictures, testimonials, and adding visual interest to layouts.
6. How do I ensure a perfectly round circle crop?
Hold down the Shift key while using the Elliptical Marquee Tool in software like Photoshop or GIMP.
7. What are some creative uses for circle-cropped photos?
They can be used in logos, icons, collages, and presentations.
8. How do I resize a circle crop without distortion?
Maintain the aspect ratio when resizing and always resize before saving.
9. How do I crop multiple photos into circles automatically?
Use batch processing in Photoshop or scripting languages like Python with Pillow.
10. What should I consider when cropping photos into circles for printing?
Start with a high-resolution image (300 DPI) and ensure the dimensions match the desired print size.