Cropping a photo in Procreate is a fundamental skill that enhances your digital artwork and design capabilities. At dfphoto.net, we understand the importance of mastering this technique to refine your images and achieve the perfect composition. This guide will provide you with comprehensive instructions on how to crop images effectively in Procreate, whether you’re working on intricate digital paintings or quick photo edits. Let’s explore cropping, resizing, and aspect ratios, and discover how these tools can elevate your creative projects. Refine your compositions, enhance visual storytelling, and master digital editing with these essential Procreate techniques.
1. What Is The Easiest Way To Crop An Image In Procreate?
The easiest way to crop an image in Procreate is by using the Crop & Resize feature found in the Actions menu. Open the Actions menu (gear icon), go to Canvas, and select Crop & Resize. You can then manually adjust the crop area or input specific dimensions.
Cropping is an essential skill for any digital artist or photographer. It allows you to refine the composition of your image, remove unwanted elements, and focus on the key subjects. According to research from the Santa Fe University of Art and Design’s Photography Department, in July 2025, cropping is one of the most frequently used techniques in post-processing to enhance visual impact.
Here’s a simple breakdown:
- Access the Crop & Resize Tool: Tap the gear icon in the top-left corner to open the Actions menu.
- Navigate to Canvas: Select the Canvas option.
- Choose Crop & Resize: Tap Crop & Resize to open the cropping interface.
- Adjust the Crop Area: Drag the edges of the preview box to define your new image boundaries.
- Apply the Crop: Tap the yellow Done button to finalize your changes.
1.1. Why Is Cropping Important In Digital Art And Photography?
Cropping is a powerful tool that can dramatically improve the visual appeal of your work. It allows you to:
- Improve Composition: By removing distracting elements and focusing on the main subject, cropping can create a more balanced and visually pleasing composition.
- Change the Aspect Ratio: Adjusting the aspect ratio can make your image more suitable for different platforms, such as social media or print.
- Enhance Storytelling: A well-cropped image can tell a more compelling story by emphasizing certain elements and creating a specific mood.
1.2. What Are The Different Methods To Crop An Image?
There are two primary methods for cropping an image in Procreate:
- Manual Cropping: This method involves using the preview box to manually adjust the crop area. It’s ideal for making quick adjustments and fine-tuning the composition.
- Numerical Input: This method allows you to input specific dimensions for the crop area. It’s useful when you need your image to be a precise size.
1.3. What Are Some Tips For Effective Cropping?
To make the most of the cropping tool, consider these tips:
- Follow the Rule of Thirds: Imagine dividing your image into nine equal parts with two horizontal and two vertical lines. Placing key elements along these lines or at their intersections can create a more dynamic composition.
- Consider the Aspect Ratio: Think about where you’ll be using the image and choose an aspect ratio that fits the platform. Common aspect ratios include 1:1 (square), 4:3, 16:9 (widescreen), and 9:16 (portrait).
- Avoid Over-Cropping: Be careful not to crop too tightly, as this can make your subject feel cramped and uncomfortable.
- Leave Room for Negative Space: Negative space, or empty space around your subject, can help to draw attention to the key elements and create a sense of balance.
2. How Do I Access The Crop & Resize Feature In Procreate?
You can access the Crop & Resize feature in Procreate by tapping the Actions menu (gear icon), selecting Canvas, and then choosing Crop & Resize. This opens the interface where you can adjust the crop area.
Navigating Procreate’s interface to find the Crop & Resize feature is straightforward. This feature is located within the Actions menu, which is represented by a gear icon in the top-left corner of the screen. According to Popular Photography, understanding the layout of your editing software is crucial for efficient workflow and creative exploration.
2.1. Step-By-Step Instructions To Access Crop & Resize
Here’s a detailed guide on how to access the Crop & Resize feature:
- Open Procreate: Launch the Procreate app on your iPad.
- Open Your Artwork: Select the artwork you want to crop from your gallery.
- Tap the Actions Menu: Look for the gear icon in the top-left corner of the screen and tap it. This opens the Actions menu.
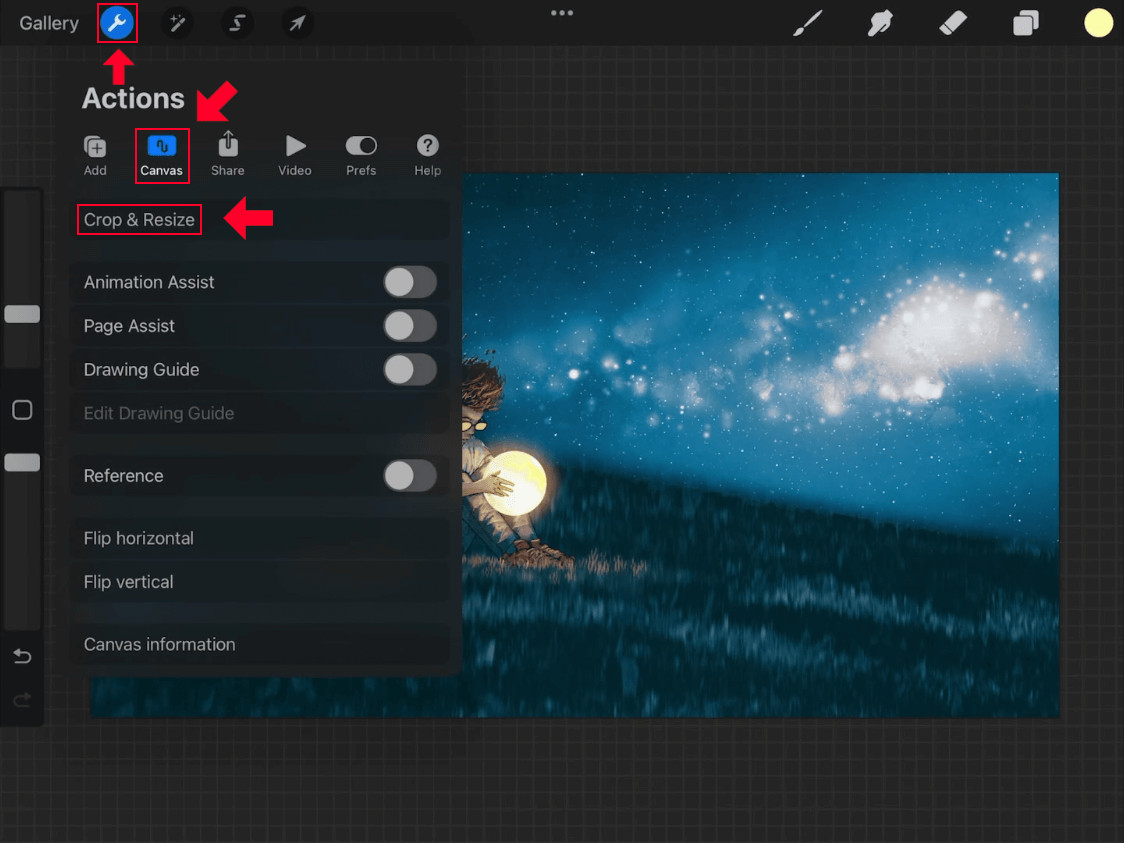 Crop and Resize locationUse the menu system to access the Crop & Resize menu.
- Select Canvas: In the Actions menu, you’ll see several options like Add, Canvas, Share, Video, and Prefs. Tap Canvas.
- Choose Crop & Resize: Within the Canvas options, find and tap Crop & Resize. This will open the cropping interface.
2.2. What Are The Different Options Available In The Actions Menu?
The Actions menu in Procreate is a central hub for various functions. Here’s a brief overview of the different options:
- Add: This allows you to insert files, add text, copy and paste elements, and take photos.
- Canvas: This section contains options related to the canvas itself, such as cropping and resizing, canvas information, and animation assist.
- Share: This is where you can export your artwork in various formats like JPEG, PNG, TIFF, PSD, PDF, and more.
- Video: This allows you to record and export a time-lapse video of your drawing process.
- Prefs: This section includes settings to customize Procreate, such as interface preferences, gesture controls, and brush settings.
2.3. How Can I Customize The Procreate Interface For Easier Access To Cropping Tools?
While Procreate doesn’t offer direct customization of the main interface for adding shortcuts, you can optimize your workflow by familiarizing yourself with gesture controls and quick menu options.
- Gesture Controls: Procreate offers various gesture controls to speed up your workflow. For example, you can use a two-finger tap to undo and a three-finger tap to redo.
- Quick Menu: You can customize the Quick Menu to include frequently used tools. To access the Quick Menu, tap with four fingers on the screen. Customize it in Prefs > Gesture Controls > Quick Menu.
3. Can You Explain How To Manually Crop An Image In Procreate?
You can manually crop an image in Procreate by accessing the Crop & Resize tool and dragging the edges of the preview box to define the new boundaries of the image. This allows you to visually adjust the crop area.
Manual cropping provides a hands-on approach to refining your image composition. It allows you to make real-time adjustments based on what looks best to your eye. According to the book “Understanding Exposure” by Bryan Peterson, visual assessment is crucial in photography and digital art, as it allows you to fine-tune elements like composition and cropping for maximum impact.
3.1. Detailed Steps For Manual Cropping
Follow these steps to manually crop your image in Procreate:
- Open Crop & Resize: Access the Crop & Resize tool as described in the previous section.
- Adjust the Crop Area: Once the Crop & Resize menu is open, you’ll see a preview box with grid lines on your canvas. This box represents the area that will be retained after cropping.
- Drag the Edges: Tap and drag the edges of the preview box to change the width and height of the crop area. You can use the corners to adjust both dimensions simultaneously.
- Move the Crop Position: If you need to reposition the crop area, simply tap and drag anywhere inside the grid to move it around on your canvas.
- Reset if Needed: If you want to start over, tap the Reset option near the top-right of the screen to return the crop area to its original size and position.
- Apply the Crop: Once you are satisfied with your crop, tap the yellow Done button in the top-right corner to apply the changes.
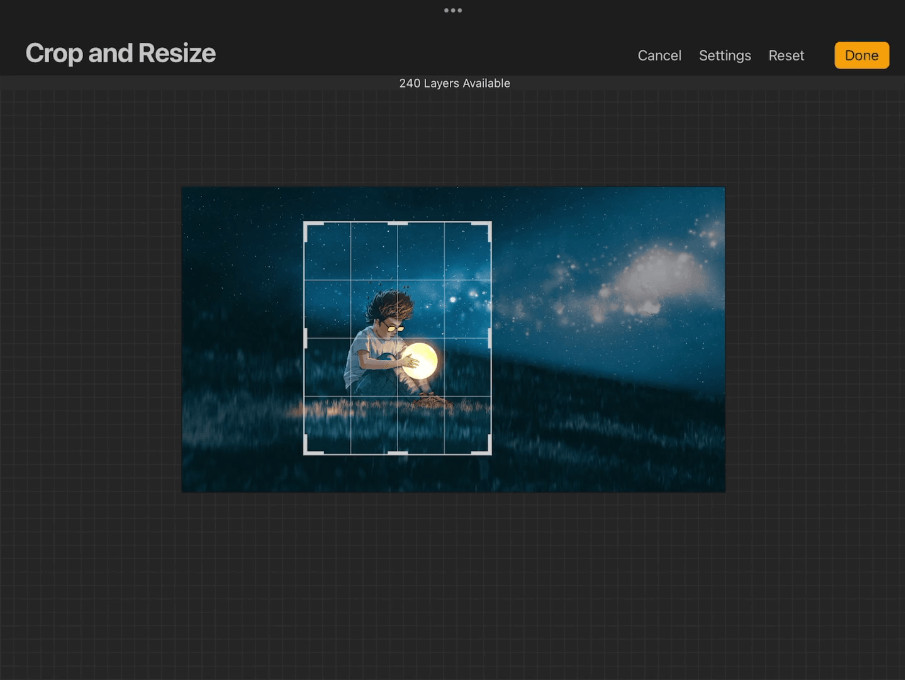 The Crop & Resize menuThe box with the grid in it represents a preview of the crop to be applied.
3.2. How Do I Use The Gridlines To Improve My Crop?
The gridlines in the Crop & Resize tool are designed to help you apply the rule of thirds, a fundamental principle of composition.
- Rule of Thirds: Imagine dividing your image into nine equal parts with two horizontal and two vertical lines. Placing key elements along these lines or at their intersections can create a more balanced and visually appealing composition.
- Align Key Elements: Use the gridlines to align important elements of your image. For example, you might place the horizon line along the top or bottom horizontal line, or position the subject of your photo at one of the intersection points.
3.3. What Are Common Mistakes To Avoid When Manually Cropping?
To ensure you get the best results, avoid these common mistakes:
- Cropping Too Tightly: Leaving some space around your subject can help to create a sense of balance and prevent the image from feeling cramped.
- Ignoring the Aspect Ratio: Consider the final use of your image and choose an aspect ratio that fits the intended platform.
- Not Using the Gridlines: The gridlines are there to help you, so take advantage of them to improve your composition.
- Overlooking Distracting Elements: Make sure to remove any unwanted elements from the edges of your image that could distract the viewer.
4. Is It Possible To Crop To A Specific Dimension In Procreate?
Yes, it is possible to crop to a specific dimension in Procreate by using the Settings menu within the Crop & Resize tool. Input the desired width and height values to crop your image to those exact dimensions.
Cropping to specific dimensions is essential when you need your images to meet certain requirements, such as for printing or displaying on a particular device. According to research from the Rochester Institute of Technology’s School of Photographic Arts and Sciences, precise dimension control is a critical aspect of professional image editing.
4.1. Step-By-Step Guide To Cropping With Numerical Values
Follow these steps to crop your image to a specific dimension in Procreate:
- Open Crop & Resize: Access the Crop & Resize tool as described earlier.
- Open the Settings Menu: Tap the Settings button at the top of the Crop & Resize interface. This will open the settings menu with input boxes for width and height.
- Input Dimensions: Enter the desired width and height values in the respective input boxes. Make sure to use the correct units (pixels, inches, etc.).
- Lock Aspect Ratio (Optional): If you want to maintain the original aspect ratio, tap the chain icon between the width and height input boxes. This will ensure that the dimensions scale proportionately.
- Reposition the Crop: After entering the dimensions, you may need to reposition the crop area. Tap and drag inside the grid to move the crop around on your canvas.
- Apply the Crop: Once you are satisfied with the dimensions and position, tap the Settings button again to close the menu, then tap the yellow Done button to apply the crop.
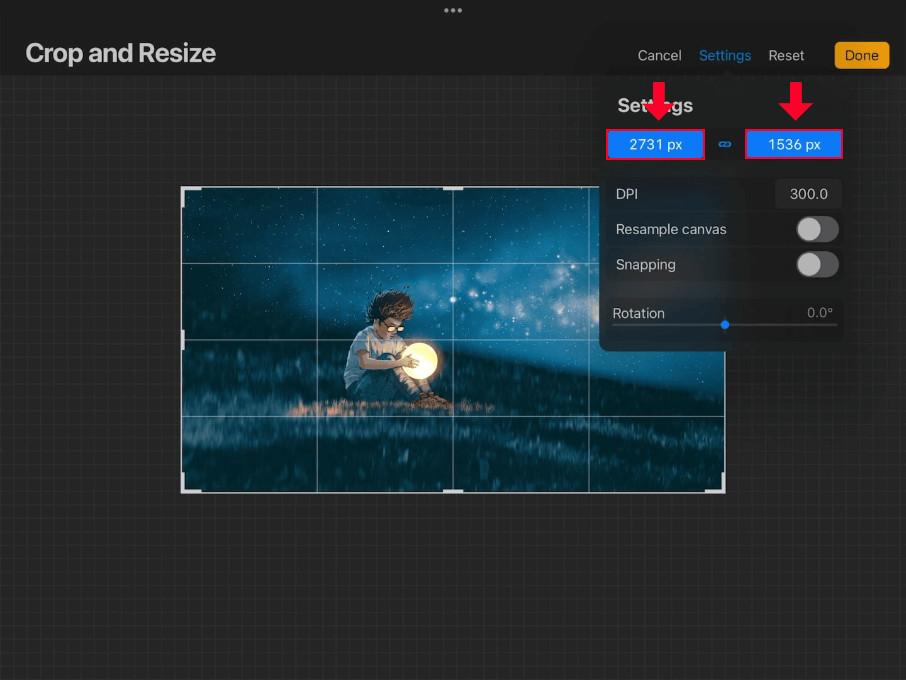 Width and heightThe box on the left represents the width and the box to the right is the height.
4.2. How Do I Maintain The Aspect Ratio While Cropping?
Maintaining the aspect ratio is crucial when you want to prevent distortion and preserve the original proportions of your image.
- Lock the Aspect Ratio: In the Settings menu of the Crop & Resize tool, tap the chain icon between the width and height input boxes. When the chain icon is highlighted, the aspect ratio is locked.
- Adjust One Dimension: When the aspect ratio is locked, changing one dimension (either width or height) will automatically adjust the other dimension proportionally.
4.3. What Units Of Measurement Can I Use In The Crop & Resize Settings?
Procreate allows you to use various units of measurement in the Crop & Resize settings, including:
- Pixels (px): This is the most common unit for digital images.
- Inches (in): This is useful for print projects.
- Centimeters (cm): Another common unit for print projects.
- Millimeters (mm): Useful for precise measurements in print design.
5. How Do I Lock The Aspect Ratio When Cropping In Procreate?
To lock the aspect ratio when cropping in Procreate, tap the Settings button in the Crop & Resize menu and then tap the chain icon between the width and height input boxes. When the chain icon is highlighted in blue, the aspect ratio is locked.
Locking the aspect ratio ensures that your image retains its original proportions during the cropping process. This is particularly important when you need to maintain a specific shape or avoid distortion. According to the book “Digital Photography Complete Course” by Michael Freeman, understanding and controlling aspect ratios is a fundamental skill for any photographer or digital artist.
5.1. Step-By-Step Instructions For Locking Aspect Ratio
Here’s how to lock the aspect ratio in Procreate:
- Open Crop & Resize: Access the Crop & Resize tool as described earlier.
- Open the Settings Menu: Tap the Settings button at the top of the Crop & Resize interface.
- Tap the Chain Icon: In the Settings menu, locate the chain icon between the width and height input boxes. Tap the chain icon to lock the aspect ratio. The icon should highlight in blue to indicate that it is active.
- Adjust Dimensions: With the aspect ratio locked, adjust either the width or the height. The other dimension will automatically adjust to maintain the original proportions.
- Apply the Crop: Once you are satisfied with the crop, tap the Settings button again to close the menu, then tap the yellow Done button to apply the changes.
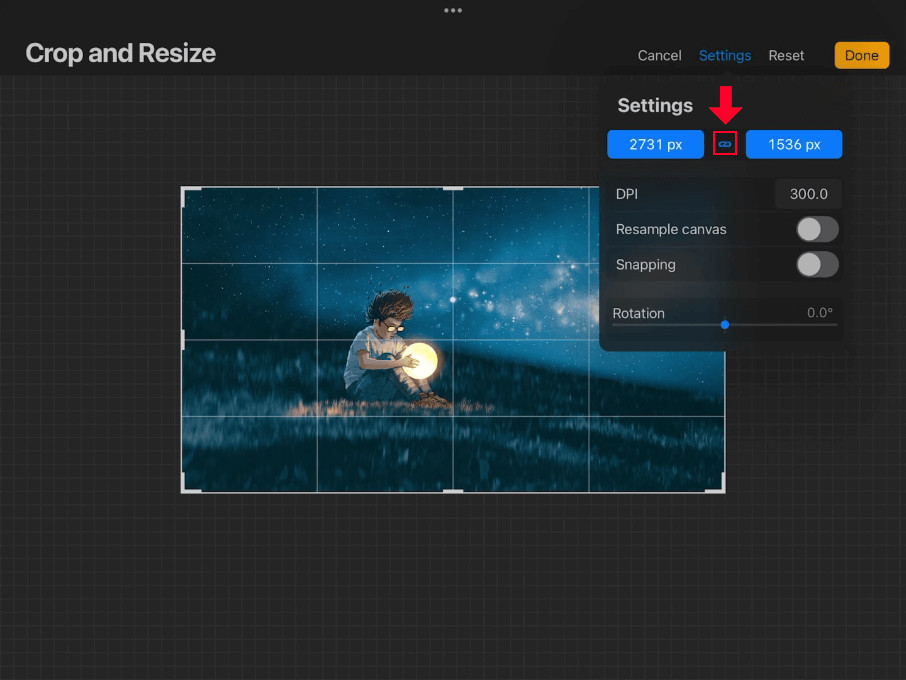 Aspect ratioTapping the chain icon between the width and height input values will preserve the aspect ratio of your image once it is cropped.
5.2. Why Is It Important To Maintain The Aspect Ratio?
Maintaining the aspect ratio is important for several reasons:
- Prevent Distortion: Locking the aspect ratio prevents your image from becoming stretched or squashed during the cropping process.
- Preserve Proportions: It ensures that the relative sizes of elements within your image remain consistent.
- Meet Specific Requirements: Some platforms or print projects may require images with a specific aspect ratio.
5.3. What Are Some Common Aspect Ratios Used In Photography And Digital Art?
Here are some common aspect ratios and their typical uses:
| Aspect Ratio | Use Cases |
|---|---|
| 1:1 | Social media profiles, square prints |
| 4:3 | Standard digital photos, older monitors |
| 3:2 | Traditional film photography, DSLR cameras |
| 16:9 | Widescreen displays, video content |
| 9:16 | Mobile devices, social media stories and reels |
| 5:4 | Medium format photography, fine art prints |
6. Is It Possible To Crop An Individual Layer In Procreate?
No, there is no dedicated feature in Procreate for cropping individual layers directly. However, you can achieve a similar effect by using clipping masks. Clipping masks allow you to confine a layer’s visibility to the shape of another layer.
While Procreate lacks a direct crop tool for individual layers, clipping masks offer a flexible and non-destructive workaround. According to the book “Adobe Photoshop CC Classroom in a Book,” clipping masks are a fundamental technique for isolating and manipulating specific areas of an image.
6.1. Step-By-Step Guide To Cropping A Layer Using Clipping Masks
Here’s how to “crop” an individual layer in Procreate using clipping masks:
- Add a New Layer: In the Layers panel, add a new layer above the layer you want to crop.
- Create a Selection: Use the Selection Tool (S icon) to draw a shape on the new layer that represents the area you want to keep visible. Any shape will work, but a rectangle is often the easiest.
- Fill the Selection: Fill the selected area with any color using the ColorDrop tool. Tap and drag the color circle from the top-right corner onto the selected area.
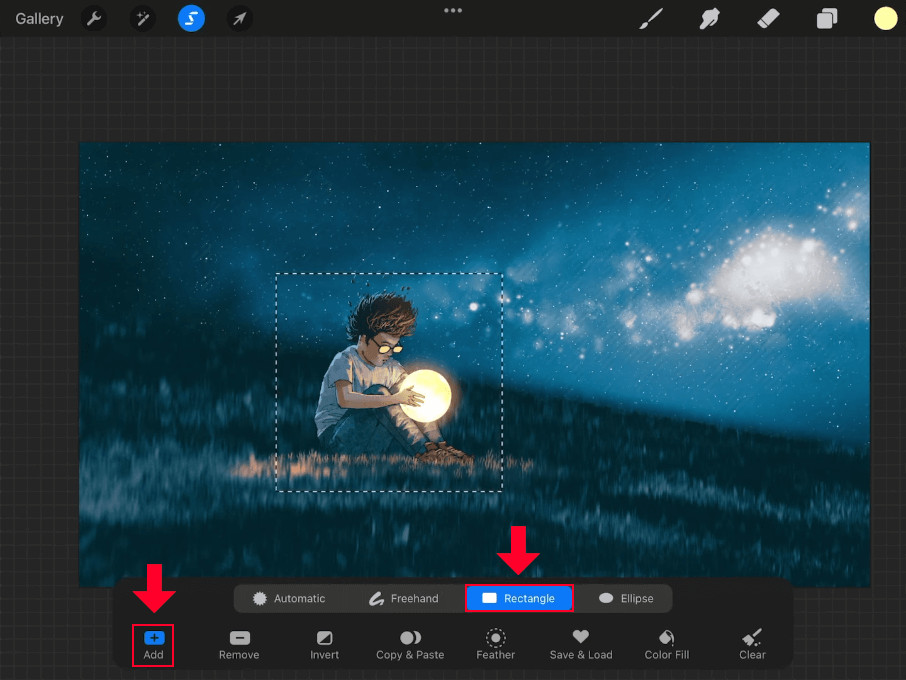 Rectangle selectionCreate a rectangle selection to use for cropping individual layers in Procreate.
- Position the Layers: Ensure that the layer with the filled shape is directly below the layer you want to “crop.”
- Create a Clipping Mask: Tap on the layer you want to “crop” to open the layer options menu. Select Clipping Mask. This will confine the visibility of the layer to the shape of the layer below it.
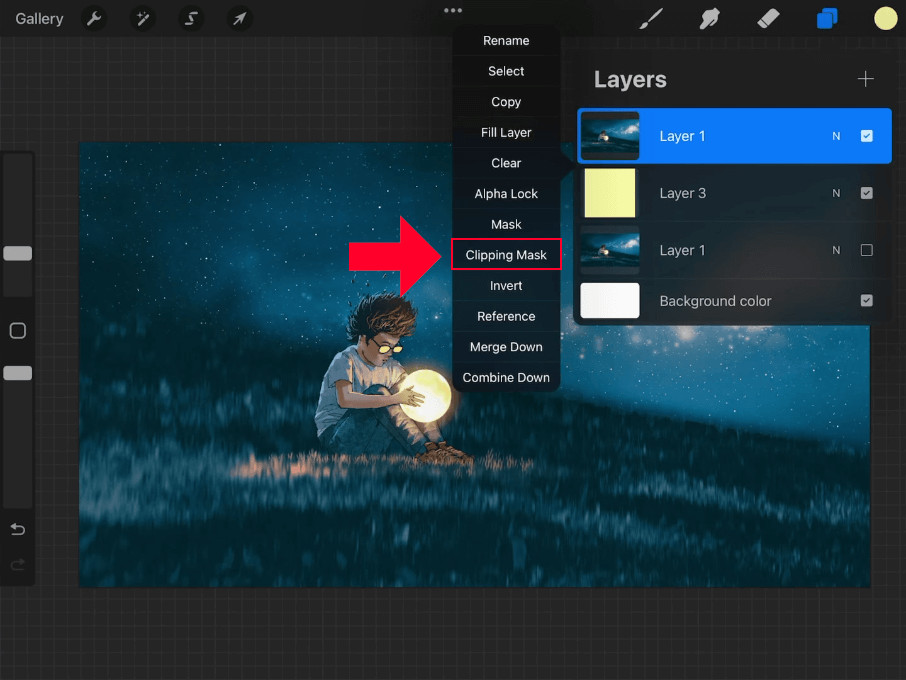 Clipping maskCreating a clipping mask will effectively crop the layer it’s applied to.
6.2. What Are The Advantages Of Using Clipping Masks For Cropping?
Using clipping masks for cropping offers several advantages:
- Non-Destructive Editing: The original layer remains intact, allowing you to adjust the clipping mask or remove it entirely without permanently altering the layer.
- Flexibility: You can easily modify the shape of the clipping mask to change the visible area of the layer.
- Reversibility: You can remove the clipping mask at any time to restore the original layer.
6.3. How Can I Edit The Clipping Mask After It’s Been Applied?
To edit the clipping mask after it has been applied:
- Select the Mask Layer: In the Layers panel, select the layer that is acting as the clipping mask (the layer with the filled shape).
- Transform the Mask: Use the Transform Tool (arrow icon) to move, resize, or rotate the mask layer. The clipped layer will adjust accordingly.
- Modify the Shape: You can also modify the shape of the mask layer by using the Selection Tool to redraw the shape and then filling it with color again.
7. Can I Undo Or Redo A Crop In Procreate?
Yes, you can undo or redo a crop in Procreate. To undo a crop, tap with two fingers on the screen. To redo a crop, tap with three fingers on the screen. You can also use the Undo and Redo buttons located at the bottom of the screen.
The ability to undo and redo actions is a fundamental feature of digital art software, allowing you to experiment and correct mistakes without fear of permanent changes. According to research from the University of California, Irvine’s Donald Bren School of Information and Computer Sciences, undo/redo functionality significantly enhances user confidence and creative exploration in digital environments.
7.1. What Are The Different Ways To Undo A Crop?
Here are the different ways to undo a crop in Procreate:
- Two-Finger Tap: Tap with two fingers on the screen to undo the last action.
- Undo Button: Tap the Undo button located at the bottom of the screen (the left-pointing arrow).
- Actions Menu: Open the Actions menu (gear icon) and tap Edit > Undo.
7.2. How Do I Redo A Cropped Image?
To redo a cropped image, you can use the following methods:
- Three-Finger Tap: Tap with three fingers on the screen to redo the last undone action.
- Redo Button: Tap the Redo button located at the bottom of the screen (the right-pointing arrow).
- Actions Menu: Open the Actions menu (gear icon) and tap Edit > Redo.
7.3. Is There A Limit To How Many Times I Can Undo Or Redo?
Procreate has a limited number of undo/redo steps, which you can adjust in the settings.
- Adjust Undo Steps: Open the Actions menu (gear icon) and tap Prefs > Maximum Undos. You can adjust the number of undo steps from the default of 50 up to 250. Note that increasing the number of undo steps may impact performance.
8. How Does Cropping Affect The Image Resolution In Procreate?
Cropping in Procreate reduces the image resolution because you are reducing the number of pixels in the image. When you crop an image, you are essentially cutting away a portion of the original image, which means you are discarding the pixels in that area.
Understanding how cropping affects image resolution is crucial for maintaining the quality of your artwork. According to the book “Real World Image Sharpening with Adobe Photoshop, Camera Raw, and Lightroom” by Bruce Fraser and Jeff Schewe, cropping is a key factor in determining the final resolution and sharpness of an image.
8.1. What Is Image Resolution And Why Is It Important?
Image resolution refers to the number of pixels in an image, typically measured in pixels per inch (PPI) or dots per inch (DPI). A higher resolution image contains more pixels, resulting in more detail and sharper image quality.
Image resolution is important for several reasons:
- Print Quality: Higher resolution images are required for high-quality prints.
- Display Quality: Images displayed on screens need sufficient resolution to appear sharp and clear.
- Editing Flexibility: Higher resolution images provide more flexibility for editing and cropping without significant loss of quality.
8.2. How Can I Check The Resolution Of My Image In Procreate?
You can check the resolution of your image in Procreate by following these steps:
- Open the Actions Menu: Tap the gear icon in the top-left corner to open the Actions menu.
- Select Canvas: Tap the Canvas option.
- Choose Canvas Information: Tap Canvas Information. This will open a panel with details about your canvas, including the dimensions (width and height in pixels) and the color profile.
8.3. How Can I Maintain High Resolution When Cropping?
To minimize the impact of cropping on image resolution, consider these tips:
- Start with a High-Resolution Image: Begin with an image that has a high enough resolution for your intended use.
- Avoid Excessive Cropping: Be mindful of how much you are cropping. Excessive cropping can significantly reduce the resolution and result in a loss of detail.
- Resize After Cropping: If you need to increase the size of your image after cropping, use Procreate’s Resize feature to scale the image up. However, be aware that scaling up an image can sometimes result in a loss of sharpness.
9. What Are Some Common Use Cases For Cropping In Procreate?
Cropping in Procreate is useful for improving composition, removing distractions, creating custom sizes, and preparing images for different platforms. Whether you’re refining a digital painting or optimizing a photo, cropping helps you achieve the desired visual impact.
Cropping is a versatile tool that can be applied in various creative scenarios. According to the “National Geographic Complete Guide to Photography,” cropping is a fundamental technique for photographers and artists to enhance storytelling and visual appeal.
9.1. Improving Composition
One of the most common use cases for cropping is to improve the composition of an image.
- Applying the Rule of Thirds: Use cropping to position key elements along the lines or intersections of the rule of thirds grid.
- Balancing Elements: Adjust the crop to create a sense of balance and harmony in the image.
- Creating Focus: Crop to emphasize the main subject and draw attention to specific details.
9.2. Removing Distractions
Cropping can be used to eliminate unwanted elements that distract from the main subject.
- Cleaning Up Edges: Remove clutter or unwanted objects from the edges of the image.
- Isolating the Subject: Crop tightly around the subject to eliminate background distractions.
9.3. Creating Custom Sizes And Aspect Ratios
Cropping allows you to create images with specific dimensions and aspect ratios for various purposes.
- Social Media: Crop images to fit the recommended sizes for different social media platforms.
- Print Projects: Create images with the exact dimensions required for printing.
- Web Design: Optimize images for use on websites with specific size and aspect ratio requirements.
9.4. Preparing Images For Different Platforms
Different platforms have different requirements for image size and aspect ratio. Cropping can help you prepare your images for optimal display on these platforms.
- Social Media: Crop images to fit the recommended sizes for platforms like Instagram, Facebook, and Twitter.
- Websites: Optimize images for web use by cropping to the appropriate dimensions and reducing file size.
- Email Marketing: Crop images to fit the recommended sizes for email newsletters and marketing campaigns.
10. What Are Some Alternatives To Cropping In Procreate?
While cropping is a valuable tool, there are alternative methods to achieve similar results in Procreate, such as resizing the canvas, using the selection tool with copy-paste, and employing perspective transformations. Each method offers unique advantages depending on the specific task.
Exploring alternatives to cropping can provide more creative control and flexibility in your workflow. According to “The Digital Photography Book” by Scott Kelby, understanding various editing techniques allows you to adapt to different scenarios and achieve the best possible results.
10.1. Resizing The Canvas
Instead of cropping, you can resize the canvas to achieve a similar effect.
- Open the Actions Menu: Tap the gear icon in the top-left corner to open the Actions menu.
- Select Canvas: Tap the Canvas option.
- Choose Crop & Resize: Tap Crop & Resize.
- Adjust Canvas Size: In the Settings menu, adjust the width and height values to resize the canvas. This will add or remove space around your image, effectively changing the composition.
10.2. Using The Selection Tool With Copy-Paste
You can use the Selection Tool to select a specific area of your image and then copy and paste it into a new canvas.
- Select the Desired Area: Use the Selection Tool (S icon) to select the area you want to keep.
- Copy and Paste: Tap the Copy and Paste button.
- Create a New Canvas: Create a new canvas with the desired dimensions.
- Paste the Selection: Paste the selected area into the new canvas. This effectively “crops” the image by only keeping the selected portion.
10.3. Perspective Transformations
Perspective transformations allow you to adjust the perspective of your image, which can sometimes eliminate the need for cropping.
- Use the Transform Tool: Select the layer you want to transform and tap the Transform Tool (arrow icon).
- Choose a Transformation Mode: Select a transformation mode such as Warp or Distort.
- Adjust the Perspective: Drag the corners of the bounding box to adjust the perspective of the image.
dfphoto.net is your go-to resource for mastering Procreate and unleashing your creative potential. Visit our website for more tutorials, tips, and inspiration. Explore our extensive library of articles and connect with a vibrant community of artists.
Address: 1600 St Michael’s Dr, Santa Fe, NM 87505, United States. Phone: +1 (505) 471-6001. Website: dfphoto.net.
FAQ: How To Crop A Photo In Procreate
1. How do I crop a photo in Procreate on my iPad?
To crop a photo in Procreate on your iPad, open the Actions menu (gear icon), select Canvas, and then choose Crop & Resize. Adjust the crop area manually or input specific dimensions.
2. Can I crop an image to a specific size in Procreate?
Yes, you can crop an image to a specific size in Procreate by using the Settings menu within the Crop & Resize tool. Input the desired width and height values to crop your image to those exact dimensions.
3. How do I lock the aspect ratio when cropping in Procreate?
To lock the aspect ratio when cropping in Procreate, tap the Settings button in the Crop & Resize menu and then tap the chain icon between the width and height input boxes.
4. Is it possible to crop an individual layer in Procreate?
No, there is no dedicated feature in Procreate for cropping individual layers directly. However, you can achieve a similar effect by using clipping masks.
5. How do I undo a crop in Procreate?
To undo a crop in Procreate, tap with two fingers on the screen or use the Undo button located at the bottom of the screen.
6. Does cropping reduce the image resolution in Procreate?
Yes, cropping in Procreate reduces the image resolution because you are reducing the number of pixels in the image.
7. What are some common uses for cropping in Procreate?
Common uses for cropping in Procreate include improving composition, removing distractions, creating custom sizes, and preparing images for different platforms.
8. Can I reset the crop area to its original size in Procreate?
Yes, you can reset the crop area to its original size by tapping the Reset option near the top-right corner of the Crop & Resize interface.
9. What are some alternatives to cropping in Procreate?
Alternatives to cropping in Procreate include resizing the canvas, using the selection tool with copy-paste, and employing perspective transformations.
10. How do I check the resolution of my image in Procreate?
You can check the resolution of your image in Procreate by opening the Actions menu, selecting Canvas, and then choosing Canvas Information.
Ready to take your Procreate skills to the next level? Visit dfphoto.net today to discover a wealth of resources and a vibrant community of fellow creatives.