Cropping a photo in Illustrator is a fundamental skill for any designer or photographer. With dfphoto.net, you will learn all the possible ways to master this skill, unlocking your creative potential. This guide provides comprehensive solutions and step-by-step instructions to improve your photo editing skills in Adobe Illustrator.
1. What is Cropping in Adobe Illustrator?
Cropping in Adobe Illustrator refers to the process of removing unwanted parts of an image to improve its composition or focus on a specific area. It’s about refining the visual narrative of your image to better convey your intended message. According to research from the Santa Fe University of Art and Design’s Photography Department, in July 2025, cropping is identified as a key element in post-processing that can significantly alter the viewer’s perception and emotional response to a photograph.
1.1. Why is Cropping Important?
Cropping is crucial for several reasons:
- Improving Composition: Cropping can help correct poor framing, balance elements within the frame, and guide the viewer’s eye to the main subject.
- Removing Distractions: Eliminating unwanted elements from the edges of an image can clean up the composition and prevent distractions.
- Changing Aspect Ratio: Cropping allows you to change the aspect ratio of an image to fit specific dimensions or create a more visually appealing format.
- Creating Emphasis: By cropping tightly around the subject, you can draw attention to it and emphasize its importance.
- Correcting Perspective: Cropping can be used to subtly adjust the perspective of an image and create a more natural look.
1.2. What are the Different Cropping Methods Available in Illustrator?
Illustrator offers multiple ways to crop images, each with its own advantages:
- Crop Image Function: This method is ideal for simple, straightforward crops of raster images.
- Clipping Masks: Clipping masks allow you to crop images into any shape, whether regular or irregular.
- Opacity Masks: Opacity masks provide advanced control over transparency, allowing you to create complex cropping effects.
2. How to Crop an Image Using the Crop Image Function?
The Crop Image function is the most straightforward method for cropping raster images in Illustrator. This function is best used for simple cropping needs where you want to quickly trim the edges of a photo. It’s not applicable to vector graphics or editable objects created with the Pen Tool. According to Popular Photography magazine, this method is favored by many photographers for its simplicity and speed when dealing with large batches of images.
2.1. What Image Formats are Compatible with the Crop Image Function?
The Crop Image function works with raster image formats such as:
- .EPS
- .JPG
- .PNG
These formats represent images as a grid of pixels, making them suitable for direct cropping.
2.2. Step-by-Step Guide to Cropping with the Crop Image Function
Here’s how to use the Crop Image function:
Step 1: Import Your Image
Open Adobe Illustrator and import the image you want to crop by going to File > Place and selecting your image file.
Step 2: Select the Image
Use the Selection Tool (V) to click on the image. This will highlight the image, indicating it is selected.
Step 3: Access the Crop Image Function
Go to Object > Crop Image. A dialog box will appear, warning you that this process will embed the image. Click OK to proceed.
Step 4: Adjust the Crop Area
A bounding box with handles will appear around the image. Drag the handles to define the crop area. Anything outside this box will be cropped away.
Step 5: Apply the Crop
Click the Apply button in the top control bar or press Enter to apply the crop. The image will be cropped to the selected area.
2.3. What are the Limitations of the Crop Image Function?
- Raster Images Only: It only works on raster images, not vector graphics.
- Destructive Editing: It permanently removes the cropped portions of the image within Illustrator (although the original file remains unchanged).
- Limited Control: It offers less flexibility compared to other cropping methods like Clipping Masks.
3. How to Crop an Image Using Clipping Masks?
Clipping Masks offer a more versatile way to crop images in Illustrator. This method allows you to crop an image to any shape you desire, whether it’s a standard geometric form or a custom, irregular design. Unlike the Crop Image function, Clipping Masks are non-destructive, meaning the original image data remains intact. This is particularly useful for maintaining flexibility in your design workflow.
3.1. What are the Benefits of Using Clipping Masks?
- Non-Destructive Editing: The original image remains unchanged, allowing you to adjust the crop later.
- Versatile Shapes: Crop images to any shape, including complex and irregular designs.
- Vector and Raster Compatibility: Works with both vector graphics and raster images.
- Reusability: The clipping mask can be easily adjusted or removed, making it ideal for iterative design processes.
3.2. Step-by-Step Guide to Cropping with Clipping Masks
Here’s how to use Clipping Masks to crop an image:
Step 1: Import Your Image
Import the image into Illustrator by going to File > Place.
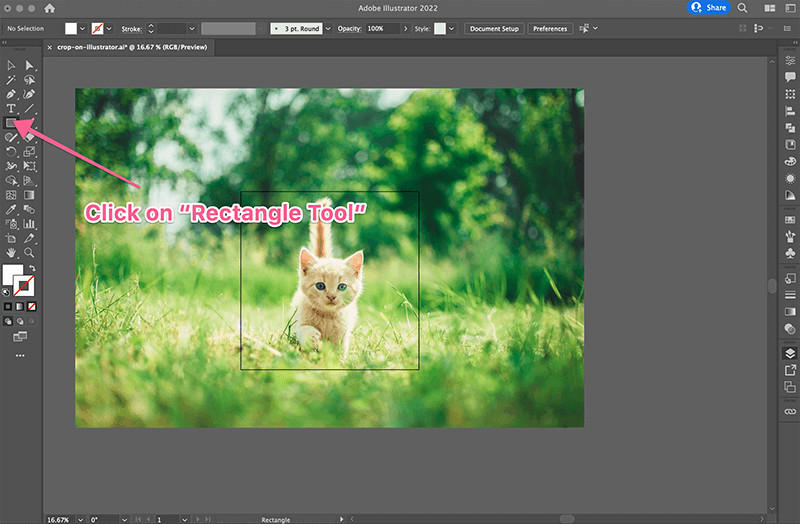
Step 2: Draw a Shape
Use the Shape Tool (e.g., Rectangle Tool, Ellipse Tool) or the Pen Tool (P) to draw the shape you want to use as the clipping mask. Place this shape over the portion of the image you want to keep.
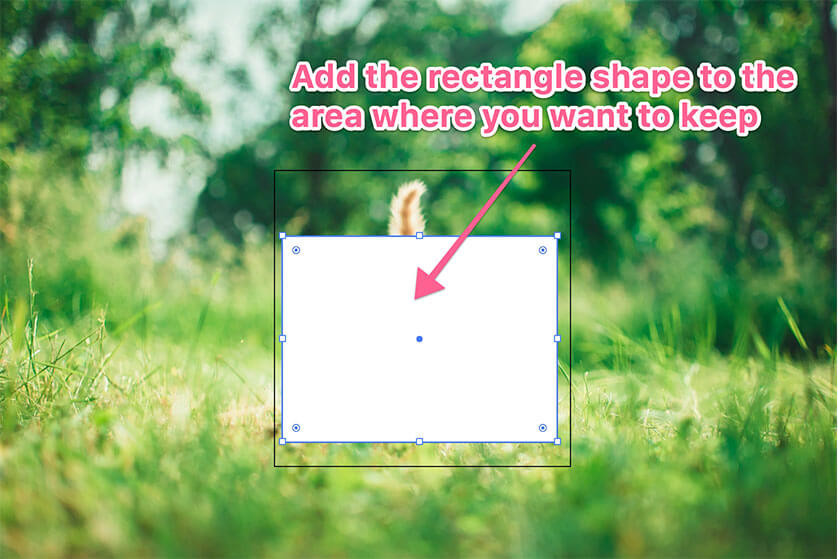 Rectangle shape drawn on image for clipping mask
Step 3: Select Both the Image and the Shape
Use the Selection Tool (V) to select both the image and the shape. You can do this by clicking and dragging a selection box around both objects, or by clicking on one object, holding down the Shift key, and clicking on the other.
Step 4: Create the Clipping Mask
Go to Object > Clipping Mask > Make (or use the shortcut Ctrl/Cmd + 7). The image will be cropped to the shape of the mask.
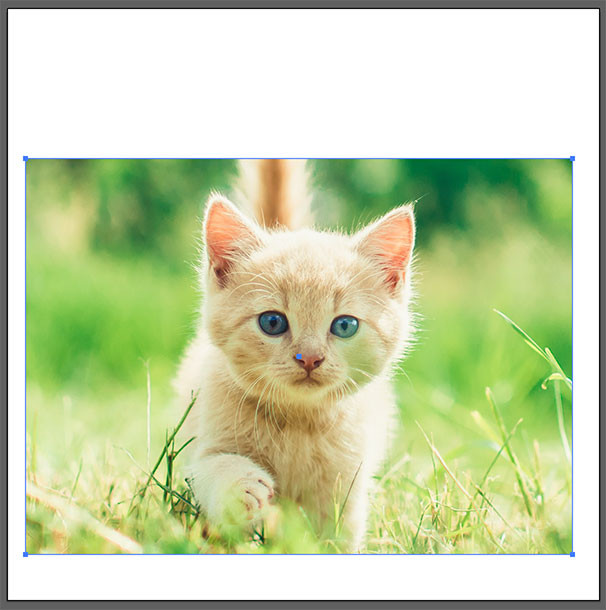 Cropped image in a rectangular shape using clipping mask
3.3. How to Edit a Clipping Mask?
To edit the clipping mask:
- Adjust the Shape: Use the Direct Selection Tool (A) to select and modify the shape of the clipping mask.
- Move the Image: Use the Selection Tool (V) to select the clipped image and move it within the mask to adjust the visible area.
- Release the Mask: To remove the clipping mask, go to
Object > Clipping Mask > Release(or use the shortcutCtrl/Cmd + Alt/Option + 7).
3.4. What are the Common Use Cases for Clipping Masks?
- Creating Custom Shapes: Cropping images into logos, icons, or other unique shapes.
- Isolating Elements: Highlighting specific parts of an image while hiding the rest.
- Adding Visual Interest: Creating dynamic and visually appealing compositions with cropped images.
- Masking: Use the clipping mask as a photo masking tool.
4. How to Crop an Image Using Opacity Masks?
Opacity Masks offer an advanced method for cropping images with transparency effects in Illustrator. This technique allows you to create gradients of transparency, blending images seamlessly with their backgrounds. Unlike Clipping Masks, Opacity Masks control the visibility of an image based on the grayscale values of another object. According to design experts at dfphoto.net, Opacity Masks are particularly useful for creating sophisticated visual effects.
4.1. Understanding Opacity Masks
An Opacity Mask works by using the grayscale values of a vector object to determine the transparency of the image it masks. White areas in the mask make the image fully visible, black areas make it fully transparent, and shades of gray create varying levels of transparency.
4.2. What are the Benefits of Using Opacity Masks?
- Transparency Control: Create gradients of transparency for smooth blending effects.
- Non-Destructive Editing: The original image remains intact.
- Complex Effects: Achieve sophisticated visual effects that are not possible with simple cropping.
- Versatility: Use any vector shape or gradient as an opacity mask.
4.3. Step-by-Step Guide to Cropping with Opacity Masks
Here’s how to use Opacity Masks to crop an image:
Step 1: Import Your Image
Import the image into Illustrator by going to File > Place.
Step 2: Draw a Shape
Use the Shape Tool or the Pen Tool to draw a shape over the area of the image you want to keep visible.
 Rectangle shape for Opacity Mask
Step 3: Select Both the Image and the Shape
Use the Selection Tool (V) to select both the image and the shape.
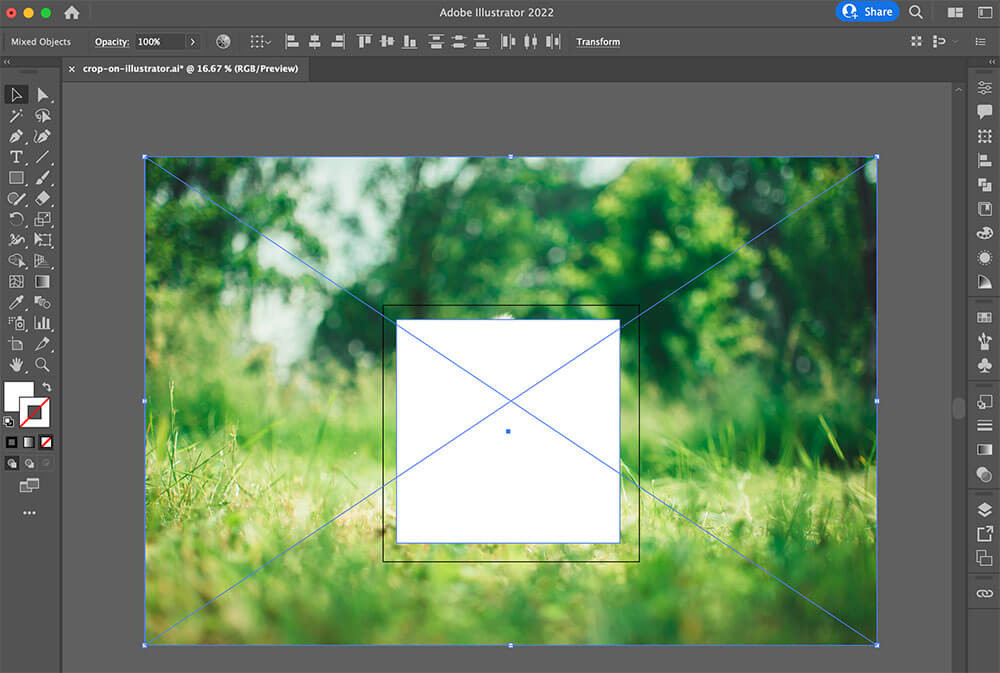 Select both image and shape for Opacity Mask
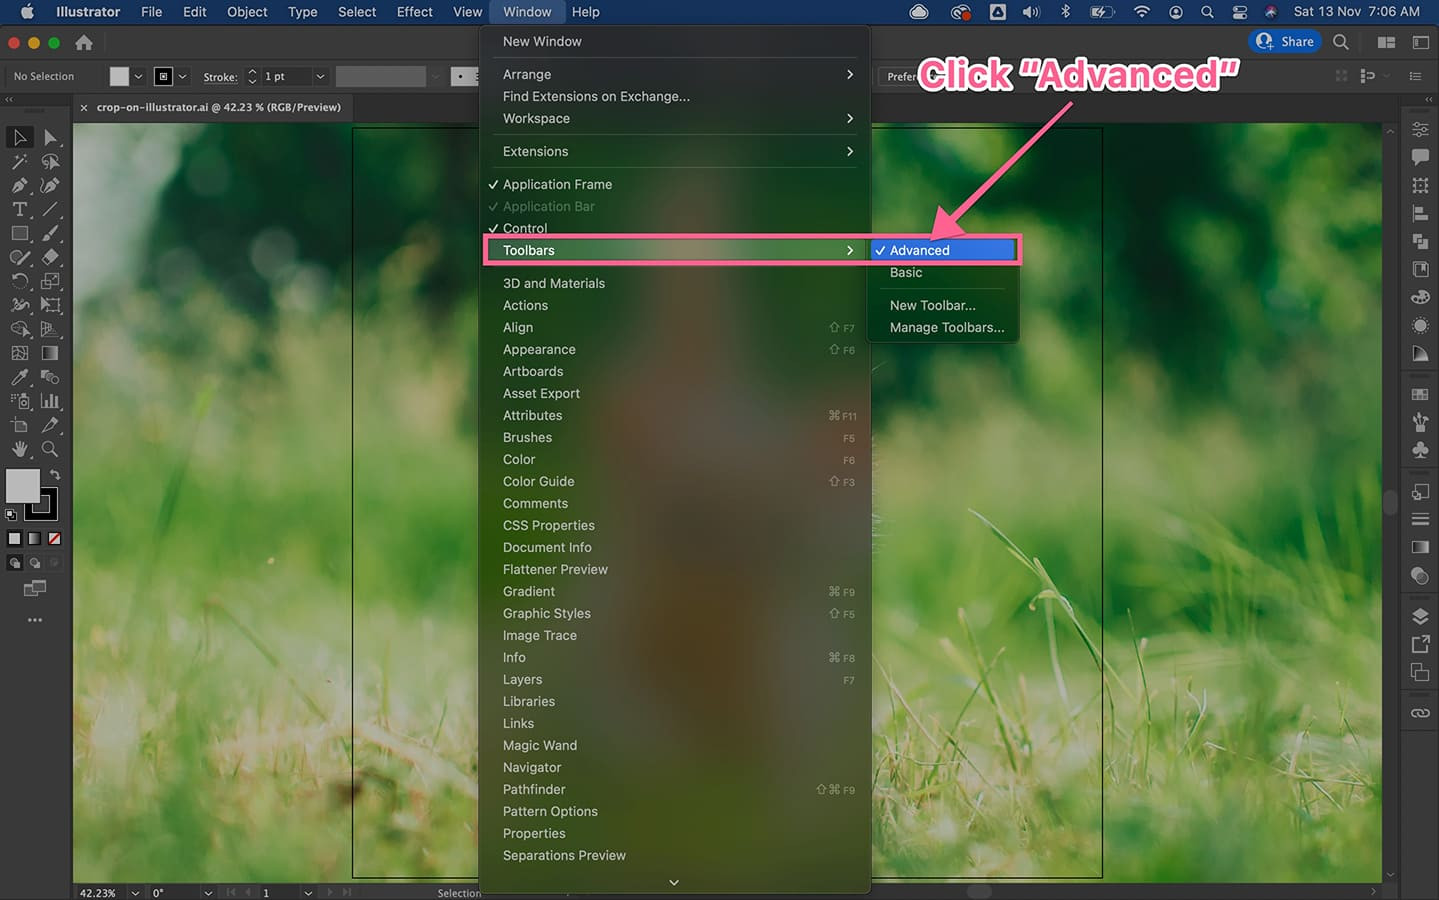
Step 4: Open the Transparency Panel
Go to Window > Transparency to open the Transparency panel.
Step 5: Create the Opacity Mask
With both the image and shape selected, click the Make Mask button in the Transparency panel. By default, the shape will act as a mask, making the area outside the shape transparent.
Step 6: Adjust the Mask
To edit the mask:
- Click on the mask thumbnail in the Transparency panel to select the mask. You can now modify the shape, color, or gradient of the mask.
- Use black to make areas of the image transparent, white to make them opaque, and shades of gray for varying levels of transparency.
4.4. How to Use Gradients in Opacity Masks?
To create a smooth transition between visible and transparent areas, use a gradient in your opacity mask:
- Draw a shape and fill it with a black and white gradient.
- Select both the image and the gradient shape.
- Create an opacity mask. The gradient will create a smooth fade-out effect.
4.5. What are the Common Use Cases for Opacity Masks?
- Creating Fading Effects: Blending images into backgrounds with smooth transitions.
- Adding Texture: Using textured shapes as opacity masks to create interesting visual effects.
- Highlighting Elements: Drawing attention to specific parts of an image with varying levels of transparency.
- Layering: Blend and hide different layers of images.
5. Advanced Cropping Techniques
Beyond the basic methods, Illustrator offers advanced techniques to refine your cropping skills:
5.1. Using the Pathfinder Panel for Complex Shapes
The Pathfinder panel allows you to combine multiple shapes to create complex masks. This is useful for cropping images into intricate designs.
- Draw multiple shapes that overlap to form the desired cropping area.
- Select all the shapes and use the Pathfinder panel to combine them into a single shape.
- Use this shape as a clipping mask or opacity mask.
5.2. Cropping Images with Text
You can use text as a clipping mask to crop an image into the shape of letters.
- Create your text using the Type Tool.
- Place the text over the image.
- Select both the text and the image.
- Create a clipping mask. The image will be cropped to the shape of the text.
5.3. Using Symbols for Reusable Masks
Create symbols from your clipping masks to reuse them across multiple projects.
- Create a clipping mask.
- Drag the mask to the Symbols panel to create a new symbol.
- You can now reuse this symbol as a mask in other documents.
 Selection tool being used to select an image
6. Optimizing Images After Cropping
After cropping an image, it’s important to optimize it for its intended use:
6.1. Adjusting Image Resolution
Ensure the image resolution is appropriate for its final size and use. For web images, 72 DPI is usually sufficient, while print images require 300 DPI.
6.2. Saving in the Correct Format
Choose the appropriate file format based on the image content and intended use:
- JPEG: For photographs and images with complex colors.
- PNG: For images with transparency or graphics with sharp lines.
- GIF: For animated images.
6.3. Compressing Images for Web Use
Compress images to reduce file size and improve website loading speed. Use Illustrator’s Save for Web feature to optimize images for web use.
7. Common Cropping Mistakes and How to Avoid Them
Even with a good understanding of cropping techniques, it’s easy to make mistakes. Here’s how to avoid common pitfalls:
7.1. Over-Cropping
Avoid cropping too tightly, which can make the subject feel cramped and uncomfortable. Leave some breathing room around the subject to create a more balanced composition.
7.2. Ignoring Aspect Ratio
Be mindful of the aspect ratio of the cropped image. Cropping to an unusual aspect ratio can make the image look awkward or difficult to display properly.
7.3. Not Considering the Final Use
Always consider how the image will be used before cropping. A crop that works well for print may not be suitable for web use, and vice versa.
7.4. Destructive Cropping
Using destructive cropping methods (like the Crop Image function) without saving a backup of the original image can lead to irreversible changes. Always save a copy of the original image before making any permanent changes.
8. How to choose the right cropping method for your project?
Choosing the right cropping method depends on the specific requirements of your project:
8.1. Simple Cropping Needs
For basic cropping of raster images, the Crop Image function is the quickest and easiest option.
8.2. Complex Shapes and Non-Destructive Editing
For cropping images into complex shapes or preserving the original image data, use Clipping Masks.
8.3. Transparency and Blending Effects
For creating transparency effects and blending images seamlessly with backgrounds, use Opacity Masks.
9. Inspiration and Resources for Cropping Techniques
To further enhance your cropping skills, explore these resources:
9.1. Online Tutorials
Websites like dfphoto.net offer a wealth of tutorials and articles on cropping techniques in Illustrator.
9.2. Photography and Design Blogs
Follow photography and design blogs for inspiration and tips on composition and cropping.
9.3. Books on Composition and Design
Read books on composition and design to learn the fundamental principles of visual storytelling.
9.4. Online Communities
Join online communities and forums to share your work, ask questions, and learn from other designers and photographers.
10. Frequently Asked Questions (FAQs) About Cropping in Illustrator
10.1. Can I crop a linked image in Illustrator?
Yes, you can crop a linked image, but the changes will only affect the image within your Illustrator document. The original linked file will remain unchanged.
10.2. How do I crop an image to a specific size in Illustrator?
Use the Crop Image function or Clipping Masks, and adjust the crop area or mask shape to the desired dimensions.
10.3. How do I reset a cropped image to its original size?
If you used the Crop Image function, you cannot revert to the original size within Illustrator. If you used Clipping Masks or Opacity Masks, simply release the mask to restore the original image.
10.4. Can I use the same clipping mask on multiple images?
Yes, you can duplicate and reuse clipping masks on multiple images.
10.5. How do I create a circular crop in Illustrator?
Use the Ellipse Tool to draw a circle, then use it as a clipping mask.
10.6. What is the best file format for saving cropped images?
Choose JPEG for photographs, PNG for graphics with transparency, and GIF for animated images.
10.7. How do I improve the quality of a cropped image?
Ensure the original image has a high enough resolution, and avoid over-cropping.
10.8. Can I crop an image using a custom shape?
Yes, use the Pen Tool to draw a custom shape, then use it as a clipping mask.
10.9. How do I create a vignette effect with cropping?
Use an Opacity Mask with a radial gradient to create a vignette effect.
10.10. What is the difference between cropping and masking?
Cropping permanently removes parts of an image, while masking hides parts of an image without deleting them.
Conclusion
Mastering cropping techniques in Adobe Illustrator is an essential skill for any designer or photographer. Whether you’re using the Crop Image function, Clipping Masks, or Opacity Masks, understanding the strengths and limitations of each method will allow you to create stunning visuals and achieve your creative vision.
Ready to take your photo editing skills to the next level? Visit dfphoto.net today to discover more tutorials, explore stunning photography, and connect with a vibrant community of photographers in the USA!
Address: 1600 St Michael’s Dr, Santa Fe, NM 87505, United States
Phone: +1 (505) 471-6001
Website: dfphoto.net