In today’s digital age, we capture countless photos, from everyday moments to special occasions. Managing these photos effectively becomes crucial, especially when you want to share them with family and friends via email. While the term “create photos” might seem broad, in this context, we’re focusing on how to create a system to organize your existing photos and prepare them for easy sharing. Let’s explore a straightforward method to create folders and manage your photos like a pro.
Why Organize Your Photos into Folders?
Before diving into the “how-to,” let’s understand the “why.” Organizing your photos into folders offers several key advantages:
- Simplified Sharing: Instead of attaching individual images one by one, you can easily attach a single folder containing all related photos to an email.
- Efficient Backup: Folders make it easier to back up your photo collections. You can copy entire folders to external drives or cloud services, ensuring your memories are safe.
- Improved Workflow: Whether you’re a casual photographer or a seasoned pro, organized folders streamline your workflow. Finding, editing, and sharing specific sets of photos becomes significantly faster.
- Reduced Email Size: For sending multiple photos, compressing them into a zip file within a folder can reduce the overall file size, making it easier to send via email and for recipients to download.
Step-by-Step Guide to Creating Photo Folders
Creating a folder to store your photos is a fundamental computer skill, and the process is remarkably similar across different operating systems. Here’s a general guide, with specific instructions for macOS as shown in the original discussion.
On macOS:
-
Navigate to your Desktop or Finder: Go to the location where you want to create your photo folder. The Desktop is a convenient and easily accessible place, but you can also choose your Documents folder or any other location in Finder.
-
Control-Click on the Desktop or in Finder: Right-click (or Control-click if you have a single-button mouse or trackpad) in an empty area of your Desktop or within a Finder window. This will bring up a contextual menu.
-
Select “New Folder”: From the contextual menu, choose the option that says “New Folder.”
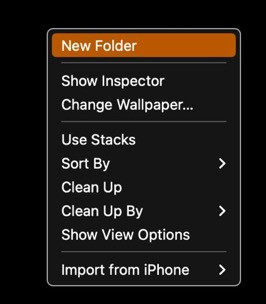 Contextual menu showing 'New Folder' option on macOS
 -
Name Your Folder: A new folder will appear, typically named “untitled folder.” Immediately type in a descriptive name for your folder. For example, if you’re organizing photos from a recent vacation, you could name it “Summer Vacation Photos 2023.” Press the Return or Enter key to save the name.
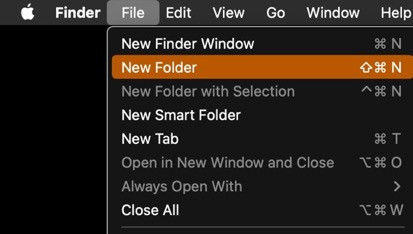 Finder File menu showing 'New Folder' option on macOS
 -
Add Your Photos: Now, locate the photos you want to organize. You can drag and drop them into the newly created folder. Alternatively, you can copy and paste the photos into the folder.
On Windows:
- Navigate to your Desktop or File Explorer: Go to the location where you want to create the folder, such as your Desktop or within File Explorer.
- Right-Click: Right-click in an empty area.
- Select “New” and then “Folder”: In the context menu, hover over “New” and then click on “Folder.”
- Name Your Folder: A new folder will appear, usually named “New folder.” Type in your desired name and press Enter.
- Add Your Photos: Drag and drop or copy and paste your photos into the folder.
Compressing Your Photo Folder for Email
Email providers often have limits on the size of attachments you can send. If your photo folder is large, compressing it into a zip file can be beneficial. Here’s how to compress your folder on macOS:
- Select Your Photo Folder: Locate the folder you just created that contains your photos.
- Control-Click on the Folder: Right-click (or Control-click) on the folder.
- Select “Compress [Folder Name]”: From the contextual menu, choose the “Compress [Folder Name]” option. This will create a zip file with the same name as your folder, but with a
.zipextension.
This zip file is now a compressed version of your photo folder, making it smaller and easier to email. You can attach this single zip file to your email instead of the original folder or individual photos.
Tips for Further Photo Organization
Beyond simply creating folders, consider these additional tips to enhance your photo organization:
- Descriptive Folder Names: Use clear and descriptive names for your folders, including dates, events, or locations. This makes it easy to find specific photos later.
- Subfolders: For large collections, use subfolders within your main photo folders to further categorize your images (e.g., “Vacation Photos 2023” > “Day 1,” “Day 2,” “Landscapes,” “Portraits”).
- File Naming Conventions: Rename your photo files to be more descriptive than the default camera filenames (e.g., “Vacation_Beach_Sunset_01.jpg”).
- Tagging and Keywords: Utilize photo management software or operating system features to tag photos with keywords. This allows you to search for photos based on content, not just folder names.
By mastering these simple techniques, you can effectively “create photos” in the sense of organizing and managing your visual memories. Creating folders and compressing files are essential steps in streamlining your digital life and making photo sharing a breeze.