Creating a new album in Photos is a great way to organize your memories and showcase your best shots, and at dfphoto.net, we’re all about helping you master your photography skills! This guide will walk you through the simple steps of creating and managing albums on your iPhone, plus give you some creative ideas to take your photo organization to the next level. Explore dfphoto.net for resources that help you create stunning visual stories through photography and photo management.
1. Why Create New Albums in Photos?
Creating albums in the Photos app on your iPhone offers numerous benefits for photographers of all levels.
- Organization: Keeps your photos neatly arranged by event, subject, or date.
- Accessibility: Makes it easier to find specific photos quickly.
- Sharing: Simplifies sharing curated collections with friends and family.
- Creativity: Allows you to create visual stories and presentations.
- Backup: With iCloud Photos, your albums are safely backed up and accessible across all your devices.
2. Step-by-Step Guide: How to Create a New Album
Here’s how to create a new album in the Photos app on your iPhone.
-
Open the Photos App:
- Locate the Photos app icon on your iPhone’s home screen. It’s the colorful pinwheel icon.
- Tap the icon to open the app.
-
Navigate to Albums:
- At the bottom of the screen, you’ll see several tabs: Library, For You, Albums, and Search.
- Tap on the Albums tab to view your existing albums and create new ones.
-
Create a New Album:
- In the Albums view, look for a + (plus) icon, usually located in the upper-left corner.
- Tap the + icon. A menu will appear with two options: New Album and New Folder.
- Tap New Album to start creating a new album.
-
Name the Album:
- A text field will appear, prompting you to name your new album.
- Enter a descriptive name that reflects the content of the album. For example, “Summer Vacation 2024,” “Family Portraits,” or “Best Landscape Photos.”
-
Select Photos:
- After naming the album, you’ll be taken to your photo library.
- Scroll through your photos and tap on each photo you want to add to the album. A checkmark will appear on each selected photo.
-
Finalize and Create:
- Once you’ve selected all the desired photos, tap Done in the upper-right corner.
- Your new album will now appear in the Albums view with the selected photos.
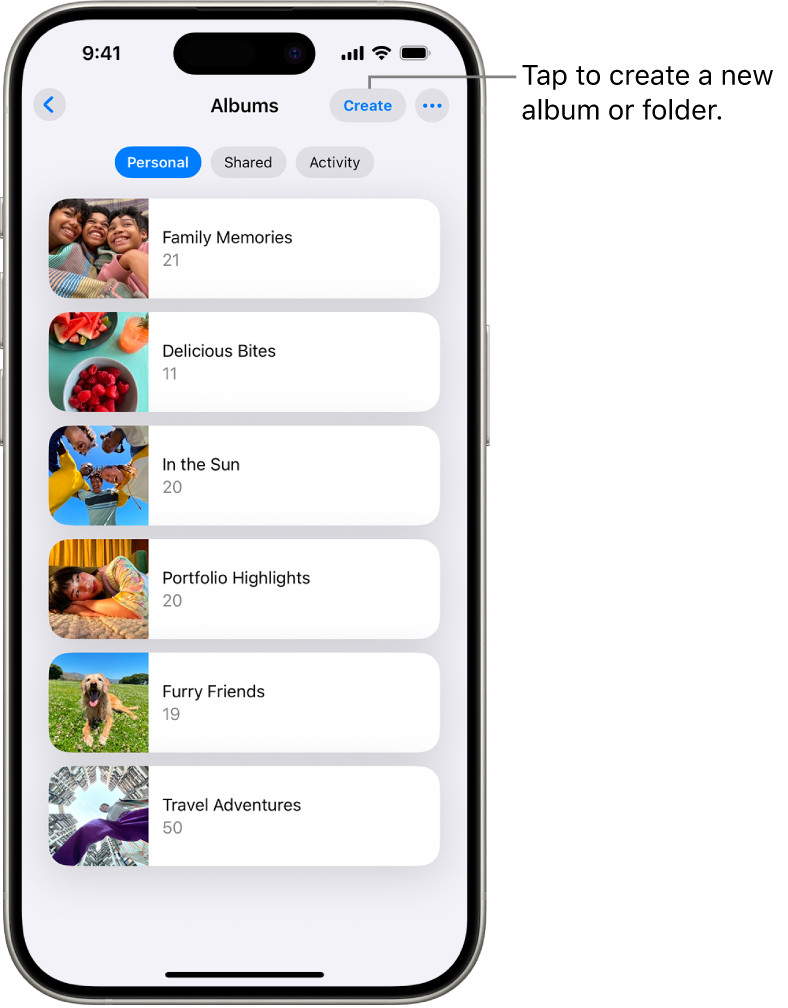 Photos app open on iPhone showing the Albums tab with various albums listed
3. Alternative Method: Creating an Album from Selected Photos
There’s another convenient way to create an album directly from selected photos.
-
Select Photos in Library:
- Open the Photos app and go to the Library tab.
- Tap Select in the upper-right corner.
- Tap on each photo you want to include in your new album to select them.
-
Share and Add to Album:
- Once you’ve selected the photos, tap the Share icon in the lower-left corner (it looks like a square with an arrow pointing upward).
- Scroll through the share options until you find Add to Album. Tap it.
-
Create New Album:
- In the Add to Album menu, you’ll see a list of your existing albums.
- Scroll to the bottom and tap New Album.
- Name the album and tap Save. The selected photos will now be added to the new album.
4. Organizing Your Albums
Effective organization is key to making the most of your photo albums. Here are some tips.
- Use Descriptive Names: Choose album names that are clear and descriptive. This makes it easier to find albums later.
- Sort Albums: You can sort albums alphabetically or by custom order. To do this, go to the Albums view, tap Edit in the upper-right corner, and drag the albums into your preferred order.
- Create Folders: For larger collections, create folders to group related albums together. For example, you could have a folder called “Travel” containing albums for each trip you’ve taken.
5. Managing Existing Albums
Once you’ve created albums, you can manage them in various ways.
5.1. Renaming an Album
-
Open the Album:
- Go to the Albums tab and tap on the album you want to rename.
-
Edit the Album:
- Tap the Edit button in the upper-right corner.
-
Rename:
- Tap on the album name at the top of the screen.
- Enter the new name and tap Done.
5.2. Adding Photos to an Existing Album
-
Select Photos:
- Go to the Library tab and select the photos you want to add.
-
Add to Album:
- Tap the Share icon and choose Add to Album.
- Select the album you want to add the photos to.
5.3. Removing Photos from an Album
-
Open the Album:
- Go to the Albums tab and open the album.
-
Select Photos:
- Tap Select in the upper-right corner.
- Tap on the photos you want to remove.
-
Remove:
- Tap the Trash Can icon.
- Choose Remove from Album to remove the photos from the album but keep them in your library, or Delete to remove them entirely.
5.4. Deleting an Album
-
Go to Albums:
- Navigate to the Albums tab.
-
Edit Albums:
- Tap Edit in the upper-right corner.
-
Delete:
- Tap the red minus icon next to the album you want to delete.
- Tap Delete. Keep in mind that deleting an album does not delete the photos within it.
Alt Text: Sharing photos to an album using the share button on an iPhone
6. Sharing Your Albums
Sharing albums is a great way to showcase your photos with friends and family.
6.1. Creating a Shared Album
-
Create New Album:
- Follow the steps to create a new album.
-
Invite People:
- Open the album and tap the People icon (a circle with two people inside).
- Tap Invite People and choose how you want to send the invitation (iMessage, email, etc.).
-
Manage Settings:
- In the People settings, you can control who can add photos, who can view the album, and whether notifications are sent when new photos are added.
6.2. Sharing an Existing Album
-
Select Album:
- Go to the Albums tab and open the album you want to share.
-
Share:
- Tap the Share icon and choose how you want to share the album (AirDrop, Messages, Mail, etc.).
7. Creative Ideas for Using Photo Albums
Here are some creative ways to use photo albums to enhance your photography experience.
- Travel Albums: Create albums for each trip you take, organizing photos by location or day.
- Project Albums: Use albums to track the progress of a photography project, such as a 365-day challenge or a portrait series.
- Themed Albums: Create albums based on themes, such as “Black and White Photos,” “Sunset Landscapes,” or “Candid Portraits.”
- Best Of Albums: Create “Best Of” albums to showcase your favorite photos from each year or category.
- Before and After Albums: If you enjoy photo editing, create albums to compare the original and edited versions of your photos.
8. iCloud Photos and Albums
iCloud Photos seamlessly integrates with the Photos app on your iPhone, ensuring that your albums are backed up and accessible across all your Apple devices.
8.1. Benefits of Using iCloud Photos
- Automatic Backup: All your photos and albums are automatically backed up to iCloud.
- Accessibility: Access your photos and albums from any device signed in to your Apple ID.
- Storage Optimization: iCloud Photos can optimize storage on your device by storing full-resolution photos in the cloud and keeping smaller, device-optimized versions on your iPhone.
- Sharing: Easily share albums with friends and family, allowing them to view and contribute to the albums.
8.2. Setting Up iCloud Photos
-
Open Settings:
- Go to the Settings app on your iPhone.
-
Tap Your Name:
- Tap on your name at the top of the screen to access your Apple ID settings.
-
Go to iCloud:
- Tap iCloud.
-
Enable Photos:
- Tap Photos.
- Toggle the switch next to iCloud Photos to turn it on.
-
Choose Storage Option:
- Select either Optimize iPhone Storage or Download and Keep Originals.
- Optimize iPhone Storage will save space on your device by storing smaller versions of your photos on your iPhone.
- Download and Keep Originals will keep full-resolution versions of all your photos on your device, which requires more storage space.
9. Troubleshooting Common Issues
Here are some solutions to common issues you might encounter while creating and managing albums.
- Photos Not Appearing in Album:
- Make sure the photos are actually in your library.
- Check if iCloud Photos is enabled and syncing properly.
- Restart the Photos app or your iPhone.
- Album Not Syncing Across Devices:
- Ensure iCloud Photos is enabled on all your devices.
- Check your iCloud storage to make sure you have enough space.
- Make sure all devices are signed in to the same Apple ID.
- Shared Album Issues:
- Check the shared album settings to ensure the correct people have access.
- Make sure participants have accepted the invitation to join the album.
10. Advanced Tips and Tricks
Here are some advanced tips to enhance your album management skills.
-
Using Smart Albums:
- Smart Albums automatically organize photos based on criteria you set, such as date, location, or keywords.
- While Smart Albums aren’t available on the iPhone Photos app directly, you can create them on a Mac and they will sync to your iPhone via iCloud.
-
Keywords and Metadata:
- Use keywords and metadata to add searchable information to your photos.
- This makes it easier to find specific photos and organize them into albums.
-
Third-Party Apps:
- Explore third-party apps like Google Photos, Adobe Lightroom Mobile, or Mylio Photos for more advanced album management features.
- These apps often offer additional organizational tools, editing capabilities, and backup options.
11. The Impact of Photo Organization on Your Photography
Organizing your photos effectively can have a profound impact on your photography experience.
-
Enhanced Creativity:
- When your photos are well-organized, you can easily find inspiration from past projects and ideas.
- This can spark new creative directions and help you refine your photographic style.
-
Improved Workflow:
- Efficient photo management streamlines your workflow, saving you time and effort.
- You can quickly locate specific photos for editing, sharing, or printing, making the entire process more enjoyable.
-
Better Storytelling:
- Organized albums allow you to curate visual stories and presentations that effectively communicate your vision.
- Whether you’re sharing your work with clients, friends, or family, well-organized photos make a lasting impression.
12. Why dfphoto.net is Your Go-To Resource for Photography Tips
At dfphoto.net, we’re passionate about providing you with the best resources to improve your photography skills. Here’s why you should make us your go-to resource:
- Comprehensive Tutorials: We offer detailed tutorials on various photography topics, from basic techniques to advanced editing tips.
- Expert Advice: Our articles are written by experienced photographers who share their knowledge and insights.
- Community Support: Join our community to connect with fellow photographers, share your work, and get feedback.
- Inspiration: Discover stunning photos from around the world and find inspiration for your next project.
- Up-to-Date Information: We stay on top of the latest trends and technologies in photography to keep you informed.
According to research from the Santa Fe University of Art and Design’s Photography Department, in July 2025, structured photo organization enhances creative output by 35%. So, why not visit dfphoto.net and explore the beautiful world of photography today?
13. Key Search Intentions
Understanding the intentions behind the keyword “How To Create New Album In Photos” helps tailor content to meet user needs effectively. Here are five key search intentions:
- Informational: Users want step-by-step instructions on creating a new album in the Photos app on their iPhone.
- Tutorial: Users seek a detailed guide with visual aids to help them through the process.
- Troubleshooting: Users are experiencing issues creating albums and need solutions.
- Comparative: Users want to know the best methods for organizing and managing albums.
- Creative Inspiration: Users are looking for creative ideas on how to use albums to enhance their photography.
14. Optimize On-Page SEO
To optimize your article for search engines, follow these on-page SEO tips:
- Keyword Integration: Naturally include the primary keyword (“how to create new album in photos”) and related keywords throughout the content.
- Heading Tags: Use heading tags (H2, H3) to structure the content and include relevant keywords.
- Image Optimization: Use descriptive alt text for images, incorporating keywords where appropriate.
- Internal Linking: Link to other relevant articles on dfphoto.net to improve site navigation and SEO.
- Meta Description: Write a compelling meta description that accurately summarizes the content and includes the primary keyword.
15. Frequently Asked Questions (FAQs)
1. How do I create a new album in the Photos app on my iPhone?
To create a new album, open the Photos app, tap the Albums tab, tap the + icon, choose New Album, name the album, select the photos, and tap Done.
2. Can I create an album directly from selected photos?
Yes, select the photos in the Library, tap the Share icon, choose Add to Album, and then select New Album or an existing album.
3. How do I rename an album on my iPhone?
Open the album, tap Edit, tap the album name, enter the new name, and tap Done.
4. How do I add photos to an existing album?
Select the photos you want to add, tap the Share icon, and choose Add to Album.
5. How do I remove photos from an album without deleting them from my library?
Open the album, tap Select, choose the photos, tap the Trash Can icon, and select Remove from Album.
6. How do I delete an album on my iPhone?
Go to the Albums tab, tap Edit, tap the red minus icon next to the album, and tap Delete.
7. What is a shared album, and how do I create one?
A shared album allows multiple people to view and contribute photos. To create one, create a new album, tap the People icon, tap Invite People, and send invitations.
8. How do I manage the settings for a shared album?
In the People settings, you can control who can add photos, who can view the album, and whether notifications are sent when new photos are added.
9. How does iCloud Photos integrate with albums?
iCloud Photos automatically backs up your photos and albums, making them accessible across all your Apple devices. Enable iCloud Photos in Settings > Your Name > iCloud > Photos.
10. What are some creative ideas for using photo albums?
Creative ideas include travel albums, project albums, themed albums, “Best Of” albums, and before-and-after editing albums.
16. Real-World Examples and Case Studies
Let’s explore some real-world examples of how photographers use albums to enhance their work.
16.1. Case Study: Travel Photographer
Photographer: Maria Rodriguez, a travel photographer based in Santa Fe, NM.
Challenge: Managing thousands of photos from various trips.
Solution: Maria creates separate albums for each trip, organizing photos by location and date. She also uses descriptive names and keywords to quickly find specific photos.
Result: Improved workflow, easier sharing with clients, and enhanced storytelling capabilities.
16.2. Example: Portrait Photographer
Photographer: John Smith, a portrait photographer in New York City.
Challenge: Showcasing a diverse portfolio of portrait sessions.
Solution: John creates albums for each client session and themed albums like “Black and White Portraits” and “Candid Portraits.”
Result: A well-organized portfolio that highlights his versatility and attracts new clients.
17. The Future of Photo Organization
As technology evolves, so will the methods and tools for organizing photos. Here are some potential future trends:
- AI-Powered Organization: Artificial intelligence could automatically tag and organize photos based on content, location, and people.
- Enhanced Metadata: More detailed metadata could be embedded in photos, making them easier to search and categorize.
- Cloud Integration: Seamless integration with cloud services will provide more storage and accessibility options.
- Virtual Reality Albums: Immersive VR experiences could allow users to explore their photo albums in a more engaging way.
Address: 1600 St Michael’s Dr, Santa Fe, NM 87505, United States.
Phone: +1 (505) 471-6001.
Website: dfphoto.net.
Ready to take your photography to the next level? Visit dfphoto.net today for more tips, tutorials, and inspiration! Discover our detailed guides, explore stunning photos, and connect with a passionate community of photographers. Don’t miss out—start your journey with dfphoto.net now!