How To Create A Photo Album that truly captures the essence of your memories? Creating a photo album involves curating and arranging photographs into a cohesive visual narrative. At dfphoto.net, we empower you with the knowledge and inspiration to transform your cherished photos into stunning, personalized keepsakes. Let’s dive into the art of crafting unforgettable photo albums, explore photographic artistry, digital curation, and memory preservation!
1. Understanding the Core of Photo Album Creation
What exactly goes into crafting a memorable photo album? Photo album creation isn’t just about sticking photos into a book; it’s about storytelling, preserving memories, and showcasing your photographic journey. Whether you’re creating a digital photo album or a physical one, understanding the core elements is crucial.
1.1. Digital Photo Albums
Digital photo albums offer versatility and ease of sharing. You can create them using various software and online platforms.
1.1.1. Advantages of Digital Photo Albums
- Accessibility: Accessible on multiple devices.
- Storage: No physical space required.
- Customization: Easy to edit, rearrange, and add captions.
- Sharing: Simple to share with friends and family online.
1.1.2. Tools for Digital Photo Albums
| Tool | Description |
|---|---|
| Adobe Photoshop | Professional-grade editing and layout tools. |
| Canva | User-friendly design platform with templates. |
| Google Photos | Cloud storage with automatic organization and sharing features. |
| Mixbook | Online platform with customizable templates and printing options. |
| Apple Photos | Integrated with iOS and macOS, offering seamless organization and editing. |
1.2. Physical Photo Albums
Physical photo albums offer a tactile and nostalgic experience, allowing you to physically hold and flip through your memories.
1.2.1. Advantages of Physical Photo Albums
- Tangibility: Offers a physical connection to your memories.
- Longevity: Properly stored albums can last for generations.
- Aesthetic Appeal: Beautiful albums can be displayed as decorative items.
- No Technology Required: Can be enjoyed without needing devices or internet.
1.2.2. Types of Physical Photo Albums
| Type | Description |
|---|---|
| Slip-in Albums | Feature plastic sleeves to easily insert and protect photos. |
| Self-adhesive Albums | Have sticky pages covered with a clear sheet to hold photos in place. |
| Traditional Albums | Require photo corners or glue to mount photos; offer a classic, customizable look. |
| Scrapbook Albums | Designed for adding embellishments, captions, and other mementos alongside photos. |
| Layflat Albums | Allow pages to lay completely flat, ideal for panoramic images and a seamless viewing experience. |
1.3. Key Elements of a Photo Album
Regardless of the format, here are essential elements to consider:
- Theme: Defining a theme (e.g., travel, wedding, childhood) helps maintain coherence.
- Chronology: Arranging photos chronologically tells a story in a timeline.
- Selection: Choose photos that are visually appealing and emotionally significant.
- Layout: Arrange photos in a visually balanced and aesthetically pleasing manner.
- Captions: Adding captions provides context and enhances the storytelling aspect.
- Quality: Use high-resolution images and archival-quality materials to ensure longevity.
2. Defining Your Photo Album’s Purpose and Theme
Why are you creating this photo album, and what story do you want it to tell? Defining the purpose and theme is the first step in creating a meaningful photo album.
2.1. Identifying the Purpose
- Personal Keepsake: To preserve your own memories.
- Gift: To create a personalized gift for someone special.
- Historical Record: To document a specific event or period.
- Artistic Expression: To showcase your photography skills and creative vision.
2.2. Selecting a Theme
- Travel Album: Documenting a trip or adventure.
- Wedding Album: Celebrating a marriage and the special moments surrounding it.
 Wedding photo album creation with carefully selected moments
 - Family Album: Chronicling family history and milestones.
- Childhood Album: Capturing the growth and development of a child.
- Pet Album: Showcasing the life and adventures of your beloved pet.
- Event Album: Documenting a specific event like a birthday, graduation, or anniversary.
2.3. How Theme Impacts Album Design
- Color Scheme: Choose colors that complement the theme (e.g., earthy tones for nature, pastels for baby photos).
- Layout Style: Opt for layouts that reflect the theme’s mood (e.g., clean and modern for professional events, whimsical for children).
- Embellishments: Select embellishments that enhance the theme (e.g., travel stickers for a travel album, floral accents for a wedding album).
3. Gathering and Curating Your Photos
What makes a photo album truly special is the careful selection and curation of photos. This process involves gathering your images and choosing the best ones that fit your album’s theme and purpose.
3.1. Gathering Your Photos
- Digital Sources: Collect photos from your computer, smartphone, tablets, and cloud storage.
- Physical Sources: Gather printed photos, negatives, and slides.
- Scanning Old Photos: Digitize old photos using a scanner or a scanning app on your smartphone.
3.2. Selecting the Best Photos
- Technical Quality: Choose photos that are sharp, well-exposed, and properly lit.
- Emotional Significance: Select photos that evoke strong emotions and memories.
- Storytelling Value: Pick photos that contribute to the overall narrative of the album.
- Variety: Include a mix of portraits, landscapes, action shots, and candid moments.
- Relevance: Ensure that each photo aligns with the album’s theme and purpose.
3.3. Organizing Your Photos
- Chronological Order: Arrange photos by date to tell a story in a timeline.
- Thematic Grouping: Group photos by event, location, or subject.
- Rating and Tagging: Use photo management software to rate and tag photos for easy searching and sorting.
3.4. Photo Editing Basics
- Cropping: Improve composition by removing distracting elements and focusing on the subject.
- Adjusting Exposure: Correct overexposed or underexposed photos to achieve optimal brightness and contrast.
- Color Correction: Adjust white balance and color saturation to ensure accurate and pleasing colors.
- Sharpening: Enhance details and sharpness to make photos look crisp and clear.
- Removing Blemishes: Eliminate dust, scratches, and other imperfections from old photos.
4. Choosing the Right Album Format and Materials
Selecting the appropriate format and materials is vital for both the aesthetic appeal and longevity of your photo album. The right choice will protect your photos and enhance the overall presentation.
4.1. Digital Album Formats
- Online Platforms: Websites like Mixbook, Shutterfly, and Snapfish offer customizable templates and printing services.
- Software: Programs like Adobe Photoshop, Lightroom, and Canva allow you to create digital layouts for printing or sharing online.
- PDF: Saving your album as a PDF allows for easy sharing and viewing on various devices.
4.2. Physical Album Types
| Album Type | Description | Pros | Cons |
|---|---|---|---|
| Slip-in Albums | Albums with clear plastic sleeves to hold photos. | Easy to use, photos are protected, good for large collections. | Limited customization, sleeves can sometimes be flimsy. |
| Self-adhesive | Albums with sticky pages covered by a clear sheet. | Versatile, allows for various photo sizes and arrangements. | Adhesive can degrade over time, can damage photos if not carefully removed. |
| Traditional | Albums where photos are mounted using photo corners or glue. | Highly customizable, classic look, allows for handwritten captions. | Requires more effort, photos can be damaged if not mounted properly. |
| Layflat | Albums with pages that lay completely flat when open, ideal for panoramic images. | Seamless display, high-quality presentation, ideal for professional photos. | More expensive, can be less durable than other types. |
| Scrapbook | Albums with blank pages for photos, embellishments, and handwritten notes. | Highly personalized, allows for creativity and adding mementos. | Requires more time and effort, can become bulky if over-embellished. |
4.3. Material Considerations
- Paper Quality: Use acid-free and lignin-free paper to prevent yellowing and deterioration.
- Cover Material: Choose durable materials like leather, linen, or high-quality book cloth.
- Adhesives: Use archival-quality photo corners, glue, or mounting tape to avoid damaging photos.
- Page Thickness: Opt for thicker pages to prevent warping and tearing.
5. Designing Your Photo Album Layout
Creating an appealing layout is essential for showcasing your photos effectively. A well-designed layout enhances the storytelling aspect of your album and keeps viewers engaged.
5.1. Basic Layout Principles
- Balance: Arrange photos to create visual equilibrium on each page.
- Hierarchy: Use size and placement to emphasize important photos.
- White Space: Leave empty space around photos to avoid a cluttered look.
- Consistency: Maintain a consistent style throughout the album.
- Flow: Guide the viewer’s eye through the album with a logical arrangement.
5.2. Layout Ideas and Examples
- Single Photo per Page: Showcase a particularly stunning or significant photo.
- Multiple Photos per Page: Arrange several photos to tell a more complex story.
- Collage Style: Create a dynamic layout with overlapping photos and embellishments.
- Grid Layout: Use a structured grid to create a clean and organized look.
- Panoramic Spreads: Display large landscape photos across two pages.
5.3. Using Templates
- Digital Templates: Online platforms and software offer customizable templates to simplify the design process.
- Pre-designed Albums: Some physical albums come with pre-designed layouts for easy photo placement.
5.4. Adding Embellishments and Captions
- Captions: Provide context, dates, names, and anecdotes to enhance the storytelling.
- Embellishments: Use stickers, stamps, washi tape, and other decorative elements to add personality and visual interest.
- Handwritten Notes: Include personal messages and memories to make the album more meaningful.
6. Optimizing Photos for Print or Digital Display
Ensuring your photos look their best, whether printed or displayed digitally, requires careful optimization. This involves adjusting resolution, color profiles, and file formats to achieve optimal results.
6.1. Resolution and Image Size
- Print Resolution: Aim for 300 DPI (dots per inch) for high-quality prints.
- Digital Display Resolution: 72 DPI is sufficient for online viewing.
- Image Size: Adjust image size to fit the layout without losing quality.
6.2. Color Profiles
- sRGB: Standard color profile for web and most consumer printers.
- Adobe RGB: Wider color gamut, suitable for professional printing.
- CMYK: Used for commercial printing; convert your images to CMYK if required by the printer.
6.3. File Formats
| File Format | Description | Pros | Cons |
|---|---|---|---|
| JPEG | Compressed image format, ideal for photos. | Small file size, widely compatible. | Lossy compression can reduce image quality. |
| PNG | Lossless image format, suitable for graphics and images with text. | Preserves image quality, supports transparency. | Larger file size compared to JPEG. |
| TIFF | High-quality, lossless image format, ideal for archival purposes. | Best image quality, suitable for professional printing. | Very large file size. |
| Portable Document Format, ideal for sharing and printing documents with embedded images and fonts. | Maintains layout and formatting, widely compatible. | Can be large file size, requires PDF viewer. |
6.4. Print Settings
- Paper Type: Choose the appropriate paper type for your printer (e.g., glossy, matte, photo paper).
- Print Quality: Set the print quality to “high” or “best” for optimal results.
- Color Management: Enable color management to ensure accurate color reproduction.
7. Adding Personal Touches and Storytelling Elements
What transforms a simple collection of photos into a compelling narrative? Adding personal touches and storytelling elements infuses your photo album with emotion and makes it truly unique.
7.1. Handwritten Notes and Captions
- Anecdotes: Share memorable stories and funny moments related to the photos.
- Dates and Locations: Provide context and help future viewers understand the timeline and setting.
- Personal Reflections: Add your thoughts and feelings about the events and people in the photos.
7.2. Including Mementos
- Tickets and Brochures: Add travel souvenirs to a travel album.
- Invitations and Programs: Include wedding or event memorabilia.
- Letters and Cards: Incorporate handwritten notes and greetings.
- Small Objects: Attach small, flat objects like pressed flowers or fabric swatches.
7.3. Creative Embellishments
- Stickers and Stamps: Use themed stickers and stamps to add visual interest.
- Washi Tape: Decorate pages with colorful and patterned washi tape.
- Ribbons and Twine: Add texture and dimension with ribbons and twine.
- Die Cuts: Use die-cut shapes and letters to create custom designs.
7.4. Incorporating Quotes and Poems
- Inspirational Quotes: Add quotes that resonate with the theme or message of the album.
- Personal Poems: Include poems that you’ve written or found that express your feelings.
8. Preserving and Storing Your Photo Album
Ensuring the longevity of your photo album involves proper preservation and storage techniques. Protecting your album from environmental factors will keep your memories intact for years to come.
8.1. Environmental Factors
- Light: Avoid direct sunlight, which can fade photos over time.
- Humidity: Store albums in a dry environment to prevent mold and mildew.
- Temperature: Keep albums in a cool place to prevent deterioration.
- Pests: Protect albums from insects and rodents that can damage materials.
8.2. Storage Solutions
- Archival Boxes: Use acid-free and lignin-free boxes to protect albums from dust and light.
- Album Sleeves: Place individual albums in protective sleeves to prevent scratches and wear.
- Storage Location: Store albums in a closet, drawer, or bookshelf away from direct sunlight and moisture.
Wedding photo album creation with carefully selected moments
8.3. Digital Backup
- Cloud Storage: Back up digital photo albums to cloud services like Google Photos, Dropbox, or iCloud.
- External Hard Drives: Store digital albums on external hard drives for added security.
- Multiple Copies: Create multiple backup copies and store them in different locations.
8.4. Handling and Care
- Clean Hands: Always handle photo albums with clean, dry hands.
- Gentle Handling: Avoid bending or folding pages.
- Protective Gloves: Wear cotton gloves when handling old or delicate photos.
9. Unleashing Creativity with Advanced Techniques
Want to elevate your photo album from ordinary to extraordinary? Explore advanced techniques that add sophistication and artistic flair to your creations.
9.1. Advanced Photo Editing
- Layering: Combine multiple images and effects using layers in Photoshop.
- Masking: Use masks to selectively edit parts of an image.
- Retouching: Remove blemishes, wrinkles, and other imperfections with precision.
- Color Grading: Adjust colors to create a specific mood or aesthetic.
9.2. Mixed Media Techniques
- Watercolor: Add watercolor washes and illustrations to pages.
- Calligraphy: Incorporate elegant handwritten text with calligraphy pens.
- Fabric and Lace: Add texture and dimension with fabric and lace scraps.
- Metal Embellishments: Use metal charms, brads, and eyelets for a vintage look.
9.3. Digital Storytelling
- Interactive Albums: Create digital albums with clickable links, videos, and audio.
- Animated Albums: Animate photos and text to create engaging slideshows.
- Virtual Reality Albums: Immerse viewers in a virtual world with 360-degree photos and videos.
9.4. Unique Binding Methods
- Japanese Binding: Use traditional Japanese binding techniques to create a unique and elegant album.
- Long Stitch Binding: Sew pages together with a decorative long stitch.
- Accordion Binding: Fold pages into an accordion shape for a compact and portable album.
10. Legal and Ethical Considerations
Before creating and sharing your photo album, it’s essential to consider the legal and ethical aspects of using images, especially when sharing online.
10.1. Copyright Laws
- Personal Use: Generally, you can use photos you’ve taken for personal photo albums.
- Commercial Use: If you plan to sell or use the photo album for commercial purposes, ensure you have the rights to use all the images.
- Online Sharing: Be cautious about sharing images online, especially if they contain copyrighted material.
10.2. Model Releases
- Privacy Rights: If your photo album includes identifiable people, consider obtaining model releases, especially if you plan to share the album publicly.
- Legal Protection: Model releases protect you from potential lawsuits related to privacy or publicity rights.
10.3. Fair Use Doctrine
- Educational Purposes: You may be able to use copyrighted images under the fair use doctrine for educational or commentary purposes.
- Transformative Use: If you significantly transform the original image, it may fall under fair use.
10.4. Creative Commons Licenses
- Attribution: If you use Creative Commons-licensed images, give proper attribution to the creator.
- License Terms: Follow the terms of the specific Creative Commons license, such as non-commercial use or share-alike.
FAQ: Your Questions About Photo Album Creation Answered
1. What is the best way to organize photos for an album?
The best way to organize photos is by theme or chronology. Organize photos by date to tell a story in a timeline, or group photos by event, location, or subject.
2. How do I choose the right size for my photo album?
Choose the size based on the number and size of your photos, and the overall look you want to achieve. Common sizes include 8×8, 10×10, and 12×12 inches.
3. What are the essential tools for creating a digital photo album?
Essential tools include photo editing software (e.g., Adobe Photoshop, Lightroom), a design platform (e.g., Canva), and cloud storage (e.g., Google Photos).
4. How can I make my photo album more personal?
Add handwritten notes, captions, and mementos to make the album more meaningful and unique.
5. What type of paper should I use for a physical photo album?
Use acid-free and lignin-free paper to prevent yellowing and deterioration.
6. How do I protect my photo album from damage?
Store albums in a cool, dry place away from direct sunlight, and use archival-quality storage boxes and sleeves.
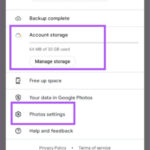
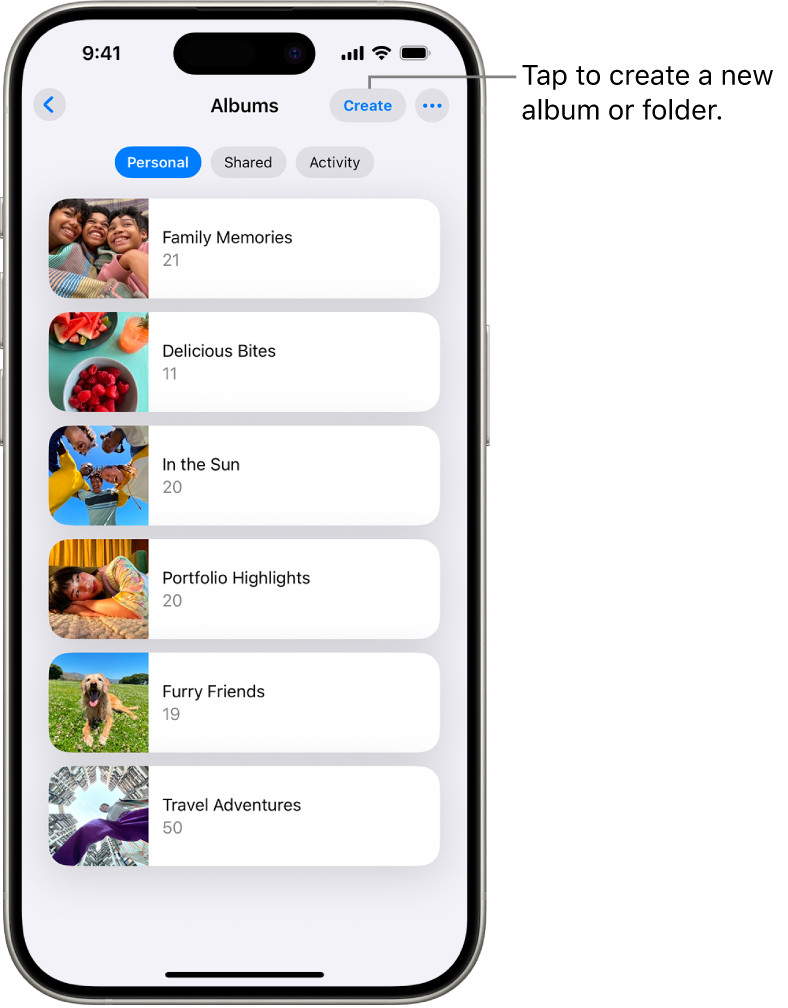
7. Can I create a photo album on my iPhone?
Yes, you can use the Photos app to create albums, add photos, and share them with others.
8. What are some creative layout ideas for a photo album?
Try a single photo per page, multiple photos per page, collage style, grid layout, or panoramic spreads.
9. How do I optimize photos for printing in an album?
Aim for 300 DPI resolution, use the sRGB color profile, and save as JPEG or TIFF format.
10. What should I consider regarding copyright when creating a photo album?
Ensure you have the rights to use all images, especially if sharing online or using for commercial purposes. Obtain model releases for identifiable people in your photos.
Creating a photo album is a journey of preserving memories and expressing creativity. Whether you opt for a digital album or a physical one, the key is to infuse it with personal touches and storytelling elements that make it uniquely yours. At dfphoto.net, we’re here to guide you through every step of the process. From selecting the right materials to mastering advanced techniques, we provide the resources and inspiration you need to create a photo album that stands the test of time.
Ready to start your photo album project? Visit dfphoto.net to explore our tutorials, discover stunning photo collections, and connect with a community of passionate photographers in the USA. Let’s transform your memories into cherished keepsakes together!