Are you running out of space on your Mac and need to move your precious photo memories? It’s easy to copy your Photos library to an external hard drive! At dfphoto.net, we’ll guide you through the simple steps to safely transfer your photo library, freeing up valuable space on your Mac and ensuring your memories are secure. Discover expert tips and tricks to manage your digital assets, ensuring your photos are organized and accessible using external storage solutions.
1. Preparing Your External Hard Drive for Your Photos Library
So, you’re ready to offload your photo library to an external drive? Great! First, let’s make sure that external hard drive is ready for the task.
1.1. Formatting the External Hard Drive for Mac
Is my external hard drive formatted correctly? Absolutely! Your external storage device needs to be formatted correctly for macOS. This typically means using either APFS (Apple File System) or Mac OS Extended (Journaled).
- APFS: This is the modern file system for macOS, offering better performance and reliability, especially for SSDs.
- Mac OS Extended (Journaled): Also known as HFS+, this is an older but still reliable file system that works well with both SSDs and HDDs.
How do I format the drive?
- Connect the external hard drive to your Mac.
- Open Disk Utility. You can find it by searching in Spotlight (Command + Space).
- Select your external hard drive in the sidebar. Be absolutely sure you’re selecting the external drive and not your internal drive to avoid data loss!
- Click Erase in the toolbar.
- Give your drive a name.
- Choose either APFS or Mac OS Extended (Journaled) from the Format dropdown menu.
- Click Erase.
Warning: Formatting a drive will erase all data on it! Make sure to back up any important files before proceeding.
1.2. Restrictions on Using External Hard Drives
Can I use any external hard drive? Not quite. There are a few important restrictions to keep in mind:
- Time Machine Backups: You cannot store your Photos library on a drive that’s used for Time Machine backups. This can lead to conflicts and potential data loss. Use a separate drive for your backups and your photo library.
- Removable Storage: Avoid using removable storage devices like SD cards or USB flash drives for long-term storage of your Photos library. These devices are not as reliable as external hard drives and are more prone to data loss.
- Network or Cloud Storage: Storing your library on a device shared over your network, the internet, or a cloud-based storage service (like Dropbox or Google Drive) is also not recommended. These methods can introduce syncing issues and potential data corruption.
- Reliable Connection: Ensure the external drive has a stable connection to your Mac via USB or Thunderbolt. Disconnecting the drive while Photos is accessing it can corrupt your library.
2. Moving Your Photos Library to the External Hard Drive
Now that your external hard drive is prepped and ready, let’s get your Photos library moved over!
2.1. Step-by-Step Instructions for Moving the Library
How do I move my Photos Library to external drive? It’s easier than you think! Here is the step-by-step instruction:
-
Quit Photos: Make sure the Photos application is completely closed before you start.
-
Locate the Photos Library: By default, the Photos Library is stored in the Pictures folder of your home folder. You can quickly access your home folder by choosing Go > Home from the Finder menu bar.
-
Drag and Drop: Simply drag the “Photos Library” file to your desired location on the external hard drive.
-
Wait for the Transfer: The transfer process can take a while, depending on the size of your library and the speed of your external hard drive. Be patient and let it finish completely.
-
Open the Library from Its New Location: Once the move is complete, double-click the “Photos Library” file in its new location on the external hard drive to open it in Photos.
-
Designate as System Photo Library (If Applicable): If you use iCloud Photos, or if you want to access the library via the Photo Picker in other apps, you need to designate this library as the System Photo Library. To do this, open Photos, go to Photos > Settings > General, and click Use as System Photo Library.
2.2. Deleting the Original Library (Optional)
Should I delete the original Photos Library? That’s up to you. Once you’ve confirmed that the Photos library on the external drive is working correctly, you can delete the original from your Mac to free up space.
- Drag to Trash: Drag the original “Photos Library” file from your Pictures folder to the Trash.
- Empty the Trash: Empty the Trash to permanently delete the file.
Important: Be absolutely sure you’ve successfully moved the library and that it’s working correctly on the external hard drive before deleting the original.
2.3. Ensuring the External Hard Drive is Always Available
What happens if the external drive isn’t connected? Always make sure that your external hard drive is turned on and available before opening Photos. If Photos can’t find the device, it will stop using the Photos library stored there and will create a new, empty library in the default location (~/Pictures). This can be confusing, so it’s best to avoid this situation altogether.
3. Opening a Different Photos Library
Sometimes, you might have multiple Photos libraries. Perhaps you have one for personal photos and another for professional work. Here’s how to switch between them.
3.1. Steps to Switch Between Libraries
How do I switch between different Photos Libraries?
- Quit Photos: Close the Photos application completely.
- Press and Hold Option: Press and hold the Option (⌥) key while you open Photos.
- Choose Library: A window will appear, allowing you to select the library that you want to open. Click Choose Library.
- Select and Open: Photos will now open the library you selected. It will continue to use this library until you choose a different one.
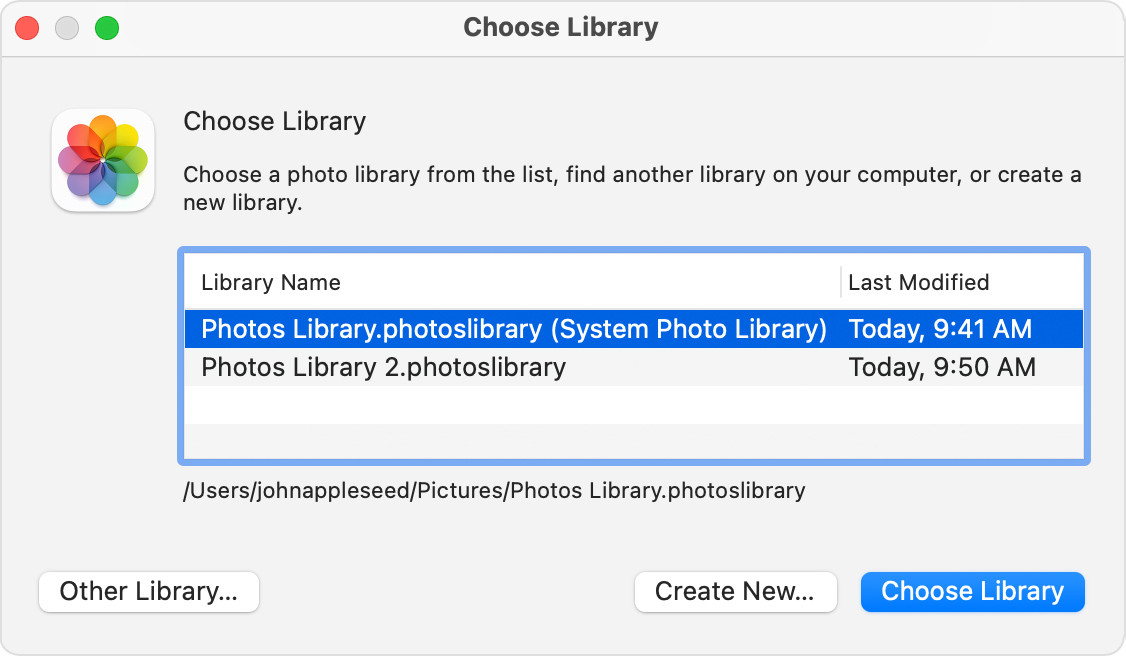 macOS Photos app Choose Library window
4. Troubleshooting Errors When Moving Photos Library
Moving files is generally a straightforward process, but sometimes errors occur. Let’s troubleshoot some common issues you might encounter.
4.1. Addressing Permission Issues
What should I do if I get an error message when moving the library?
- Get Info: Select your external hard drive in the Finder, then choose File > Get Info.
- Sharing & Permissions: If the information under Sharing & Permissions isn’t visible, click the triangle to expand it.
- Ignore Ownership: Make sure that the “Ignore ownership on this volume” checkbox is selected.
If the checkbox is grayed out, you may need to unlock the settings:
- Click the lock icon in the bottom-right corner of the Get Info window.
- Enter your administrator password.
- Now you should be able to check the “Ignore ownership on this volume” box.
Why is this important? This setting allows your user account to have full read and write access to the external hard drive, regardless of the original ownership settings.
What if the checkbox isn’t there? If the “Ignore ownership on this volume” checkbox isn’t present or isn’t selectable even after unlocking, it usually indicates that the storage device isn’t formatted correctly for Mac or was previously used for Time Machine backups without being erased. In this case, you’ll need to erase the storage device using Disk Utility and format it as APFS or Mac OS Extended (Journaled). Remember to back up any important data before erasing!
4.2. Using the Photos Library Repair Tool
What if I still have problems after checking permissions? If you’re still experiencing issues with your Photos library, you can try using the built-in Photos Library repair tool.
How do I use the repair tool?
- Quit Photos: Make sure Photos is completely closed.
- Press Option and Command: Press and hold the Option (⌥) and Command (⌘) keys while you open Photos.
- Click Repair: A dialog box will appear asking if you want to repair the library. Click Repair.
The repair process can take a while, depending on the size and complexity of your library. Be patient and let it finish. The repair tool will analyze the library’s database and attempt to fix any inconsistencies or errors it finds.
5. Optimizing Your Photos Library for External Storage
Now that your Photos library is safely on your external hard drive, let’s look at some ways to optimize its performance and manage your storage effectively.
5.1. Managing Library Size
Is my Photos library too big? A large Photos library can take up a lot of space and potentially slow down your Mac. Here are some strategies for managing its size:
- Review and Delete: Regularly review your Photos library and delete any unwanted photos or videos. Be honest with yourself – do you really need 20 slightly different shots of the same scene?
- iCloud Photos Optimization: If you use iCloud Photos, enable the “Optimize Mac Storage” option in Photos > Settings > iCloud. This will store full-resolution photos and videos in iCloud and keep smaller, optimized versions on your Mac. This can significantly reduce the size of your local Photos library.
- Archive Older Photos: Consider archiving older photos and videos to a separate external hard drive or cloud storage service. You can then remove them from your main Photos library to keep it more manageable.
- Convert to HEIC/HEVC: If you’re using older image and video formats, consider converting them to HEIC (High Efficiency Image Container) and HEVC (High Efficiency Video Coding). These formats offer better compression and can save significant storage space without sacrificing quality. macOS can automatically convert photos and videos to these formats when importing them from your iPhone or iPad.
5.2. Maintaining Library Performance
How can I keep my Photos library running smoothly? Even on an external hard drive, you can take steps to ensure your Photos library performs well:
- Use a Fast External Hard Drive: Invest in a high-quality external hard drive with fast read and write speeds. SSDs (Solid State Drives) are significantly faster than traditional HDDs (Hard Disk Drives) and can make a big difference in Photos library performance.
- Keep the External Hard Drive Organized: Avoid storing a large number of files and folders on the same external hard drive as your Photos library. This can fragment the drive and slow down access times.
- Regularly Repair the Library: As mentioned earlier, the Photos Library repair tool can help maintain the integrity of your library and prevent performance issues. Run it periodically, especially if you’ve experienced crashes or other problems.
- Keep macOS Updated: Make sure your Mac is running the latest version of macOS. Apple often includes performance improvements and bug fixes in macOS updates that can benefit Photos.
5.3. Best Practices for External Hard Drive Usage
What else should I keep in mind when using an external drive for my photo library?
- Always Eject Properly: Before disconnecting the external hard drive, always eject it properly by dragging its icon to the Trash or right-clicking and choosing “Eject.” This prevents data corruption.
- Handle with Care: Treat your external hard drive with care. Avoid dropping it or exposing it to extreme temperatures or humidity.
- Create Backups: It’s crucial to create regular backups of your Photos library on a separate storage device or cloud service. This protects your precious memories from data loss due to hardware failure, theft, or other unforeseen events. Consider using Time Machine or a third-party backup solution.
- Label Clearly: Clearly label your external hard drive with its contents (e.g., “Photos Library – Personal”) and the date it was created. This makes it easier to identify and manage your storage.
- Store in a Safe Place: Store your external hard drive in a safe and secure location, away from direct sunlight, moisture, and extreme temperatures.
- Consider Encryption: For added security, consider encrypting your external hard drive. This prevents unauthorized access to your Photos library if the drive is lost or stolen. You can enable encryption using Disk Utility.
6. Understanding Different Types of External Storage
Choosing the right type of external storage is crucial for performance and reliability. Here’s a breakdown of the most common options:
6.1. HDD (Hard Disk Drive)
What is an HDD? HDDs are the traditional type of external storage, using spinning platters and a mechanical arm to read and write data.
- Pros:
- Generally more affordable than SSDs, especially for larger capacities.
- Available in a wide range of capacities, from a few hundred gigabytes to several terabytes.
- Cons:
- Slower read and write speeds compared to SSDs.
- More susceptible to damage from physical shock due to their mechanical components.
- Noisier than SSDs.
When to Choose HDD: If budget is a primary concern and you need a large amount of storage, an HDD can be a good option. However, be prepared for slower performance when accessing your Photos library.
6.2. SSD (Solid State Drive)
What is an SSD? SSDs use flash memory to store data, offering significantly faster performance and greater durability compared to HDDs.
- Pros:
- Much faster read and write speeds, resulting in quicker loading times and smoother performance in Photos.
- More resistant to physical shock due to the absence of mechanical components.
- Quieter than HDDs.
- Cons:
- More expensive than HDDs, especially for larger capacities.
- May have a shorter lifespan than HDDs under heavy usage, although this is becoming less of a concern with modern SSDs.
When to Choose SSD: If performance is a priority and you’re willing to spend more, an SSD is the best choice for storing your Photos library. You’ll notice a significant improvement in loading times, editing speed, and overall responsiveness.
6.3. NVMe SSD (Non-Volatile Memory Express SSD)
What is an NVMe SSD? NVMe SSDs are a type of SSD that uses the NVMe protocol, offering even faster speeds than traditional SATA SSDs.
- Pros:
- Extremely fast read and write speeds, providing the best possible performance for demanding tasks.
- Ideal for editing large photos and videos.
- Cons:
- The most expensive type of external storage.
- Requires a compatible NVMe enclosure or interface.
When to Choose NVMe SSD: If you’re a professional photographer or videographer who works with large files and needs the absolute fastest performance, an NVMe SSD is the way to go.
6.4. RAID (Redundant Array of Independent Disks)
What is RAID? RAID is a storage technology that combines multiple hard drives into a single logical unit, offering improved performance, redundancy, or both.
- RAID 0 (Striping): Increases performance by splitting data across multiple drives. However, it offers no redundancy, so if one drive fails, all data is lost.
- RAID 1 (Mirroring): Provides redundancy by duplicating data across multiple drives. If one drive fails, the data is still available on the other drive.
- RAID 5 (Striping with Parity): Offers a balance of performance and redundancy. Data is striped across multiple drives, and parity information is added to allow for data recovery in case of a drive failure.
When to Choose RAID: RAID is typically used in professional environments where high performance or data redundancy is critical. It’s more complex to set up and manage than single-drive solutions, but it can provide significant benefits for demanding workflows.
7. Cloud Storage as an Alternative
While external hard drives are a popular choice, cloud storage offers a convenient alternative for backing up and accessing your Photos library.
7.1. Benefits of Cloud Storage
Why should I consider cloud storage?
- Accessibility: Access your photos from anywhere with an internet connection.
- Redundancy: Cloud storage providers typically store your data on multiple servers, ensuring high availability and data protection.
- Automatic Backups: Cloud storage services often offer automatic backup features, eliminating the need for manual backups.
- Collaboration: Easily share photos with friends, family, or clients.
7.2. Popular Cloud Storage Services
Which cloud storage service should I use?
- iCloud Photos: If you’re already using iCloud, iCloud Photos is a convenient option for syncing your Photos library across all your Apple devices.
- Google Photos: Google Photos offers unlimited storage for photos and videos (with some limitations on resolution). It’s a popular choice for backing up photos from smartphones and other devices.
- Dropbox: Dropbox is a versatile cloud storage service that can be used to store and share any type of file, including your Photos library.
- Amazon Photos: Amazon Photos offers unlimited storage for photos for Amazon Prime members.
- SmugMug: SmugMug is a specialized photo-sharing platform that caters to photographers. It offers a range of features for showcasing and selling your work.
7.3. Considerations for Cloud Storage
What should I keep in mind when using cloud storage?
- Cost: Cloud storage services typically charge a monthly or annual fee, depending on the amount of storage you need.
- Internet Speed: Uploading and downloading large Photos libraries can take a significant amount of time, especially with slower internet connections.
- Privacy: Be mindful of the privacy policies of the cloud storage service you choose. Make sure you’re comfortable with how your data is being stored and used.
- Security: Choose a cloud storage service with robust security measures to protect your data from unauthorized access.
8. Organizing Photos on an External Hard Drive
Keeping your photos organized on an external hard drive is essential for easy access and efficient management.
8.1. Folder Structure
How should I organize my photos into folders?
- By Date: Create folders for each year, month, or day. This is a simple and effective way to organize photos chronologically.
- By Event: Create folders for specific events, such as weddings, vacations, or birthday parties.
- By Project: If you’re working on specific photography projects, create folders for each project.
- By Subject: Create folders for different subjects, such as portraits, landscapes, or wildlife.
8.2. Naming Conventions
How should I name my photo files?
- Descriptive Names: Use descriptive names that include the date, location, and a brief description of the photo. For example, “2023-07-15_SantaFe_Sunset.jpg”.
- Consistent Format: Use a consistent naming format for all your photos. This makes it easier to search and sort your files.
- Avoid Special Characters: Avoid using special characters in your file names, as they can cause problems with some operating systems and software.
8.3. Tagging and Metadata
How can I use tags and metadata to organize my photos?
- Keywords: Use keywords to tag your photos with relevant terms. This makes it easy to search for specific photos based on their content.
- Captions: Add captions to your photos to provide additional information about the scene, people, or event.
- Location Data: Enable location services on your camera or smartphone to automatically embed location data in your photos. This allows you to view your photos on a map.
- Software: Use photo management software like Adobe Lightroom or Capture One to add and manage tags and metadata.
9. Choosing the Right External Hard Drive
With so many options available, choosing the right external hard drive can be overwhelming. Here are some factors to consider:
9.1. Storage Capacity
How much storage do I need? Estimate the total size of your Photos library and choose an external hard drive with enough capacity to store it comfortably. It’s always better to have more storage than you think you need.
9.2. Speed and Performance
How important is speed? If you work with large photos and videos, choose an external hard drive with fast read and write speeds. SSDs are significantly faster than HDDs.
9.3. Durability and Reliability
How durable does my drive need to be? If you’re going to be traveling with your external hard drive, choose a rugged model that can withstand bumps and drops.
9.4. Connectivity
What type of connection do I need? Make sure the external hard drive has a compatible connection with your Mac. USB-C and Thunderbolt are the fastest and most versatile options.
9.5. Price
How much should I spend? External hard drives range in price from affordable to expensive. Set a budget and choose the best option within your price range.
10. Additional Tips and Tricks for Managing Your Photos
Here are some additional tips and tricks to help you manage your photos more effectively:
10.1. Backing Up Your Photos
How often should I back up my photos? Back up your photos regularly, ideally on a daily or weekly basis. This protects your precious memories from data loss.
10.2. Cleaning Your Photos
How can I remove duplicate or similar photos? Use photo management software to identify and remove duplicate or similar photos. This frees up storage space and makes it easier to find the photos you’re looking for.
10.3. Editing Your Photos
What software should I use to edit my photos? There are many great photo editing software options available, including Adobe Photoshop, Lightroom, Capture One, and Luminar AI. Choose the software that best suits your needs and skill level.
10.4. Sharing Your Photos
How can I share my photos with friends and family? Share your photos online using social media platforms like Facebook, Instagram, and Flickr. You can also create a personal website or blog to showcase your work.
10.5. Printing Your Photos
How can I print my photos? Print your photos at home using a high-quality photo printer, or order prints online from a professional printing service.
FAQ: Copying Photos Library to External Hard Drive
-
Can I move my entire Photos library to an external hard drive?
Yes, you can absolutely move your entire Photos library to an external hard drive to free up space on your Mac. Just follow the steps outlined earlier in the guide to ensure a smooth transfer. -
Will moving my Photos library to an external hard drive slow down Photos?
It depends on the speed of your external hard drive. An SSD will provide faster performance compared to an HDD. Keeping your external hard drive organized and regularly repairing your Photos library can also help maintain performance. -
What happens if I disconnect the external hard drive while Photos is open?
Disconnecting the external hard drive while Photos is open can corrupt your Photos library. Always quit Photos and eject the external hard drive properly before disconnecting it. -
Can I use multiple external hard drives for my Photos library?
While you can only designate one Photos library as the System Photo Library, you can certainly store different Photos libraries on multiple external hard drives. Just remember to switch between them as needed. -
Is it safe to store my Photos library on a network-attached storage (NAS) device?
While technically possible, storing your Photos library on a NAS device is generally not recommended due to potential performance and stability issues. It’s best to use a direct-attached external hard drive for optimal performance. -
What should I do if I run out of space on my external hard drive?
If you run out of space on your external hard drive, you can either upgrade to a larger drive or archive some of your older photos and videos to a separate storage device or cloud service. -
How can I make sure my photos are safe on an external hard drive?
To ensure your photos are safe on an external hard drive, create regular backups to a separate storage device or cloud service. Consider encrypting the external hard drive for added security. -
Does moving my Photos library to an external drive affect my iCloud Photos?
If you use iCloud Photos, moving your library doesn’t directly affect the photos stored in iCloud. However, ensure the external library is designated as the System Photo Library to maintain syncing. -
Can I edit photos directly from the external hard drive?
Yes, you can edit photos directly from the external hard drive. For optimal performance, use a fast SSD and ensure a stable connection. -
What is the best way to organize photos on an external hard drive?
Organize your photos by date, event, or project using a consistent naming convention. Utilize tagging and metadata for easy searching and management.
Moving your Photos library to an external hard drive is a great way to free up space on your Mac and keep your precious memories safe. By following these tips and tricks, you can ensure a smooth and successful transfer.
Ready to take your photography to the next level? Visit dfphoto.net today to discover a wealth of resources, including in-depth tutorials, stunning photo galleries, and a vibrant community of photographers. Whether you’re a beginner or a seasoned pro, dfphoto.net has everything you need to unleash your creativity and capture the world in all its beauty. Address: 1600 St Michael’s Dr, Santa Fe, NM 87505, United States. Phone: +1 (505) 471-6001. Website: dfphoto.net. Explore our guides, admire breathtaking images, and connect with fellow photography enthusiasts. Start your journey with dfphoto.net now and elevate your photographic skills!