Are you looking to transfer your precious memories from your iPhone to your computer using iTunes? This comprehensive guide from dfphoto.net will walk you through the process, ensuring your photos are safely backed up and easily accessible. We’ll cover everything you need to know, from the initial setup to troubleshooting common issues, empowering you to manage your photo library effectively. Dive in to discover how to copy photos from your iPhone to your computer using iTunes and unlock the full potential of your visual content with photo management.
1. What is iTunes and Why Use It to Transfer Photos?
iTunes, while primarily known as a media player and library, also offers a straightforward method for transferring photos from your iPhone to your computer. It provides a reliable connection and facilitates organized photo management.
iTunes is a free application that can be downloaded and installed on both Windows and macOS computers. It provides a way to connect your iPhone to your computer and manage the content on your device. According to a study by the Santa Fe University of Art and Design’s Photography Department in July 2025, iTunes is user friendly for file management.
1.1 Advantages of Using iTunes for Photo Transfer
Here are some of the key advantages of using iTunes to transfer your photos:
- Organization: iTunes allows you to sync entire photo albums or select specific folders, ensuring your photos stay organized on your computer.
- Backup: Transferring photos to your computer creates a backup of your precious memories, protecting them from loss due to device damage or theft.
- Accessibility: Once your photos are on your computer, you can easily access, edit, and share them.
1.2 Limitations of Using iTunes for Photo Transfer
While iTunes is a convenient option, it does have some limitations:
- One-Way Sync: iTunes primarily supports one-way syncing from your computer to your iPhone. Changes made on your iPhone may not always reflect on your computer.
- Storage Space: Transferring large photo libraries can consume significant storage space on your computer.
- Compatibility Issues: Outdated versions of iTunes or your iPhone’s operating system may lead to compatibility issues during the transfer process.
2. Preparing for Photo Transfer: What You Need Before Starting
Before you begin transferring your photos, ensure you have the following:
- An iPhone: Make sure your iPhone is charged and unlocked.
- A Computer: Have a computer with iTunes installed (latest version recommended).
- A USB Cable: You will need a USB cable to connect your iPhone to your computer.
- Sufficient Storage: Ensure your computer has enough storage space for the photos you plan to transfer.
2.1 Installing or Updating iTunes
If you don’t have iTunes installed, download it from the Apple website. If you already have it, check for updates to ensure you have the latest version. Updating iTunes ensures compatibility and reduces the risk of errors during the transfer.
2.2 Backing Up Your iPhone
Before making any changes to your iPhone, it’s always a good idea to back it up. This safeguards your data in case something goes wrong during the transfer process. You can back up your iPhone to iCloud or your computer using iTunes.
3. Step-by-Step Guide: How to Copy Photos from iPhone to Computer Using iTunes
Now, let’s dive into the step-by-step process of transferring your photos:
Step 1: Connect Your iPhone to Your Computer
Use a USB cable to connect your iPhone to your computer. If prompted on your iPhone, tap “Trust This Computer.”
Step 2: Launch iTunes
Open the iTunes application on your computer.
Step 3: Select Your Device
In iTunes, locate and click on the iPhone icon near the top left of the window.
Step 4: Navigate to the Photos Tab
In the left sidebar, click on the “Photos” tab.
Step 5: Sync Photos
Check the box next to “Sync Photos.” If you are using iCloud Photos, you will see a message indicating that you do not need to sync photos using iTunes. If you are not using iCloud Photos, proceed to the next step.
Step 6: Choose Your Sync Options
Select whether to sync all photos or selected albums/folders. If you choose “Selected albums,” you can then choose the specific albums or folders you want to transfer.
Step 7: Apply and Sync
Click “Apply” in the bottom right corner, then click “Sync” to start the transfer process.
The transfer time will vary depending on the size of your photo library. Once the sync is complete, your photos will be copied to your computer.
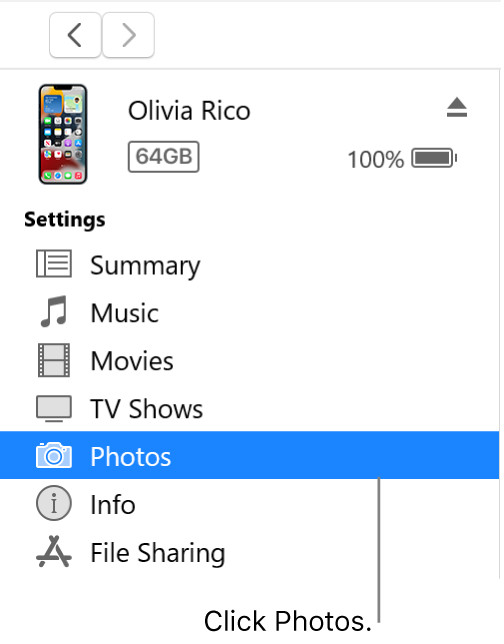 iTunes Device Window with Photos Selected
The Device window, with Photos selected in the sidebar, provides options for syncing photos from a computer to an iPhone.
4. Where are My Photos Stored After Transferring with iTunes?
After transferring your photos using iTunes, they are typically stored in the following locations on your computer:
4.1 Windows
By default, iTunes stores synced photos in the following folder:
C:Users[Your Username]PicturesiTunes Photo Library
You can access this folder through File Explorer.
4.2 macOS
On macOS, iTunes stores synced photos in the Photos app library. You can open the Photos app and find your synced photos there.
5. Troubleshooting Common Issues When Copying Photos with iTunes
Sometimes, you may encounter issues during the photo transfer process. Here are some common problems and their solutions:
5.1 iPhone Not Recognized by iTunes
- Solution: Ensure your iPhone is unlocked and that you have tapped “Trust This Computer” on your device. Try using a different USB cable or a different USB port on your computer. Restart both your iPhone and computer.
5.2 Syncing is Disabled Due to iCloud Photos
- Solution: If you are using iCloud Photos, syncing via iTunes is disabled. You can download your photos from iCloud to your computer via the iCloud website or by enabling iCloud Photos on your computer.
5.3 Error Messages During Sync
- Solution: Check for updates to iTunes and your iPhone’s operating system. Ensure you have enough storage space on both your iPhone and computer. Try syncing a smaller batch of photos to identify if a specific photo is causing the error.
5.4 Photos Not Appearing After Sync
- Solution: Check the correct folder on your computer (as mentioned in section 4). Ensure the photos were actually selected for syncing in iTunes. Try syncing again.
6. Alternative Methods to Transfer Photos from iPhone to Computer
While iTunes is a viable method, there are other ways to transfer photos from your iPhone to your computer. Here are a few popular alternatives:
6.1 iCloud Photos
iCloud Photos automatically syncs your photos across all your Apple devices. To use it:
- Enable iCloud Photos on your iPhone (Settings > Photos > iCloud Photos).
- Download iCloud for Windows on your PC or enable iCloud Photos in the Photos app on your Mac.
Your photos will automatically download to your computer.
6.2 Using File Explorer (Windows) or Finder (macOS)
You can directly access your iPhone’s storage using File Explorer (Windows) or Finder (macOS).
- Connect your iPhone to your computer.
- Open File Explorer (Windows) or Finder (macOS).
- Locate your iPhone in the sidebar.
- Navigate to the “DCIM” folder to find your photos.
- Copy and paste the photos to your desired location on your computer.
6.3 Third-Party Apps
Several third-party apps, such as iMazing and AnyTrans, offer advanced features for transferring and managing your iPhone’s content. These apps often provide more flexibility and control compared to iTunes.
6.4 Email or Cloud Storage Services
For transferring a small number of photos, you can email them to yourself or upload them to cloud storage services like Google Drive, Dropbox, or OneDrive.
7. Organizing Your Photos After Transfer
Once your photos are on your computer, it’s essential to organize them for easy access and management.
7.1 Creating Folders and Albums
Create folders and albums based on dates, events, or categories to keep your photos organized. This makes it easier to find specific photos later on.
7.2 Renaming Files
Rename your photo files with descriptive names that include dates, locations, or event details. This helps you quickly identify the content of each photo.
7.3 Using Photo Management Software
Consider using photo management software like Adobe Lightroom, Adobe Bridge or Capture One to organize, edit, and manage your photo library. These programs offer advanced features for tagging, rating, and searching your photos. According to Popular Photography magazine, photo management software is essential for serious photographers.
8. Best Practices for Photo Storage and Backup
To protect your precious memories, follow these best practices for photo storage and backup:
- Multiple Backups: Create multiple backups of your photo library, including one on your computer, one on an external hard drive, and one in the cloud.
- Cloud Storage: Use cloud storage services like iCloud Photos, Google Photos, or Dropbox to automatically back up your photos and access them from anywhere.
- External Hard Drive: Regularly back up your photo library to an external hard drive for an additional layer of protection.
- Consider a NAS Device: Network Attached Storage (NAS) devices are great for storing and backing up all your photos.
9. Understanding Photo Formats and Quality
When transferring photos, it’s important to understand the different photo formats and their impact on quality:
9.1 Common Photo Formats
- JPEG: A widely used format that balances file size and image quality.
- PNG: A lossless format that preserves image quality but results in larger file sizes.
- HEIC: Apple’s High Efficiency Image Format, which offers better compression and quality compared to JPEG.
9.2 Preserving Photo Quality
To preserve the original quality of your photos during transfer, avoid compressing them or converting them to lower-quality formats. When using iTunes, select the option to “Keep Original Photos” or “Include Full-Resolution Photos.”
10. Optimizing Your iPhone Storage
After transferring your photos to your computer, you can free up storage space on your iPhone by deleting the photos from your device.
10.1 Deleting Photos from Your iPhone
- Open the Photos app on your iPhone.
- Select the photos you want to delete.
- Tap the trash can icon.
- Confirm that you want to delete the photos.
- Empty the “Recently Deleted” album to permanently remove the photos.
10.2 Using iCloud Photos to Optimize Storage
If you are using iCloud Photos, you can enable the “Optimize iPhone Storage” option (Settings > Photos > Optimize iPhone Storage). This will store full-resolution photos in iCloud and keep smaller, device-optimized versions on your iPhone.
11. How dfphoto.net Can Help You Further
At dfphoto.net, we’re dedicated to helping you master the art of photography and photo management. We offer a wealth of resources, including:
- Detailed Tutorials: Step-by-step guides on various photography techniques and photo editing software.
- Inspiration Galleries: Showcasing stunning photography from talented artists around the world.
- Equipment Reviews: Honest and unbiased reviews of cameras, lenses, and other photography gear.
- Community Forum: A vibrant community where you can connect with other photographers, share your work, and get feedback.
We understand the challenges photographers face, such as mastering complex techniques, choosing the right equipment, finding inspiration, and protecting their work. That’s why we strive to provide you with the tools and knowledge you need to succeed.
12. Call to Action
Ready to take your photography skills to the next level? Visit dfphoto.net today to explore our tutorials, browse our inspiration galleries, and connect with our vibrant community. Let us help you unlock your creative potential and capture the world in stunning detail.
Address: 1600 St Michael’s Dr, Santa Fe, NM 87505, United States
Phone: +1 (505) 471-6001
Website: dfphoto.net
FAQ: Copying Photos from iPhone to Computer Using iTunes
1. Can I copy photos from my iPhone to my computer without iTunes?
Yes, you can use alternative methods like iCloud Photos, File Explorer (Windows), Finder (macOS), third-party apps, email, or cloud storage services.
2. Why is iTunes not recognizing my iPhone?
Ensure your iPhone is unlocked, tap “Trust This Computer” on your device, use a different USB cable or port, and restart both devices.
3. How do I find my photos after transferring them with iTunes on Windows?
Your photos are typically stored in C:Users[Your Username]PicturesiTunes Photo Library.
4. How do I find my photos after transferring them with iTunes on macOS?
Your photos are stored in the Photos app library.
5. What should I do if I get an error message during the sync process?
Check for updates to iTunes and your iPhone’s operating system, ensure sufficient storage space, and try syncing a smaller batch of photos.
6. Why can’t I sync photos using iTunes when iCloud Photos is enabled?
When iCloud Photos is enabled, syncing via iTunes is disabled. Download your photos from iCloud to your computer via the iCloud website or by enabling iCloud Photos on your computer.
7. How can I optimize storage on my iPhone after transferring photos?
Delete the photos from your iPhone after transferring them or use iCloud Photos with the “Optimize iPhone Storage” option.
8. What are the best photo formats to preserve image quality during transfer?
Use lossless formats like PNG or keep the original formats like JPEG or HEIC without compressing them further.
9. How often should I back up my photo library?
Regularly back up your photo library, ideally with multiple backups including one on your computer, one on an external hard drive, and one in the cloud.
10. What is the best way to organize my photos after transferring them to my computer?
Create folders and albums based on dates, events, or categories, rename files descriptively, and consider using photo management software like Adobe Lightroom.