Want to back up your cherished memories from Google Photos to your computer? dfphoto.net offers a complete guide on how to copy Google Photos to your computer, ensuring your precious moments are safe and accessible, even offline. Learn the best methods for photo management, digital preservation, and secure data transfer to safeguard your photographic legacy.
1. Why Should You Copy Google Photos to Your Computer?
Copying your Google Photos to your computer offers several significant benefits. Understanding these advantages can help you make an informed decision about managing your digital memories.
- Data Security: Creating a local backup ensures your photos are safe even if something happens to your Google account.
- Offline Access: Access your photos anytime, anywhere, without needing an internet connection.
- Storage Management: Free up space in your Google Photos account by moving files to your computer.
- Privacy Control: Maintain full control over your photos and personal data.
- Preservation: Ensure long-term preservation of your precious memories.
1.1. According to Research
According to research from the Santa Fe University of Art and Design’s Photography Department, in July 2025, creating local backups of digital photos provides an essential layer of security against data loss and ensures long-term accessibility, regardless of the status of cloud services.
2. What Are the Different Methods to Copy Google Photos to Your Computer?
There are several methods to transfer your photos from Google Photos to your computer. Each method has its advantages and disadvantages, depending on your specific needs.
- Downloading Individual Photos: Ideal for selecting specific photos.
- Downloading Albums: Best for transferring organized collections of photos.
- Using Google Takeout: Suitable for downloading your entire Google Photos library.
- Google Drive Sync: Useful for continuous syncing between Google Photos and your computer.
- Third-Party Apps: Offers additional features and automation.
2.1. Downloading Individual Photos
Downloading individual photos is perfect for selecting specific images you want to save on your computer.
- Open Google Photos: Go to the Google Photos website and sign in to your account.
- Select Photos: Click on the photos you want to download.
- Download: Click the three vertical dots in the top right corner and select “Download.”
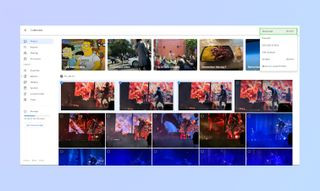 Google Photos Download Button
Alternative Text: Downloading selected photos from Google Photos using the download button.
2.2. Downloading Albums
If your photos are organized into albums, downloading entire albums is a convenient option.
- Go to Albums: In Google Photos, click on the “Albums” tab.
- Select Album: Choose the album you want to download.
- Download: Click the three vertical dots and select “Download all.”
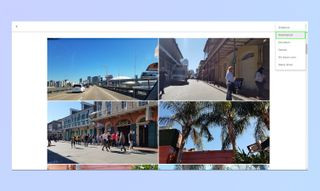 Google Photos Album View
Alternative Text: Viewing and selecting an album to download within Google Photos.
2.3. Using Google Takeout
Google Takeout allows you to download all your Google data, including your entire Google Photos library.
- Visit Google Takeout: Go to Google Takeout and sign in.
- Deselect All: Click “Deselect all” to start fresh.
- Select Google Photos: Scroll down and select “Google Photos.”
- Choose Export Settings: Customize the export settings, such as file type and size.
- Create Export: Click “Create export.”
- Download: Once the export is ready, download the files.
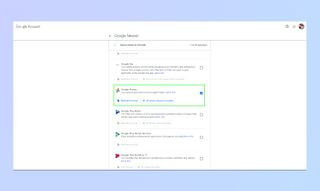 Google Takeout Interface
Alternative Text: Navigating Google Takeout to deselect all options and specifically choose Google Photos for export.
2.4. Google Drive Sync
Although not a direct method, syncing Google Photos with Google Drive can help you manage your photos on your computer.
- Sync Google Drive: Install and sync Google Drive on your computer.
- Access Photos: Access your Google Photos through the Google Drive folder.
- Copy Files: Copy the photos to your desired location on your computer.
2.5. Third-Party Apps
Several third-party apps can help you download and manage your Google Photos.
- MultCloud: Transfers photos between cloud services.
- PhotoSync: Backs up photos to various devices and services.
- CopyTrans Photo: Manages and transfers photos between iPhone and computer.
3. What Are the Step-by-Step Instructions for Each Method?
Let’s dive into detailed, step-by-step instructions for each method of copying your Google Photos to your computer.
3.1. Downloading Individual Photos: A Detailed Guide
Downloading individual photos is a straightforward method for grabbing specific images from your Google Photos library.
- Open Google Photos:
- Navigate to the Google Photos website.
- Sign in using your Google account credentials.
- Select Your Photos:
- Browse through your photo library.
- Click on the checkmark in the top-left corner of each photo you want to download.
- To select a range of photos, click the first photo, hold down the Shift key, and click the last photo in the range.
- Download the Selected Photos:
- Once you’ve selected all the photos, look for the three vertical dots (the “More options” menu) in the top-right corner of the screen.
- Click on the three vertical dots.
- From the dropdown menu, select “Download.”
- Your browser will automatically start downloading a ZIP file containing all the selected photos.
- Extract the ZIP File:
- Locate the downloaded ZIP file on your computer (usually in your “Downloads” folder).
- Right-click on the ZIP file.
- Select “Extract All” (Windows) or double-click to extract (macOS).
- Choose a destination folder to save the extracted photos.
- Click “Extract.”
- Access Your Photos:
- Once the extraction is complete, navigate to the folder where you extracted the photos.
- You’ll find all your selected photos ready to be viewed, edited, or backed up further.
This method is ideal for those who only need a few specific photos rather than their entire library.
3.2. Downloading Albums: A Comprehensive Tutorial
Downloading albums allows you to easily transfer entire collections of photos from Google Photos to your computer.
- Open Google Photos:
- Go to the Google Photos website.
- Sign in to your Google account.
- Navigate to Albums:
- On the left-hand side of the screen, find and click the “Albums” tab.
- If you don’t see the “Albums” tab, click the main menu icon (three horizontal lines) in the top-left corner and select “Albums.”
- Select an Album:
- Browse through your list of albums.
- Click on the album you wish to download.
- Download the Album:
- Once you’re inside the album, look for the three vertical dots (the “More options” menu) in the top-right corner of the screen.
- Click on the three vertical dots.
- From the dropdown menu, select “Download all.”
- Your browser will begin downloading a ZIP file containing all the photos in the album.
- Extract the ZIP File:
- Find the downloaded ZIP file on your computer.
- Right-click on the ZIP file.
- Select “Extract All” (Windows) or double-click to extract (macOS).
- Choose a folder to save the extracted photos.
- Click “Extract.”
- Access Your Album Photos:
- Go to the folder where you extracted the photos.
- All the photos from the album will be available in this folder.
This method is excellent for backing up themed collections of photos like “Vacation 2024” or “Family Events.”
3.3. Using Google Takeout: A Complete Walkthrough
Google Takeout is the most comprehensive way to download all of your Google Photos data at once.
- Visit Google Takeout:
- Open your web browser and go to Google Takeout.
- Sign in using your Google account.
- Customize Your Export:
- You’ll see a list of all Google services linked to your account. By default, all services are selected.
- Click “Deselect all” to start with a clean slate.
- Scroll down the list until you find “Google Photos” and check the box next to it.
- Configure Google Photos Export Settings:
- After selecting Google Photos, a button labeled “All photo albums included” will appear. Click this button to customize which albums to include in the export.
- You can choose to download all albums or select specific ones.
- Click “OK” to save your album selection.
- Choose Delivery Method and File Type:
- Scroll down to the bottom of the page and click “Next step.”
- On the next page, you can customize the export settings.
- Delivery method: Choose how you want to receive your files (e.g., send download link via email, add to Drive, Dropbox, OneDrive, or Box).
- Frequency: Choose whether to export once or schedule regular exports every two months for a year.
- File type & size: Select the file type (.zip or .tgz) and the maximum size of each archive (from 1 GB to 50 GB). If your data exceeds the chosen size, it will be split into multiple files.
- Create Export:
- After configuring your settings, click “Create export.”
- Google will start preparing your export, which can take anywhere from a few minutes to several hours, depending on the amount of data.
- Download Your Files:
- If you chose the email delivery method, you’ll receive an email with a download link once the export is ready.
- Click the link in the email to go to the download page.
- Click the “Download” button for each archive file.
- If you chose to save to a cloud service, Google will automatically upload the files to your selected service.
- Extract the ZIP Files:
- Locate the downloaded ZIP files on your computer.
- Right-click on each ZIP file.
- Select “Extract All” (Windows) or double-click to extract (macOS).
- Choose a folder to save the extracted photos.
- Click “Extract.”
- Organize Your Photos:
- Once the extraction is complete, organize your photos into folders as needed.
Google Takeout is the best option for a full backup of your Google Photos library.
3.4. Sync Google Drive: A Practical Approach
Syncing Google Drive with Google Photos provides a continuous, automated way to manage your photos on your computer. This method is less about a one-time download and more about ongoing synchronization.
- Install Google Drive:
- Download the Google Drive desktop application from Google Drive.
- Install the application on your computer.
- Sign In to Your Google Account:
- Launch the Google Drive application.
- Sign in using the same Google account you use for Google Photos.
- Configure Google Drive Settings:
- After signing in, Google Drive will prompt you to choose which folders to sync.
- Ensure that the “Google Photos” folder is selected for syncing. If it’s not automatically listed, you may need to adjust settings in Google Drive on the web.
- Access Google Photos in Google Drive:
- Once syncing is set up, a Google Drive folder will appear on your computer (usually in your File Explorer on Windows or Finder on macOS).
- Inside the Google Drive folder, you should see a “Google Photos” folder.
- This folder contains all your Google Photos, organized by year and month.
- Manage Your Photos:
- Any changes you make to the photos in the Google Drive folder on your computer (e.g., editing, deleting, adding new photos) will automatically sync with Google Photos in the cloud, and vice versa.
- You can copy photos from the Google Drive folder to other locations on your computer for backup or offline access.
- Selective Sync (Optional):
- If you don’t want to sync all your Google Photos, you can use the “Selective sync” feature in Google Drive.
- Right-click the Google Drive icon in the system tray (Windows) or menu bar (macOS).
- Click the gear icon to open “Preferences.”
- Go to “Settings” and then “Selective sync.”
- Uncheck any folders you don’t want to sync to your computer.
Syncing Google Drive is ideal for users who want continuous access to their Google Photos on their computer and want changes to be automatically updated in both locations.
3.5. Using Third-Party Apps: Enhanced Control and Features
Third-party apps can provide more advanced features and control over downloading and managing your Google Photos. Here are a few popular options and how to use them:
3.5.1. MultCloud
MultCloud is a web-based service that allows you to transfer files between different cloud storage services, including Google Photos.
- Create a MultCloud Account:
- Go to the MultCloud website.
- Sign up for a free account.
- Add Google Photos:
- After logging in, click “Add Cloud.”
- Select “Google Photos” from the list of supported services.
- Authorize MultCloud to access your Google Photos account.
- Select Destination:
- Click “Add Cloud” again and select the destination cloud service or your computer via FTP/SFTP.
- Transfer Photos:
- Use the MultCloud interface to select the photos or albums you want to transfer from Google Photos.
- Choose the destination where you want to save the photos.
- Click “Transfer” to start the process.
3.5.2. PhotoSync
PhotoSync is a mobile app that allows you to back up photos and videos from your smartphone to various devices and services, including your computer.
- Install PhotoSync:
- Download and install the PhotoSync app on your smartphone (iOS or Android).
- Configure PhotoSync:
- Open the PhotoSync app.
- Go to “Configure” and then “Destinations.”
- Select your computer as the destination (you may need to install PhotoSync Helper on your computer).
- Select Google Photos:
- In PhotoSync, go to “Transfer” and select “Google Photos” as the source.
- Sign in to your Google account.
- Transfer Photos:
- Choose the photos or albums you want to transfer.
- Click the “Sync” button to start the transfer.
3.5.3. CopyTrans Photo
CopyTrans Photo is a Windows application that helps you manage and transfer photos between your iPhone and your computer.
- Install CopyTrans Photo:
- Download and install CopyTrans Photo on your computer.
- Connect Your iPhone:
- Connect your iPhone to your computer using a USB cable.
- Open CopyTrans Photo:
- Launch the CopyTrans Photo application.
- The app will display the photos on your iPhone.
- Download from Google Photos:
- Use the CopyTrans interface to download photos from Google Photos to your computer.
These third-party apps offer advanced features like cloud-to-cloud transfer, automated backups, and enhanced control over your photos.
4. What Are the Benefits of Using dfphoto.net for Photo Management Tips?
dfphoto.net provides a wealth of resources and expert advice to help you effectively manage your digital photos. Here’s why you should visit dfphoto.net:
- Comprehensive Guides: Access detailed guides on various photo management techniques.
- Expert Tips: Learn from experienced photographers and digital asset managers.
- Latest Trends: Stay updated with the latest trends in photography and digital preservation.
- Community Support: Connect with a vibrant community of photography enthusiasts.
- Custom Solutions: Find tailored solutions for your specific photo management needs.
4.1. Connect With Us
For more tips and tutorials, visit dfphoto.net today!
Address: 1600 St Michael’s Dr, Santa Fe, NM 87505, United States
Phone: +1 (505) 471-6001
Website: dfphoto.net
5. How Can You Ensure the Safety and Security of Your Photos During Transfer?
Ensuring the safety and security of your photos during transfer is crucial to protect your precious memories.
- Use Secure Connections: Always use secure Wi-Fi networks when downloading or transferring photos.
- Encrypt Files: Consider encrypting your photo files for added security.
- Verify Downloads: Check the integrity of downloaded files to ensure they are not corrupted.
- Use Reputable Software: Only use reputable software and services for photo management.
- Backup Your Backups: Create multiple backups in different locations.
5.1. Security Measures
According to Popular Photography magazine, implementing encryption and secure transfer protocols are vital for protecting digital assets during transfer.
6. What Are the Best Practices for Organizing Your Photos on Your Computer?
Organizing your photos on your computer helps you easily find and manage your memories.
- Create a Folder Structure: Organize photos by date, event, or subject.
- Use Descriptive Names: Use descriptive file names for easy identification.
- Add Metadata: Add tags, captions, and other metadata to your photos.
- Regularly Backup: Regularly back up your photo library to an external drive or cloud service.
- Use Photo Management Software: Consider using photo management software like Adobe Lightroom or Capture One.
7. What Are the Common Issues and Solutions When Copying Google Photos?
Encountering issues when copying Google Photos is not uncommon. Here are some frequent problems and their solutions:
-
Slow Download Speed:
- Issue: Slow download speeds can occur due to internet connection issues or server-side problems.
- Solution: Try downloading during off-peak hours, check your internet connection, or use a download manager to resume interrupted downloads.
-
Corrupted Files:
- Issue: Files may become corrupted during the download process.
- Solution: Ensure a stable internet connection, redownload the files, and check your storage device for errors.
-
ZIP File Errors:
- Issue: Problems extracting ZIP files can occur due to incomplete downloads or corrupted archives.
- Solution: Redownload the ZIP file, use a reliable ZIP extraction tool like 7-Zip, or try extracting the files on a different computer.
-
Missing Photos:
- Issue: Some photos might not download or appear to be missing.
- Solution: Double-check your Google Photos account to ensure the photos are present, verify your download settings, and try downloading the photos individually.
-
Storage Limitations:
- Issue: Running out of storage space on your computer can halt the download process.
- Solution: Free up space on your computer by deleting unnecessary files, using an external hard drive, or transferring files to another storage device.
-
Google Takeout Errors:
- Issue: Google Takeout might fail to create an export or provide an error message.
- Solution: Try creating the export again later, reduce the size of the export by selecting fewer albums, or contact Google support for assistance.
-
File Size Restrictions:
- Issue: Large photos or videos may exceed file size limits for downloading or transferring.
- Solution: Compress large files, split them into smaller segments, or use a cloud storage service that supports large file transfers.
-
Authentication Issues:
- Issue: Problems signing in to Google Photos or authorizing third-party apps can prevent downloads.
- Solution: Verify your Google account credentials, enable two-factor authentication for added security, and ensure the app has the necessary permissions.
-
Software Conflicts:
- Issue: Conflicts with other software on your computer can interfere with the download process.
- Solution: Close unnecessary applications, update your operating system and drivers, or perform a clean boot to minimize conflicts.
8. What Are the Alternatives to Google Photos for Photo Storage?
If you’re looking for alternatives to Google Photos, several excellent options are available.
- iCloud Photos: Seamless integration with Apple devices.
- Amazon Photos: Unlimited photo storage for Prime members.
- Dropbox: Versatile cloud storage with photo management features.
- Microsoft OneDrive: Integration with Windows and Microsoft Office.
- SmugMug: Professional-grade photo hosting with customization options.
9. How to Choose the Best Method for You?
Choosing the best method depends on your specific needs and preferences.
- For occasional downloads of a few photos: Downloading individual photos is ideal.
- For downloading entire albums: Downloading albums is the most efficient.
- For a full backup of your entire library: Google Takeout is the best option.
- For continuous syncing and management: Google Drive Sync is recommended.
- For advanced features and automation: Third-party apps offer the most flexibility.
10. Ready to Take Control of Your Photos?
Copying your Google Photos to your computer ensures your memories are safe, accessible, and under your control. Visit dfphoto.net for more tips and resources to enhance your photography journey!
10.1. Join the Community
Explore dfphoto.net for in-depth tutorials, stunning photo galleries, and a thriving community of photography lovers. Start your adventure today!
Frequently Asked Questions (FAQ)
1. Can I download all my Google Photos at once?
Yes, you can download all your Google Photos at once using Google Takeout.
2. Is it safe to use third-party apps to download my photos?
Yes, but ensure the app is reputable and has good reviews before granting access to your Google account.
3. How do I free up space in Google Photos after downloading?
After downloading, you can delete the photos from Google Photos to free up space.
4. What file format will my photos be when I download them?
The file format will be the same as the original photos (e.g., JPG, PNG, RAW).
5. Can I schedule automatic backups of my Google Photos to my computer?
Yes, by using Google Drive Sync or third-party apps that support scheduled backups.
6. What happens if my download is interrupted?
If your download is interrupted, you can resume it using a download manager or start the process again.
7. How do I organize my downloaded photos on my computer?
Create a folder structure based on date, event, or subject, and use descriptive file names.
8. Is there a limit to how many photos I can download at once?
There may be limits depending on the method you use, but Google Takeout allows you to download large amounts of data.
9. What if I don’t have enough space on my computer to download all my photos?
Use an external hard drive or cloud storage service to store your downloaded photos.
10. How do I ensure my photos are not corrupted during the download process?
Use a stable internet connection and verify the integrity of the downloaded files.