For photographers at every level, from enthusiastic beginners to seasoned professionals, understanding how to convert RAW image files to the widely accessible JPEG format is an essential skill. RAW files, while offering superior image quality and editing flexibility, aren’t always practical for quick sharing, printing, or general use. JPEG’s universal compatibility and smaller file size make it ideal for these purposes.
This guide will walk you through various methods to convert your RAW photos to JPEG, using popular software and devices you likely already have. By mastering these techniques, you’ll be able to efficiently manage your workflow and ensure your images are ready for any application. We’ll also delve into the nuances of each format to help you make informed decisions about when and why to convert. Let’s explore the simple yet crucial process of RAW to JPEG conversion.
Converting RAW to JPEG: Multiple Methods for Every Photographer
There are several effective ways to convert RAW files to JPEG, depending on your preferred device, software, and workflow. Below are the most common and user-friendly methods to transform your RAW images into JPEGs.
Converting RAW to JPEG on macOS with Preview
Apple’s macOS includes a surprisingly capable image tool called Preview, which is pre-installed and completely free. Many users underestimate Preview, assuming it’s just for viewing images. However, it offers a range of basic editing features, including the ability to convert RAW files to JPEG effortlessly.
To begin, open your RAW image file using Preview. You can do this by right-clicking on the RAW file, selecting “Open With,” and then choosing “Preview.”
Once your image is open in Preview, navigate to the menu bar at the top of your screen. Click on “File,” and from the dropdown menu, select “Export.”
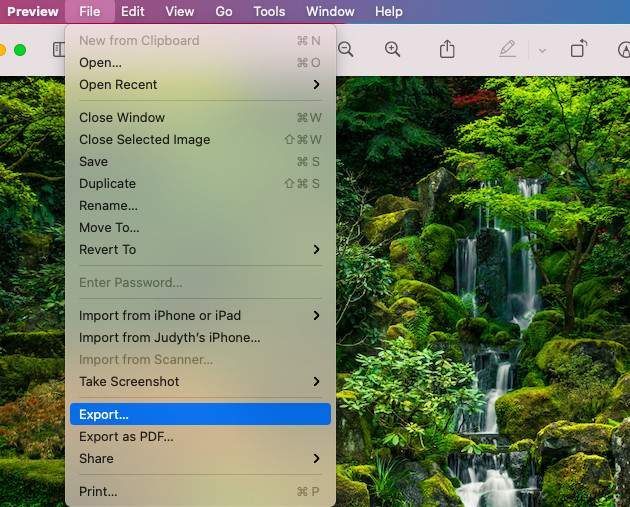 Converting RAW to JPEG on Mac Preview: In the Export window, select JPEG from the Format dropdown menu to convert raw image files to JPEG using Apple Preview.
A pop-up window will appear, presenting you with various export options. Look for the “Format” dropdown menu. Click on this menu and choose “JPEG” as your desired output format.
After selecting JPEG, you can adjust other settings like image quality if available, and then click the “Save” button. Choose a location to save your new JPEG file.
 Saving RAW as JPEG in Mac Preview: Click the Save button in the Export window to finalize the conversion of your RAW photo to JPEG format on macOS.
Preview will convert your RAW image to JPEG and save it in your chosen location. Importantly, your original RAW file remains untouched, and you’ll now have a separate JPEG copy alongside it. This method in Preview also supports converting other image formats like PNG, TIFF, and PDF to JPEG on your Mac.
Converting RAW to JPEG on Windows with Photos App
Similar to macOS, Windows operating systems come with a built-in photo application called “Photos.” This free app allows for basic image viewing and editing, including a straightforward method to convert RAW files to JPEG format.
To start, open your RAW image in the Photos app. Right-click on the RAW file you want to convert, select “Open With,” and choose “Photos.”
Once your RAW file is open within the Photos application, locate the “Save As” option. In many versions of Photos, this might be found under the “…” menu (More options) or within the “File” menu if available.
Select “Save As” and in the “Save As” dialog box, look for a dropdown menu next to “Save as type:” or “Format:”. Choose “JPEG” from the available options.
Select your desired save location on your computer and click “Save.” The Photos app will then convert your RAW file to JPEG and save the new file without altering your original RAW image.
Converting RAW to JPEG on iPhone
Apple’s introduction of ProRAW format for iPhones allows users to capture RAW images directly on their mobile devices. While these files might appear with a .DNG extension, they are indeed RAW files, containing significantly more image data than standard iPhone photos, which is ideal for post-processing.
Converting these ProRAW files to JPEG directly on your iPhone is quite simple when you need to share or use them in a more universally compatible format.
Open the Photos app on your iPhone and select the ProRAW image you wish to convert. Tap on the image to view it full screen.
In the bottom left corner of the screen, you’ll see the “Share” button (it looks like a square with an upward arrow). Tap this button.
In the share sheet that appears, scroll down through the options until you find “Save to Files.” Tap “Save to Files.”
 Converting iPhone ProRAW to JPEG: On iPhone Photos app, tap Share, scroll down and select 'Save to Files' to convert ProRAW DNG image to JPEG on iOS device.
The Files app interface will open, prompting you to choose a location to save the converted file. You can select a folder within “iCloud Drive” or “On My iPhone.” Once you’ve chosen a location, tap “Save” in the top right corner. Your iPhone will then save a JPEG version of your ProRAW image in the selected location. The original ProRAW file remains in your Photos library.
Converting RAW to JPEG in Adobe Photoshop
Adobe Photoshop is the industry-standard photo editing software, and as such, it provides robust and versatile options for converting RAW files to JPEG. For photographers who are already using Photoshop for editing, it’s a natural and efficient choice for format conversion.
Launch Adobe Photoshop on your computer. To open your RAW file, go to “File” in the top menu bar, then select “Open.” Navigate to your RAW file, select it, and click “Open.” If you are working with multiple RAW files, you can select and open them all at once for batch conversion.
Once your RAW file is open in Photoshop (it might first open in Adobe Camera Raw, depending on your settings), you can proceed directly to exporting. Go to “File” in the top menu bar, then hover over “Export,” and select “Export As…” from the submenu.
 Exporting RAW to JPEG in Photoshop: In Photoshop's Export As window, choose JPEG as the file format to convert your RAW image to JPEG format using Adobe Photoshop.
The “Export As” dialog box will appear, giving you a range of options. On the right side of this window, under “File Settings,” you’ll see a “Format” dropdown menu. Click on this menu and select “JPEG.”
 Selecting JPEG Format in Photoshop Export: Detail view of the File Format dropdown menu in Photoshop's Export As dialog box, highlighting the JPEG option for converting RAW files.
You can also adjust other settings here, such as image size, quality, and metadata options. Once you have configured your settings, click the “Export” button at the bottom right corner. Choose a location to save your JPEG file and click “Save.” Photoshop will then convert your RAW image to JPEG and save it to your specified folder.
Converting RAW to JPEG Without Photoshop
If you prefer not to use Photoshop, or are looking for alternative methods, there are numerous ways to convert RAW to JPEG. As demonstrated, built-in tools like Preview on Mac and Photos on Windows provide free and easy solutions. Additionally, Adobe Lightroom, and online converters (discussed below) are excellent alternatives.
Converting RAW to JPEG in Adobe Lightroom Classic
Adobe Lightroom Classic is another popular tool in the Adobe Creative Suite, primarily used for photo organization, editing, and workflow management. It’s also highly effective for converting RAW files to JPEG, especially when working with batches of images.
Open Adobe Lightroom Classic and import your RAW images into your Lightroom library. You can do this by clicking “File” in the top menu bar, then “Import Photos and Video…” and selecting the RAW files you want to convert.
Once your images are imported and visible in your Lightroom Library, select the images you wish to convert. You can select single or multiple images for batch conversion.
With your images selected, go to “File” in the top menu bar and choose “Export.” This will open the Export dialog window, which provides comprehensive options for converting and saving your images.
In the Export dialog window, you’ll see various panels. In the “File Settings” panel, find the “Image Format” dropdown menu. Click on it and select “JPEG.”
Configure other export settings as needed, such as file naming, export location, image quality, and resizing. After setting your preferences, click the “Export” button at the bottom right of the dialog. Lightroom will then process your selected RAW files and export JPEG versions to your specified location.
Free Online RAW to JPEG Conversion
For users seeking a quick, free, and software-free method, online RAW to JPEG converters are readily available. These web-based tools allow you to upload your RAW files and download converted JPEGs directly from your browser.
One such online converter is ZAMZAR. To use ZAMZAR, visit their website and locate the file conversion section. Click the “Choose Files” button to upload your RAW file from your computer.
Once your file is uploaded, ensure that the output format is set to “JPEG.” ZAMZAR usually automatically detects the desired conversion. If not, manually select JPEG from the format options.
 ZAMZAR Online RAW to JPEG Converter: ZAMZAR website interface showing the option to upload a RAW file and convert it to JPEG online for free.
Click the “Convert Now” button to start the conversion process. ZAMZAR will upload, convert, and then provide a download link for your JPEG file. Click the download link to save the converted JPEG to your computer. Be aware of ZAMZAR’s terms and privacy policy before using their service.
Raw.Pics.io is another reputable online RAW converter. Visit their website and you will find a user-friendly interface where you can simply drag and drop your RAW files directly onto the homepage.
 Raw.Pics.io Free Online RAW Converter: Raw.Pics.io website homepage, allowing users to drag and drop RAW files for free conversion to JPEG format in a web browser.
After uploading your files, follow the on-screen prompts to convert them to JPEG. Raw.Pics.io often provides options for basic adjustments before conversion. Once converted, you can download your JPEG files.
While online converters offer convenience, consider the security and privacy implications of uploading your images to third-party websites, especially for sensitive or professional work. For critical images, using offline software might be a more secure option.
Understanding RAW and JPEG Formats: Key Differences
Choosing between RAW and JPEG formats is a fundamental decision for photographers. Each format has distinct characteristics that cater to different needs and workflows.
| Feature | RAW Format | JPEG Format |
|---|---|---|
| Pros | ||
| Image Quality | Highest quality, captures maximum detail | Good quality, suitable for most applications |
| Editing Flexibility | Extensive post-processing latitude | Limited post-processing flexibility |
| Color & Exposure | Full control over color and exposure adjustments | Camera applies automatic color/exposure adjustments |
| Cons | ||
| File Size | Large, consumes significant storage | Small, storage-efficient |
| Shooting Speed | Slower, due to larger file size | Faster, allows for rapid shooting |
| Compatibility | Requires specific software for viewing/editing | Universally compatible with devices/software |
| Editing | Requires processing before viewing as image | Ready to view and share immediately |
Modern digital cameras allow photographers to select between shooting in JPEG or RAW formats, or sometimes both simultaneously.
JPEG (Joint Photographic Experts Group) is a raster file format known for its compression efficiency, making it ideal for sharing and storage. JPEG is the format of choice for most amateur photographers due to its balance of good image quality and smaller file sizes.
RAW files, in contrast, are not technically images but rather unprocessed data captured directly from the camera sensor. Professional photographers often prefer RAW format because it retains all the original image information, providing maximum flexibility in post-processing.
A RAW file allows for extensive adjustments to white balance, tones, and colors after the photo is taken. For example, if a photo is overexposed, a RAW file contains more data to recover details in highlights compared to a JPEG. RAW format is akin to a film negative, requiring development (processing) to become a viewable image, while a JPEG is like a developed print – a final product with limited adjustability.
Compression and Quality Settings in JPEG Conversion
When converting RAW to JPEG, understanding compression and quality settings is crucial for achieving the desired balance between file size and image quality. JPEG is a compressed format, designed to reduce file size for easier storage and sharing.
Compression in JPEG files is achieved through a “lossy” process, meaning some image data is permanently discarded to reduce file size. The level of compression directly impacts the amount of data lost. Higher compression results in smaller file sizes but greater loss of image detail, which can lead to visible artifacts and reduced image quality.
Quality settings during RAW to JPEG conversion determine the level of compression applied. These settings are typically represented as a percentage or a scale (e.g., 1-10 or 0-100). A higher quality setting means less compression, more data retained, and therefore, higher image quality but larger file size. Conversely, a lower quality setting increases compression, reduces file size, but decreases image quality.
Finding the right balance between compression and quality depends on the intended use of the JPEG images. For online sharing or when storage space is limited, a lower quality setting might suffice. However, for printing or professional applications where maximum detail preservation is essential, a higher quality setting is recommended.
It’s important to remember that JPEG compression is irreversible. Once a RAW file is converted and saved as a JPEG, the discarded data is lost permanently. This is why many photographers preserve their original RAW files, allowing them to revisit and create new JPEGs with different settings or for different purposes in the future.
In summary, understanding JPEG compression and quality settings empowers you to make informed decisions, optimizing your images for various needs while being mindful of the trade-off between file size and image quality.
Deciding When to Convert RAW to JPEG
The decision to convert RAW files to JPEG hinges on your current needs and future plans for your images. Both formats offer distinct advantages and disadvantages, making them suitable for different scenarios.
Retaining your images in RAW format provides the ultimate flexibility for future editing. RAW files are non-destructive, allowing you to re-edit them without any loss of original image data. This is invaluable if you anticipate needing to revisit and re-process your photos with new techniques or for different outputs in the future.
However, RAW files are significantly larger than JPEGs, consuming considerably more storage space. If storage is a concern, or if you’re certain that your initial edits are final and won’t require further adjustments, converting to JPEG can be practical.
The conversion process to JPEG inherently involves compression and some loss of image data. While for many everyday uses this loss is negligible, for critical applications or extensive post-processing, it can be a limiting factor.
Consider your workflow and final output. If you need images for quick online sharing, social media, or general viewing, JPEG is perfectly adequate and often preferred due to smaller file sizes and universal compatibility. If you are printing large format, engaging in detailed editing, or archiving for professional use, maintaining RAW files is generally advisable.
In conclusion, weigh the benefits of editing flexibility and maximum image quality offered by RAW against the storage efficiency and ease of use of JPEG. Your choice should align with your photographic goals and workflow requirements.
