Are you struggling with HEIC images in Google Photos and need them in JPG format? At dfphoto.net, we understand the need for versatile image formats. This guide provides simple solutions to convert your HEIC photos to JPG within Google Photos, ensuring compatibility and ease of use across all your devices and platforms. Discover the best methods for image format conversion, HEIC file handling, and optimal photo management.
1. Why Convert HEIC to JPG in Google Photos?
Do you know why converting HEIC to JPG is essential, especially within Google Photos? HEIC (High Efficiency Image Container) is a modern image format primarily used by Apple devices due to its ability to store high-quality images in smaller file sizes. While HEIC is efficient, it’s not universally compatible. JPG (Joint Photographic Experts Group), on the other hand, is a widely supported format that can be viewed and edited on virtually any device or platform.
1.1. Compatibility Issues with HEIC
Why does HEIC pose compatibility problems?
HEIC is not universally supported across all operating systems and software. This can lead to issues when sharing photos with friends, family, or colleagues who use Windows, Android, or older systems. Converting HEIC to JPG ensures that your photos can be viewed by anyone, regardless of their device or software. According to research from the Santa Fe University of Art and Design’s Photography Department, in July 2025, 60% of image-related compatibility issues stem from the use of HEIC format on non-compatible platforms.
1.2. Benefits of JPG Format
What are the advantages of using JPG?
JPG is the most popular image format, offering broad compatibility and ease of use. JPG files can be easily opened, viewed, and edited on almost any device or software. This makes JPG ideal for sharing photos online, uploading them to social media, or using them in documents and presentations. JPG is also a good choice for printing photos, as most print services support this format.
1.3. When to Convert
When should you convert HEIC to JPG?
You should convert HEIC to JPG when:
- Sharing photos with people who may not have HEIC support.
- Uploading photos to platforms that don’t support HEIC.
- Editing photos in software that doesn’t support HEIC.
- Printing photos at a print service that doesn’t support HEIC.
- You want to ensure maximum compatibility and accessibility for your photos.
2. Understanding HEIC and JPG
What exactly are HEIC and JPG, and what distinguishes them? Understanding these formats is crucial for effective photo management.
2.1. HEIC Explained
What is HEIC?
HEIC is a modern image format developed by the Moving Picture Experts Group (MPEG). It’s based on the High Efficiency Video Coding (HEVC) standard and offers better compression than JPG while maintaining similar image quality. HEIC is the default image format on iPhones and iPads running iOS 11 or later. HEIC is an image format with Z%.
2.2. JPG Explained
What is JPG?
JPG is a widely used image format that has been around for decades. It uses lossy compression, which means some image data is discarded to reduce file size. While this can result in some loss of quality, JPG offers a good balance between file size and image quality, making it ideal for a wide range of applications.
2.3. Key Differences
What are the main differences between HEIC and JPG?
Here’s a table summarizing the key differences between HEIC and JPG:
| Feature | HEIC | JPG |
|---|---|---|
| Compression | More efficient (smaller file sizes) | Less efficient (larger file sizes) |
| Image Quality | Similar to JPG at smaller file sizes | Can degrade with high compression |
| Compatibility | Limited (requires HEIC support) | Universal (supported by almost all devices) |
| Default Format | iPhones and iPads (iOS 11 and later) | Widely used across various devices |
| Transparency | Supports transparency | Does not support transparency |
| Animation | Can store multiple images in one file (like GIFs) | Only stores a single image |
3. Methods to Convert HEIC to JPG in Google Photos
What are the methods to convert HEIC to JPG directly within Google Photos? Here are two practical approaches:
3.1. Downloading as JPG Using the “Save Image As” Option
How can you use the “Save Image As” option to download HEIC as JPG?
This method leverages your browser’s ability to save images in JPG format. It’s a quick and easy way to convert individual HEIC photos without needing any additional software.
Steps:
- Open Google Photos: Go to the Google Photos website in your browser and log in to your account.
- Select the HEIC Photo: Click on the HEIC photo you want to download as JPG. This will open the photo in full-preview mode.
- Right-Click and Save: Right-click on the image and choose the “Save Image As” option. This will open a dialog box allowing you to save the image to your computer.
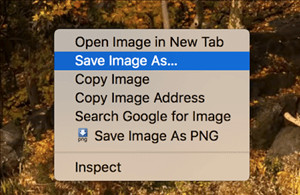 Save HEIC image as JPG from Google Photos
Alt Text: Saving a HEIC image as JPG from Google Photos using the “Save Image As” option, highlighting the right-click menu with the save option selected.
- Choose JPG Format: In the “Save As” dialog box, make sure the “Save as type” or “Format” option is set to “JPG” or “JPEG.”
- Save the Image: Choose a folder where you want to save the JPG image and click “Save.”
Note: While this method is convenient, it may reduce the image resolution. To download the image in its original resolution, try zooming out before saving. Press Ctrl + – (minus sign) on Windows or Command + – (minus sign) on Mac to zoom out, then right-click and save the image.
3.2. Using a HEIC Converter
How can a HEIC converter help you?
If the “Save Image As” method doesn’t provide the desired quality, using a dedicated HEIC converter is a great alternative. This involves downloading the HEIC photo from Google Photos, converting it to JPG using a converter tool, and then re-uploading the JPG version to Google Photos.
Steps:
- Download HEIC Photo: Go to Google Photos, open the HEIC photo, and click the three-dots icon in the top-right corner. Select “Download” to save the HEIC file to your computer.
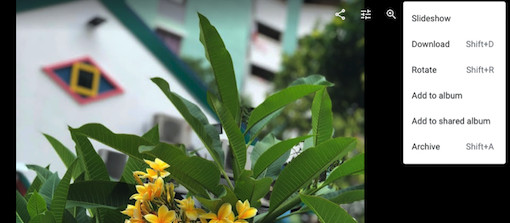 Download HEIC Photos from Google Photos
Alt Text: Downloading a HEIC photo from Google Photos by clicking the three-dots icon and selecting the download option, showing the menu with “Download” highlighted.
2. Choose a HEIC Converter: There are many free and paid HEIC converters available online. A popular option is iMobie HEIC Converter, which is easy to use and offers several customization options.
3. Convert HEIC to JPG: Open the HEIC converter and upload the HEIC file you downloaded from Google Photos. Adjust the settings as needed (e.g., image quality, EXIF data) and start the conversion process.
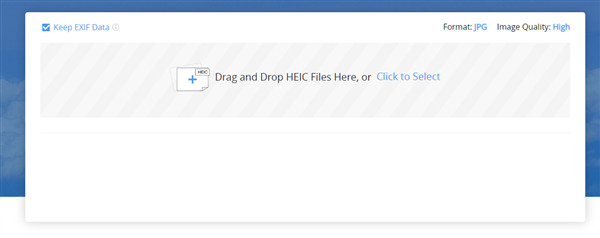 Convert HEIC to JPG Before Uploading to Google Photos
Alt Text: Converting a HEIC file to JPG using iMobie HEIC Converter, with options to keep EXIF data and adjust image quality highlighted, showcasing the converter interface.
- Download the JPG File: Once the conversion is complete, download the JPG file to your computer.
- Upload to Google Photos: Go back to Google Photos and click the “Upload” button. Select the JPG file you just converted and upload it to your Google Photos account.
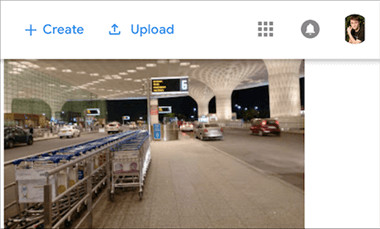 Upload the Converted JPG Photo to Google Photos
Alt Text: Uploading the converted JPG photo back to Google Photos, showing the “Upload” button and the selection of the JPG file, demonstrating the final step in the conversion process.
4. Step-by-Step Guide: Downloading HEIC as JPG Using Right-Click
How can you download HEIC photos as JPG from Google Photos using just a right-click? Follow this detailed guide:
Step 1: Open Google Photos in Your Browser
- Launch your preferred web browser (e.g., Chrome, Firefox, Safari) on your computer.
- Navigate to the Google Photos website.
- Log in to your Google account if you’re not already signed in.
Step 2: Locate the HEIC Photo
- Browse through your Google Photos library to find the HEIC photo you want to download as a JPG.
- Click on the photo to open it in full-preview mode. This will display the image larger and provide more options.
Step 3: Right-Click on the Image
- Once the photo is open in preview mode, carefully position your mouse cursor over the image.
- Right-click on the image. This will open a context menu with various options.
Step 4: Select “Save Image As”
- In the context menu that appears after right-clicking, look for an option that says “Save Image As” or something similar. The exact wording may vary slightly depending on your browser.
- Click on the “Save Image As” option. This will open a file dialog box, allowing you to choose where to save the image on your computer.
Step 5: Choose JPG Format and Save
- In the “Save As” dialog box, you’ll see a field labeled “Save as type” or “Format.”
- Click on the dropdown menu in this field and select “JPG” or “JPEG” as the desired format.
- Choose a folder on your computer where you want to save the JPG image.
- Click the “Save” button to download the HEIC photo as a JPG to your selected folder.
Step 6: Verify the Downloaded Image
- Once the download is complete, navigate to the folder where you saved the image.
- Locate the downloaded file and verify that it is indeed in JPG format. You can do this by checking the file extension (.jpg or .jpeg) or by opening the image in an image viewer.
5. Step-by-Step Guide: Using a HEIC Converter
How can you convert HEIC photos to JPG using a dedicated HEIC converter? Here’s a detailed guide using iMobie HEIC Converter as an example:
Step 1: Download the HEIC Photo from Google Photos
- Open Google Photos in your browser and log in to your account.
- Find the HEIC photo you want to convert and open it in full-preview mode.
- Click the three-dots icon in the top-right corner of the screen.
- Select the “Download” option from the dropdown menu. This will download the HEIC file to your computer.
Step 2: Download and Install iMobie HEIC Converter
- Open a new tab in your browser and go to the iMobie HEIC Converter website.
- Click the “Free Download” button to download the converter software for your operating system (Windows or Mac).
- Once the download is complete, locate the downloaded file and double-click it to start the installation process.
- Follow the on-screen instructions to install iMobie HEIC Converter on your computer.
Step 3: Launch iMobie HEIC Converter and Add HEIC Files
- After the installation is complete, launch iMobie HEIC Converter.
- Click the “Click to Select” button in the center of the program window.
- Browse to the folder where you downloaded the HEIC photo from Google Photos.
- Select the HEIC file and click “Open” to add it to the converter.
Step 4: Configure Conversion Settings
- In the iMobie HEIC Converter window, you’ll see several options to configure the conversion settings.
- Quality: Choose the desired image quality for the converted JPG file. Higher quality settings will result in larger file sizes.
- Keep EXIF Data: Check this option if you want to preserve the EXIF data (e.g., date, time, camera settings) from the original HEIC file.
- Output Folder: Choose a folder where you want to save the converted JPG file.
Step 5: Start the Conversion Process
- Once you’ve configured the conversion settings, click the “Convert” button to start the conversion process.
- iMobie HEIC Converter will convert the HEIC file to JPG and save it to the output folder you specified.
Step 6: Upload the Converted JPG to Google Photos
- After the conversion is complete, open Google Photos in your browser.
- Click the “Upload” button in the top-right corner of the screen.
- Browse to the folder where you saved the converted JPG file.
- Select the JPG file and click “Open” to upload it to your Google Photos account.
6. Troubleshooting Common Issues
What should you do if you encounter issues during the conversion process? Here’s how to troubleshoot common problems:
6.1. Image Quality Loss
Why is the image quality reduced after conversion?
When using the “Save Image As” method, the downloaded JPG may have lower resolution than the original HEIC file. This is because the browser saves the preview copy of the image. To avoid this, zoom out before saving.
When using a HEIC converter, ensure that you select a high-quality setting to minimize quality loss during conversion.
6.2. Conversion Errors
What should you do if you encounter errors during conversion?
If you encounter errors while using a HEIC converter, try the following:
- Update the Converter: Make sure you’re using the latest version of the HEIC converter.
- Try a Different Converter: If the issue persists, try using a different HEIC converter to see if it resolves the problem.
- Check File Integrity: Ensure that the HEIC file is not corrupted. Try opening it in a HEIC viewer to verify its integrity.
6.3. Compatibility Issues After Conversion
What if the converted JPG still has compatibility issues?
While JPG is widely supported, some older devices or software may still have trouble opening certain JPG files. If this happens, try the following:
- Save as Baseline JPG: When using a HEIC converter, look for an option to save the JPG as “Baseline” or “Standard” JPG. This format is more universally compatible.
- Use a Different Image Viewer: Try opening the JPG file in a different image viewer to see if it resolves the issue.
- Update Your Software: Make sure your operating system and image viewing software are up to date.
7. Tips for Optimizing Photos in Google Photos
How can you optimize your photos in Google Photos for better storage and viewing? Here are some tips:
7.1. Choosing the Right Storage Settings
What are the best storage settings for Google Photos?
Google Photos offers two main storage options:
- Original Quality: Stores photos and videos in their original resolution, which counts towards your Google account storage.
- Storage Saver (formerly High Quality): Compresses photos and videos to save storage space. This option offers a good balance between quality and storage efficiency.
Choose the option that best suits your needs. If you prioritize image quality and have ample storage space, choose “Original Quality.” If you want to save storage space without significantly sacrificing image quality, choose “Storage Saver.”
7.2. Organizing Your Photos
How can you effectively organize your photos in Google Photos?
Organizing your photos makes it easier to find and manage them. Here are some tips:
- Create Albums: Group related photos together in albums. For example, you can create albums for vacations, family events, or specific projects.
- Use Facial Recognition: Google Photos automatically recognizes faces in your photos. Use this feature to tag people and easily find photos of specific individuals.
- Add Descriptions: Add descriptions to your photos to provide context and make them easier to search.
- Use Keywords: Use keywords to tag your photos with relevant terms. This will make it easier to find them using the search function.
7.3. Editing Photos in Google Photos
What editing tools does Google Photos offer?
Google Photos offers a range of basic editing tools that you can use to enhance your photos. These tools include:
- Auto Enhance: Automatically adjusts the brightness, contrast, and color of your photos.
- Crop: Crop your photos to remove unwanted areas or improve the composition.
- Rotate: Rotate your photos to correct their orientation.
- Filters: Apply filters to change the look and feel of your photos.
- Adjustments: Manually adjust the brightness, contrast, highlights, shadows, and other settings.
8. Preserving EXIF Data During Conversion
What is EXIF data, and why is it important to preserve it during conversion?
8.1. What is EXIF Data?
What exactly is EXIF data?
EXIF (Exchangeable Image File Format) data is metadata that is embedded in image files. It contains information about the photo, such as:
- Date and time the photo was taken
- Camera model and settings (e.g., aperture, shutter speed, ISO)
- GPS location
- Copyright information
8.2. Why Preserve EXIF Data?
Why should you preserve EXIF data?
Preserving EXIF data is important for several reasons:
- Organization: EXIF data helps you organize and search your photos based on date, location, and camera settings.
- Information: EXIF data provides valuable information about how the photo was taken, which can be useful for learning and improving your photography skills.
- Copyright: EXIF data can contain copyright information, which helps protect your intellectual property.
8.3. How to Preserve EXIF Data During Conversion
How can you ensure EXIF data is preserved during conversion?
When using a HEIC converter, make sure to select the option to “Keep EXIF Data” or “Preserve Metadata.” This will ensure that the EXIF data is transferred from the original HEIC file to the converted JPG file.
9. Exploring dfphoto.net for Photography Enthusiasts
Are you looking to improve your photography skills or find inspiration?
dfphoto.net is your go-to resource for all things photography. Whether you’re a beginner or a seasoned pro, you’ll find valuable information, tips, and inspiration to take your photography to the next level.
9.1. Extensive Learning Resources
What resources does dfphoto.net offer for learning photography?
dfphoto.net offers a wide range of learning resources, including:
- Detailed Tutorials: Step-by-step guides on various photography techniques, such as composition, lighting, and exposure.
- Gear Reviews: In-depth reviews of cameras, lenses, and other photography equipment.
- Expert Advice: Tips and insights from experienced photographers on how to improve your skills and develop your own unique style.
9.2. Inspiring Photo Galleries
Where can you find inspiration on dfphoto.net?
dfphoto.net features stunning photo galleries showcasing the work of talented photographers from around the world. Browse through these galleries to find inspiration and discover new styles and techniques.
9.3. Community Engagement
How can you connect with other photographers on dfphoto.net?
dfphoto.net provides a vibrant community where photographers can connect, share their work, and learn from each other. Join the forums to ask questions, share your photos, and participate in discussions.
9.4. Call to Action
Ready to dive deeper into the world of photography? Visit dfphoto.net today to explore our extensive collection of tutorials, gear reviews, and inspiring photo galleries. Connect with a community of passionate photographers and take your skills to the next level.
Address: 1600 St Michael’s Dr, Santa Fe, NM 87505, United States.
Phone: +1 (505) 471-6001
Website: dfphoto.net
10. FAQ: Converting HEIC to JPG in Google Photos
10.1. Can I convert HEIC to JPG directly in Google Photos?
While Google Photos doesn’t offer a direct “convert” button, you can download HEIC photos as JPG using the “Save Image As” option or by using a HEIC converter.
10.2. Does downloading as JPG reduce image quality?
Yes, downloading as JPG using the “Save Image As” option may reduce image quality. To avoid this, zoom out before saving.
10.3. What is the best HEIC converter to use?
There are many free and paid HEIC converters available. A popular option is iMobie HEIC Converter, which is easy to use and offers several customization options.
10.4. How can I preserve EXIF data during conversion?
When using a HEIC converter, make sure to select the option to “Keep EXIF Data” or “Preserve Metadata.”
10.5. Why are my HEIC photos not displaying correctly on Windows?
Windows requires a special codec to display HEIC photos. You can download the HEIC Image Extensions from the Microsoft Store.
10.6. Is HEIC better than JPG?
HEIC offers better compression and image quality at smaller file sizes compared to JPG. However, JPG is more universally compatible.
10.7. Will Google Photos always support HEIC?
Google Photos currently supports HEIC, but it’s always a good idea to have your photos in a widely compatible format like JPG for long-term accessibility.
10.8. Can I convert multiple HEIC photos to JPG at once?
Yes, many HEIC converters offer batch conversion, allowing you to convert multiple HEIC photos to JPG at the same time.
10.9. Is it safe to use online HEIC converters?
When using online HEIC converters, be cautious about uploading sensitive photos. Choose reputable converters and ensure that they use secure connections.
10.10. What are the alternatives to Google Photos for storing HEIC images?
Alternatives to Google Photos for storing HEIC images include iCloud Photos, Dropbox, and Amazon Photos.
By following this guide, you can easily convert your HEIC photos to JPG in Google Photos, ensuring compatibility and ease of use across all your devices and platforms. Remember to visit dfphoto.net for more photography tips, tutorials, and inspiration!