Converting color photos to black and white opens up a world of creative possibilities for photographers. Whether you’re aiming for timeless elegance or dramatic contrast, understanding the nuances of black and white conversion is key, and dfphoto.net is here to guide you through it. Let’s dive into the art of transforming your images and explore how to create stunning monochrome masterpieces, enhancing your skills in photography and visual arts with advanced image editing techniques and artistic grayscale conversion methods.
1. What Is The Simplest Way To Convert A Color Photo To Black And White?
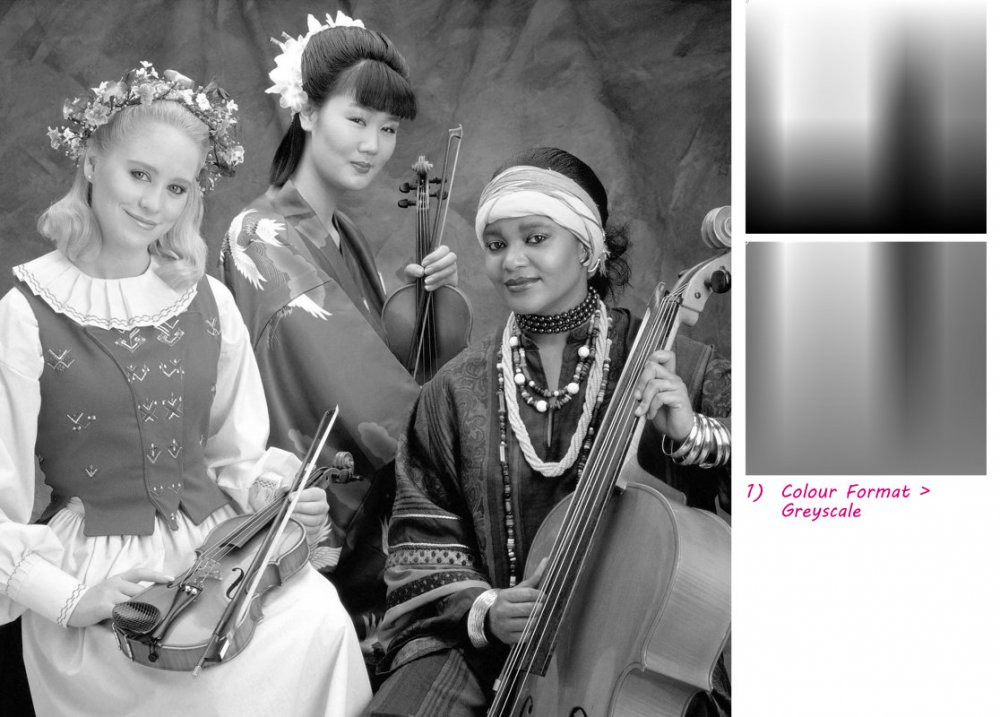
The simplest way to convert a color photo to black and white is often through the Desaturate tool found in most photo editing software. This method quickly removes all color information, resulting in a grayscale image. While fast, it might not offer the nuanced control that other methods provide.
1.1 Exploring The Desaturate Tool
The Desaturate tool is a one-step solution. You simply select the layer you wish to convert, navigate to the “Adjustments” or “Image” menu, and choose “Desaturate”. The software then automatically removes the color, leaving you with a black and white image.
1.2 The Appeal Of Simplicity
The primary advantage of the Desaturate tool is its speed and ease of use. It’s perfect for photographers who need a quick conversion without spending too much time on editing. However, this simplicity comes at a cost. The Desaturate tool treats all colors equally, which can lead to a flat, uninspiring grayscale image.
1.3 Limitations Of Desaturation
When you desaturate an image, you lose the ability to control how individual colors are translated into shades of gray. For example, a vibrant red and a deep blue might both become the same shade of gray, resulting in a loss of contrast and detail. This is where more advanced methods come into play, offering greater control over the final result.
1.4 When To Use Desaturation
Despite its limitations, the Desaturate tool is useful in certain situations. It’s a good option when:
- You need a quick preview of what your image looks like in black and white.
- You plan to make further adjustments using other tools.
- The color information in the original image isn’t critical to the final result.
1.5 Alternatives To Desaturation
For photographers seeking more control, several alternatives to desaturation offer greater flexibility. These include using adjustment layers like Black & White, Channel Mixer, and Curves. These tools allow you to fine-tune the conversion process and create a more compelling black and white image. dfphoto.net offers detailed tutorials on these advanced techniques, helping you master the art of monochrome conversion.
2. How Does The Black & White Adjustment Layer Work?
The Black & White adjustment layer allows you to convert a color photo to black and white while retaining control over how each color is translated into shades of gray. By adjusting the sliders for each color channel (red, yellow, green, cyan, blue, and magenta), you can lighten or darken specific areas of the image, creating a more nuanced and visually appealing result.
2.1 Understanding Color Channels
Color channels represent the primary colors that make up an image: red, green, and blue (RGB). The Black & White adjustment layer also includes sliders for their complementary colors: cyan, magenta, and yellow. By manipulating these sliders, you can control the brightness of each color in the final black and white image.
2.2 Fine-Tuning The Conversion
The key to using the Black & White adjustment layer effectively is to understand how each color channel affects the image. For example, if you want to make the sky appear darker, you can decrease the blue slider. If you want to lighten skin tones, you can increase the red and yellow sliders.
2.3 Presets For Different Scenarios
Many photo editing software programs offer presets for the Black & White adjustment layer. These presets are designed for specific scenarios, such as portraits, landscapes, and architecture. They provide a good starting point, which you can then fine-tune to your liking.
2.4 Non-Destructive Editing
One of the main advantages of using an adjustment layer is that it’s non-destructive. This means that the original image remains untouched, and you can always go back and make changes to the adjustment layer without affecting the underlying pixels. This is particularly useful when experimenting with different conversion techniques.
2.5 Advanced Techniques
For advanced users, the Black & White adjustment layer can be combined with other tools and techniques to create even more stunning results. For example, you can use layer masks to apply the adjustment to specific areas of the image or use blending modes to create unique effects.
 Black and White Adjustment Layer Interface
2.6 Real-World Examples
Consider a landscape photo with a vibrant sunset. By using the Black & White adjustment layer, you can darken the blue sky to create a dramatic contrast with the lighter clouds. You can also increase the red and yellow sliders to emphasize the warm tones of the sunset, resulting in a more visually striking image.
2.7 Resources On Dfphoto.Net
To further enhance your understanding and skills, dfphoto.net offers a wealth of resources, including tutorials, articles, and examples of how to use the Black & White adjustment layer effectively. Whether you’re a beginner or an experienced photographer, you’ll find valuable information to help you master the art of black and white conversion.
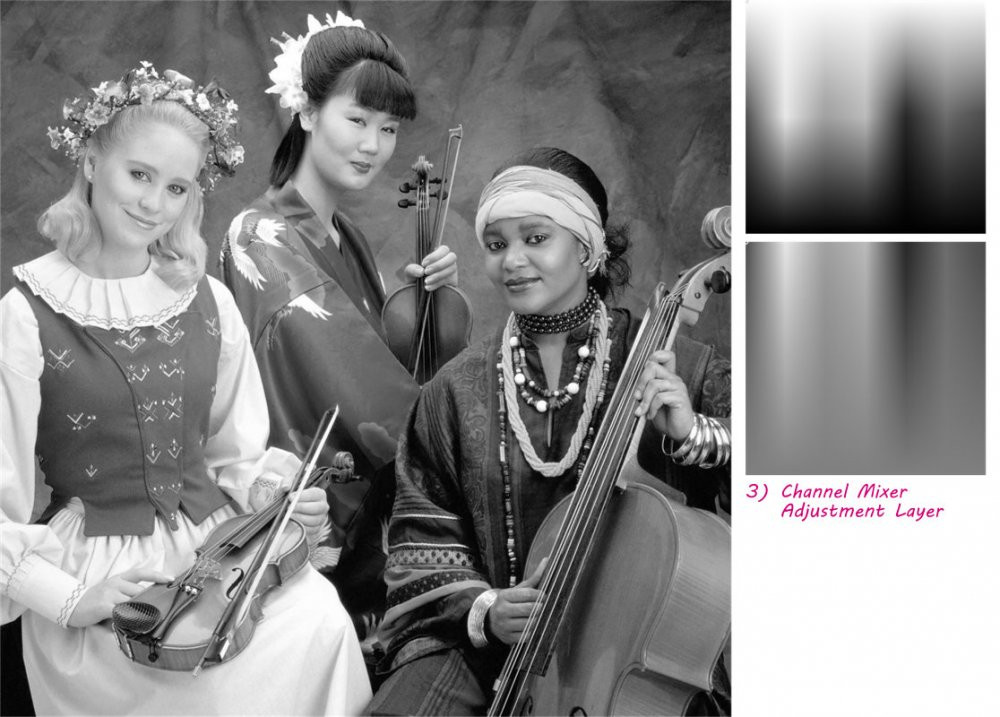
3. What Is The Channel Mixer And How Can It Help?
The Channel Mixer is a powerful tool that allows you to create black and white conversions by mixing the color channels of an image. Unlike simple desaturation, the Channel Mixer provides precise control over how each color contributes to the final grayscale image, enabling you to enhance contrast, emphasize textures, and achieve a unique artistic vision.
3.1 Understanding Channel Mixing
The Channel Mixer works by allowing you to specify the percentage of each color channel (red, green, and blue) that will contribute to the final grayscale image. For example, you can increase the red channel to make red tones lighter or decrease the blue channel to darken blue tones.
3.2 Precise Control Over Tones
This level of control is particularly useful for portraits, where you can adjust the red and yellow channels to create flattering skin tones. For landscapes, you can manipulate the blue and green channels to emphasize foliage and skies.
3.3 Creating Unique Effects
The Channel Mixer also allows you to create unique and artistic effects. By experimenting with different combinations of color channels, you can achieve a wide range of looks, from classic black and white to surreal and otherworldly.
3.4 Non-Destructive Workflow
Like the Black & White adjustment layer, the Channel Mixer can be used non-destructively by applying it as an adjustment layer. This allows you to experiment freely without affecting the original image and to easily revert to the original settings if needed.
3.5 Advanced Techniques With Channel Mixer
Advanced techniques with the Channel Mixer include using it in combination with other adjustment layers, such as Curves and Levels, to fine-tune the contrast and tonal range of the image. You can also use layer masks to apply the Channel Mixer to specific areas of the image, allowing for even more precise control.
3.6 Practical Examples
Consider a photo of a weathered wooden fence. By increasing the red and yellow channels and decreasing the blue channel, you can emphasize the texture and grain of the wood, creating a more dramatic and visually interesting image.
3.7 Resources For Mastering The Channel Mixer
To help you master the Channel Mixer, dfphoto.net offers a variety of resources, including tutorials, articles, and example images. You’ll learn how to use the Channel Mixer effectively in different scenarios and how to combine it with other tools to achieve your desired results. With practice and experimentation, you can unlock the full potential of the Channel Mixer and create stunning black and white images that reflect your unique artistic vision.
4. How Can Curves Adjustment Layers Enhance Black And White Conversions?
Curves adjustment layers are invaluable for enhancing black and white conversions by providing precise control over the tonal range of an image. They allow you to adjust the brightness and contrast of specific areas, creating a more dynamic and visually appealing monochrome photograph.
4.1 Understanding Curves
A curves adjustment layer displays a graph representing the tonal range of your image, with the darkest tones on the left and the lightest tones on the right. By manipulating the curve, you can lighten or darken specific areas of the image, adjust the overall contrast, and create unique effects.
4.2 Precise Tonal Control
Unlike simple brightness and contrast adjustments, curves allow you to target specific tonal ranges. For example, you can brighten the highlights without affecting the shadows, or darken the midtones without losing detail in the bright areas.
4.3 Creating Contrast
One of the most common uses of curves is to increase contrast. By creating an S-shaped curve, you can darken the shadows and brighten the highlights, resulting in a more dramatic and visually engaging image.
4.4 Applying Curves To Black And White
When applied to black and white conversions, curves can be used to fine-tune the tonal range and create a more nuanced result. You can use curves to emphasize textures, create mood, and guide the viewer’s eye through the image.
4.5 Advanced Techniques With Curves
Advanced techniques with curves include using multiple curves adjustment layers, each targeting a specific tonal range. You can also use layer masks to apply curves to specific areas of the image, allowing for even more precise control.
4.6 Practical Examples
Consider a portrait in black and white. By using curves, you can brighten the subject’s eyes, smooth out their skin, and add depth to their hair. You can also darken the background to create a more dramatic and intimate feel.
4.7 Learning Resources On Dfphoto.Net
Dfphoto.net provides a wealth of resources to help you master curves adjustment layers, including tutorials, articles, and example images. You’ll learn how to use curves effectively in different scenarios and how to combine them with other tools to achieve your desired results. With practice and experimentation, you can unlock the full potential of curves and create stunning black and white images that showcase your unique artistic vision.
 Curves Adjustment Layer Interface
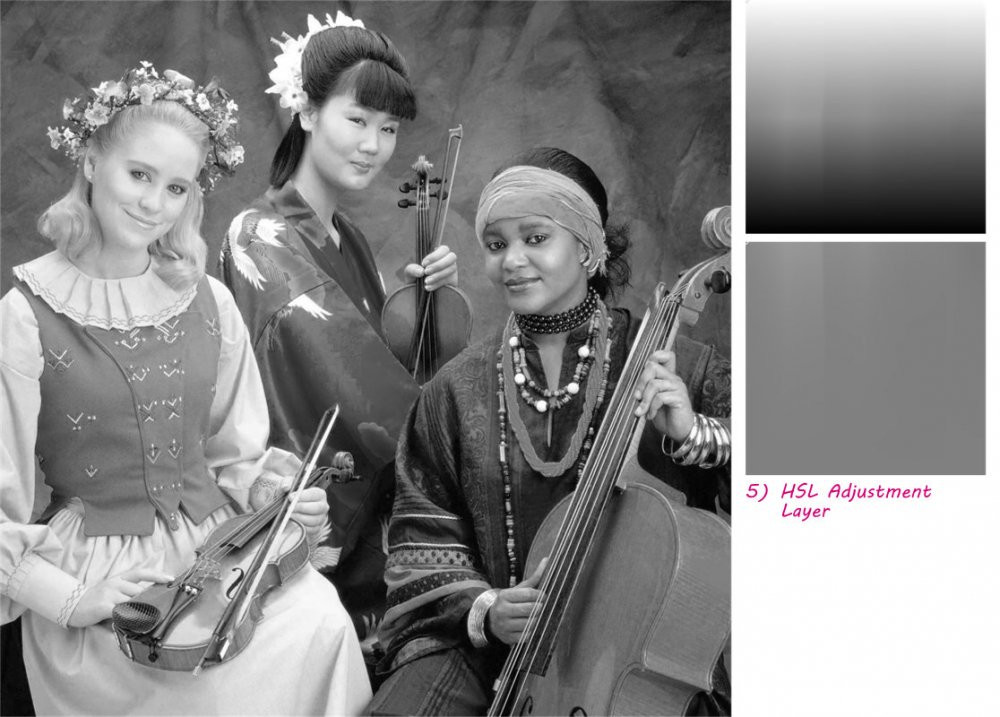
5. What Role Does The HSL Adjustment Layer Play In Monochrome Conversions?
The HSL (Hue, Saturation, Luminance) adjustment layer plays a crucial role in monochrome conversions by allowing you to manipulate the individual color channels before converting to black and white. This enables you to control how each color translates into shades of gray, resulting in a more refined and artistic conversion.
5.1 Understanding HSL
HSL stands for Hue, Saturation, and Luminance. Hue refers to the color itself (e.g., red, green, blue), Saturation refers to the intensity of the color, and Luminance refers to the brightness of the color. By adjusting these three parameters for each color channel, you can fine-tune the look of your image before converting it to black and white.
5.2 Controlling Color Translation
The HSL adjustment layer allows you to control how each color is translated into shades of gray. For example, you can darken the blue channel to make skies appear more dramatic or lighten the red channel to brighten skin tones. This level of control is essential for creating a visually appealing black and white image.
5.3 Emphasizing Specific Tones
By manipulating the HSL sliders, you can emphasize specific tones in the black and white image. For example, if you want to bring out the texture in a weathered wooden fence, you can increase the saturation and luminance of the yellow and brown channels.
5.4 Creating Mood And Atmosphere
The HSL adjustment layer can also be used to create mood and atmosphere in your black and white images. By selectively adjusting the color channels, you can create a sense of drama, mystery, or serenity.
5.5 Using HSL In Combination With Other Tools
The HSL adjustment layer is most effective when used in combination with other tools, such as the Black & White adjustment layer and curves. By first using HSL to fine-tune the color channels and then using the Black & White adjustment layer to convert the image, you can achieve a truly stunning result. Curves can then be used to adjust the overall tonal range of the image.
5.6 Practical Examples
Consider a landscape photo with a vibrant sunset. By using the HSL adjustment layer, you can increase the saturation of the red and orange channels to emphasize the warm tones of the sunset. You can then convert the image to black and white and use curves to fine-tune the contrast and tonal range.
5.7 Dfphoto.Net Resources
To learn more about using the HSL adjustment layer for monochrome conversions, dfphoto.net offers a variety of resources, including tutorials, articles, and example images. You’ll discover how to use HSL effectively in different scenarios and how to combine it with other tools to achieve your desired results. With practice and experimentation, you can unlock the full potential of HSL and create stunning black and white images that showcase your unique artistic vision.
6. What Is The Advantage Of Soft Proofing For Greyscale Conversion?
Soft proofing for greyscale conversion allows you to simulate how your image will look when printed in black and white, taking into account the limitations of the printing process. This enables you to make informed adjustments to your image, ensuring that the final print matches your artistic vision.
6.1 Understanding Soft Proofing
Soft proofing is the process of previewing an image on your computer screen to simulate how it will look when printed. This is particularly important for black and white images, as the way colors are converted to grayscale can vary depending on the printer and paper used.
6.2 Accurate Preview Of Final Print
By using soft proofing, you can get an accurate preview of how your black and white image will look when printed. This allows you to make adjustments to the brightness, contrast, and tonal range of the image, ensuring that the final print matches your expectations.
6.3 Avoiding Unexpected Results
Without soft proofing, you may be surprised by the results of your black and white prints. Colors may be converted to grayscale in unexpected ways, resulting in a loss of detail or unwanted tonal shifts.
6.4 Customizing Your Workflow
Soft proofing allows you to customize your workflow to match the specific characteristics of your printer and paper. You can create custom soft proofing profiles that take into account the color gamut, black point, and tonal response of your printing setup.
6.5 Streamlining The Printing Process
By using soft proofing, you can streamline the printing process and reduce the number of test prints needed to achieve your desired results. This saves time, money, and resources, making your workflow more efficient and sustainable.
6.6 How To Use Soft Proofing
To use soft proofing, you’ll need a calibrated monitor and a soft proofing profile that matches your printer and paper. Most photo editing software programs offer built-in soft proofing tools that allow you to load custom profiles and preview your images.
6.7 Dfphoto.Net Resources
Dfphoto.net offers a variety of resources to help you master soft proofing for greyscale conversion, including tutorials, articles, and example images. You’ll learn how to calibrate your monitor, create custom soft proofing profiles, and use soft proofing effectively in your workflow. With practice and experimentation, you can unlock the full potential of soft proofing and create stunning black and white prints that showcase your unique artistic vision.
7. Can Layer Effects Be Used For Black And White Conversion?
Yes, layer effects can be used for black and white conversion, offering a creative and flexible way to transform color images into monochrome masterpieces. By applying layer effects such as Color Overlay and Gradient Overlay, you can achieve unique and artistic results that go beyond traditional conversion methods.
7.1 Exploring Layer Effects
Layer effects are a set of non-destructive adjustments that can be applied directly to a layer in photo editing software. These effects include shadows, glows, bevels, and overlays, which can be used to enhance and transform the look of an image.
7.2 Color Overlay For Simple Conversions
The Color Overlay effect allows you to replace the colors in a layer with a single color. By setting the blend mode to Color and choosing a grayscale color, you can quickly convert a color image to black and white.
7.3 Gradient Overlay For Tonal Control
The Gradient Overlay effect allows you to apply a gradient of colors to a layer. By creating a black and white gradient, you can map the colors in the original image to different shades of gray, creating a more nuanced and artistic conversion.
7.4 Combining Layer Effects
Layer effects can be combined to create even more complex and interesting black and white conversions. For example, you can use a Color Overlay to remove the color from the image and then use a Gradient Overlay to add contrast and depth.
7.5 Non-Destructive Editing
Like adjustment layers, layer effects are non-destructive, meaning that the original image remains untouched. This allows you to experiment freely and to easily revert to the original settings if needed.
7.6 Creative Possibilities
Layer effects offer a wide range of creative possibilities for black and white conversion. You can use them to create surreal effects, emphasize textures, and add mood to your images.
7.7 Dfphoto.Net Resources
To learn more about using layer effects for black and white conversion, dfphoto.net offers a variety of resources, including tutorials, articles, and example images. You’ll discover how to use layer effects effectively in different scenarios and how to combine them with other tools to achieve your desired results. With practice and experimentation, you can unlock the full potential of layer effects and create stunning black and white images that showcase your unique artistic vision.
 Layer Effects Panel
8. How Do Different Conversion Methods Affect The Final Black And White Image?
Different conversion methods significantly affect the final black and white image by influencing the tonal range, contrast, and overall mood. Understanding these differences allows photographers to choose the best method for achieving their desired artistic vision.
8.1 Desaturation: A Basic Approach
Desaturation is the simplest method, removing all color information and converting the image to grayscale. However, it often results in a flat and lifeless image with limited contrast.
8.2 Black & White Adjustment Layer: Precise Control
The Black & White adjustment layer offers precise control over how each color is converted to grayscale. By adjusting the sliders for each color channel, you can lighten or darken specific areas of the image, creating a more nuanced and visually appealing result.
8.3 Channel Mixer: Creative Mixing
The Channel Mixer allows you to mix the color channels of an image, providing even more control over the tonal range and contrast. This method is particularly useful for portraits and landscapes.
8.4 Curves Adjustment Layer: Fine-Tuning Tones
Curves adjustment layers offer the most precise control over the tonal range of an image. By manipulating the curve, you can lighten or darken specific areas of the image, adjust the overall contrast, and create unique effects.
8.5 HSL Adjustment Layer: Emphasizing Tones
The HSL adjustment layer allows you to manipulate the hue, saturation, and luminance of each color channel before converting to black and white. This enables you to emphasize specific tones and create mood and atmosphere in your images.
8.6 Soft Proofing: Accurate Print Preview
Soft proofing allows you to simulate how your image will look when printed in black and white, taking into account the limitations of the printing process. This ensures that the final print matches your artistic vision.
8.7 Layer Effects: Unique Artistic Results
Layer effects, such as Color Overlay and Gradient Overlay, offer a creative and flexible way to transform color images into monochrome masterpieces. These effects can be used to create surreal effects, emphasize textures, and add mood to your images.
8.8 Dfphoto.Net Resources
Dfphoto.net provides a wealth of resources to help you understand the differences between these conversion methods and choose the best one for your needs. You’ll find tutorials, articles, and example images that showcase the unique characteristics of each method. With practice and experimentation, you can master the art of black and white conversion and create stunning images that reflect your unique artistic vision.
9. What Are Some Tips For Achieving A Timeless Black And White Look?
Achieving a timeless black and white look involves understanding classic techniques, mastering tonal control, and paying attention to the subtle nuances that make a monochrome image truly captivating.
9.1 Embrace Simplicity
A timeless black and white image often benefits from simplicity. Focus on strong compositions, clean lines, and essential elements that convey your message without unnecessary distractions.
9.2 Master Tonal Range
The tonal range is the key to a compelling black and white image. Aim for a full range of tones, from deep blacks to bright whites, with smooth transitions in between. Use curves and levels adjustments to fine-tune the tonal range and create depth and dimension.
9.3 Emphasize Contrast
Contrast is essential for creating a visually striking black and white image. Use contrast to separate elements, emphasize textures, and create a sense of drama. However, be careful not to overdo it, as excessive contrast can lead to a harsh and unnatural look.
9.4 Pay Attention To Texture
Texture plays a crucial role in black and white photography. Look for opportunities to capture textures in your subjects, such as the wrinkles on a person’s face, the grain of wood, or the roughness of stone.
9.5 Use Light And Shadow
Light and shadow are your most powerful tools in black and white photography. Use them to create mood, shape your subjects, and guide the viewer’s eye through the image.
9.6 Study The Masters
Study the work of classic black and white photographers, such as Ansel Adams, Henri Cartier-Bresson, and Dorothea Lange. Pay attention to their use of composition, light, and tone, and try to incorporate their techniques into your own work.
9.7 Practice Patience
Creating a timeless black and white image takes time and patience. Don’t be afraid to experiment with different techniques and settings until you find what works best for you.
9.8 Dfphoto.Net Resources
Dfphoto.net offers a wealth of resources to help you achieve a timeless black and white look, including tutorials, articles, and example images. You’ll learn how to master tonal control, emphasize contrast, and use light and shadow effectively. With practice and dedication, you can create stunning black and white images that stand the test of time.
 Classic Black and White Portrait
10. How Can I Avoid Common Mistakes When Converting To Black And White?
Avoiding common mistakes when converting to black and white involves understanding the nuances of tonal range, contrast, and color conversion, as well as mastering the tools and techniques available in photo editing software.
10.1 Overlooking Tonal Range
One of the most common mistakes is overlooking the tonal range. A good black and white image should have a full range of tones, from deep blacks to bright whites, with smooth transitions in between. Avoid images that are too dark or too light, as they will lack depth and detail.
10.2 Excessive Contrast
Excessive contrast can lead to a harsh and unnatural look. While contrast is important for creating a visually striking image, it should be used judiciously. Avoid clipping the highlights or shadows, as this will result in a loss of detail.
10.3 Ignoring Color Conversion
Ignoring color conversion is another common mistake. When converting to black and white, it’s important to control how each color is translated into shades of gray. Use the Black & White adjustment layer or the Channel Mixer to fine-tune the conversion and achieve your desired result.
10.4 Over-Sharpening
Over-sharpening can create unwanted artifacts and make your image look artificial. Use sharpening sparingly and only where it’s needed.
10.5 Not Calibrating Your Monitor
Not calibrating your monitor can lead to inaccurate color and tonal representation. Calibrate your monitor regularly to ensure that you’re seeing the true colors and tones of your images.
10.6 Neglecting Soft Proofing
Neglecting soft proofing can result in unexpected results when printing your images. Use soft proofing to simulate how your image will look when printed and make any necessary adjustments.
10.7 Lack Of Experimentation
Lack of experimentation can limit your creative potential. Don’t be afraid to try different techniques and settings until you find what works best for you.
10.8 Dfphoto.Net Resources
Dfphoto.net offers a wealth of resources to help you avoid these common mistakes, including tutorials, articles, and example images. You’ll learn how to master tonal range, control contrast, and use color conversion effectively. With practice and dedication, you can create stunning black and white images that showcase your unique artistic vision.
FAQ: Mastering Black And White Conversions
1. What is the best software for converting color photos to black and white?
Adobe Photoshop and Lightroom are widely regarded as the best software options due to their advanced features and precise control.
2. Can I convert photos to black and white on my smartphone?
Yes, many smartphone apps offer black and white conversion tools, such as Snapseed and Adobe Lightroom Mobile.
3. Is it better to convert to black and white during or after shooting?
It’s generally better to convert to black and white during post-processing, as you retain the full color information from the original image.
4. How do I create a high-contrast black and white image?
Use curves or levels adjustments to increase the contrast between the darkest and lightest areas of the image.
5. How do I preserve details when converting to black and white?
Use techniques like the Black & White adjustment layer and the Channel Mixer to control how each color is converted to grayscale, preserving important details.
6. What is the role of dodging and burning in black and white photography?
Dodging and burning are techniques used to selectively lighten or darken areas of an image, enhancing contrast and drawing attention to specific details.
7. How do I create a vintage black and white look?
Experiment with adding a slight sepia tone, grain, and vignette to simulate the look of old photographs.
8. What are some common mistakes to avoid when converting to black and white?
Avoid over-sharpening, clipping highlights or shadows, and neglecting tonal range.
9. How can I improve the composition of my black and white photos?
Focus on strong lines, shapes, and textures, and use leading lines to guide the viewer’s eye through the image.
10. Where can I find inspiration for black and white photography?
Explore the works of classic black and white photographers and visit online galleries and communities dedicated to monochrome photography, such as dfphoto.net.
Ready to elevate your black and white photography? Visit dfphoto.net for comprehensive guides, inspiring galleries, and a vibrant community of photographers. Discover the art of monochrome and unlock your creative potential today! Address: 1600 St Michael’s Dr, Santa Fe, NM 87505, United States. Phone: +1 (505) 471-6001. Website: dfphoto.net.