Are you struggling with large image files on your Mac? Compressing photos is essential for saving storage space, speeding up website loading times, and making it easier to share images. At dfphoto.net, we’re dedicated to helping you master the art of image optimization. Discover effective techniques to reduce image file sizes without sacrificing visual quality.
If you’re looking to optimize your images for web or storage, dfphoto.net offers a wealth of information and resources. Learn about image resolution, aspect ratio, and the best image editors to fine-tune your photos.
1. Why Should You Compress Photos on Your Mac?
Compressing photos on your Mac offers numerous benefits, but why is it so important?
1.1 Save Valuable Storage Space
- The Problem: High-resolution photos consume significant storage space on your Mac’s hard drive or SSD, leading to performance slowdowns and storage limitations.
- The Solution: Compressing photos reduces their file size, freeing up valuable storage space. You can store more images and other important files without upgrading your storage.
1.2 Optimize Website Loading Times
- The Problem: Large image files slow down website loading times. Visitors will likely leave a slow-loading site, increasing bounce rates and decreasing user engagement.
- The Solution: Compressing images optimizes them for web use. Smaller image files load faster, improving website performance and user experience. According to a study by Google, 53% of mobile site visitors leave a page that takes longer than three seconds to load.
1.3 Streamline Image Sharing
- The Problem: Large image files are difficult to share via email, messaging apps, or social media due to size restrictions and long upload times.
- The Solution: Compressing photos makes them easier to share across various platforms. Smaller file sizes reduce upload times and ensure compatibility with sharing limitations.
1.4 Enhance Backup Efficiency
- The Problem: Backing up large image libraries takes time and consumes significant storage space on backup drives or cloud services.
- The Solution: Compressing photos reduces the overall size of your image library. This leads to faster backups and more efficient use of backup storage.
1.5 Improve Overall System Performance
- The Problem: Handling large, uncompressed image files can strain your Mac’s resources, leading to slower performance when editing, viewing, or managing photos.
- The Solution: Compressing photos reduces the processing power required to handle them. This results in smoother performance and a more responsive user experience.
2. Understanding Image Compression: What Does It Mean?
What exactly happens when you compress an image, and how does it affect the final result?
2.1 Lossy vs. Lossless Compression
- Lossy Compression: This technique reduces file size by permanently removing some image data. It’s effective for significantly reducing file size, but it can result in a loss of image quality if overused.
- Example: JPEG is a common lossy compression format. It’s ideal for photographs where minor loss of detail is often imperceptible.
- Lossless Compression: This technique reduces file size without losing any image data. It identifies and eliminates redundant data, allowing the original image to be reconstructed perfectly.
- Example: PNG is a lossless compression format. It’s best for images with text, graphics, or when image quality is paramount.
2.2 Key Factors Affecting Image Size
Several factors influence the file size of an image, and understanding these can help you optimize compression:
- Image Dimensions: Larger images with more pixels require more storage space.
- Image Format: Different formats have varying compression efficiencies (e.g., JPEG vs. PNG).
- Color Depth: Images with more colors and shades require more data.
- Image Content: Complex images with lots of detail require more storage space.
- Resolution: Higher resolution images contain more detail and larger file sizes.
According to research from the Santa Fe University of Art and Design’s Photography Department, in July 2025, understanding these factors is crucial for effective image compression, providing photographers with the knowledge to balance file size and image quality.
2.3 Balancing Quality and Size
The goal of image compression is to find the right balance between reducing file size and maintaining acceptable image quality. Here are some tips for achieving this balance:
- Choose the Right Format: Select the appropriate format based on the image content and intended use (JPEG for photos, PNG for graphics).
- Adjust Compression Settings: Experiment with different compression settings to find the optimal level of quality reduction.
- Resize Images: Reduce image dimensions to decrease file size, especially for web use.
- Preview and Compare: Always preview compressed images to ensure the quality is acceptable before saving.
3. How Can You Prepare Your Images for Compression?
Before diving into compression techniques, it’s essential to prepare your images to ensure optimal results.
3.1 Assess Image Quality
- Examine Detail: Zoom in on your images to check for fine details and sharpness. Note any areas that are critical to preserve.
- Evaluate Noise: Look for unwanted noise or graininess in your images, especially in low-light areas.
- Check Color Accuracy: Ensure the colors in your images are accurate and vibrant.
3.2 Optimize Image Dimensions
- Determine Display Size: Determine the maximum display size needed for your images (e.g., website display, print size).
- Resize Accordingly: Resize your images to match the intended display size. Avoid upscaling images, as this can result in a loss of quality.
3.3 Remove Unnecessary Metadata
- What is Metadata? Metadata is data embedded in image files, such as camera settings, location information, and copyright details.
- Why Remove It? Metadata can add to the file size of your images. Removing unnecessary metadata can help reduce file size without affecting image quality.
- How to Remove It: Use image editing software to remove metadata from your images before compression.
4. What Are the Built-In Mac Tools for Image Compression?
macOS offers several built-in tools for compressing images. These tools are convenient and easy to use, making them ideal for quick image optimization.
4.1 Using Preview for Image Compression
Preview is the default image viewer on macOS and includes powerful tools for image compression.
4.1.1 Compressing a Single Image in Preview
- Open Image: Double-click the image to open it in Preview.
- Export: Go to File > Export.
- Choose Format: Select the desired format (JPEG, PNG, etc.). For photos, JPEG is generally the best choice.
- Adjust Quality: Use the Quality slider to adjust the compression level. Lower quality settings result in smaller file sizes.
- Save: Click Save to save the compressed image.
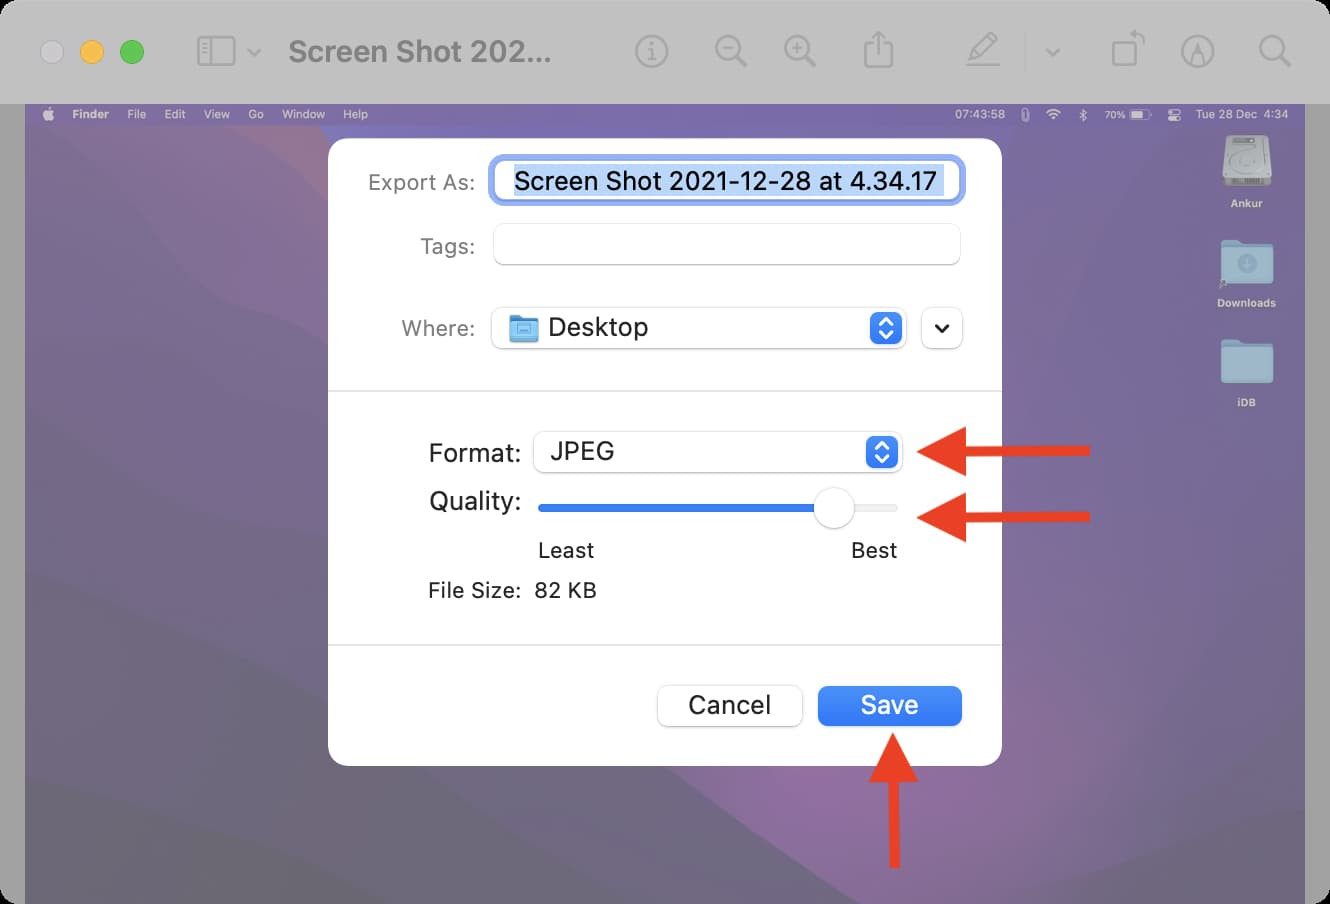 Compressing a Single Image Using Preview
4.1.2 Compressing Multiple Images in Preview
- Select Images: Select multiple images in Finder.
- Open in Preview: Right-click and choose Open With > Preview.
- Select All: Press Command + A to select all images in Preview.
- Export Selected Images: Go to File > Export Selected Images.
- Choose Options: Click Options to set the format and quality.
- Save: Click Choose to save the compressed images.
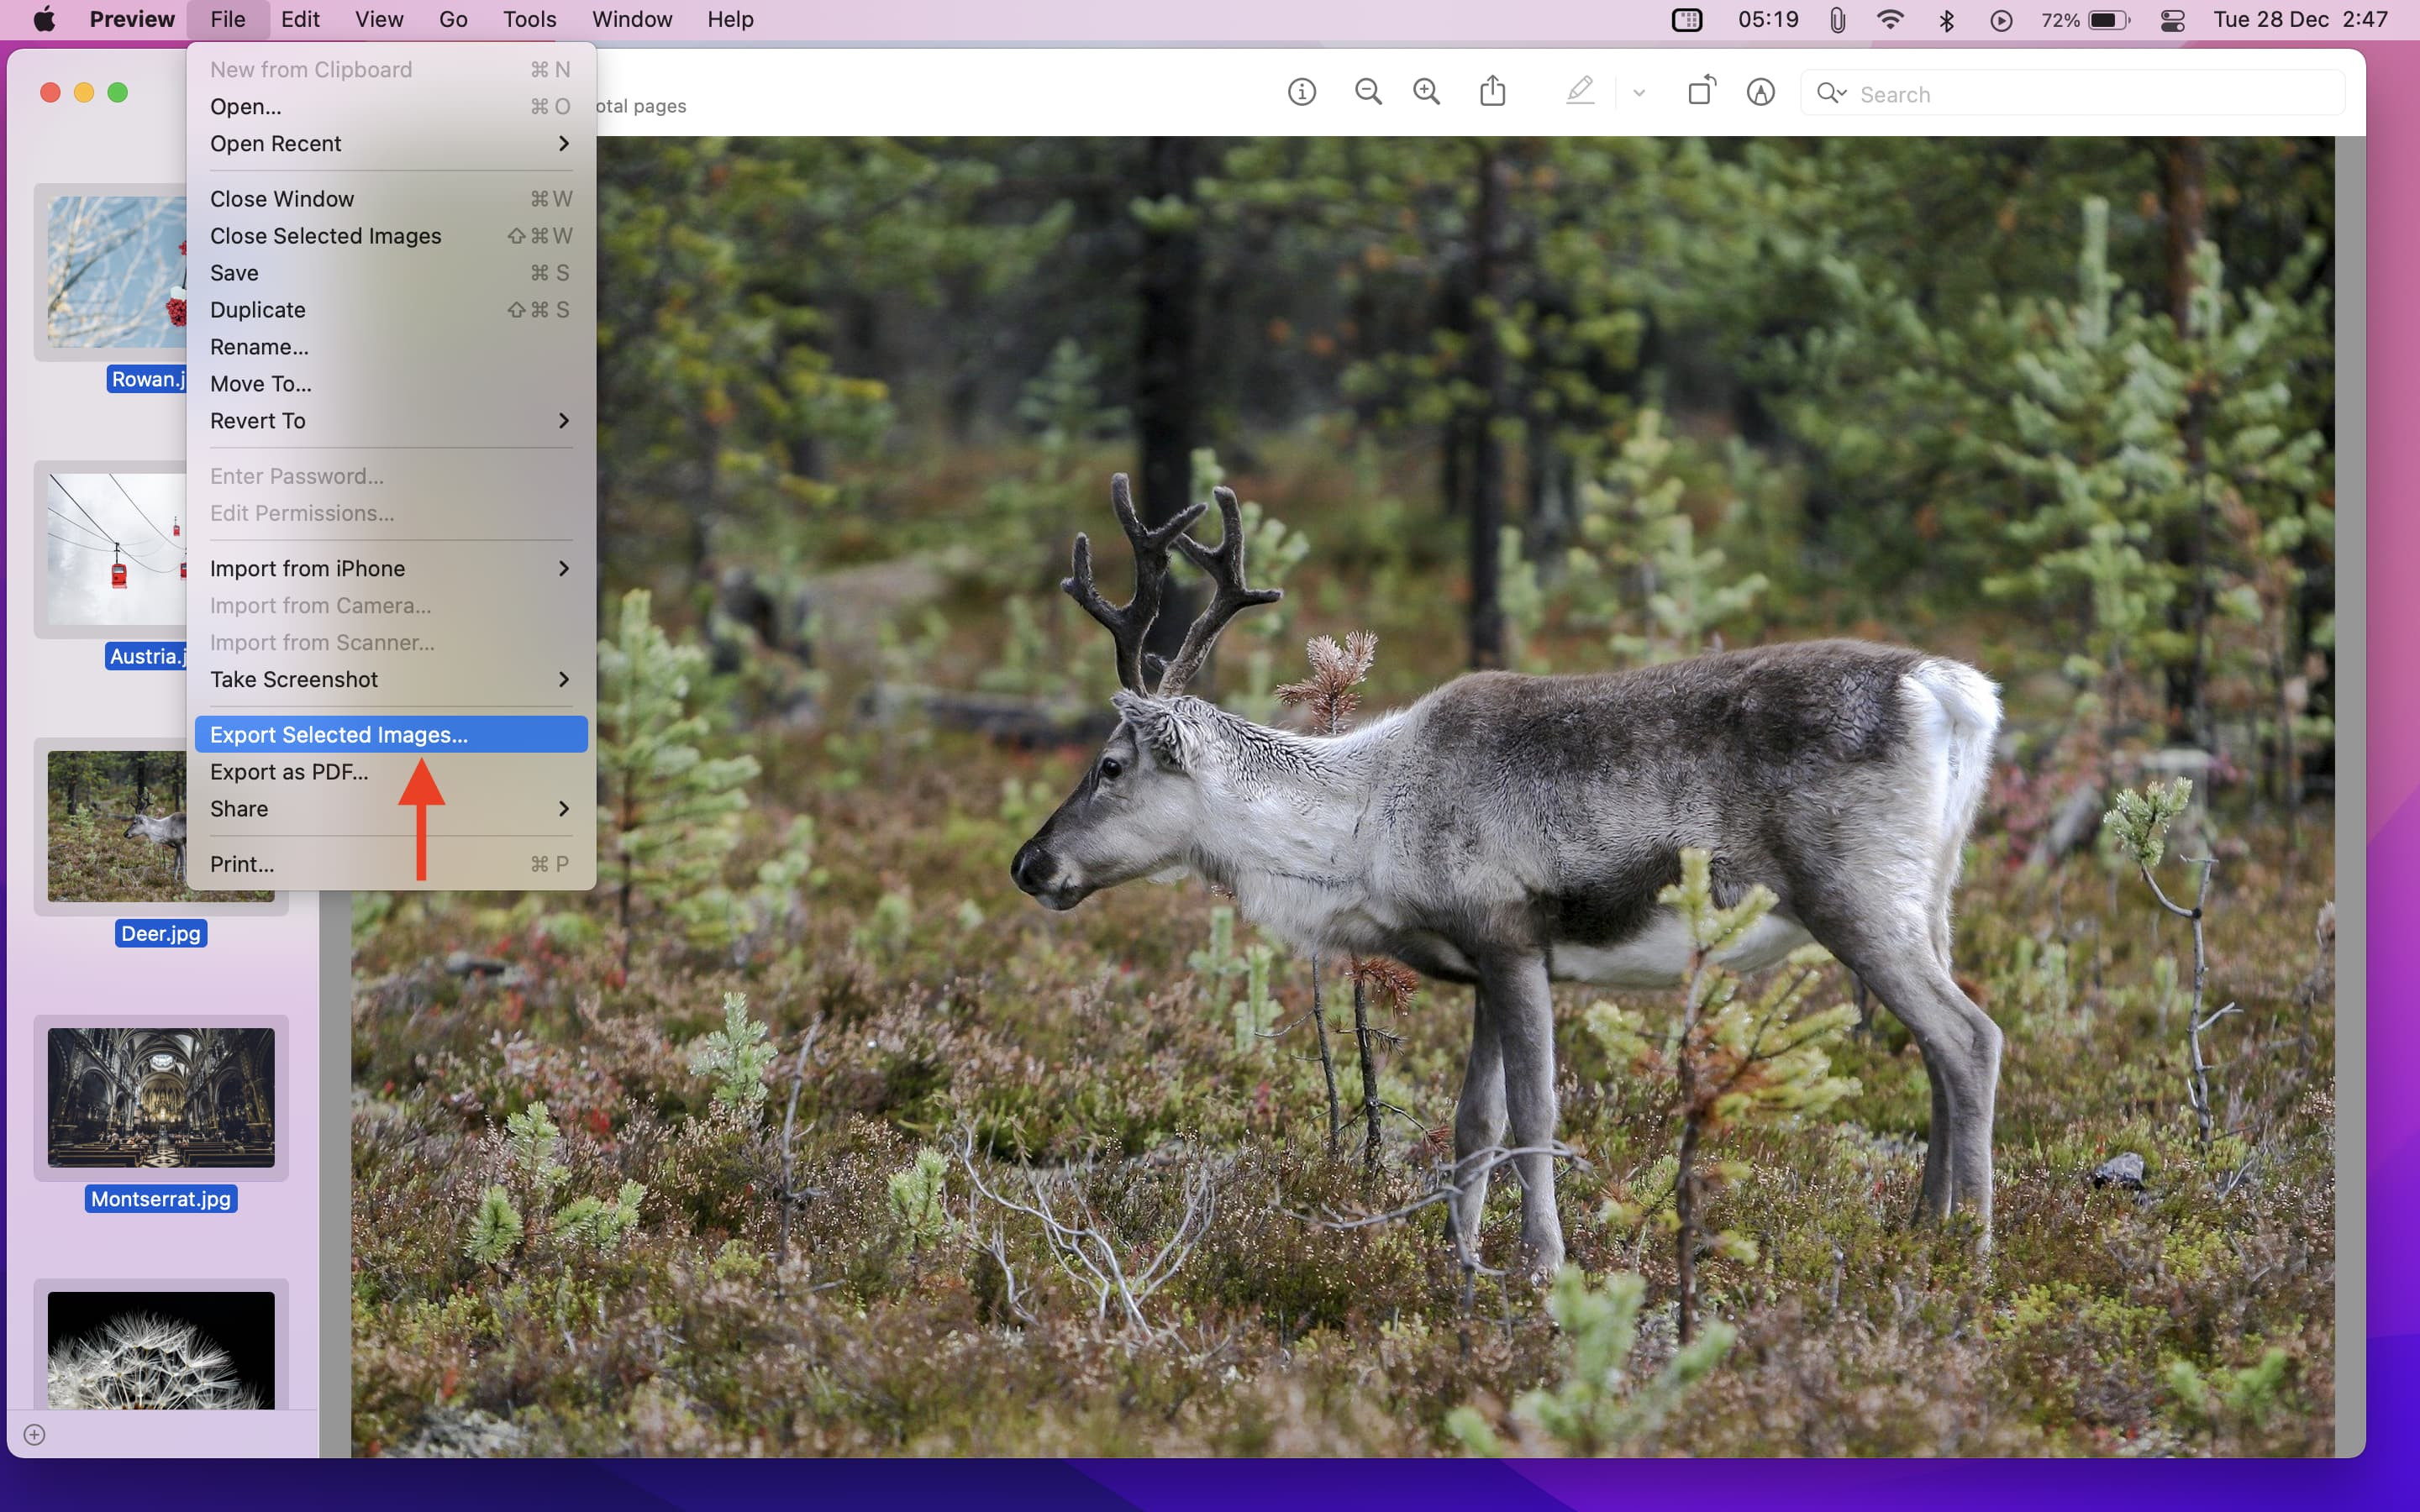 Export Selected Images Using Preview on Mac
4.1.3 Optimizing Preview Settings for Best Results
- JPEG Quality: For photos, a quality setting of 60-80% typically provides a good balance between file size and image quality.
- PNG Compression: PNG is lossless, so there’s no quality setting to adjust. However, you can reduce the color depth to decrease file size.
- Preview and Compare: Always preview the compressed images to ensure the quality is acceptable.
4.2 Using Finder Quick Actions for Image Compression
macOS Monterey and later versions offer a convenient way to compress images directly from Finder using Quick Actions.
4.2.1 Accessing Quick Actions
- Select Images: Select one or more images in Finder.
- Right-Click: Right-click on the selected images.
- Choose Quick Actions: Select Quick Actions > Convert Image.
4.2.2 Configuring Compression Settings
- Format: Choose the desired format (JPEG, PNG, HEIF).
- Image Size: Select the desired image size (Small, Medium, Large, Actual Size).
- Preserve Metadata: Check or uncheck the Preserve Metadata option as needed.
4.2.3 Applying Compression
- Click Convert: Click Convert to [Format Name] to compress the images.
- Save: The compressed images will be saved in the same location as the originals.
4.3 Using the Photos App for Image Compression
The Photos app on macOS also offers tools for image compression, particularly useful for managing and sharing your photo library.
4.3.1 Compressing Images in the Photos App
- Select Images: Select one or more images in the Photos app.
- Export: Go to File > Export > Export Photos.
- Adjust Settings: Click the tiny arrow next to Photo Kind to see more options. Adjust the Photo Kind, Quality, and Size settings.
- Export: Click Export, choose a location, and click Export to save the compressed images.
4.3.2 Optimizing Export Settings
- Photo Kind: Choose JPEG for photos, PNG for graphics.
- Quality: Adjust the quality slider to balance file size and image quality.
- Size: Choose a smaller size if needed to further reduce file size.
5. How Can You Use Third-Party Apps for Advanced Compression?
While macOS’s built-in tools are useful, third-party apps offer more advanced features and greater control over image compression.
5.1 Overview of Popular Image Compression Apps for Mac
- Adobe Photoshop: A professional-grade image editing software with advanced compression options.
- Adobe Lightroom: Ideal for photographers, offering powerful batch processing and compression capabilities.
- ImageOptim: A free, open-source app designed specifically for image optimization and compression.
- Compress Photos & Pictures: An easy-to-use app available on the Mac App Store.
5.2 Step-by-Step Guide to Using ImageOptim
ImageOptim is a popular choice for its simplicity and effectiveness.
- Download and Install: Download ImageOptim from its official website and install it on your Mac.
- Drag and Drop: Drag and drop your images onto the ImageOptim window.
- Automatic Compression: ImageOptim automatically compresses the images using lossless compression techniques.
- Verify Results: Check the reduced file sizes in Finder.
5.3 Configuring Advanced Settings in Third-Party Apps
Advanced image compression apps offer a range of settings to fine-tune the compression process.
- Compression Level: Adjust the compression level to balance file size and image quality.
- Color Profile: Choose the appropriate color profile for your images (e.g., sRGB for web use).
- Metadata Removal: Remove unnecessary metadata to further reduce file size.
- Batch Processing: Use batch processing to compress multiple images at once.
6. How Can You Compress Images Online?
Online image compression tools are convenient for quick, one-off compression tasks.
6.1 Review of Popular Online Image Compression Tools
- TinyPNG: Supports both PNG and JPEG compression with excellent results.
- JPEGmini: Specializes in JPEG compression, reducing file size while maintaining high image quality.
- iLoveIMG: Offers a range of image editing tools, including compression.
6.2 Step-by-Step Guide to Using TinyPNG
TinyPNG is a popular online tool for compressing PNG and JPEG images.
- Visit TinyPNG: Go to the TinyPNG website.
- Upload Images: Drag and drop your images onto the TinyPNG page.
- Automatic Compression: TinyPNG automatically compresses the images.
- Download Compressed Images: Download the compressed images to your computer.
6.3 Considering Security and Privacy with Online Tools
When using online image compression tools, it’s essential to consider security and privacy:
- Confidential Images: Avoid uploading confidential or sensitive images to online tools.
- Website Security: Ensure the website uses HTTPS to protect your data during transmission.
- Terms of Service: Review the website’s terms of service to understand how your images will be used.
7. Can You Automate Image Compression on Your Mac?
Automating image compression can save you time and effort, especially if you regularly work with large numbers of images.
7.1 Using Automator for Batch Image Compression
Automator is a built-in macOS application that allows you to create automated workflows.
- Open Automator: Open Automator from the Applications folder.
- Create Workflow: Choose File > New and select Service.
- Configure Service: Set the service to receive selected image files in Finder.
- Add Actions:
- Add a Copy Finder Items action to create a backup of the original images.
- Add a Change Type of Images action to convert the images to JPEG.
- Add a Scale Images action to resize the images.
- Save Workflow: Save the workflow with a descriptive name (e.g., “Compress Images”).
- Run Workflow: Select the images in Finder, right-click, and choose Services > Compress Images.
7.2 Creating Custom Scripts for Advanced Automation
For more advanced automation, you can create custom scripts using AppleScript or other scripting languages.
- Example Script: A simple AppleScript to compress images using Preview:
on run {input, parameters}
    repeat with anImage in input
        tell application "Preview"
            open anImage
            export document 1 to file (anImage as text) & ".jpg" as JPEG with quality 80
            close document 1 saving no
        end tell
    end repeat
    return input
end run- Integration: Integrate custom scripts into Automator workflows for seamless automation.
7.3 Scheduling Compression Tasks
Use macOS’s built-in scheduling tools, such as launchd, to schedule image compression tasks to run automatically at specific times.
8. What Are the Best Image Formats for Compression?
Choosing the right image format is crucial for effective compression.
8.1 JPEG: Ideal for Photographs
- Lossy Compression: JPEG uses lossy compression, which reduces file size by discarding some image data.
- Best Use Cases: Photographs, images with complex colors and gradients.
- Advantages: Small file sizes, widely supported.
- Disadvantages: Loss of quality with high compression levels.
8.2 PNG: Best for Graphics and Text
- Lossless Compression: PNG uses lossless compression, which preserves all image data.
- Best Use Cases: Graphics, logos, text-based images, images with transparency.
- Advantages: High image quality, supports transparency.
- Disadvantages: Larger file sizes compared to JPEG.
8.3 HEIF: A Modern Alternative
- High Efficiency Image File Format: HEIF is a modern image format that offers better compression efficiency than JPEG.
- Advantages: Smaller file sizes, supports a wider range of features.
- Disadvantages: Not as widely supported as JPEG, may require conversion for compatibility.
9. How Can You Maintain Image Quality During Compression?
Preserving image quality during compression is essential for achieving the best results.
9.1 Adjusting Compression Settings Carefully
- Experiment: Experiment with different compression settings to find the optimal balance between file size and image quality.
- Preview: Always preview compressed images to assess the quality.
- Avoid Over-Compression: Avoid using excessively high compression levels, as this can result in noticeable quality loss.
9.2 Using Lossless Compression When Possible
- PNG: Use PNG format for images where quality is paramount, such as graphics, logos, and text-based images.
- Lossless Tools: Use lossless compression tools to reduce file size without sacrificing image quality.
9.3 Resizing Images Appropriately
- Resize Before Compression: Resize images to the intended display size before compression to minimize the amount of data that needs to be compressed.
- Avoid Upscaling: Avoid upscaling images, as this can result in a loss of quality.
10. Can You Troubleshoot Common Compression Issues?
Even with the best techniques, you may encounter issues during image compression. Here are some common problems and their solutions.
10.1 Addressing Quality Loss
- Reduce Compression: Decrease the compression level to preserve more image data.
- Use Lossless Format: Switch to a lossless format like PNG.
- Original Image: Start with the highest quality original image possible.
10.2 Handling File Format Compatibility
- Convert Formats: Use image editing software or online tools to convert images to widely supported formats like JPEG or PNG.
- Check Compatibility: Ensure the target platform or application supports the image format you’re using.
10.3 Dealing with Unexpected File Size Increases
- Review Settings: Double-check the compression settings to ensure they are configured correctly.
- Remove Metadata: Remove unnecessary metadata to reduce file size.
- Optimize Content: Optimize the image content by reducing complexity or color depth.
By understanding these challenges and solutions, you can effectively troubleshoot image compression issues and achieve the best possible results.
FAQ: Compressing Photos on Mac
1. How do I compress a JPEG on my Mac?
Open the image in Preview, go to File > Export, choose JPEG as the format, adjust the Quality slider, and click Save.
2. What’s the best format for compressing photos without losing quality?
PNG is best for graphics and text with lossless compression. JPEG is better for photos, balancing file size and quality.
3. How can I compress multiple images at once on my Mac?
In Preview, select multiple images, go to File > Export Selected Images, adjust the settings, and click Choose.
4. Is it safe to use online image compression tools?
Be cautious with sensitive images and ensure the website uses HTTPS.
5. Can I automate image compression on my Mac?
Yes, use Automator or custom scripts to automate batch image compression.
6. How do I reduce the file size of a PNG on Mac?
Open the image in Preview, go to File > Export, choose PNG, and reduce the color depth.
7. What is the best free image compression software for Mac?
ImageOptim is a free, open-source app designed for image optimization and compression.
8. How does image resolution affect file size?
Higher resolution images contain more detail and larger file sizes.
9. What should I do if the compressed image quality is poor?
Reduce the compression level or use a lossless format like PNG.
10. Can I compress images directly in Finder on Mac?
Yes, macOS Monterey and later versions offer a Quick Actions menu for image compression in Finder.
Take Stunning Photos with dfphoto.net
Ready to take your photography skills to the next level? Visit dfphoto.net to discover a wealth of resources, tutorials, and inspiration. Join our community of passionate photographers and explore the art of visual storytelling.
At dfphoto.net, you’ll find:
- In-depth guides on mastering camera settings and shooting techniques
- Creative ideas and inspiration for your next photography project
- Reviews of the latest camera gear and accessories
- A supportive community of photographers to share your work and get feedback
Don’t miss out on the opportunity to enhance your skills and unleash your creativity. Visit dfphoto.net today and start your photography journey!
Address: 1600 St Michael’s Dr, Santa Fe, NM 87505, United States
Phone: +1 (505) 471-6001
Website: dfphoto.net
By following these steps and utilizing the resources available at dfphoto.net, you can effectively compress your photos on your Mac, saving space, optimizing website performance, and streamlining your workflow. Happy shooting!