As photo quality and screen resolutions advance, image file sizes can quickly become substantial, often reaching several megabytes. These large files consume valuable storage space on your Mac, iCloud, or SSD and can significantly slow down sharing via messaging apps, email, and online platforms. Learning How To Compress A Photo On Mac is essential for efficient digital file management and sharing.
While compressing images does slightly reduce image quality, in most cases, the difference is barely noticeable. This guide explores seven straightforward methods to effectively reduce image file size on your Mac, ensuring you save space without significantly compromising visual quality.
Understanding Image File Size: Key Factors
Before diving into compression techniques, it’s helpful to understand what influences image file size. Several factors contribute to the size of your photo files:
- Image Dimensions: The pixel dimensions (width and height) directly impact file size. A larger image, such as 1920 x 1080, will naturally be bigger than a smaller one, like 720 x 480.
- Image Format: Different file formats handle image data differently. JPG or JPEG generally results in smaller file sizes compared to PNG for most photographs. However, PNG is often superior for images with text or graphics due to its lossless compression.
- Image Content and Color Depth: The complexity of the image and the range of colors also play a role. Images with less color variation or large areas of solid color may compress more effectively.
- Camera Type: Photos from high-resolution cameras, like your iPhone’s primary camera, will typically be larger than those from front-facing cameras or webcams.
- Flash: Using flash can increase file size due to the added detail and light information captured.
- Screen Resolution (for Screenshots): Screenshots taken on high-resolution displays, like Retina MacBooks, will be larger because they capture more pixels.
Knowing these factors helps you understand why your image files are large and how compression methods work to reduce their size.
7 Proven Ways to Compress Photos on Your Mac
Here are seven effective methods to compress your photos on a Mac, ranging from built-in tools to online services:
1. Change Image Format for Compression
One of the simplest ways to reduce photo file size is by changing the image format. Apple devices, by default, often save screenshots and some images in PNG format, which preserves image quality but results in larger files.
For images that are primarily photographs or graphics, converting from PNG to JPG can significantly reduce file size, often with minimal visual quality loss. In some instances, this format conversion can lead to file size reductions of up to 98%.
You can change image formats using several methods described below, including Finder Quick Actions and Preview. If you frequently take screenshots, consider using a Terminal command to change the default screenshot format on your Mac to JPG for automatic file size reduction.
2. Resize the Image to Reduce File Size
Resizing an image, essentially reducing its dimensions (width and height), is another effective compression technique. If you have a high-resolution image, such as 4000 x 2800 pixels, it will likely be several megabytes in size. Reducing the dimensions to something like 2000 x 1400 pixels can substantially decrease the file size.
To check the dimensions of an image on your Mac, select the image file in Finder and press Command + I to open the “Get Info” window. The dimensions will be listed under “Dimensions.”
For even smaller file sizes, you can combine resizing with other compression methods, like format conversion or quality reduction.
3. Quick Compress with Finder Quick Actions
macOS Monterey and later versions offer a convenient way to compress images directly from Finder using Quick Actions. This method allows for quick, right-click compression without opening any applications.
Steps to compress images using Finder Quick Actions:
- Select Images: Choose one or multiple images you want to compress in Finder.
- Right-Click (or Control-Click): Right-click on the selected image(s).
- Navigate to Quick Actions: In the context menu, select Quick Actions > Convert Image.
- Choose Format (Optional): The default format is JPEG, which is generally suitable for compression. You can change it if needed. Decide whether to “Preserve metadata” to keep photo details like date, time, and location.
- Select Image Size: Click the Image Size dropdown menu and choose from Small, Medium, Large, or Actual Size. Note that “Actual Size” primarily reduces file size when changing the format (e.g., PNG to JPEG).
- Convert: Click Convert to [Format Name] to compress the image and save a new, smaller file in the same location as the original.
Alt text: Convert image using Quick Actions on Mac, showing the Convert Image menu options for format and size selection.
Tip: To easily identify large image files, click “Size” at the top of the Finder window to sort files by size, allowing you to quickly locate images that would benefit most from compression.
4. Leverage Preview for Image Compression
Preview, macOS’s built-in image viewer and editor, provides robust tools for compressing both single images and batches of photos. It offers control over format and quality, making it a versatile option for managing image file sizes.
Compressing a Single Image in Preview
Steps to compress a single image using Preview:
- Open in Preview: Double-click the image to open it in the Preview application.
- Export: From the top menu bar, click File > Export.
- Choose Format: Select your desired format. JPEG is recommended for smaller file sizes. HEIC offers even smaller files but may have compatibility limitations.
- Adjust Quality: Drag the “Quality” slider to the left to reduce image quality and file size. Observe the estimated file size as you adjust the slider.
- Save: Once satisfied with the quality and file size, click Save.
Tip: After saving a compressed image, review its quality. If it’s too low, repeat the process with the original image and adjust the quality slider more conservatively.
Alt text: Export options in Preview on Mac, highlighting the format and quality settings for reducing image file size.
Batch Image Compression in Preview
Preview also excels at compressing multiple images simultaneously, saving you time when dealing with large photo collections.
Steps for batch image compression in Preview:
- Select Multiple Images: In Finder, select multiple images by holding the Command key while clicking or using Command + A to select all images in a folder.
- Open in Preview: Right-click the selected images and choose Open With > Preview.
- Select Thumbnails in Preview: In Preview, ensure all image thumbnails are selected in the left sidebar (use Command + A if needed).
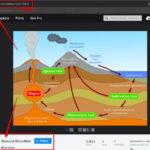
- Export Selected Images: From the top menu bar, click File > Export Selected Images.
- Show Options: Click Show Options or Options at the bottom of the export dialog.
- Configure Format and Quality: Set the desired format and adjust the quality slider to your preferred compression level.
- Choose and Save: Click Choose to select a save location and compress all images in batch.
 Export Selected Images in Preview on Mac
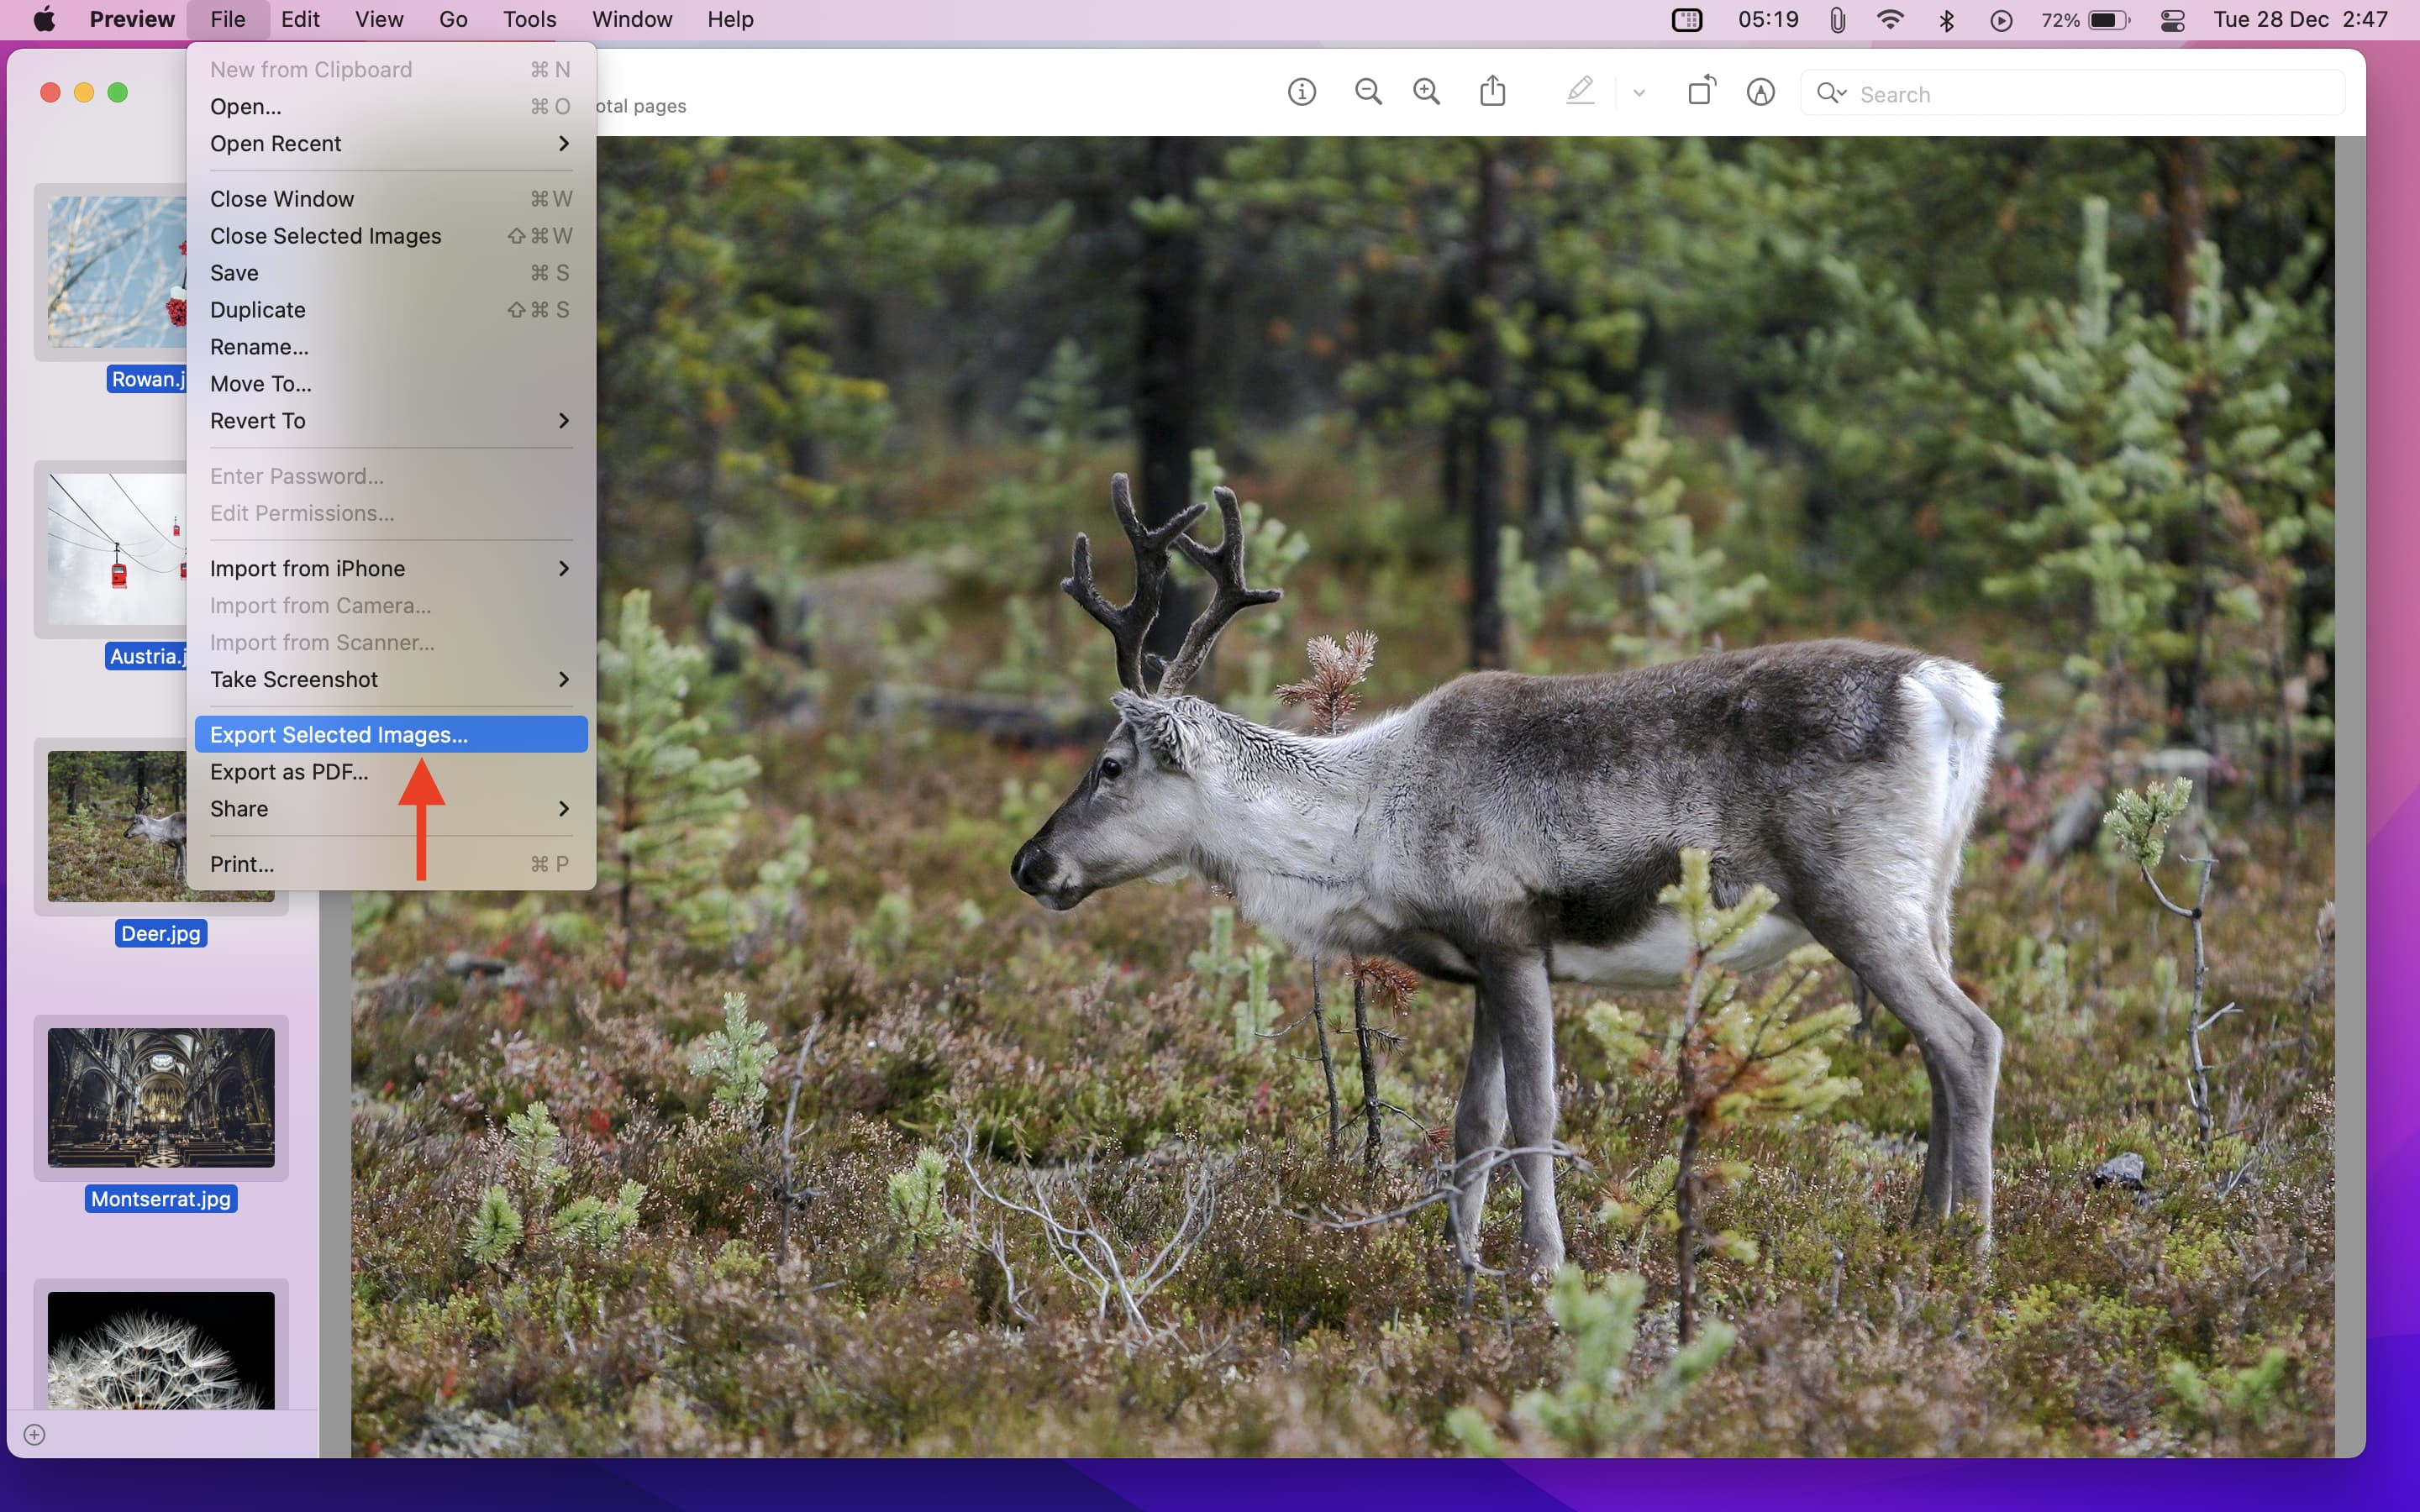
Troubleshooting “Cannot export selected items” Error in Preview
If you encounter the error message “Cannot export selected items” in Preview, it usually indicates that you’ve selected images of different formats for batch export with format conversion.
Solution:
- Click Ok on the error message.
- Deselect Conflicting Formats: Hold the Command key and click on thumbnails in the Preview sidebar to deselect images that are in a different format than the majority.
- Retry Export: Repeat the “Export Selected Images” steps with the remaining images.
Alternatively, sort your images by format in Finder (“Kind” column) and compress images of each format separately in Preview to avoid this issue.
 Cannot export selected items Preview Mac
5. Utilize the Photos App for Compression
The macOS Photos app also offers built-in image compression capabilities when exporting photos. This method is useful for compressing images directly from your photo library.
Steps to compress photos using the Photos app:
- Select Photos: Open the Photos app and select one or more photos you want to compress.
- Export: Press Command + Shift + E or go to File > Export > Export Photos from the menu bar.
- Show Export Options: Click the tiny arrow next to “Photo Kind” to expand and reveal more export options.
- Adjust Settings: Configure Photo Kind (JPEG for compression), Quality (adjust slider for desired quality/size balance), and Size (choose from Small, Medium, Large, or Actual Size).
- Export and Save: Click Export, choose a save location, and click Export again to compress and save the photos.
6. Explore Dedicated Photo Compression Apps
For more advanced compression options and features, consider using dedicated photo compression applications available on the Mac App Store. Search for terms like “compress images” to find various apps.
One example is “Compress Photos & Pictures,” an app originally developed for iPhone and iPad by iDB, which can also be installed on Apple Silicon Macs. These apps often offer features like customizable compression levels, batch processing, and more specialized compression algorithms.
Alt text: Compress Photos & Pictures app interface on Mac, showing options for adjusting compression settings and importing photos for compression.
7. Online Image Compression Tools
Numerous online services provide image compression, offering a convenient option, especially for quick, one-off compressions or when you don’t want to install additional software.
A simple web search for “compress images online” will reveal many such websites. Popular and reliable options include:
- iLoveIMG (iloveimg.com)
- TinyPNG (tinypng.com)
- CompressJPEG (compressjpeg.com)
These sites typically allow you to upload images directly from your browser and download compressed versions. However, be mindful of privacy when using online tools, especially for sensitive images. Avoid uploading personal or confidential photos to these services and opt for offline methods for such images.
Conclusion
Compressing photos on your Mac is a straightforward process that can significantly free up storage space and make sharing images easier. Whether you prefer the quick convenience of Finder Quick Actions, the versatility of Preview, the Photos app integration, dedicated apps, or online tools, there’s a method to suit every need. For everyday compression tasks, Finder Quick Actions and Preview offer excellent built-in solutions. Experiment with these techniques to find the best approach for managing your image file sizes and optimizing your digital workflow.