Are you struggling to create captivating photographs? How To Compose A Photo is key to visual storytelling and dfphoto.net offers a comprehensive guide to help you master this essential skill, turning everyday scenes into stunning works of art. Learn the core principles of photographic arrangement, explore advanced methods, and understand how they impact the emotional resonance of your images. Ready to transform your photography? Let’s dive in and discover the secrets to creating visually compelling photographs. With insights into visual elements, we’ll ensure your images capture attention.
1. Why Is Composition Important In Photography?
Composition transforms ordinary scenes into engaging photographs. Just as random piano keys produce noise, disorganized elements in a photo create confusion. Proper arrangement brings harmony, guiding the viewer’s eye and enhancing the image’s narrative. Composition elevates a simple snapshot into a captivating story.
Consider a messy room versus an organized space. One is chaotic and hard to navigate, while the other offers clarity and ease. Similarly, the human body’s composition ensures both functionality and beauty.
Key Takeaway: Effective composition is not just about aesthetics; it’s about directing the viewer’s gaze, conveying a message, and evoking emotions. It’s the arrangement of visual elements.
2. Painting Composition vs. Photography Composition: What’s The Difference?
Both painting and photography are visual arts, but time is a significant differentiator. Painters can spend weeks perfecting their compositions, adjusting every detail to achieve their vision. Photographers often have mere seconds to capture a scene, especially in genres like landscape, street, and sports photography.
Ilya Repin Zaporozhian Cossacks
The difference in time allocation means photographers must quickly assess and compose their shots, often relying on instinct and a deep understanding of compositional principles. According to research from the Santa Fe University of Art and Design’s Photography Department, in July 2025, the ability to make rapid compositional decisions is crucial for capturing fleeting moments. While portrait, macro, and still life photography allow more deliberate composition, landscape and street photographers need to be decisive. Therefore, always take extra shots to ensure you capture the best possible image.
Key Takeaway: Photographers need to develop a sharp eye and quick decision-making skills to create compelling compositions under time constraints. Quick thinking is everything.
3. What Are The Key Concepts And Principles Of Composition?
Understanding the core concepts and principles of composition helps photographers create impactful images. These elements work together to guide the viewer’s eye, convey meaning, and evoke emotions.
3.1. Frame Shape: How Does It Affect The Image?
The frame shape is the first element affecting perception. Historically, the rectangle has been the standard. The 3:2 aspect ratio, derived from the 36 x 24mm sensor size, is common due to how our eyes are positioned horizontally. A square frame presents a unique challenge due to its stability and lack of dynamics, best suited for symmetrical subjects or patterns.
 frame shapes
Key Takeaway: The frame shape influences the stability and dynamics of a photograph, requiring careful consideration based on the subject. Choose a shape that enhances your subject’s qualities.
3.2. Vertical vs. Horizontal Alignment: Which One Should You Choose?
Choose a horizontal frame for horizontal compositional lines and a vertical frame for vertical lines. Breaking this rule can add tension, such as including a vertical subject in a horizontal frame with ample breathing space.
Key Takeaway: Align the frame with the dominant lines in your composition unless you intentionally want to create tension. Use alignment to emphasize your subject.
3.3. Filling The Frame: Why Is It Important?
Filling the frame ensures every part of the photo contributes to the story. Arrange elements to avoid crowded or empty spaces. Use the entire area to enhance harmony; if cropping improves the image, the original composition was lacking.
 fill the frame composition
Avoid bright, dark, or high-contrast elements near the edges, as they draw excessive attention. Similarly, positioning vertical lines near vertical edges or horizontal lines near horizontal edges can be distracting.
Key Takeaway: Utilize the entire frame to support the narrative, avoiding distractions and ensuring balance. Think of the frame as a canvas.
3.4. Visual Storytelling: How Do You Tell A Story Through Photos?
Visual storytelling is the heart of photography, conveying a message or narrative. It’s not just about snapping a picture; it’s about communicating a story through subject, context, and layout. This entire guide explores different means of visual storytelling, helping you craft compelling narratives.
 composition storytelling
Changing the context alters the story told by the image. Composition techniques are storytelling tools that add depth and meaning to your photographs.
Key Takeaway: Use composition as a tool to tell a story, ensuring your photographs communicate a message to the viewer. Every element should serve the narrative.
3.5. Point Of Interest: What Should Be The Main Focus?
Identify the main subject, whether an object, a mood, or a feeling. This point of interest is the hero of your story, around which the entire composition is built. It can be anything from a person to a color or a relationship between objects.
 point of interest relation
Key Takeaway: Define a clear point of interest to anchor the viewer’s attention and build your story around it. Make sure the subject stands out.
3.6. Breathing Space: How Much Space Should You Leave Around The Subject?
Give your subject breathing space by leaving an area around it, free from obstructions or frame edges. Objects near the edge can feel visually suffocated, disrupting the viewer’s experience. Manipulate breathing space to achieve specific effects.
 breathing space composition
Key Takeaway: Provide enough space around your subject to avoid visual suffocation and allow the viewer’s eye to move freely. Space enhances the subject.
3.7. Checking The Corners: Why Is It Important?
Always check the corners of your frame before capturing the image to eliminate distractions. Corners draw significant attention, and any object placed there can pull the viewer’s eye away from the main subject. Simplicity and clarity are key.
 check corners composition
Key Takeaway: Ensure corners are free from distracting elements to maintain focus on the primary subject. Keep your corners clean.
3.8. Checking The Background: What Should You Avoid?
Ensure the main subject is distinct from the background, free from distractions like branches appearing to protrude from the head. Prevent any elements from blending with or obscuring the point of interest.
Key Takeaway: Keep the background clean and uncluttered to make your subject stand out. Separation enhances clarity.
3.9. Simplifying: How Can Less Be More?
Exclude anything that doesn’t contribute to the story. Strive for clarity by removing distractions, competing elements, and overly bright areas. This process, known as subtraction, helps the viewer grasp the concept quickly.
Key Takeaway: Subtraction enhances clarity by removing unnecessary elements, allowing the viewer to focus on the essential message. Less is often more impactful.
3.10. Balance: How Do You Achieve It In Photography?
Balance in composition refers to the visual equilibrium within the frame. Balanced shots are generally desirable, but imbalance can intentionally increase tension or expressiveness. “Heavy” elements include dark, bright, high-contrast areas, and saturated zones.
 balance in photography composition
A dark mountain can be balanced by a bright-colored cloud. The visual weight increases with distance from the center, so avoid heavy objects near the edges unless balancing something larger.
Key Takeaway: Balance is crucial for harmony, but intentional imbalance can add tension and drama. Understand the weight of each element.
3.10.1. Static Balance: What Is It?
Static balance involves similar objects at equal distances from the visual center. For example, a red cloud on one side can balance a strong dark tree on the other.
 static balance photo
Key Takeaway: Static balance creates stability and symmetry, ideal for serene and harmonious compositions. Symmetry adds a sense of calm.
3.10.2. Dynamic Balance: How Does It Work?
Dynamic balance is achieved with different-sized objects at varying distances from the center. This contrast creates equilibrium, making the composition visually interesting.
 dynamic balance picture
Key Takeaway: Dynamic balance uses contrast and asymmetry to create visually engaging compositions. Contrast adds visual interest.
3.11. Foreground, Middle-Ground, And Background: Why Are They Important?
Subdivide your photograph into foreground, middle-ground, and background to add depth. This transformation of the 3-D world into a 2-D image requires using layers to create volume and dimensionality.
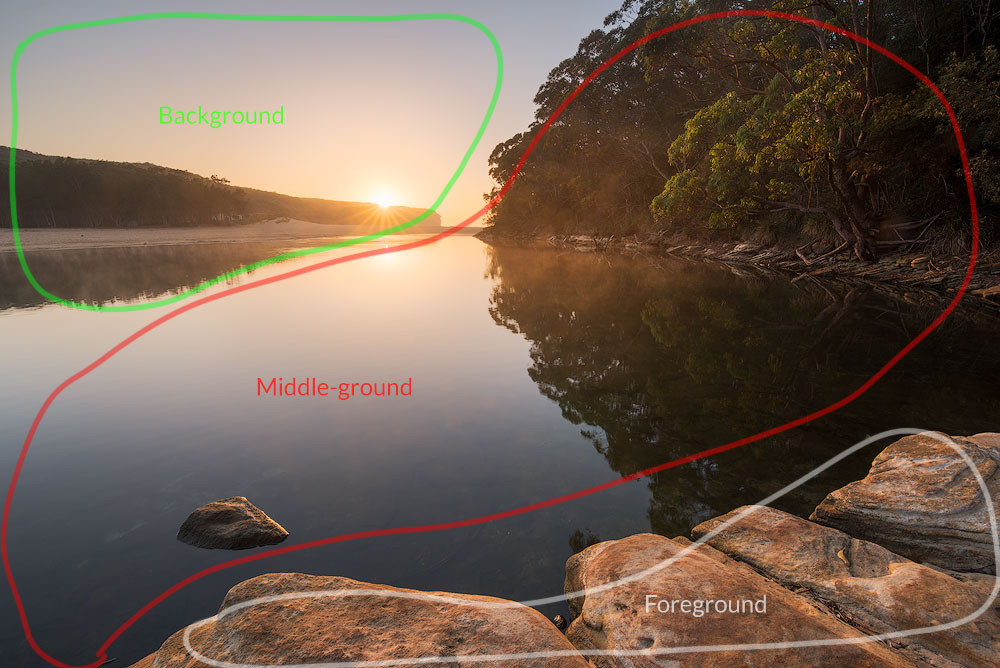 layers in landscape photography
Three layers allow the viewer to look smoothly into the shot. One layer can appear flat, while two layers might compete. In a seascape, include distant cliffs and sky as a background, the sea as a middle-ground, and rocks or beach as a foreground.
Key Takeaway: Layers add depth and dimension, making the image more engaging and realistic. Use layers to guide the viewer’s eye.
4. What Are Essential Composition Techniques For Beginners?
Mastering composition techniques can significantly enhance your photography. These techniques provide a framework for arranging elements within your frame to create visually appealing and impactful images.
4.1. Leading Lines: How Can They Guide The Viewer’s Eye?
A leading line guides the viewer’s eye through the image, helping to tell a story and enhance understanding. Any line in the photo, such as a fence or cliff face, can serve as a leading line. Even a broken line made of separate objects can suggest a path.
 leading lines composition
Avoid splitting the frame with a line, especially a vertical line in the middle. Lines should keep the viewer’s eye within the frame.
Key Takeaway: Use leading lines to direct the viewer’s gaze and enhance the narrative. Make sure lines lead into the photo, not out of it.
4.2. Tension And Stability: How Do Lines Affect Mood?
Lines parallel to the edges (vertical and horizontal) add stability, while diagonals and triangles add dynamism and tension. Because our eyes are used to seeing horizontals and verticals, diagonals create a sense of instability.
 triangles composition
Use geometric shapes, especially triangles, to add dynamism. A composition made entirely of triangles will appear lively and energetic.
Key Takeaway: Use horizontal and vertical lines for stability, and diagonals and triangles for tension and dynamism. Balance these elements to achieve the desired mood.
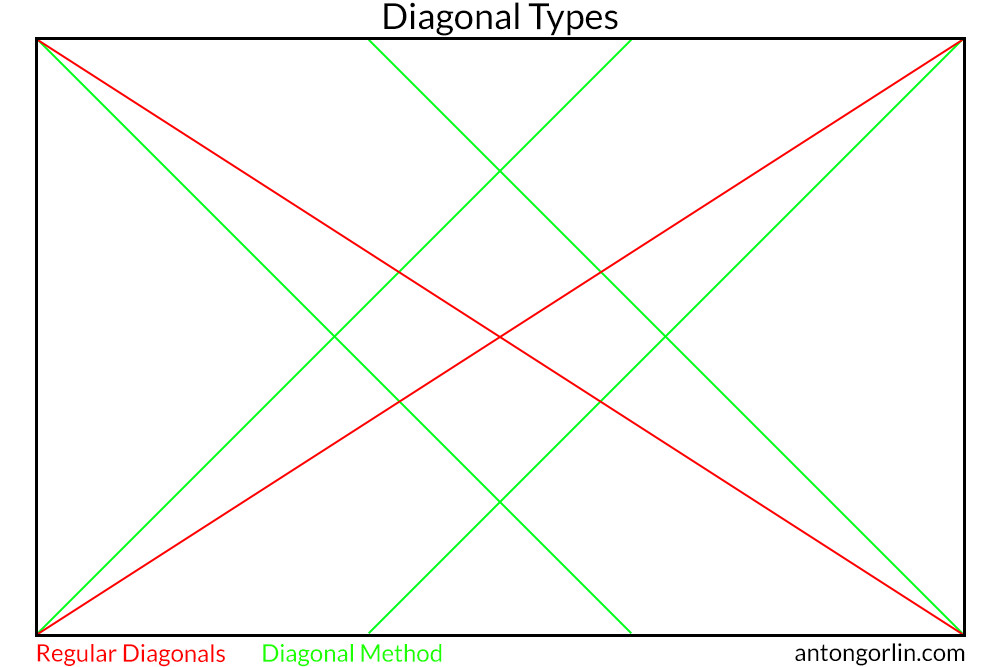
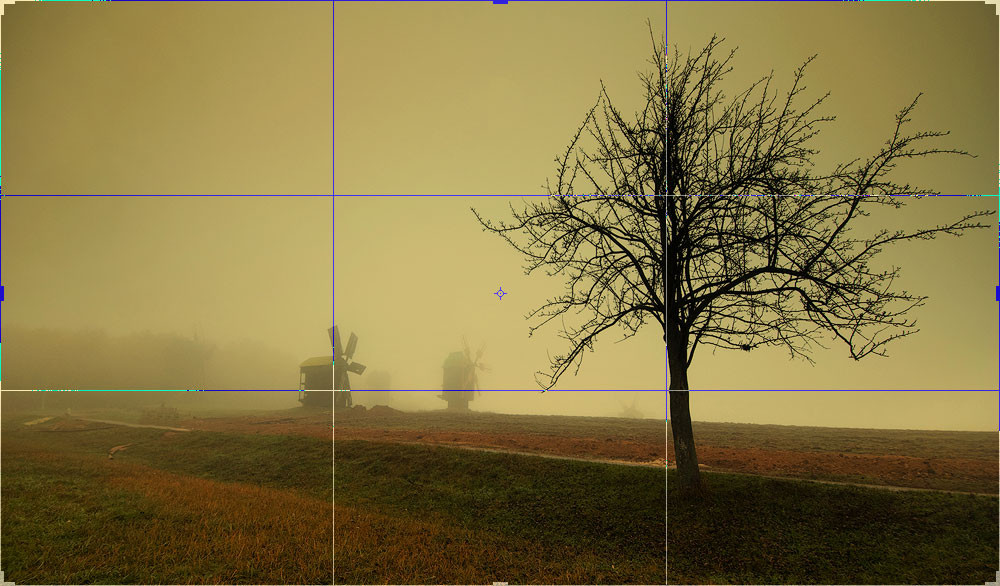
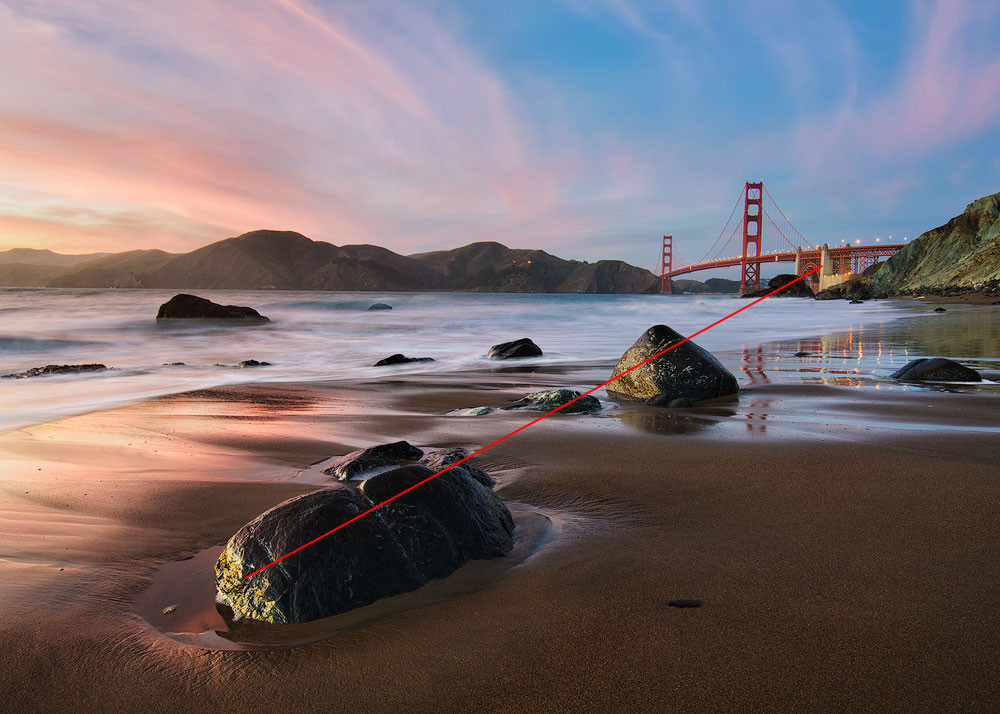
4.3. Diagonals: How Do You Create Dynamic Compositions With Them?
Diagonals are easy to create and add dynamism. A slight angle change transforms a horizontal line into a diagonal, guiding the viewer’s eye. Start diagonals from the corners to lead to a significant subject in the depth of the shot.
Two ways to place diagonals include:
- From one corner to another.
- Using the Diagonal Method, with lines from each corner at 45 degrees, forming a rhombus in the center.
 composition diagonals
Key Takeaway: Diagonals add dynamism and guide the eye, especially when starting from the corners and leading to the main subject. Use them to create visual interest.
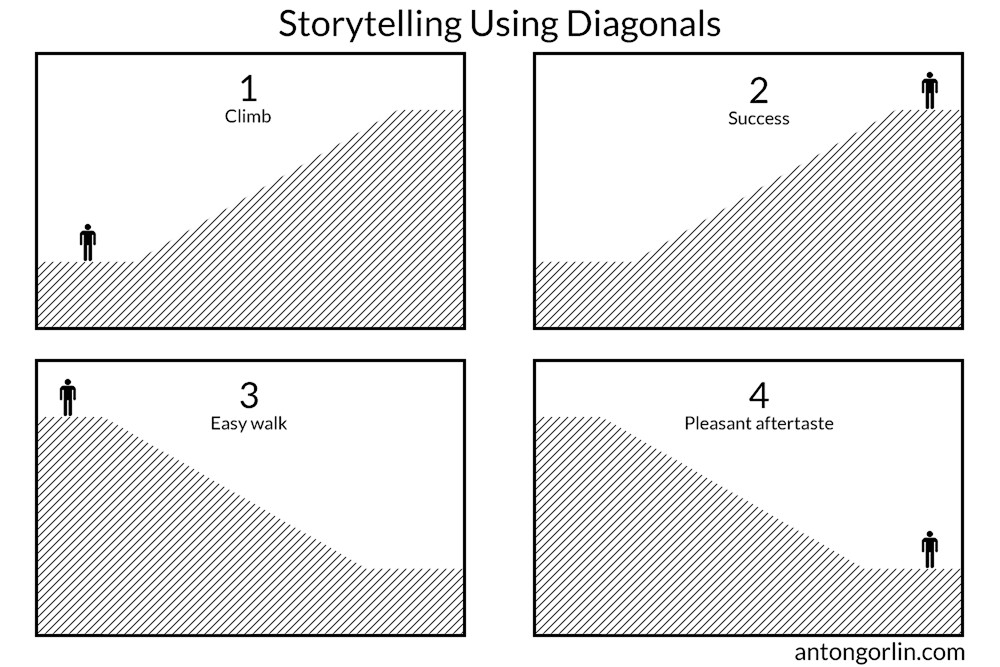
4.4. Ascending vs. Descending Diagonals: What Do They Mean?
The way elements are organized affects perception. Eyes typically scan left to right. A slope can be shown as a challenge or a smooth descent.
 diagonals storytelling
An ascending diagonal can represent a challenge, while a descending diagonal suggests an easy walk. Use these diagonals to add context and tell a story.
Key Takeaway: Ascending diagonals convey positivity and challenges, while descending diagonals suggest negativity and ease. Use them to enhance your narrative.
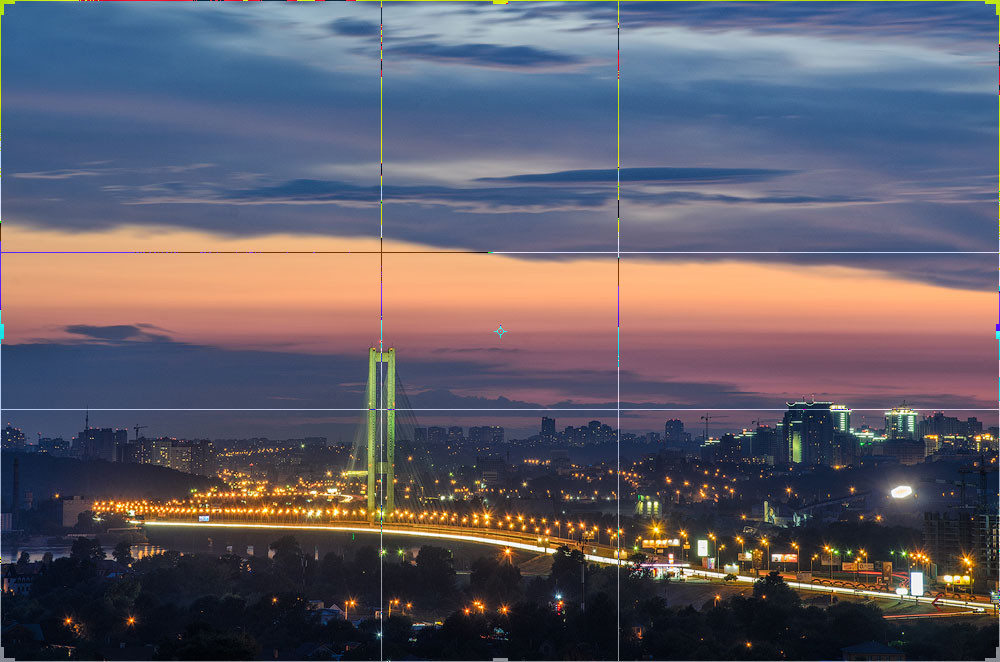
4.5. Rule Of Thirds: How Do You Use It Effectively?
The Rule of Thirds is a basic yet effective way to divide the frame. Split the photo into thirds, creating a grid, and place the main subject at one of the intersections. This positioning allows for smoother eye scanning.
 rule of thirds
Place important lines on the grid lines. This grid helps you position elements with visual relation but doesn’t explain dynamism or plane connections.
Key Takeaway: Use the Rule of Thirds to create balanced and visually appealing compositions. Position key elements at the intersections for better engagement.
4.6. Golden Rectangle: What Is It And How Do You Apply It?
The Golden Rectangle is based on the Golden Ratio and splits the frame into unequal parts, with grid lines closer to the center. It originates from natural proportions found in many things, including humans.
 golden ratio photo
Key Takeaway: Apply the Golden Rectangle for compositions that reflect natural proportions and create harmony. Follow the grid for a balanced layout.
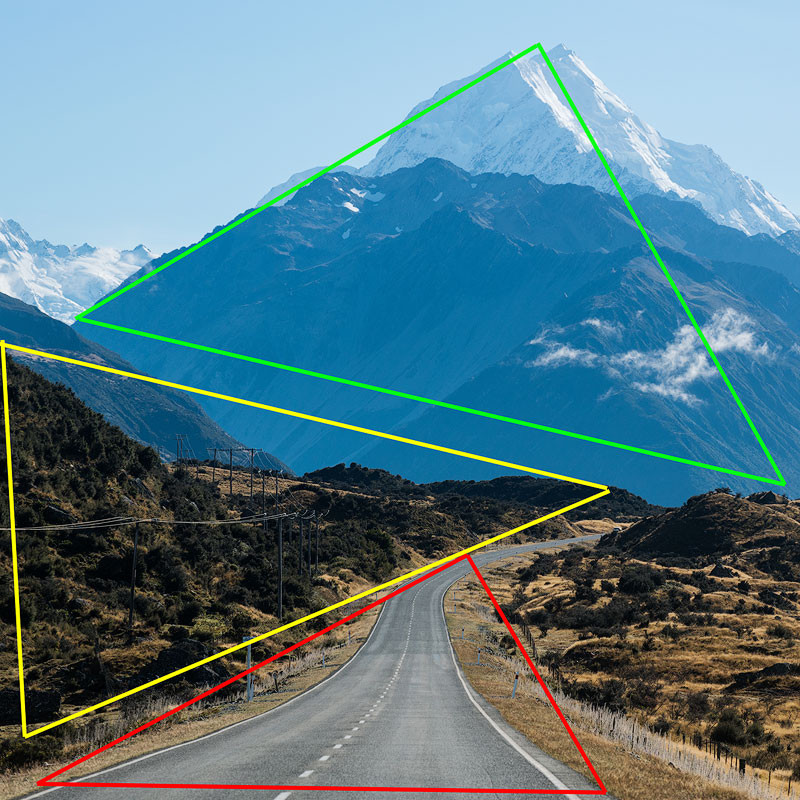
4.7. Golden Triangle: How Is It Different From The Golden Ratio?
The Golden Triangle, despite its name, is unrelated to the Golden Ratio. It involves drawing a diagonal from corner to corner, then two lines from the remaining corners at 90 degrees to the diagonal, forming four triangles.
 diagonal seascape photography composition
Objects should roughly align with these lines. The triangles are asymmetrical and can be flipped as needed.
Key Takeaway: Use the Golden Triangle to create dynamic compositions based on diagonal lines and triangles. Align key elements with the lines for impact.
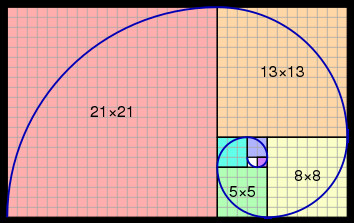
4.8. Golden Spiral: How Does It Relate To Nature?
The Golden Spiral is a self-repeating spiral with a constant growth ratio, approximated by Fibonacci numbers. This spiral appears in natural formations like galaxies and shells.
 fibonacci spiral
Objects should form a spiral, with the primary subject near the twisting point. This rule is flexible and doesn’t require precise calculations.
Key Takeaway: Use the Golden Spiral to create visually appealing compositions that mimic natural growth patterns. Place your main subject near the spiral’s center.
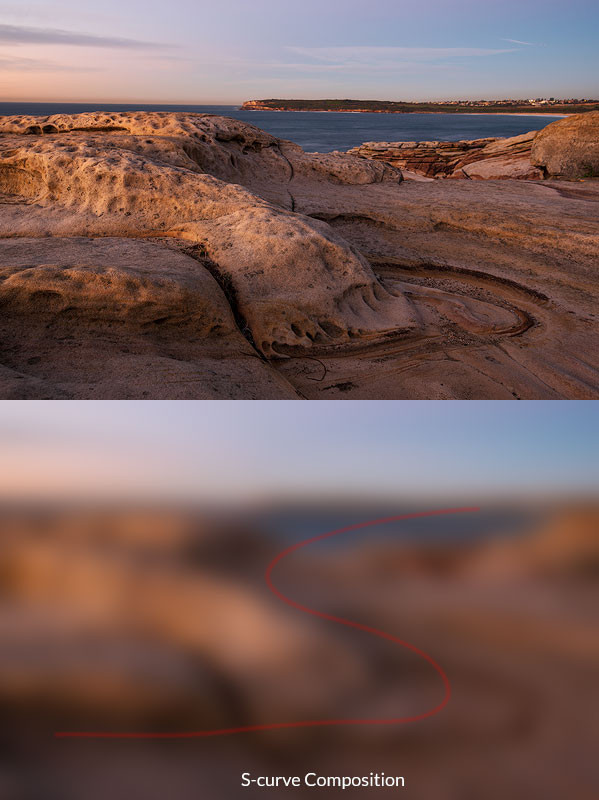
4.9. S-Shaped Curve: What Makes It Pleasing To The Eye?
An S-shaped curve is dynamic and pleasing, allowing the eye to browse all parts of the shot and leading to the main subject. Unlike a direct diagonal, the curve is gentle and natural.
 s shape seascape
Key Takeaway: Incorporate S-shaped curves to create a smooth and engaging visual flow, guiding the viewer through the image. Curves add a sense of grace.
4.10. Central Composition: When Is It Appropriate?
While often discouraged, central composition is effective when the photo is solely about the subject and everything else is secondary. It requires strong composition lines pointing at the subject and prominent symmetry.
 central composition image
In central composition, the subject must be the center of gravity, with no competing elements. Also, putting the horizon in the middle works when one part is significantly stronger, or there is symmetry, or the horizon is not a signature line.
Key Takeaway: Use central composition when the subject is dominant and symmetrical, with strong lines directing attention to it. Symmetry enhances balance.
4.11. Symmetry: How Does It Relate To Balance?
Look for symmetry in architecture and reflections. Humans are symmetrical, which is why we find it appealing. Use symmetry with central composition for balanced images.
 symmetry photo reflections
Key Takeaway: Incorporate symmetry for balanced and visually pleasing compositions, especially with reflections and architecture. Symmetry brings a sense of order.
4.12. Resemblance: How Do You Spot Similarities Between Objects?
Find resemblance between different objects, spotting similar shapes and accentuating them with composition. Use other rules to build the photo once you’ve noticed similarities.
 resemblance in framing
The bigger the difference between objects, the better the visual effect. Resemblance can be straight or mirrored, of different sizes but the same shape.
Key Takeaway: Use resemblance to create visual connections between disparate objects, enhancing the photo’s narrative. Spotting patterns adds depth.
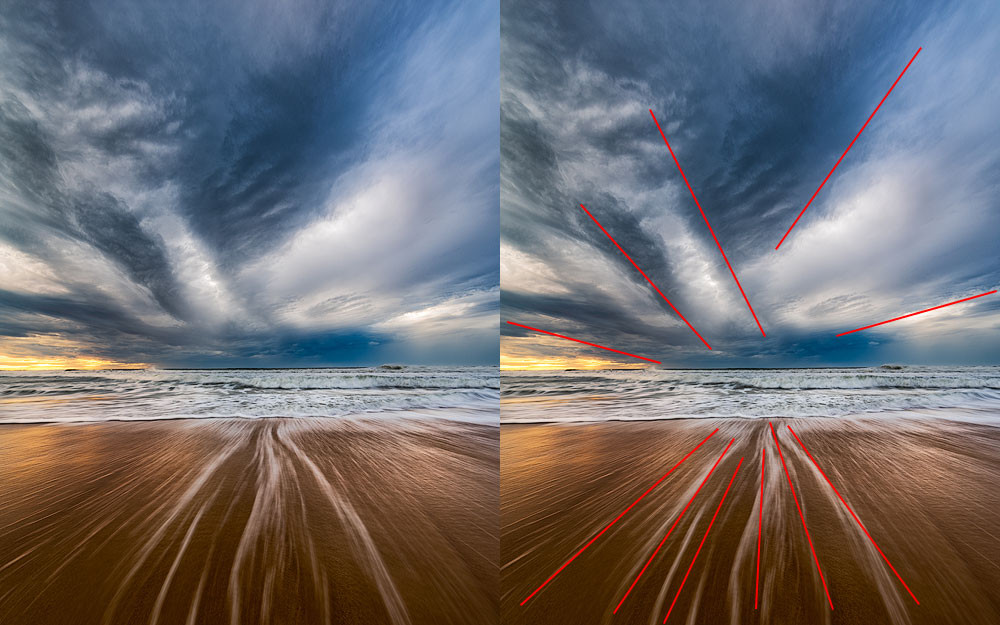
4.13. Radial Composition: How Do You Use Lines To Draw Attention?
Radial composition involves lines and triangles pointing toward a main subject, resembling the sun and its rays. Avoid other centers of gravity or significant lines to strengthen the effect.
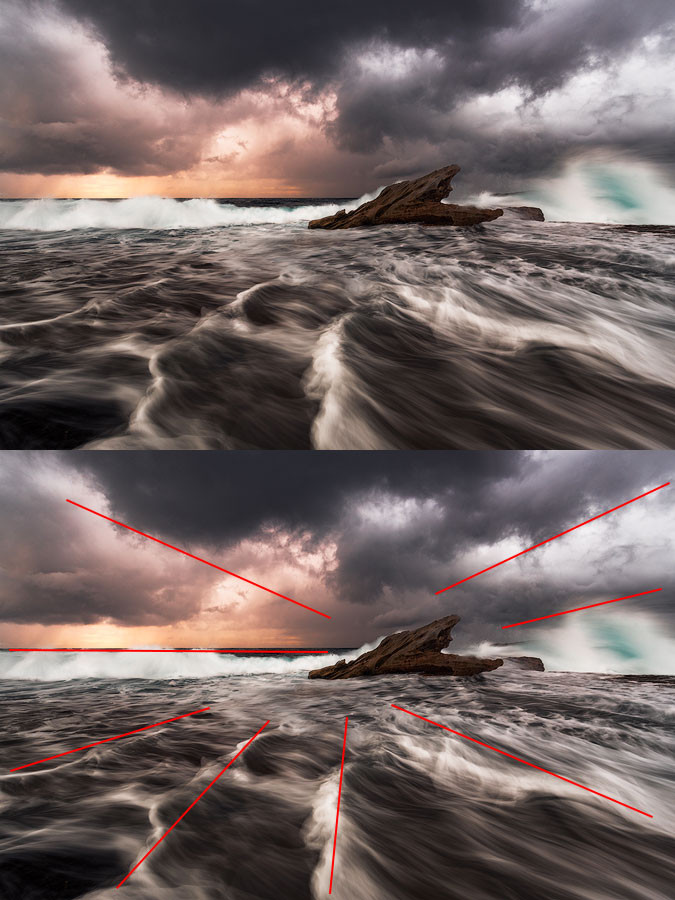 radial composition landscape
Key Takeaway: Create radial compositions with lines converging on a central subject, drawing the eye and adding focus. This technique is great for emphasis.
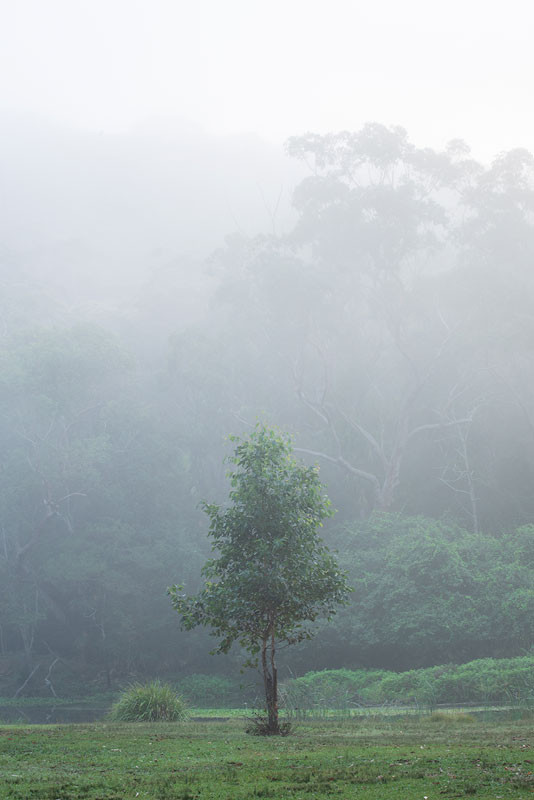
4.14. Negative Space: How Does Emptiness Enhance The Subject?
Deliberately leave empty space around the subject to emphasize loneliness, emptiness, or the smallness of humans. Negative space breaks the “fill the frame” principle tastefully.
 negative space composition
Key Takeaway: Use negative space to highlight the subject and convey a sense of solitude or vastness. Empty space can be powerful.
4.15. Rule Of Odds: Why Do Uneven Numbers Work Better?
The rule of odds suggests that uneven numbers of objects are more appealing than even numbers due to stability versus dynamism. Even numbers suggest balance, while odd numbers convey a story and dynamic balance.
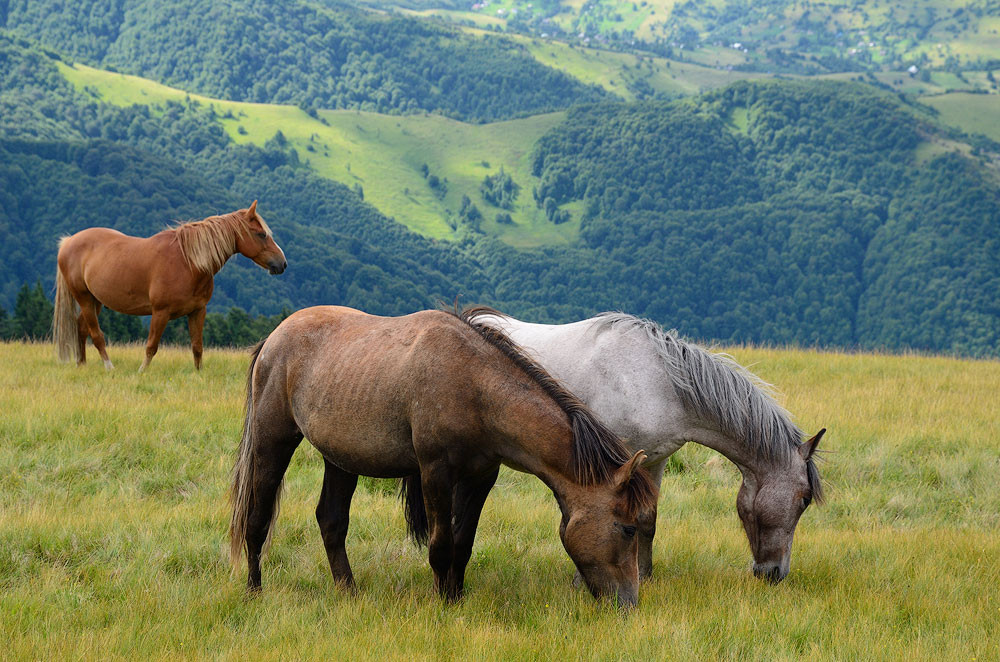 rule of odds in photography
Arrange elements in groups to achieve this effect, creating a single complex component.
Key Takeaway: Use odd numbers of elements to create dynamic, engaging compositions. Group elements to achieve the desired effect.
4.16. Blocked vs. Unblocked Areas: How Do You Control Flow?
Creating blocked (closed) or unblocked (open) areas affects the image’s flow. Open space allows flow into infinity, while closed areas keep us inside.
 open area photography
The desired effect dictates how you compose a shot. Open space is optimistic, encouraging movement towards the future. Closed areas are stable, prompting reflection.
Key Takeaway: Use open areas for freedom and forward movement, and closed areas for stability and reflection. Control the viewer’s journey.
4.17. Contrast: How Do You Create Impactful Images With It?
Implement contrast between objects within a frame to create an expressive effect. Types of contrast include light, color, psychological condition, physical condition, and part-to-whole relation.
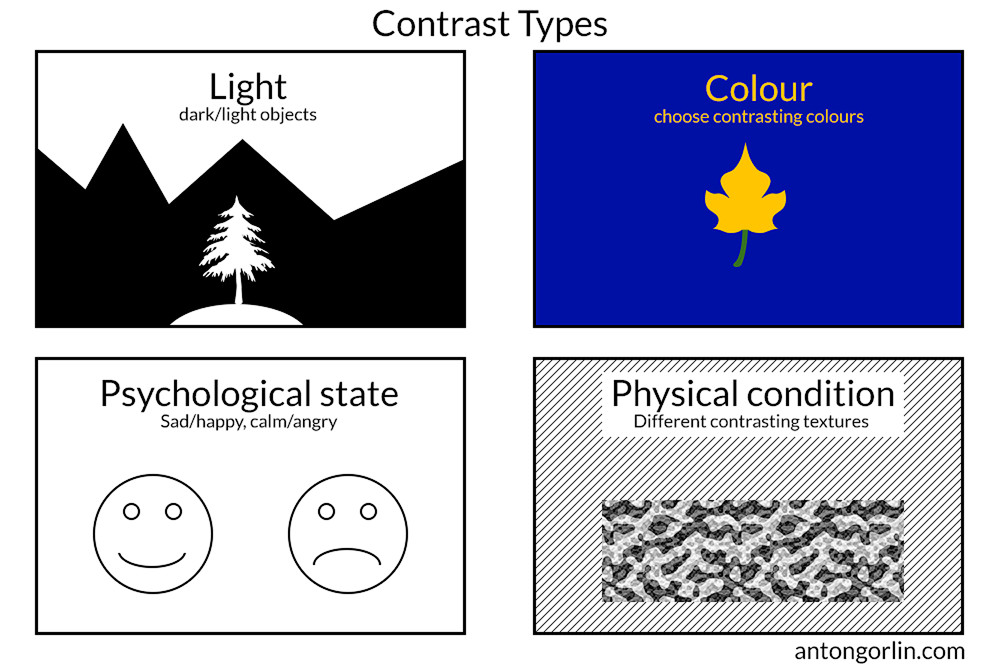 contrast composition
The color wheel helps identify contrasting colors.
Key Takeaway: Use contrast to create visual interest and highlight key elements, enhancing the impact of your image. Conflict draws attention.
4.18. Subject Isolation: How Do You Make The Subject Stand Out?
Isolate the subject using shallow depth of field, framing, or figure-to-ground relation. Shallow depth of field is common in portrait, wildlife, and macro photography.
4.18.1. Framing:
Frame the subject with cliffs, branches, or keyholes, adding dimension and context. Frame-within-frame emphasizes the center.
 framing composition
4.18.2. Figure-To-Ground Relation:
Separate the subject from the background using color contrast or sharpness. Blurred backgrounds are common, but blurred foregrounds can also work, especially in reporting.
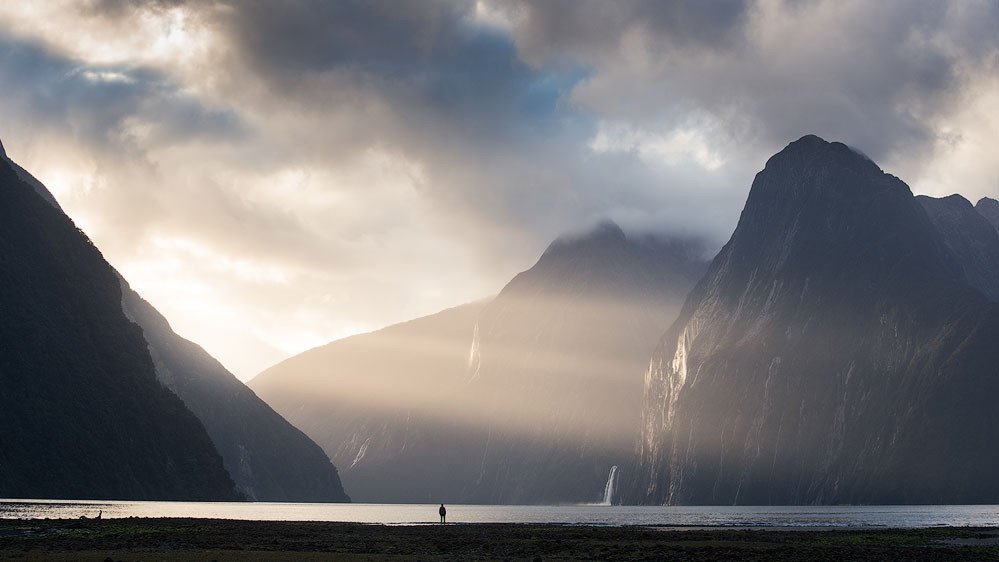 figure to ground relation photography
Key Takeaway: Isolate the subject to draw attention and create a clear focal point. Use framing, depth of field, and contrast to achieve this.
4.19. Repetition: What Does It Add To An Image?
Repetition involves repeating the same elements, like a row of soldiers. Our eyes tend to follow the lines and rest while browsing such photos.
 repetition in composition
Simple repetition can be dull but works well for interior pictures or as a subsidiary technique.
Key Takeaway: Use repetition to create patterns and guide the viewer’s eye, but avoid making it too monotonous. Add variation for interest.
4.20. Rhythm: How Does It Differ From Repetition?
Rhythm is a recurring pattern of elements differing by strong or weak elements or varying conditions. It requires something repeating over time, creating a pattern.
 rhythm landscape photography
The rhythm can be built around lines, objects, colors, tones, flares, or light and dark areas.
Key Takeaway: Create rhythm by varying repeating elements, encouraging the eye to move in a particular direction. Think of it as music for the eyes.
4.21. Breaking The Rhythm: When Should You Do It?
Incorporate the subject into the rhythm, or break the rhythm to accentuate it. Breaking the rhythm draws attention to imperfection or makes the viewer take a closer look.
 break the rhythm
Key Takeaway: Break the rhythm to highlight the subject or draw attention to specific details. Imperfection can be captivating.
4.22. Depth Of Field: How Does It Affect Composition?
Depth of field affects which parts of the photo are in focus. Whatever is in focus is the most important part, while blurred parts add context.
 depth of field in landscape
Landscapes usually have everything in focus, while portraits and macros blur the background. Blurring the foreground can increase the sense of volume.
Key Takeaway: Use depth of field to control focus and guide the viewer’s eye. Choose what to highlight and what to blur.
4.23. Linear Perspective: How Do Converging Lines Create Depth?
Converging lines create linear perspective, making parallel lines appear to point to a vanishing point in the distance. This effect makes the picture seem three-dimensional.
 linear perspective
Including similar subjects that decrease in size adds depth.
Key Takeaway: Use linear perspective to create depth and realism, making the scene more immersive. Converging lines draw the viewer in.
4.24. Tonal And Aerial Perspective: How Do You Create Atmospheric Depth?
The atmosphere affects distant objects more than closer ones. Clarity, saturation, and contrast decrease with distance, adding volume.
4.24.1. Aerial Perspective:
Backlight brightens particles in the air, making haze more prominent.
 aerial perspective landscape
4.24.2. Tonal Perspective:
Use tones or colors to achieve perspective. Put darker objects in the foreground and brighter objects in the background.
 tonal perspective landscape
Key Takeaway: Use tonal and aerial perspective to create atmospheric depth, making the image more realistic. Tone and haze add dimension.
4.25. Patterns: How Do You Use Them To Create Engaging Images?
Patterns are based on repetition but don’t encourage eye movement in a particular direction. They create geometry and continuation.
 pattern nature
If you can’t see the border, assume the pattern stretches beyond the frame.
Key Takeaway: Use patterns to create visually appealing areas that hold the viewer’s attention. Geometry adds structure.
4.25.1. Breaking The Pattern:
Break the pattern with a different color, size, or alignment to draw attention to a specific object.
Key Takeaway: Disrupting a pattern highlights a specific element and draws the eye to it. Imperfection stands out.
5. What Are The Building Blocks Of Photographic Composition?
To effectively compose a photograph, it helps to understand the fundamental elements that can be used to construct an image. These building blocks, when combined thoughtfully, create a cohesive and compelling visual narrative.
5.1. Solid Lines: How Can They Structure Your Image?
Solid lines are continuous elements that provide structure, such as walls, rocks, or trees. Perspective makes parallel lines converge, forming diagonals in the photo.
 solid line composition
Key Takeaway: Use solid lines to guide the viewer’s eye and create structure. These elements can define the composition.
5.2. Suggested And Broken Lines: How Do You Create Implied Connections?
Use suggested or broken lines to connect elements. Our eyes naturally find patterns, creating imaginary lines between objects.
 broken line composition
Key Takeaway: Use suggested lines to create connections, enhancing the narrative and guiding the viewer’s eye. Implied connections can be powerful.
5.3. Direction Using Sight/Movement: How Can They Influence The Viewer?
Eyesight or movement creates strong composition lines. Our brains extend and prolong eyesight or movement, forming strong lines that connect planes or create diagonals. Give enough breathing space for the direction of eyesight.
 composing using sight
Key Takeaway: Use sight and movement to create strong compositional lines, but provide sufficient breathing space in the direction of the gaze or motion.
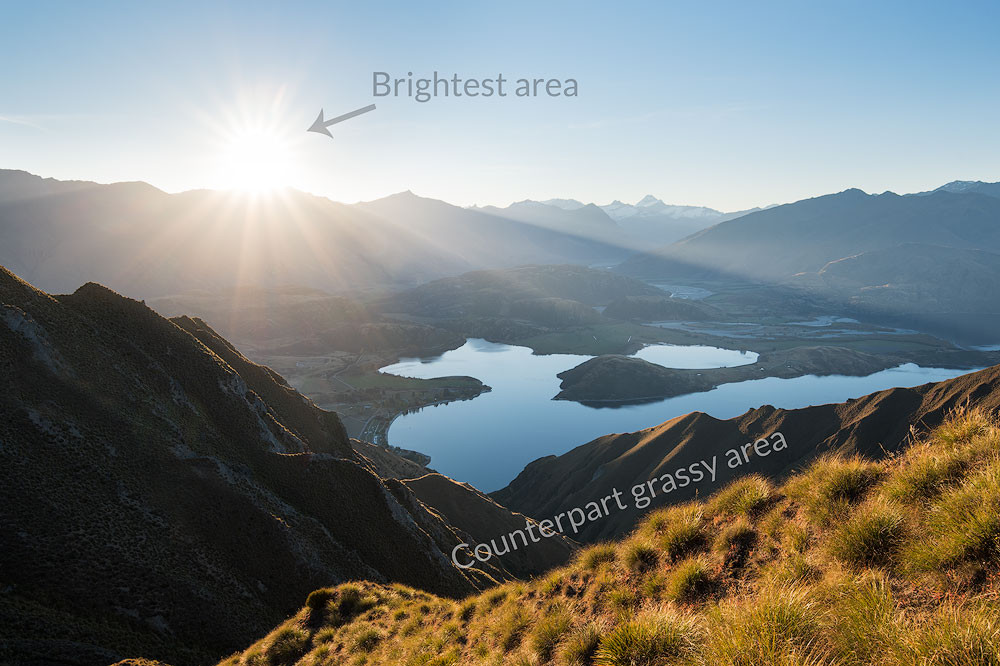
5.4. Visual Masses: What Factors Determine Visual Weight?
Visual masses are elements that carry prominence and visual strength. Factors include:
- Color saturation: Saturated areas have more weight than pale ones.
- Contrast: Black on white stands out.
- Solid objects: Arrangements of points carry weight.
 visual mass balance
Key Takeaway: Use visual masses to balance the composition. Understand how color, contrast, and objects contribute to visual weight.
5.5. Shadows: How Can They Add Depth And Interest?
Shadows, especially long ones, can build a whole photograph or create strong lines. Being dark, they carry decent visual weight.
 shadows in composition
Key Takeaway: Use shadows to add depth, create lines, and enhance visual weight. They can transform an image.
5.6. Colors: How Do They Create Harmony And Contrast?
Colored areas are fundamental building blocks, with saturated areas being stronger than less saturated ones. Halftones connect regions. De-saturate all colors except the main one or two for a logical accent.
Key Takeaway: Use colors to create accents, break patterns, and set a mood. Saturated colors draw attention and build a narrative.
5.7. Brightness And Contrast: How Do They Guide The Viewer?
In black and white or muted images, high contrast areas drag attention. It works for both bright and dark tones as well as area edges.
 black and white landscape contrast
Key Takeaway: Use brightness and contrast to guide the viewer’s eye, especially in monochrome images. Contrast creates focal points.
5.8. Faces And Figures: How Do They Draw The Eye?
Faces, even small ones, carry psychological weight. This extends to entire figures, human or non-human. Living shapes bring more visual weight and meaning.
Key Takeaway: Incorporate faces and figures to draw the viewer’s attention and create a connection. Living subjects add meaning.
5.9. Textures And Patterns: How Do They Engage The Viewer?
Textures and patterns lack direction, making them great for the foreground. They create pleasing areas that hold the viewer’s attention.
 landscape foreground pattern
Key Takeaway: Use textures and patterns to engage the viewer and add visual interest. They create appealing areas that keep the eye busy.
6. How Can You Control And Affect Composition?
Several parameters significantly affect composition. Understanding these factors allows you to control and fine-tune your images for maximum impact.
6.1. Focal Length: How Does It Change The Perspective?
Focal length is the first decision to make. Different focal lengths have different visual effects:
| Focal Length | |
|---|---|
| Ultra-wide | 0-24 mm |
| Wide | 24-35 mm |
| Normal | 40-58 mm |
| Telephoto | 60 mm + |
Wide-Angle Lens: Stretches and exaggerates the foreground, conveying vastness and scale.
Telephoto Lens: Squeezes perspective and distance, making objects seem closer.
Normal Lens: Offers a versatile range of compositions.
Key Takeaway: Choose focal length based on the desired perspective and scale. Wide angles exaggerate, telephotos compress, and normal lenses provide versatility.
6.2. Adding A Hero: How Does It Enhance The Story?
Adding a story hero conveys scale and emphasizes figure-to-ground relation. It improves the overall look and feel. This applies to landscapes (add a human or animal), nature (add a fallen leaf), and still life.
 hero in landscape
Key Takeaway: Add a hero to create a story and emphasize scale. Small details can make a big difference.
6.3. Long Exposure: How Does It Affect The Scene?
Long exposure smooths clouds into lines, flattens seas into fog, blurs mobs, and creates star trails. It transforms the structure of the shot.
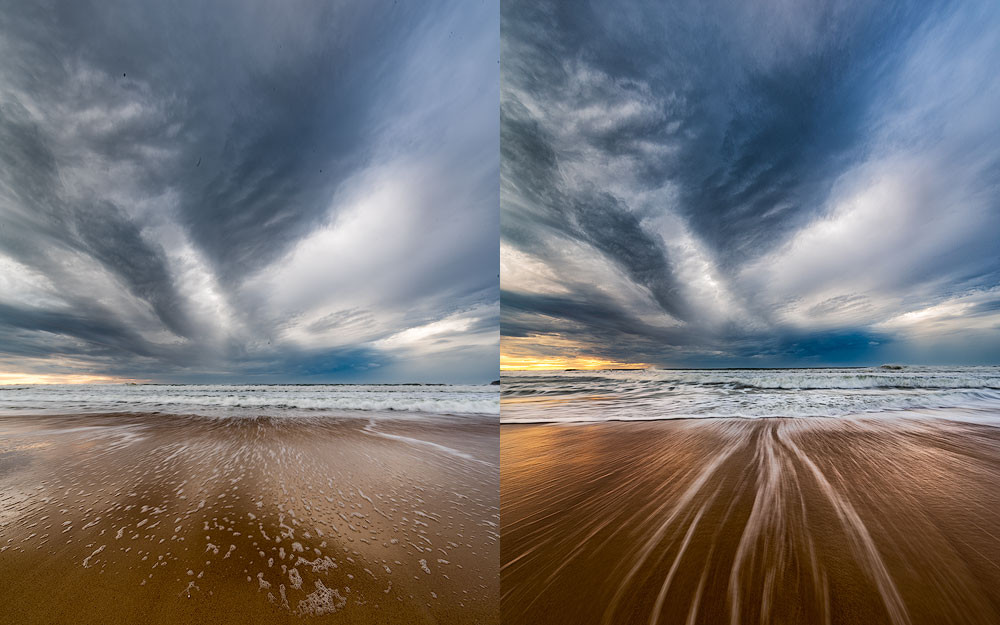 long composition comparison
Key Takeaway: Use long exposure to transform elements and create unique effects. It changes the overall structure.
6.4. Point Of View Height: How Does It Change Shapes?
The point of view (camera height) affects composition and object shapes. Towering objects seem larger, while lower positions hide the middle-ground.
Psychologically, the lower position detaches layers, offering excellent expressiveness. Higher viewpoints stretch everything between foreground and background, creating a harmonious picture.
Key Takeaway: Adjust your viewpoint to change object shapes and create different effects. Low positions add drama, and high positions create harmony.
6.5. Light Direction And Quality: How Does It Affect Texture?
Light is crucial. Side light reveals structure and texture, creating light and shadow and adding volume. Morning and evening light cast long shadows.
 side light photography
Backlight lightens haze and dust, producing a glowing effect. Front light is the worst, making the shot look flat.
Key Takeaway: Use side light to reveal texture and backlight for a glowing effect. Avoid front light for depth and dimension.
7. How To Improve Composition In Editing?
Editing offers opportunities to refine and enhance the composition of your photographs. Simple tricks can make all the difference.
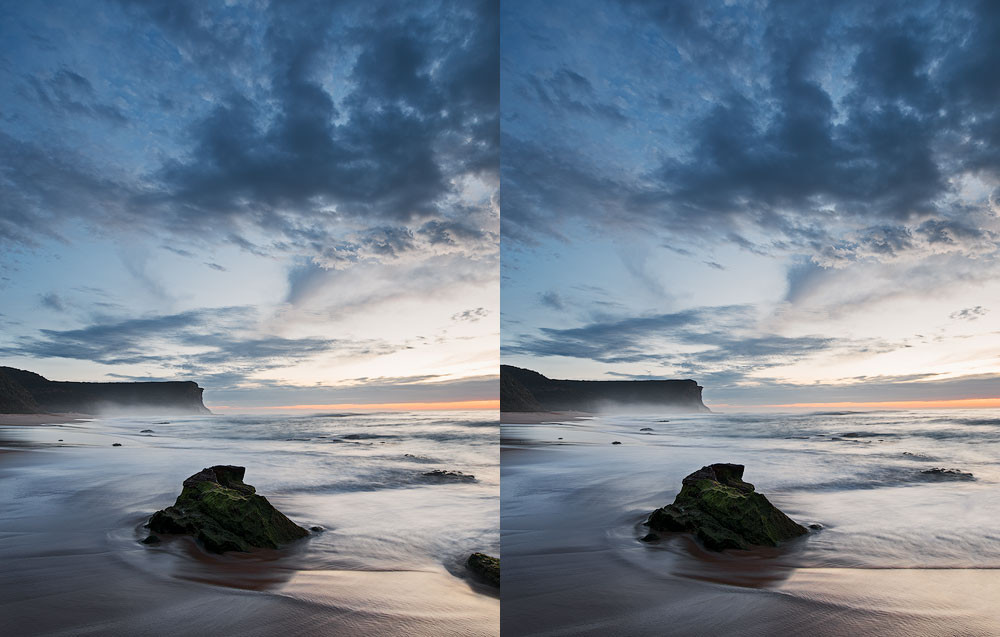
7.1. How To Check Composition: What’s The Blurred Method?
Blur your photo heavily to check if the composition is prominent. Significant lines, areas, shapes, and colors should still be visible.
 blurred composition
Key Takeaway: Blur your image to check the strength of your composition. The basic structure should remain clear.
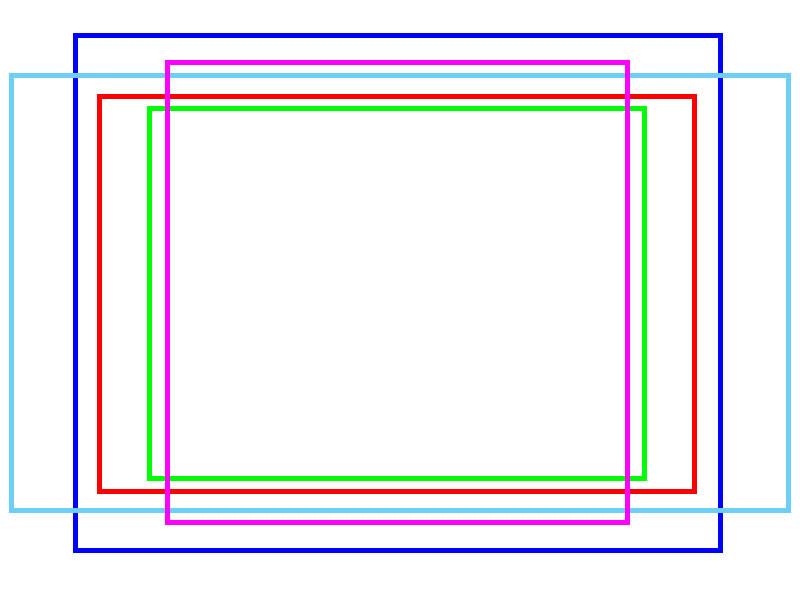
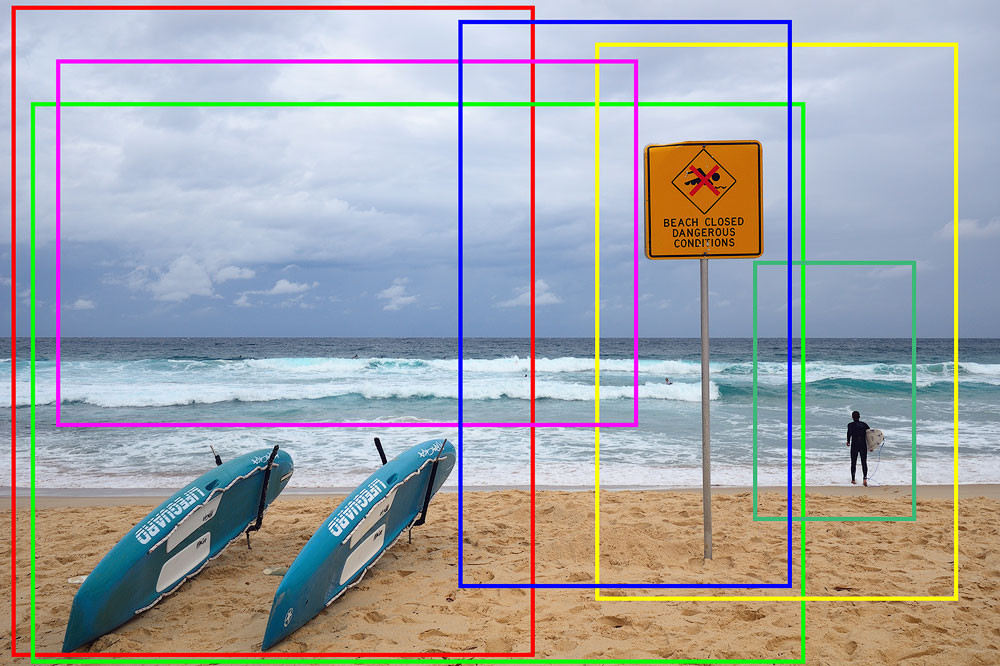
7.2. Photoshop Crop Tool: How Does It Help Composition?
The crop tool in Photoshop contains composition assistant grids. Select a grid to guide your composition. Some overlays are asymmetrical and can be