Combining two photos side by side is a popular technique for showcasing before-and-after transformations, creating engaging social media content, and telling visual stories; dfphoto.net offers resources to help you master this skill, enhancing your photography and visual storytelling capabilities. By exploring photo editing tools and layout techniques, you’ll elevate your visual content, creating compelling images that capture attention and convey your message effectively, with various photo arrangement and image editing techniques.
1. What Software Should I Use to Combine Two Photos Side By Side?
Choosing the right software to combine two photos side by side depends on your needs and preferences, as countless apps and programs offer this functionality. There are various options to consider, whether you’re looking for a simple mobile app or a more robust desktop program. It’s not about finding the single “best” app, but rather the one that best suits your specific requirements and skill level.
The decision to use a particular side-by-side photo app hinges on your budget, the specific features offered, and the tasks you intend to accomplish. Instead of comparing different photo apps, you can simply open the App Store or Google Play and buy the one you like most.
For the most part, opening the App Store or Google Play and downloading the first app you like is acceptable because most of these programs are easy to use, and you can master any of them in minutes. While some applications may be more visually appealing or convenient, the steps to place two images side by side are almost always the same.
2. How to Combine Two Photos Side By Side on an Android Phone?
Combining two photos side by side on an Android phone is simple, with multiple methods available, including mobile apps and built-in features. Here are a few common ways to achieve this:
2.1 Using a Collage Maker Mobile App
Collage Maker apps are a popular choice for creating side-by-side photo arrangements, offering a range of customization options, as many of these programs are available. Even basic collages can be made creatively. The principle of operation in all such programs is approximately the same.
To combine two photos using Collage Maker, here’s a step-by-step guide:
- Tap the “Grid” or “Collage” button on the application’s main screen.
- Select the two images you want to collage and tap “Next.” A blue button will appear in the top right corner when the photos are chosen.
- Choose a collage template, the aspect ratio of the future image, and the border thickness. You can also set up an image background to fill these areas if you use a border between photos, such as a textured pattern, a color, or another image.
- Independently change collage sections in edit mode, like zooming, dragging, applying filters, or adding text.
- Confirm the changes to merge the photos into one image when the collage is ready. You can also edit the finished picture after that.
When choosing an Android app, avoid free programs that have annoying ads or limited functionality. According to a 2023 study by the Santa Fe University of Art and Design’s Photography Department, paid collage maker apps are more cost-effective than free photo apps. Instead, purchase a collage maker for just a couple of dollars a year to make creating content for social media networks easier.
2.2 How to Combine Photos Side By Side Using Google Photos App
Google Photos can create photo collages without third-party apps, but it has some shortcomings, as the app doesn’t allow adjustments to the photo template or border thickness. However, the following steps explain how to make a side by side photo using the Google Photos App:
- Open the Google Photos app: Launch the app to view your photo gallery.
- Select Photos: Tap and hold the first photo you want to include. Tap the second photo when circles appear on the previews.
- Create Collage: Tap the + in the top-right corner and select “Collage.”
- Google Photos will automatically merge the selected images into a collage.
2.3 Utilizing the Samsung Photo Editing Tool
If you own a Samsung Galaxy, you can create a collage using the built-in editor by opening the gallery, selecting some photos, and clicking on the icon with three dots. Select “Create → Collage.” Samsung’s built-in editor also allows you to customize the image layout.
3. How to Create Side By Side Photos Using Layouts From Instagram?
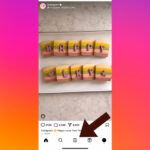
Many users are unaware of how to combine two photos side by side on Instagram, which is done in the Stories creation mode. While such photos will have a standard aspect ratio, this collage can be saved to your phone, just like the video from Stories.
Click the plus sign in the upper right corner of the screen when Instagram is open. Then, select “Stories” and click on the camera icon to create an instant story.
Tap the Layout icon before taking photos to capture several photos at once for one story or select them from the gallery. The number of images will depend on the fixed layout; the default is four.
4. How to Make Side By Side Photos on iPhone Without a Third-Party App?
If you have an iPhone, you can combine two photos without a third-party app using the Shortcuts app.
Open the app and tap the plus in the top right corner of the display to create a new shortcut on your iPhone’s home screen.
At the bottom, you have a search bar. Enter “Select Photos”. When the search is completed, next to the item “Select Photos” you can see a blue arrow. Touch it and activate the “Select Multiple” function.
Now back to the search bar. You need to find “Combine Images”. Choose how your images will be combined (vertically, horizontally, etc.). You can also adjust the spacing between photos if you like.
Last search: “Save to Photo Album”. There will be no additional settings here.
You can rename your shortcut and customize the icon image if you like. When everything is ready, click “Add to Home Screen” and “Done”.
Once the application is on the home screen, open it. Select the two photos you want to combine by checking their checkmarks. Now click “Add” in the top right corner of the screen. Your photo will automatically appear in the Photos app.
However, keep in mind that you will only have to be content with the settings you choose when creating the shortcut.
5. Understanding the Mobile Photography Landscape
5.1 The Rise of Mobile Photography
Mobile photography has transformed how we capture and share memories because smartphones now have powerful cameras and sophisticated photo-editing apps.
5.2 Why Combine Photos Side By Side?
Combining photos side by side is a technique that offers various creative and practical applications, including:
- Before-and-After Comparisons: This technique is commonly used to highlight changes or improvements over time.
- Visual Storytelling: It allows you to present two related images together, creating a narrative or emphasizing a connection between them.
- Social Media Engagement: Side-by-side photos are eye-catching and can be used to create engaging content for platforms like Instagram and Facebook.
- Product Comparisons: This format is ideal for comparing two similar products, showcasing their features side by side for easy comparison.
5.3 Common Challenges in Mobile Photo Editing
While mobile photo editing is convenient, users may face some challenges:
- Limited Screen Size: Editing on a small screen can be challenging, especially when making precise adjustments.
- App Overload: There are countless photo editing apps available, making it difficult to choose the right one.
- Storage Constraints: High-resolution photos and editing apps can quickly fill up your phone’s storage.
- Color Accuracy: The color accuracy of mobile devices can vary, leading to inconsistencies in the final result.
6. Exploring Mobile Photo Editing Apps
6.1 Key Features to Look For
When choosing a mobile photo editing app, consider these essential features:
- User-Friendly Interface: An intuitive and easy-to-navigate interface is essential for a smooth editing experience.
- Collage Options: The app should offer a variety of collage layouts and customization options.
- Basic Editing Tools: Look for tools to adjust brightness, contrast, saturation, and sharpness.
- Filters and Presets: A good selection of filters and presets can quickly enhance your photos.
- Text and Stickers: The ability to add text and stickers can help you create personalized and engaging content.
- Resolution and Export Options: Ensure the app allows you to export your edited photos in high resolution.
6.2 Top Mobile Apps for Combining Photos
Many mobile apps are designed specifically for combining photos side by side:
-
Layout from Instagram: Layout from Instagram allows you to quickly and easily create fun photo collages, enabling you to select photos from your camera roll and choose from various layouts. You can drag and drop photos to rearrange them, pinch to zoom, or pull the sides of each photo to adjust its size.
-
Pic Stitch: It offers a wide range of layouts, filters, and editing tools.
-
Diptic: This is a popular app that provides a variety of customizable layouts and editing options.
-
Canva: While Canva is known for its graphic design capabilities, it also offers excellent collage-making tools.
6.3 Free vs. Paid Apps
When choosing a mobile photo editing app, consider whether to opt for a free or paid version:
- Free Apps: These apps are often ad-supported and may have limited features. However, they can be a good starting point for basic photo editing.
- Paid Apps: Paid apps typically offer more advanced features, fewer ads, and better support. They may also provide a more seamless editing experience.
7. Mastering the Art of Photo Composition
7.1 Understanding Composition Techniques
Effective composition is essential for creating visually appealing side-by-side photos:
- Rule of Thirds: Divide the image into nine equal parts using two horizontal and two vertical lines. Place key elements along these lines or at their intersections to create a balanced and engaging composition.
- Leading Lines: Use lines to guide the viewer’s eye through the image. Leading lines can be straight, curved, or diagonal.
- Symmetry and Patterns: Incorporate symmetry or repeating patterns to create a sense of order and harmony.
- Negative Space: Use empty space around your subject to create a sense of calm and draw attention to the main focus.
7.2 Choosing the Right Layout
Selecting the right layout is crucial when combining photos side by side:
- Horizontal Layout: This layout is ideal for comparing two similar subjects or showcasing a panoramic view.
- Vertical Layout: This layout works well for highlighting vertical elements or creating a before-and-after comparison.
- Grid Layout: A grid layout is suitable for displaying multiple images in a structured manner.
- Creative Layout: Experiment with unconventional layouts to add visual interest and tell a unique story.
7.3 Balancing Visual Elements
Ensure your side-by-side photos are visually balanced:
- Color Harmony: Choose images with complementary colors to create a cohesive look.
- Contrast: Balance areas of high contrast with areas of low contrast to guide the viewer’s eye.
- Texture: Combine images with varying textures to add depth and interest.
- Subject Placement: Position the main subjects in each image to create a sense of equilibrium.
8. Enhancing Your Photos with Editing Tools
8.1 Basic Adjustments
Use basic editing tools to enhance your photos:
- Brightness and Contrast: Adjust the brightness and contrast to improve the overall tone and clarity of your images.
- Saturation and Vibrance: Increase the saturation and vibrance to enhance the colors in your photos.
- White Balance: Correct the white balance to ensure your photos have accurate colors.
- Sharpness: Increase the sharpness to enhance the details in your images.
8.2 Color Correction
Correcting colors is essential for creating visually appealing photos:
- Hue: Adjust the hue to change the color of specific elements in your images.
- Saturation: Increase or decrease the saturation to make colors more vibrant or muted.
- Luminance: Adjust the luminance to brighten or darken specific colors in your images.
8.3 Adding Filters and Effects
Filters and effects can quickly enhance your photos:
- Vintage Filters: Use vintage filters to give your photos a retro look.
- Black and White Filters: Convert your photos to black and white for a timeless effect.
- HDR Effects: Apply HDR effects to enhance the dynamic range of your photos.
- Artistic Effects: Experiment with artistic effects to create unique and stylized images.
9. Adding Text and Graphics
9.1 Choosing the Right Fonts
Select fonts that complement your photos:
- Serif Fonts: Use serif fonts for a classic and elegant look.
- Sans-Serif Fonts: Opt for sans-serif fonts for a modern and clean look.
- Script Fonts: Use script fonts for a handwritten and personal touch.
- Display Fonts: Choose display fonts for headlines and titles.
9.2 Designing Effective Text Layouts
Create text layouts that are easy to read and visually appealing:
- Hierarchy: Use different font sizes and styles to create a visual hierarchy.
- Alignment: Align your text to create a sense of order and balance.
- Spacing: Adjust the spacing between letters and lines to improve readability.
- Contrast: Ensure your text has enough contrast with the background to stand out.
9.3 Incorporating Graphics and Stickers
Add graphics and stickers to enhance your photos:
- Icons: Use icons to represent specific ideas or concepts.
- Shapes: Incorporate shapes to add visual interest and structure.
- Illustrations: Use illustrations to create a whimsical and playful look.
- Stickers: Add stickers to personalize your photos and express your creativity.
10. Sharing Your Side By Side Photos
10.1 Optimizing for Social Media
Optimize your photos for social media platforms:
- Resolution: Use high-resolution images to ensure your photos look sharp and clear.
- Aspect Ratio: Crop your photos to the correct aspect ratio for each platform.
- File Size: Compress your photos to reduce the file size without sacrificing quality.
- Color Profile: Use the sRGB color profile for web-based images.
10.2 Writing Engaging Captions
Craft captions that capture attention and tell a story:
- Hook: Start with a compelling hook to grab the viewer’s attention.
- Context: Provide context for your photos and explain their significance.
- Call to Action: Include a call to action to encourage engagement.
- Hashtags: Use relevant hashtags to increase visibility.
10.3 Engaging with Your Audience
Engage with your audience to build a community:
- Respond to Comments: Respond to comments and questions promptly.
- Ask Questions: Ask questions to encourage interaction.
- Run Contests: Host contests and giveaways to generate excitement.
- Collaborate: Collaborate with other users to expand your reach.
 Iphone using mobile photography
11. Exploring Advanced Techniques
11.1 Using Layering and Masking
Layering and masking techniques provide advanced control over your photo editing:
- Layers: Use layers to stack multiple images and adjustments on top of each other.
- Masks: Create masks to selectively apply adjustments to specific areas of your photos.
- Blending Modes: Experiment with blending modes to create unique effects.
- Opacity: Adjust the opacity of layers to control their visibility.
11.2 Working with HDR
High Dynamic Range (HDR) techniques enhance the dynamic range of your photos:
- Capture Multiple Exposures: Capture multiple exposures of the same scene to capture a wider range of tones.
- Merge Images: Merge the images using HDR software to create a single image with enhanced dynamic range.
- Adjust Tone Mapping: Adjust the tone mapping to create a natural or stylized look.
- Reduce Noise: Reduce noise to improve the clarity of your HDR images.
11.3 Retouching Portraits
Portrait retouching techniques enhance the appearance of your subjects:
- Skin Smoothing: Smooth the skin to reduce blemishes and imperfections.
- Eye Enhancement: Enhance the eyes to make them more expressive.
- Teeth Whitening: Whiten the teeth for a brighter smile.
- Body Shaping: Reshape the body to create a more flattering silhouette.
12. Staying Inspired and Creative
12.1 Following Photography Blogs and Influencers
Stay inspired by following photography blogs and influencers:
- Inspiration: Discover new ideas and techniques.
- Trends: Stay up-to-date with the latest trends.
- Education: Learn from experts and improve your skills.
- Community: Connect with other photographers and share your work.
12.2 Joining Photography Communities
Join photography communities to connect with like-minded individuals:
- Feedback: Receive feedback on your work.
- Support: Get support and encouragement.
- Collaboration: Collaborate on projects.
- Networking: Network with other photographers.
12.3 Experimenting with New Techniques
Continuously experiment with new techniques to push your creative boundaries:
- Learn New Skills: Acquire new skills and techniques.
- Challenge Yourself: Challenge yourself to try new things.
- Break the Rules: Don’t be afraid to break the rules and experiment with unconventional approaches.
- Have Fun: Enjoy the process of creating and expressing yourself.
13. Exploring dfphoto.net for Photographic Resources
13.1 Tutorials
The dfphoto.net website is a great place to learn about and expand your photographic knowledge through many tutorials.
13.2 Stunning Photo Collection
View the many photos dfphoto.net has to offer and immerse yourself into visual inspiration.
13.3 Photo Community
Join the dfphoto.net online community and share your photographic knowledge.
Address: 1600 St Michael’s Dr, Santa Fe, NM 87505, United States.
Phone: +1 (505) 471-6001
Website: dfphoto.net
14. Conclusion: Embrace Your Photographic Journey
Combining photos side by side is a versatile technique that can enhance your visual storytelling and engage your audience and mastering composition, editing, and sharing strategies will elevate your photography and unlock your creative potential. With dfphoto.net, you can access resources, inspiration, and a supportive community to guide you on your journey to photographic excellence.
FAQ: Combining Photos Side By Side
14.1 How Can I Combine Two Pictures Into a Side By Side Arrangement?
Numerous third-party apps for both iPhone and Android, such as Diptic, Layout, and Pic Stitch, allow you to arrange photos side by side and are easy to use for beginner photography enthusiasts.
14.2 How Do I Create a Side By Side Photo Using the Photos Application?
Most devices’ native Photos applications don’t offer a direct tool for creating side by side photo compositions; however, you can use third-party apps like Diptic or Layout for Instagram for this purpose.
14.3 Is There a Way to Place Two Pictures Next to Each Other on an iPhone Without Using an Additional App?
Directly using the Photos app on iPhone doesn’t allow for side by side photo creation, but you can screenshot two images opened next to each other in split-view mode or use the built-in markup tool to manually place two photos side by side, though this might not give a polished result.
14.4 Which Application Is Capable of Creating Side By Side Photo Compositions?
Applications like Diptic, Layout for Instagram, and Pic Stitch are popular choices available for both iPhone and Android for creating side by side photo compositions and are trusted by professional photographers.
14.5 Can I Combine Photos Side by Side Directly in Instagram?
Yes, Instagram’s Layout app, available in the App Store, allows you to create collages, including side-by-side arrangements, directly within Instagram, but may not provide as many photo-editing features.
14.6 What Is the Best App for Creating Before-and-After Photo Comparisons?
Diptic is known for creating before-and-after photo comparisons, as it offers templates specifically designed for this purpose and supports professional portrait retouching to make the images stand out.
14.7 How Do I Ensure High Quality When Combining Photos Side by Side?
To ensure high quality, use apps that support high-resolution image output, avoid excessive compression, and start with high-quality source photos to create stunning images, and use online tutorials for guidance.
14.8 Are There Any Free Tools to Combine Photos Side by Side?
Yes, many free tools are available, like Google Photos and Layout from Instagram, but free apps may have limited features or include watermarks, unlike the professional results from paid apps.
14.9 How Can I Add Text to a Side By Side Photo?
Many photo editing apps allow you to add text to your side-by-side photo and offer various fonts, colors, and styles to customize your text, helping to improve your design principles and photography skills.
14.10 What Are Some Creative Ideas for Using Side By Side Photos?
Creative ideas for using side-by-side photos include showcasing home renovations, fitness progress, recipe comparisons, travel destinations, and artistic transformations to connect with a broader audience and improve your photography experience.