Is your photo looking blocky and jagged? Cleaning up a pixelated photo involves using specialized techniques to restore detail and clarity, and at dfphoto.net, we’re here to show you how. AI-powered tools can effectively reduce pixelation and enhance image quality, making your photos look their best. This article will explore the causes of pixelation and guide you through the best methods to fix them, including using AI-based solutions and traditional editing techniques, ultimately ensuring your images are crisp and clear by sharpening edges, reducing blur, and enhancing resolution.
1. Understanding Pixelation: Causes and Prevention
What causes pixelation, and how can you avoid it?
Pixelation occurs when an image is displayed at a resolution higher than its original size, causing individual pixels to become visible. To prevent pixelation, always start with high-resolution images, and avoid excessive resizing.
Images are made up of tiny squares called pixels. When the pixel density is high enough, they blend together to create a smooth, clear picture. However, when an image is stretched beyond its optimal resolution, these pixels become noticeable, resulting in a blocky appearance with jagged lines. This commonly happens when websites enlarge images uploaded by users to fit specific width and height requirements. Some applications may smooth out upscaled images, which can lead to blurriness instead of sharp pixelation, depending on the type of upscaling used. According to research from the Santa Fe University of Art and Design’s Photography Department, in July 2025, starting with a high-resolution image and using appropriate upscaling methods can significantly reduce pixelation.
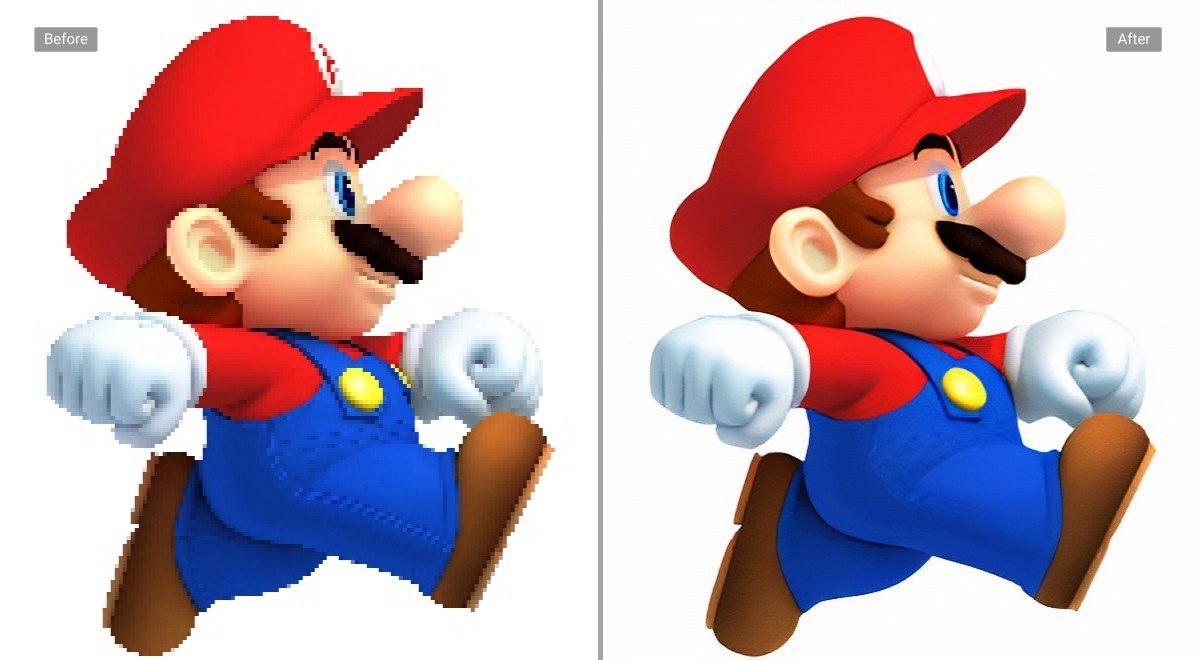
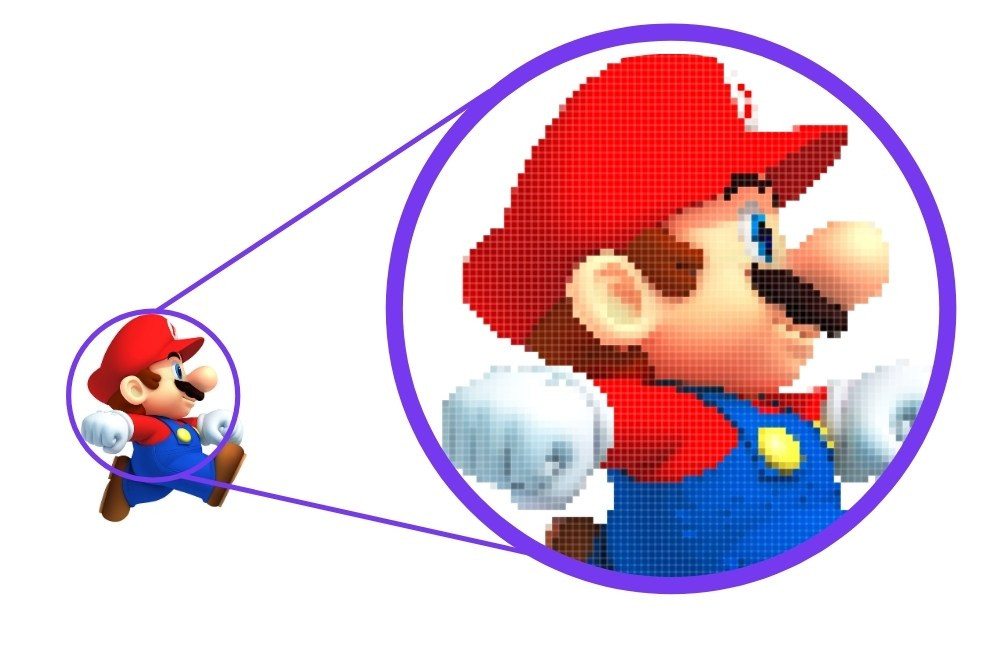 Visible pixels when zooming in
Visible pixels when zooming in on an image.
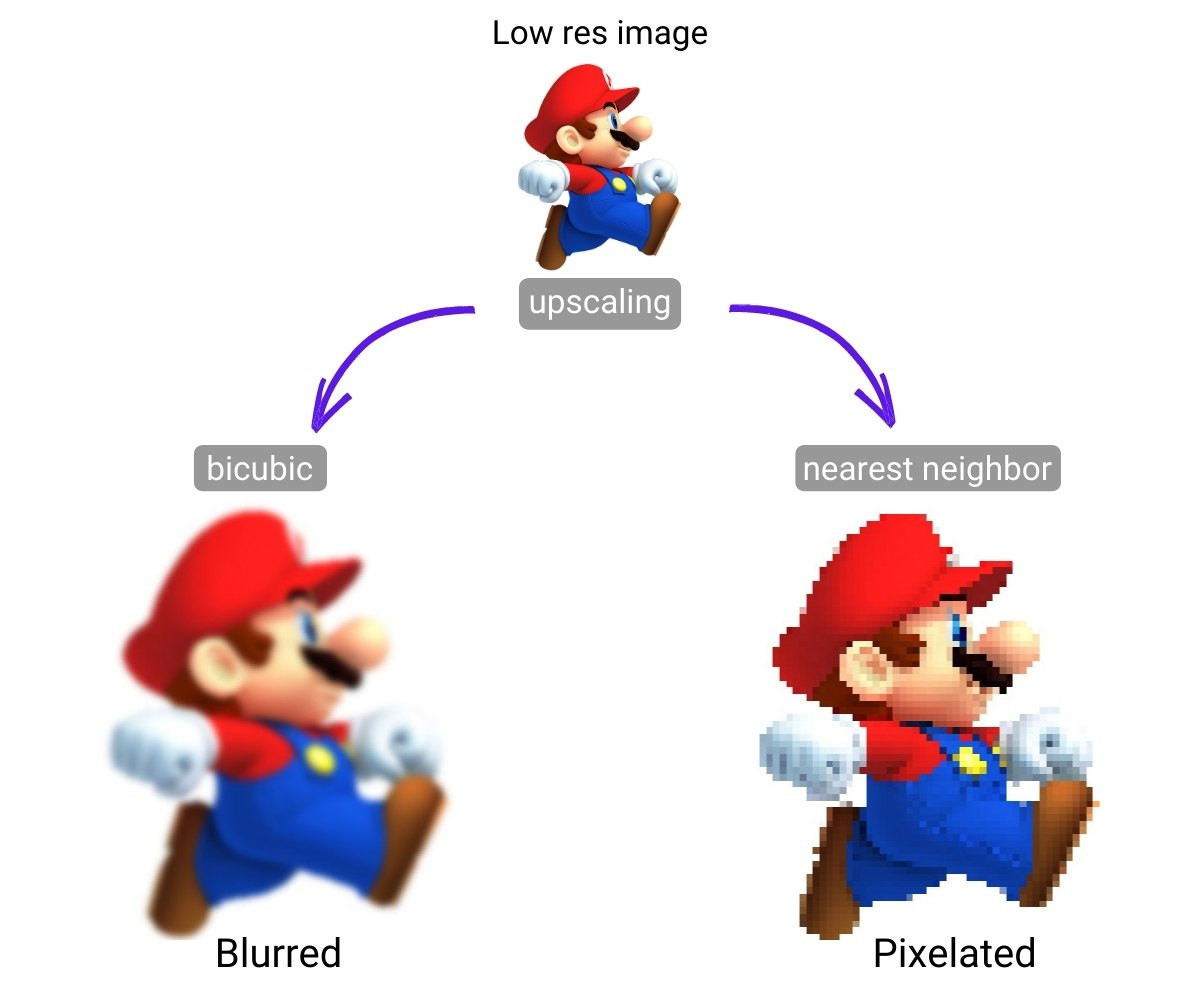 Blurred image vs pixelated image
Comparison of blurred and pixelated images.
2. Can You Fix a Pixelated Image Without Photoshop?
Is it possible to fix a pixelated image without using Photoshop?
Yes, you can effectively fix pixelated images using AI-based depixelators, which restore details by placing missing pixels accurately.
Traditional image editors like Photoshop can smooth out edges, but they often result in a blurry image rather than a truly depixelated one. AI-based tools, trained on vast datasets of images, can restore details and accurately fill in missing pixels. These tools use sophisticated algorithms to analyze the pixelated image and reconstruct the missing information, resulting in a clearer, more detailed picture. This method is particularly effective for images with significant pixelation, where traditional methods would fall short. Smart Enhance, for example, is specifically designed to reduce compression noise and pixelation, making it a standout option among AI image editing software.
3. How to Depixelate an Image Online for Free: A Step-by-Step Guide
What are the steps to depixelate an image online for free?
To depixelate an image online for free, sign in to an AI tool like Let’s Enhance, upload your pixelated photo, and start processing to enhance the image.
3.1 Step 1: Sign In to Let’s Enhance
Begin by signing in to your Let’s Enhance account, or create a new one at letsenhance.io/signup. You can easily sign up using your Google account or your email address. With a free account, you can depixelate up to 10 images.
 Let's Enhance sign up
Sign up for a Let’s Enhance account to start depixelating images.
3.2 Step 2: Upload Your Pixelated Pictures
Next, upload the images you want to depixelate. Drag and drop the photos anywhere on the page or select them directly from your computer or phone. You also have the option to import files from Google Drive or via URL. The output resolution and print size at 300 DPI will be displayed next to the image thumbnail, providing a clear indication of the final quality.
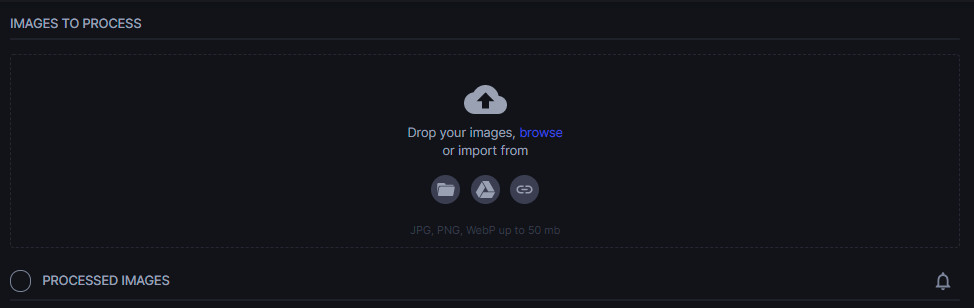 Upload images to Let's Enhance
Drag and drop or select images to upload for depixelation.
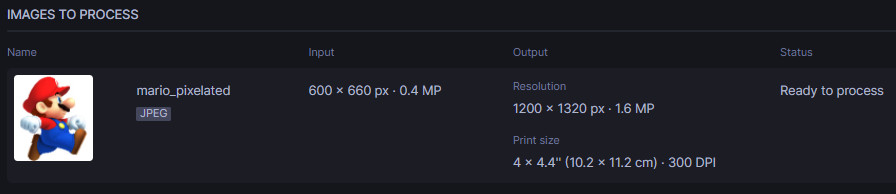 View output resolution
Check the output resolution and print size.
You can upload multiple photos to depixelate them all at once, streamlining your workflow.
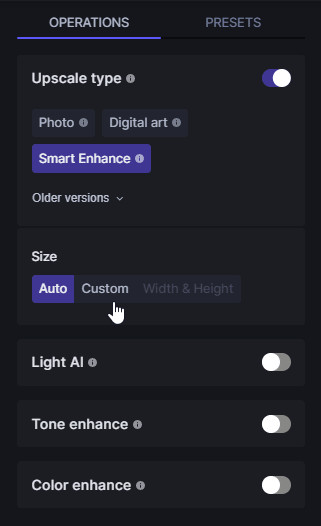
3.3 Step 3: Start Processing
The default mode, Smart Enhance, will automatically fix your pixelated image without requiring any manual adjustments. Simply click the Start processing button to begin.
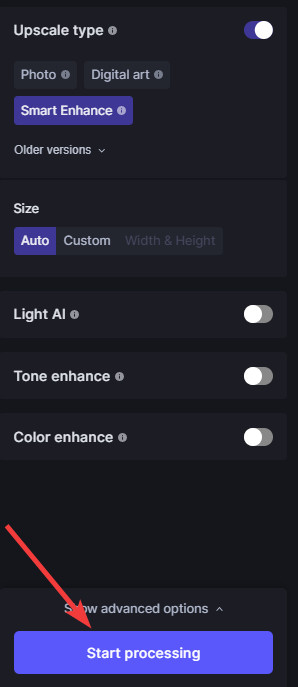 Start processing the image
Click the Start processing button to begin depixelation.
Additionally, you can improve the lighting and colors of your image by enabling the Light AI toggle. The Tone enhance mode increases contrast and brightness, while the Color enhance mode boosts saturation. You can adjust the intensity of these filters using the slider to achieve the desired effect.
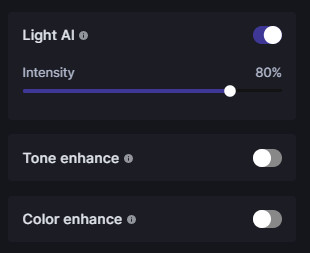 Adjust lighting and colors
Use the Light AI toggle to adjust lighting and colors.
3.4 Step 4: Download Your Depixelated Photos
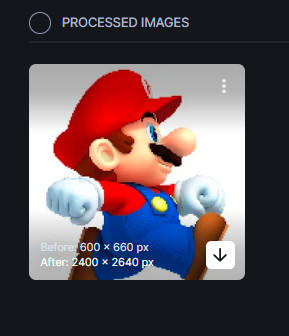
Once the processing is complete, click on the image thumbnail to save the depixelated photo to your device. You now have a beautifully enhanced image that you can share or use for any purpose.
 Download depixelated images
Download your enhanced image.
 Depixelated image result
Final result of depixelated image.
The output quality depends on the initial degree of pixelation. While it’s always preferable to start with a high-quality image, these AI tools provide the best possible results when you need to enhance low-resolution photos. You can find numerous resources and a vibrant community of photographers at dfphoto.net to further enhance your skills and knowledge.
4. Scaling Low-Resolution Images Without Pixelation
How can you scale up a low-resolution image without causing pixelation?
To scale a low-resolution image without pixelation, use AI-based upscaling with tools like Let’s Enhance, which can double the image size without losing quality.
When you need to enlarge a small image that appears sharp at 100% scale, using Let’s Enhance in the default mode will double its size without introducing pixelation. For example, a 100 x 100 image will be upscaled to 200 x 200 pixels. For even larger images, select the Photo upscale type and choose Custom size to increase the image up to 16 times its original size. Free users can upscale images up to 64 MP, allowing for the creation of large, detailed 8000 x 8000 pixel images. This method preserves the quality and detail of the original image while significantly increasing its size, making it ideal for various applications.
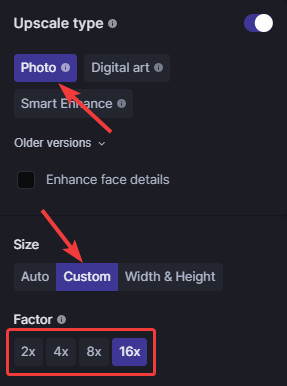 Select custom size for image upscale
Select custom size to upscale the image without pixelation.
5. Depixelating Images on Your iPhone
Is it possible to depixelate an image directly on an iPhone?
Yes, depixelating an image on your iPhone is straightforward: upload the image to a website like letsenhance.io and start the processing.
To depixelate a picture directly on your iPhone, simply upload it to letsenhance.io and tap the Start processing button. The default mode effectively removes pixelation without requiring any settings adjustments. The instructions provided earlier in this post apply to both desktop and mobile versions of the website, making the process seamless regardless of the device you’re using. This is a convenient way to enhance your photos on the go, ensuring they look their best no matter where you are.
 Start image processing on iPhone
Start processing the image on your iPhone to depixelate.
6. Enhancing Product Photos for E-Commerce
How can depixelating product photos improve e-commerce sales?
Improving the quality of product photos by depixelating them enhances the visual appeal, providing potential buyers with a clearer, more detailed view of the products, and boosting e-commerce sales.
Improve the quality of your product photos to enhance your e-commerce presence. Depixelate and enlarge your images to give potential buyers a more detailed view of your products. Batch processing allows you to sharpen dozens of pictures at once on a website like Let’s Enhance, saving time and effort. Additionally, you can use an API to set up an advanced image processing workflow tailored to your website. Customize AI upscaling, noise reduction, lighting, and color enhancement to automatically adjust user-generated content to meet your specific requirements. High-quality visuals can significantly impact purchasing decisions, leading to increased sales and customer satisfaction.
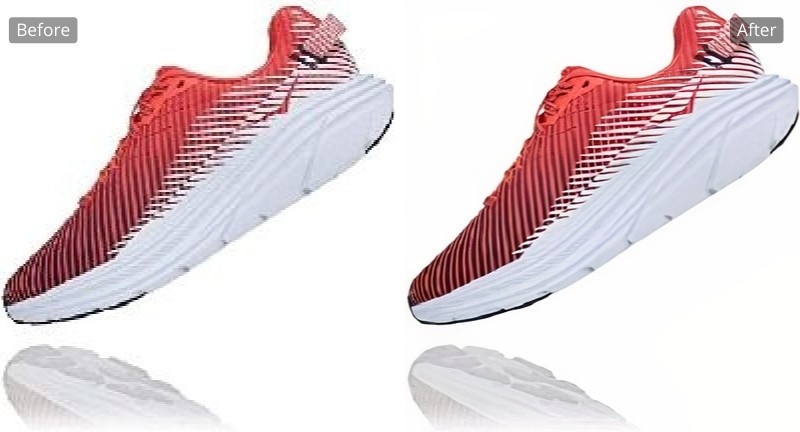 Depixelate product photos
Depixelating product photos improves the visual appeal for e-commerce.
For more information on optimizing your online marketplace, visit claid.ai.
7. Improving Real Estate Images
How do high-quality photos impact the real estate business?
High-quality photos in real estate listings attract more potential renters and buyers, leading to increased revenue.
High-quality photos play a crucial role in the online real estate business. A study shows that rental listings with clear images generate an average of $2,348 in extra annual revenue. Depixelating and enhancing real estate images can make listings more attractive to potential customers. Use real estate presets that include Light AI, depixelation, upscaling, and noise reduction for optimal results.
 Depixelate real estate photos
Depixelating real estate photos makes listings more appealing.
To enable the real estate preset, click Presets > Real Estate.
 Enable real estate preset
Enable the real estate preset for optimal image enhancement.
8. Enhancing Zoomed-In and Cropped Images
How can you improve the quality of zoomed-in or cropped images?
You can improve the quality of zoomed-in or cropped images by using AI-based tools like Let’s Enhance to fix pixelation and restore detail.
Pixelation often occurs when cropping a small region of a photo, which is common in genres like wildlife photography where close views are essential. With Let’s Enhance, you can easily fix cropped, pixelated images, providing a lossless optical zoom effect that can be applied after taking the photo.
 Fix cropped pixelated images
Fix cropped pixelated images with AI-based tools.
9. Depixelating Images in Photoshop: Traditional Techniques
What are some traditional techniques to depixelate images using Photoshop?
In Photoshop, common techniques include using Despeckle, Smart Blur, Gaussian Blur, and Bicubic Smoother enlargement to reduce pixelation.
There are several methods to address minor pixelation in Photoshop:
9.1 A. Despeckle Filter
Navigate to Filter > Noise > Despeckle. Apply this filter multiple times by pressing CTRL + F (Windows) or CMD + F (Mac) to reduce pixelation.
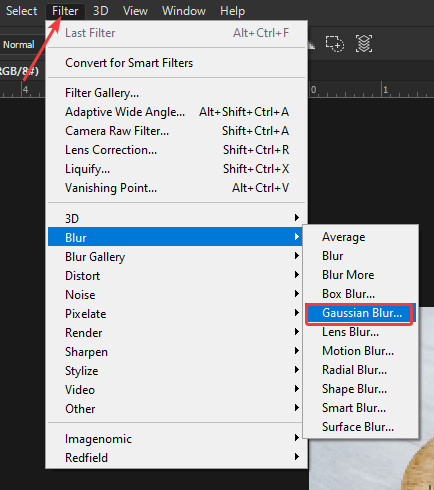
9.2 B. Smart Blur Filter
Go to Filter > Blur > Smart Blur. Adjust the Radius and Threshold sliders until you achieve the best result. If Smart Blur doesn’t provide satisfactory results, experiment with the Gaussian Blur filter, as it can sometimes yield better outcomes.
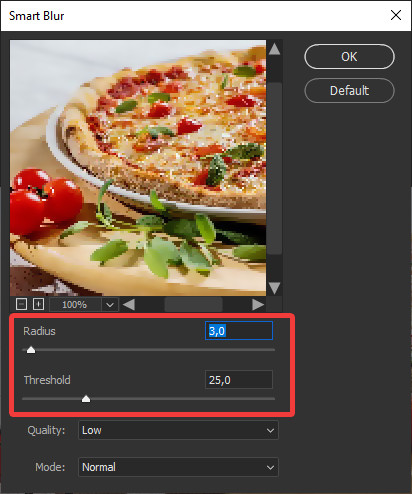 Experiment with Smart Blur filter
Experiment with the Smart Blur filter in Photoshop.
 Experiment with Gaussian Blur filter
Experiment with the Gaussian Blur filter in Photoshop.
9.3 C. Image Size Adjustment
Go to Image > Image Size. Set the resolution to twice the original size. Check the Resample box and apply a Bicubic Smoother enlargement.
 Apply Bicubic Smoother enlargement
Apply Bicubic Smoother enlargement in Photoshop.
Combining these methods can further smooth out the image. However, Photoshop’s smoothing capabilities are limited. For heavy pixelation, AI-based tools like Let’s Enhance offer superior results.
 Comparison of Photoshop and AI enhancement
Comparison of depixelation results between Photoshop and Let’s Enhance.
In this example, Smart Blur and Bicubic Smoother enlargement were used in Photoshop, while Let’s Enhance was used in its default mode (Smart Enhance).
10. Frequently Asked Questions (FAQ)
10.1 How do I know if an image is pixelated?
Photos consist of pixel grids. When an image is upscaled beyond its original resolution, pixels become visible. The picture appears blocky, and curves have triangle edges, similar to the style of old 8-bit games or modern pixel art.
10.2 How can I avoid pixelation?
To avoid pixelation:
- Set your camera to the maximum megapixel setting.
- Use source files with the highest resolution when editing or uploading photos.
- Avoid old upsampling methods like ‘nearest neighbor’ when enlarging images.
- Use vector graphics for simple visuals like logos, as they can be scaled without quality loss.
10.3 Is blurred the same as pixelated?
No, blurred and pixelated are not the same. Blurry photos occur when the camera is out of focus or when images are enlarged using specific upscaling algorithms. Pixelation happens when low-resolution photos are enlarged with basic upscaling methods like ‘nearest neighbor’.
10.4 How can I make a blurry picture clear?
To clear a blurry picture, upload it to a website like Let’s Enhance and click Start processing. The default AI upscaling network, Smart Enhance, identifies and corrects blur, pixelation, and grain automatically.
10.5 How does AI depixelation work?
AI code is trained on thousands of image pairs to reconstruct missing details. Initially, it makes mistakes, similar to humans, but it improves with each iteration. By the time the AI/ML-based app is available to users, it accurately restores missing pixels.
Conclusion: Enhance Your Photos Today
Cleaning up pixelated photos doesn’t have to be a daunting task. Whether you choose to use AI-powered tools like Let’s Enhance or traditional methods in Photoshop, the goal is to restore clarity and detail to your images. At dfphoto.net, we encourage you to explore these techniques and discover the best approach for your specific needs.
Ready to transform your pixelated photos into stunning visuals? Sign up now at dfphoto.net and join our vibrant community of photographers. Enhance your skills, find inspiration, and share your creations. Don’t let pixelation hold you back – unlock the full potential of your images today with dfphoto.net, located at 1600 St Michael’s Dr, Santa Fe, NM 87505, United States. For more information, call us at +1 (505) 471-6001.