Cleaning out your Google Photos storage is essential to manage your digital memories effectively. At dfphoto.net, we understand the importance of keeping your photo library organized and optimized, especially with the evolving storage policies of Google Photos. This guide provides a comprehensive approach to decluttering your Google Photos, ensuring you make the most of your available storage and keep your cherished memories safe and accessible. Let’s dive into techniques for photo culling, optimizing storage settings, and exploring alternative backup solutions to enhance your photo management workflow.
1. Why Is Cleaning Out Google Photos Important?
Cleaning out your Google Photos is important for several reasons, including managing storage space, improving organization, and enhancing overall performance. Let’s explore these benefits in detail.
- Free Up Storage Space: Google Photos offers a limited amount of free storage, and once you exceed this limit, you’ll need to purchase additional storage. By regularly cleaning out your Google Photos, you can remove unnecessary or low-quality images and videos, freeing up valuable storage space. This is particularly important for users who frequently upload high-resolution photos and videos.
- Improve Organization: Over time, your Google Photos library can become cluttered with duplicate photos, blurry images, and screenshots. Cleaning out these unwanted files helps you maintain a well-organized library, making it easier to find and enjoy your favorite memories. A structured photo collection enhances your ability to quickly locate specific images and create albums or projects.
- Enhance Performance: A large and disorganized photo library can slow down the performance of Google Photos, making it take longer to load images, search for specific files, and perform other tasks. By removing unnecessary files, you can improve the app’s speed and responsiveness, providing a smoother and more efficient user experience.
- Reduce Clutter: Digital clutter can be overwhelming and make it difficult to appreciate your photos. Cleaning out your Google Photos helps you focus on the images that truly matter, allowing you to relive important moments without being distracted by irrelevant or low-quality content.
- Save Money: If you exceed your free storage limit, you’ll need to pay for additional storage. By regularly cleaning out your Google Photos, you can reduce the amount of storage you need, potentially saving money on subscription fees. Effective storage management ensures you only pay for what you truly need.
- Backup Efficiency: Cleaning out your Google Photos also streamlines the backup process. Smaller, more organized libraries are quicker to back up and restore, ensuring your precious memories are safely stored and easily accessible when needed. Efficient backups save time and reduce the risk of data loss.
2. Understanding Google Photos Storage Policies
Understanding Google Photos storage policies is crucial for managing your digital memories effectively. Here’s a breakdown:
- Original Quality: Photos and videos are stored in their original resolution and quality, counting towards your Google account storage.
- Storage Saver (formerly High Quality): Photos and videos are compressed, slightly reducing quality but saving significant storage space. Media uploaded in this setting before June 1, 2021, doesn’t count towards your storage.
- Google Account Storage: Google provides 15 GB of free storage shared across Google Drive, Gmail, and Google Photos.
- Purchasing Storage: If you exceed the free 15 GB, you can purchase additional storage through Google One.
- Impact of Policy Changes: After June 1, 2021, all new photos and videos, regardless of quality, count towards your Google account storage.
- Checking Storage: You can check your current storage usage in Google Photos settings under “Account storage.”
- Managing Storage: Regularly clean out unwanted photos and videos to optimize storage usage.
- Backup Strategy: Consider backing up photos to external drives or other cloud services for redundancy.
- Alternatives: Explore alternative photo storage services if Google Photos doesn’t meet your needs.
- dfphoto.net Recommendations: Visit dfphoto.net for tips on managing Google Photos and exploring alternative storage solutions to optimize your photography workflow.
3. Assessing Your Current Google Photos Storage
Assessing your current Google Photos storage is a critical first step in managing your digital memories effectively. By understanding how much storage you’re using and what types of files are consuming the most space, you can make informed decisions about how to clean out and optimize your photo library. Here’s how to assess your current Google Photos storage:
- Open Google Photos: Start by opening the Google Photos app on your mobile device or visiting the Google Photos website on your computer.
- Access Settings:
- On Mobile: Tap on your profile picture in the top right corner, then select “Photos settings”.
- On Web: Click on the gear icon in the top right corner to access settings.
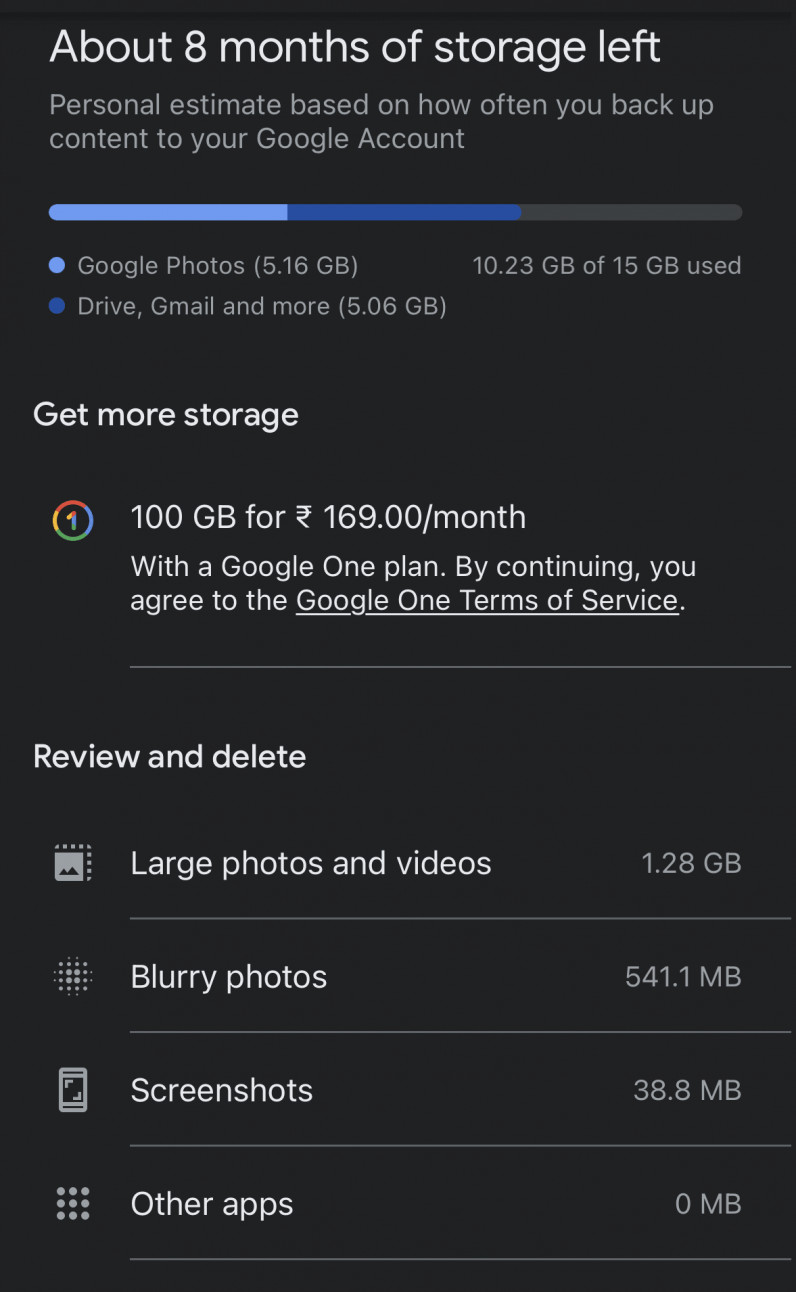
- Check Account Storage:
- On Mobile: Look for the “Backup & sync” option, then tap “Manage storage”.
- On Web: Select “Manage storage” directly from the settings menu.
- Review Storage Usage: Google Photos will display a breakdown of your storage usage, showing how much space is being used by Google Photos, Google Drive, and Gmail. This overview helps you understand where your storage is being consumed.
- Identify Large Files: The storage management tool will also highlight large photos and videos that are taking up significant space. This feature is particularly useful for identifying files that you may want to delete or compress.
- Check Upload Size: Verify your upload size setting to understand whether you’re uploading photos and videos in “Original quality” or “Storage saver”. “Original quality” files consume more storage, while “Storage saver” compresses files to save space.
- Analyze Usage Patterns: Take note of your usage patterns. Are you frequently uploading high-resolution videos? Are you storing a lot of screenshots or duplicate photos? Understanding your habits can help you develop a more effective storage management strategy.
- Utilize Google One: If you’re a Google One subscriber, you can access additional storage insights and tools to help you manage your storage more effectively. Google One provides detailed reports on your storage usage and offers personalized recommendations for optimizing your storage.
- dfphoto.net Tips: Visit dfphoto.net for more tips on assessing your Google Photos storage and implementing strategies to optimize your photo library. Our resources can help you make informed decisions about how to manage your digital memories effectively.
- Consider Alternatives: If you find that Google Photos doesn’t meet your storage needs, consider exploring alternative photo storage solutions. dfphoto.net offers reviews and comparisons of various photo storage services, helping you find the best option for your needs.
4. Identifying What to Delete: The Cull
Identifying which photos and videos to delete—the cull—is a crucial step in cleaning out your Google Photos storage and optimizing your digital library. This process involves carefully reviewing your collection and making informed decisions about what to keep and what to remove. Here’s a comprehensive guide to effectively culling your Google Photos:
- Duplicate Photos: Start by identifying and deleting duplicate photos. Google Photos often detects duplicates automatically, but it’s worth manually reviewing your library to ensure accuracy. Duplicate photos take up unnecessary storage space and clutter your collection.
- Blurry or Out-of-Focus Images: Remove any blurry or out-of-focus images that don’t add value to your collection. While some blurry photos might have sentimental value, most are simply taking up space and can be safely deleted.
- Poorly Composed Shots: Delete photos with poor composition, bad lighting, or other technical issues. Unless these shots capture a unique moment that can’t be replicated, they’re unlikely to be worth keeping.
- Accidental Shots: Review your library for accidental shots, such as photos of the ground, blurry images taken while the camera was in your bag, or screenshots that are no longer needed. These files can be easily removed to free up storage space.
- Unnecessary Screenshots: Screenshots can quickly accumulate and consume storage space. Regularly review your screenshot folder and delete any that are no longer relevant.
- Similar Photos: If you have multiple photos of the same subject taken in quick succession, choose the best one or two and delete the rest. Keeping multiple nearly identical photos can clutter your library without adding significant value.
- Low-Resolution Videos: Remove any low-resolution videos that don’t offer a good viewing experience. These videos take up storage space but don’t provide much in terms of visual quality.
- Photos You Don’t Care About: Be honest with yourself about which photos you truly care about. If there are images that don’t evoke any emotion or memories, consider deleting them to streamline your collection.
- Seasonal Reviews: Set aside time each season to review your Google Photos library and perform a cull. Regular reviews help you stay on top of storage management and keep your collection organized.
- dfphoto.net Tips: Visit dfphoto.net for more tips on effectively culling your Google Photos library. Our resources provide guidance on identifying which photos and videos to delete and optimizing your storage.
- Backup Before Deleting: Before deleting any files, consider backing them up to an external drive or another cloud storage service. This ensures that you have a copy of your photos and videos in case you change your mind later.
- Use Google Photos Tools: Take advantage of Google Photos’ built-in tools for managing storage, such as the “Manage storage” feature, which helps you identify large photos and videos that are consuming the most space.
 New tool from Google Photos that helps you reduce the clutter and increase your free storage
5. Using Google Photos’ Built-In Tools for Cleaning
Using Google Photos’ built-in tools for cleaning is an efficient way to manage and optimize your photo storage. Google Photos offers several features that help you identify and remove unnecessary files, freeing up valuable storage space. Here’s how to use these tools effectively:
- Access the Manage Storage Tool:
- Open the Google Photos app on your mobile device or visit the Google Photos website on your computer.
- Tap on your profile picture in the top right corner, then select “Photos settings”.
- From the settings menu, choose “Manage storage”.
- Review Storage Suggestions:
- The “Manage storage” tool provides suggestions for cleaning up your storage, such as removing blurry photos, large videos, and screenshots.
- Review these suggestions carefully and decide which files you want to delete.
- Delete Blurry Photos:
- Google Photos can identify blurry photos in your library. Review these images and delete any that are not worth keeping.
- Blurry photos take up storage space but offer little in terms of visual quality.
- Remove Large Videos:
- Large videos consume significant storage space. Use the “Manage storage” tool to identify and remove large videos that you no longer need.
- Consider backing up important videos to an external drive before deleting them from Google Photos.
- Eliminate Screenshots:
- Screenshots can quickly accumulate and consume storage space. Regularly review your screenshot folder and delete any that are no longer relevant.
- The “Manage storage” tool can help you identify and remove screenshots efficiently.
- Convert to Storage Saver Quality:
- If you’re running out of storage, consider converting your existing photos and videos to “Storage saver” quality.
- This option compresses your files, reducing their size and saving storage space. Note that this may slightly reduce the quality of your media.
- Review Backed Up Items:
- Ensure that all your important photos and videos are backed up to Google Photos.
- The “Backup & sync” setting allows you to automatically back up your media to the cloud.
- Empty the Trash:
- When you delete photos and videos from Google Photos, they are moved to the trash. To permanently remove these files and free up storage space, you need to empty the trash.
- Open the trash folder and select “Empty trash” to permanently delete the files.
- dfphoto.net Tips: Visit dfphoto.net for more tips on using Google Photos’ built-in tools for cleaning. Our resources provide guidance on effectively managing your photo storage and optimizing your digital library.
- Regular Maintenance: Make it a habit to regularly review and clean your Google Photos library using these built-in tools. This will help you keep your storage under control and ensure that your photos are well-organized.
- Explore Additional Features: Google Photos also offers other features, such as the ability to create albums, edit photos, and share media with friends and family. Explore these features to enhance your photo management experience.
6. Optimizing Your Upload Settings in Google Photos
Optimizing your upload settings in Google Photos is crucial for managing your storage space effectively. By choosing the right settings, you can balance the quality of your photos and videos with the amount of storage they consume. Here’s how to optimize your upload settings in Google Photos:
- Access Settings:
- Open the Google Photos app on your mobile device or visit the Google Photos website on your computer.
- Tap on your profile picture in the top right corner, then select “Photos settings”.
- From the settings menu, choose “Backup & sync”.
- Choose Upload Quality:
- Google Photos offers two main upload quality options: “Original quality” and “Storage saver” (formerly known as “High quality”).
- “Original quality” stores your photos and videos in their original resolution, consuming more storage space.
- “Storage saver” compresses your files, reducing their size and saving storage space. This option may slightly reduce the quality of your media.
- Select Storage Saver:
- If you’re concerned about storage space, choose the “Storage saver” option. This setting is ideal for users who want to store a large number of photos and videos without exceeding their storage limit.
- Keep in mind that photos and videos uploaded in “Storage saver” quality may not be suitable for large prints or professional editing.
- Understand the Trade-Offs:
- Before changing your upload settings, understand the trade-offs between storage space and image quality.
- “Original quality” is best for preserving the highest level of detail in your photos and videos, while “Storage saver” prioritizes storage efficiency.
- Check Existing Uploads:
- If you’ve been using Google Photos for a while, you may have a mix of photos and videos uploaded in both “Original quality” and “Storage saver”.
- You can use the “Manage storage” tool to identify and convert existing files to “Storage saver” quality.
- Set Upload Size for New Photos:
- Ensure that your upload size setting is configured to your preferred quality level.
- This setting will apply to all new photos and videos that you upload to Google Photos.
- Manage Video Quality:
- In addition to photo quality, consider the quality of your video uploads.
- High-resolution videos consume a significant amount of storage space, so you may want to reduce the video quality to save space.
- Monitor Storage Usage:
- Regularly monitor your storage usage in Google Photos to ensure that you’re not exceeding your storage limit.
- The “Manage storage” tool provides a breakdown of your storage usage, showing how much space is being used by Google Photos, Google Drive, and Gmail.
- dfphoto.net Tips: Visit dfphoto.net for more tips on optimizing your upload settings in Google Photos. Our resources provide guidance on balancing image quality with storage efficiency and managing your digital library effectively.
- Experiment with Settings: Don’t be afraid to experiment with different upload settings to find the right balance for your needs. You can always change your settings later if you’re not satisfied with the results.
- Consider Backup Options: If you’re concerned about losing image quality, consider backing up your photos and videos to an external drive or another cloud storage service in their original resolution. This ensures that you have a high-quality backup of your media in case you need it.
7. Archiving Photos to External Drives or Other Cloud Services
Archiving photos to external drives or other cloud services is a smart strategy for managing your Google Photos storage and ensuring the long-term preservation of your digital memories. By creating backup copies of your photos and videos, you can free up space in Google Photos while still having access to your media whenever you need it. Here’s how to archive your photos effectively:
- Choose an Archiving Method:
- External Hard Drive: An external hard drive provides a physical backup of your photos and videos. It’s a reliable option for long-term storage, but it requires manual management.
- Cloud Storage Service: Cloud storage services like Dropbox, OneDrive, and Amazon Photos offer convenient online backups. They provide accessibility from any device and automatic syncing capabilities.
- NAS (Network Attached Storage): A NAS device is a dedicated storage device connected to your home network. It offers centralized storage and can be accessed by multiple devices.
- Select Photos and Videos:
- Identify the photos and videos you want to archive from Google Photos. You can select individual files or entire albums.
- Consider archiving older photos or those that you don’t access frequently to free up space in Google Photos.
- Download Your Files:
- Download the selected photos and videos from Google Photos to your computer.
- You can download individual files by clicking on them and selecting “Download”. To download entire albums, use the Google Takeout service.
- Use Google Takeout:
- Google Takeout allows you to export your data from various Google services, including Google Photos.
- Visit the Google Takeout website and select Google Photos. Choose the albums or files you want to download and select your preferred file format (.zip or .tgz).
- Google will create an archive of your data, which you can then download to your computer.
- Organize Your Files:
- Before archiving your photos and videos, organize them into folders on your computer.
- Create a logical folder structure based on dates, events, or categories to make it easier to find your files later.
- Copy Files to Archiving Method:
- Copy the organized folders to your chosen archiving method (external hard drive, cloud storage service, or NAS device).
- Ensure that all files are copied successfully and verify the integrity of the backup.
- Delete from Google Photos (Optional):
- Once you’ve created a backup of your photos and videos, you can delete them from Google Photos to free up storage space.
- Be sure to empty the trash in Google Photos to permanently remove the files.
- dfphoto.net Tips: Visit dfphoto.net for more tips on archiving photos to external drives or other cloud services. Our resources provide guidance on choosing the right archiving method and ensuring the long-term preservation of your digital memories.
- Regular Backups: Make it a habit to regularly back up your photos and videos to your chosen archiving method. This ensures that you always have a recent copy of your media in case of data loss.
- Test Your Backups: Periodically test your backups to ensure that they are working correctly. Try restoring a few files from your backup to verify that the data is intact.
- Consider Redundancy: For maximum data protection, consider using multiple archiving methods. For example, you could back up your photos to both an external hard drive and a cloud storage service.
8. Exploring Alternative Photo Storage Services
Exploring alternative photo storage services can be a strategic move if Google Photos doesn’t fully meet your needs, whether due to storage limitations, privacy concerns, or feature preferences. Several services offer robust solutions for storing, organizing, and sharing your photos. Here are some alternatives to consider:
- Amazon Photos:
- Features: Amazon Photos provides unlimited full-resolution photo storage for Prime members. It also offers 5 GB of video storage.
- Pros: Tight integration with Amazon services, automatic photo organization, and facial recognition.
- Cons: Limited video storage, requires an Amazon Prime membership.
- Dropbox:
- Features: Dropbox offers cloud storage with file syncing and sharing capabilities. It’s not specifically designed for photos but can be used to store and organize your photo library.
- Pros: Versatile file storage, easy file sharing, and integration with other apps.
- Cons: Limited free storage, can be expensive for large photo libraries.
- OneDrive:
- Features: OneDrive is Microsoft’s cloud storage service. It provides file syncing, sharing, and online access to your photos and videos.
- Pros: Integration with Windows and Microsoft Office, automatic syncing, and affordable storage plans.
- Cons: Limited free storage, primarily designed for file storage rather than photo management.
- Flickr:
- Features: Flickr is a photo-sharing and storage platform popular among photographers. It offers tools for organizing, editing, and showcasing your photos.
- Pros: Large community of photographers, advanced photo management tools, and generous free storage.
- Cons: Focus on photo sharing, limited privacy options for free accounts.
- iCloud Photos:
- Features: iCloud Photos is Apple’s photo storage service. It automatically syncs your photos and videos across all your Apple devices.
- Pros: Seamless integration with Apple devices, automatic syncing, and iCloud Family Sharing.
- Cons: Limited free storage, primarily designed for Apple users.
- SmugMug:
- Features: SmugMug is a professional photo hosting and sharing platform. It offers customizable galleries, e-commerce tools, and advanced privacy settings.
- Pros: Designed for photographers, customizable galleries, and excellent customer support.
- Cons: Paid service, may be overkill for casual users.
- pCloud:
- Features: pCloud is a secure cloud storage service with a focus on privacy. It offers file syncing, sharing, and encryption options.
- Pros: Strong security features, generous storage plans, and lifetime subscription options.
- Cons: Less integration with other apps compared to some other services.
- dfphoto.net Tips: Visit dfphoto.net for reviews and comparisons of alternative photo storage services. Our resources provide guidance on choosing the right service for your needs and managing your digital library effectively.
- Consider Your Needs: When choosing a photo storage service, consider your specific needs and priorities. Do you need unlimited storage, advanced photo management tools, or strong privacy features?
- Test Before Committing: Take advantage of free trials or free storage tiers to test out different photo storage services before committing to a paid plan.
- Backup Strategy: Regardless of which photo storage service you choose, always maintain a backup of your photos on an external drive or another cloud service. This ensures that you have a copy of your media in case of data loss or service disruptions.
9. Creating a Photo Management Routine
Creating a photo management routine is key to keeping your Google Photos storage organized and under control. Regular maintenance ensures that your digital memories are easily accessible, well-preserved, and don’t overwhelm your storage limits. Here’s how to establish an effective photo management routine:
- Schedule Regular Cull Sessions:
- Set aside time each month or quarter to review your Google Photos library and perform a cull.
- This involves deleting duplicate photos, blurry images, unnecessary screenshots, and other unwanted files.
- Allocate Time for Organizing:
- Dedicate time each week or month to organize your photos into albums or folders.
- Use descriptive names and tags to make it easier to find your photos later.
- Review Upload Settings:
- Periodically review your upload settings in Google Photos to ensure that you’re using the optimal quality setting for your needs.
- Consider switching to “Storage saver” if you’re running low on storage space.
- Backup Regularly:
- Establish a regular backup schedule for your photos and videos.
- Back up your files to an external drive, another cloud storage service, or a NAS device.
- Empty the Trash:
- Make it a habit to empty the trash in Google Photos regularly.
- This permanently deletes the files you’ve removed from your library and frees up storage space.
- Update Metadata:
- Take the time to update the metadata for your photos, such as adding captions, descriptions, and location information.
- This makes it easier to search for and organize your photos.
- Check for Duplicates:
- Regularly check your Google Photos library for duplicate photos and videos.
- Delete any duplicates to free up storage space and reduce clutter.
- dfphoto.net Tips: Visit dfphoto.net for more tips on creating a photo management routine. Our resources provide guidance on organizing your digital library and keeping your Google Photos storage under control.
- Use Tools: Utilize Google Photos’ built-in tools for managing storage, such as the “Manage storage” feature, which helps you identify large photos and videos that are consuming the most space.
- Stay Consistent: The key to a successful photo management routine is consistency. Stick to your schedule and make it a habit to regularly maintain your Google Photos library.
- Automate Where Possible: Look for opportunities to automate parts of your photo management routine. For example, you can set up automatic backups to an external drive or cloud storage service.
10. Understanding Image Compression and Quality Loss
Understanding image compression and quality loss is essential for effectively managing your photo storage and ensuring that your digital memories are preserved in the best possible condition. Image compression involves reducing the file size of an image, which can save storage space but may also result in some loss of image quality. Here’s a breakdown of the key concepts:
- Lossy Compression:
- Lossy compression techniques remove some of the data from an image to reduce its file size.
- This can result in a noticeable loss of image quality, especially if the compression is applied aggressively.
- Common lossy compression formats include JPEG.
- Lossless Compression:
- Lossless compression techniques reduce file size without removing any data from the image.
- This means that the image can be restored to its original condition without any loss of quality.
- Common lossless compression formats include PNG and TIFF.
- JPEG (Joint Photographic Experts Group):
- JPEG is a widely used lossy compression format for digital photos.
- It offers a good balance between file size and image quality, but it can introduce artifacts and reduce sharpness if the compression is set too high.
- PNG (Portable Network Graphics):
- PNG is a lossless compression format commonly used for graphics and images with sharp lines and text.
- It preserves image quality but typically results in larger file sizes compared to JPEG.
- TIFF (Tagged Image File Format):
- TIFF is a lossless compression format often used for professional photography and archival purposes.
- It supports high-resolution images and preserves image quality, but it can result in very large file sizes.
- Image Resolution:
- Image resolution refers to the number of pixels in an image. Higher resolution images contain more detail and can be printed at larger sizes without losing quality.
- Reducing the resolution of an image can significantly reduce its file size but may also result in a loss of detail.
- Bit Depth:
- Bit depth refers to the number of bits used to represent each pixel in an image. Higher bit depths allow for more colors and shades, resulting in smoother gradients and more accurate color reproduction.
- Reducing the bit depth of an image can reduce its file size but may also result in a loss of color accuracy.
- dfphoto.net Tips: Visit dfphoto.net for more tips on understanding image compression and quality loss. Our resources provide guidance on choosing the right compression format and settings for your needs.
- Experiment: Experiment with different compression settings to find the right balance between file size and image quality.
- Consider Original Purpose: Consider the original purpose of your photos when choosing a compression format. If you plan to print your photos at large sizes, it’s best to use a lossless compression format or store them in their original resolution.
- Backup: Always maintain a backup of your original, uncompressed photos in case you need them in the future.
Here are five search intents for the keyword “How To Clean Out Google Photos”:
- Informational: Users want to learn the steps to delete photos and videos from Google Photos to free up storage space.
- Practical: Users are looking for specific methods or tools within Google Photos to identify and remove unnecessary files like duplicates or blurry images.
- Problem-Solving: Users are facing storage limitations in Google Photos and need guidance on how to efficiently manage and optimize their storage.
- Comparative: Users want to explore alternative photo storage solutions or backup options to complement or replace Google Photos.
- Preventative: Users are seeking tips on how to maintain their Google Photos library to avoid clutter and efficiently manage their digital memories.
Cleaning out Google Photos might seem daunting, but with these strategies, you can reclaim valuable storage and rediscover your best memories. Remember to visit dfphoto.net for more photography tips and resources!