Personalizing your Windows experience is easier than you might think, and one of the simplest yet most impactful ways to do this is by changing your desktop background. Setting a photo as your background not only injects your personal style into your digital workspace but can also evoke positive emotions, keep important memories close, or simply make your computer feel more inviting. Whether it’s a cherished family photo, a breathtaking landscape from your travels, or a piece of art you admire, Windows offers seamless ways to display your favorite images right on your desktop.
This guide will walk you through the various methods to change the background on a photo in Windows, ensuring you can customize your screen exactly to your liking. We’ll explore how to set a single image, create a rotating slideshow of your photos, and even delve into advanced options for multiple monitors and virtual desktops. Let’s transform your screen and make your Windows experience truly yours.
Step-by-Step Guide to Changing Your Background Photo
Changing your desktop background in Windows is a straightforward process, and there are multiple ways to access the settings. Here’s a detailed walkthrough:
-
Accessing Personalization Settings:
There are a few quick ways to get to the Personalization settings where you can manage your background:
-
Through the Settings App: Click on the Start Menu (Windows icon in the bottom left corner) and then select the Settings gear icon. In the Settings app, click on Personalization.
-
Right-Click on the Desktop: This is the quickest shortcut. Simply right-click anywhere on your empty desktop space. In the context menu that appears, select Personalize.
Both methods will directly take you to the Personalization settings within Windows.
-
-
Navigating to the Background Settings:
Once you are in the Personalization settings, ensure Background is selected in the left-hand sidebar menu. This will open up all the options for customizing your desktop background.
-
Choosing “Picture” for Your Background Photo:
Under the “Personalize your background” dropdown menu, you’ll see a few options. To set a photo as your background, select Picture.
-
Selecting Your Photo:
After choosing “Picture”, you’ll see a section below with the heading “Choose your picture”. Here you have a few choices:
-
Default Windows Pictures: Windows offers a selection of default images you can use. These are displayed as thumbnails. You can click on any of these to set them as your background instantly.
-
Browse for Your Own Photo: To use your personal photo, click the Browse button. This will open a file explorer window. Navigate to the folder where your photo is saved, select the image file, and click Choose picture. Windows supports common image formats like JPG, PNG, BMP, and more.
-
Setting a Photo Directly from File Explorer: You can also set a photo as your background directly from File Explorer. Open File Explorer, find the image you want to use, right-click on the image file, and in the context menu, select Set as desktop background.
-
Setting a Photo from the Photos App: If you are viewing a photo in the Windows Photos app, you can also set it as your background from there. Open the photo in the Photos app, click on the See more menu (three dots icon,
...), navigate to Set as, and then choose Background.
-
-
Choose a Fit for Your Background Photo:
Once you’ve selected your photo, the “Choose a fit” dropdown menu becomes important. This determines how your photo is displayed on your screen, especially if the photo’s dimensions don’t perfectly match your screen’s resolution. Here are the available options:
-
Fill: This option scales the photo to completely cover your screen. To achieve this, the image might be cropped, meaning some parts of the edges of the photo may be cut off to ensure there are no empty spaces on the screen.
-
Fit: “Fit” resizes the image to fit within your screen while maintaining its original aspect ratio. This means the entire image will be visible, but if the aspect ratio isn’t the same as your screen, you might see black bars on the sides (or top and bottom) to fill the empty space.
-
Stretch: This option stretches the image to fill the entire screen, regardless of its original aspect ratio. Stretching can distort the image if its proportions are very different from your screen’s, making objects in the photo appear elongated or squashed.
-
Tile: “Tile” repeats the image to fill the screen. This is most effective with smaller images that are designed to be patterns. The image will be placed side-by-side and top-to-bottom to cover the entire desktop area.
-
Center: This option places your photo in the very center of the screen at its actual size, without any resizing. If the photo is smaller than your screen resolution, the background area around the image will be filled with a solid color (usually black by default, depending on your theme).
-
Span: “Span” is specifically designed for multi-monitor setups. It stretches a single image across all your displays, creating a panoramic background. This is ideal if you have multiple monitors side-by-side and want a cohesive look across them.
Alt text: Windows 10 Settings interface displaying options for choosing how desktop background images are fitted to the screen, including Fill, Fit, Stretch, Tile, Center, and Span.
Choose the “fit” option that best displays your photo on your screen according to your preference. “Fill” and “Fit” are generally the most popular choices for photos.
-
Beyond a Single Photo: Slideshows and More
While setting a single photo as your background is a great start, Windows offers even more customization:
-
Slideshow Background: If you have multiple photos you love, you don’t have to choose just one! By selecting Slideshow in the “Personalize your background” dropdown, you can choose a folder of images. Windows will then cycle through these images as your desktop background, changing at a set interval you can configure. You can also choose to shuffle the order of the pictures. To manually advance to the next image in your slideshow, right-click on the desktop and select Next desktop background.
-
Solid Color Background: For a minimalist look, you can choose a Solid color as your background. This option lets you select any color from a palette or even create a custom color. Solid color backgrounds can be less distracting and may be preferable for users who want a clean and simple desktop.
-
Windows Spotlight: For a constantly refreshing and visually stunning desktop, select Windows spotlight. This option automatically downloads and displays beautiful, high-quality images from Bing as your background, changing daily. These images often showcase breathtaking landscapes and scenes from around the world, and sometimes include interesting facts about the image.
Backgrounds on Multiple Displays
If you are using multiple monitors, Windows provides options to manage your background across all your screens:
-
Same or Different Photo on Each Display (Picture Background): When you choose “Picture” as your background, you can set the same image across all displays or choose a different image for each monitor. To set different images, right-click on an image thumbnail in the “Choose your picture” section and select whether to “Set for monitor 1”, “Set for monitor 2”, etc.
Note: This per-monitor background setting is not available if you are using multiple desktops.
-
Slideshow Across Displays (Slideshow Background): If you select “Slideshow”, by default, each monitor will display a different image from the selected folder in the slideshow rotation. This can create a dynamic and varied visual experience across your multi-monitor setup.
Backgrounds on Multiple Desktops (Virtual Desktops)
Windows allows you to create and use multiple virtual desktops to organize your workspace. Here’s how background customization works with multiple desktops:
-
Different Background for Each Desktop: You can set a unique background photo for each virtual desktop. To do this, when you are in the Background settings and have chosen “Picture”, right-click on an image thumbnail in the “Recent images” section. You will then see options to “Set for all desktops” or to choose a specific desktop (like “Set for Desktop 1”, “Set for Desktop 2”, etc.) to apply the background to. This is a fantastic way to visually distinguish between your different workspaces.
-
No Per-Monitor Backgrounds with Multiple Desktops: If you are using multiple desktops, you cannot set different background pictures for different monitors within the same desktop. The background setting will apply to the entire desktop (across all monitors if you have them).
-
Slideshow Not Supported for Multiple Desktops: Unfortunately, the slideshow background option is not supported when using multiple desktops. You will need to choose either a single picture or a solid color background for each desktop.
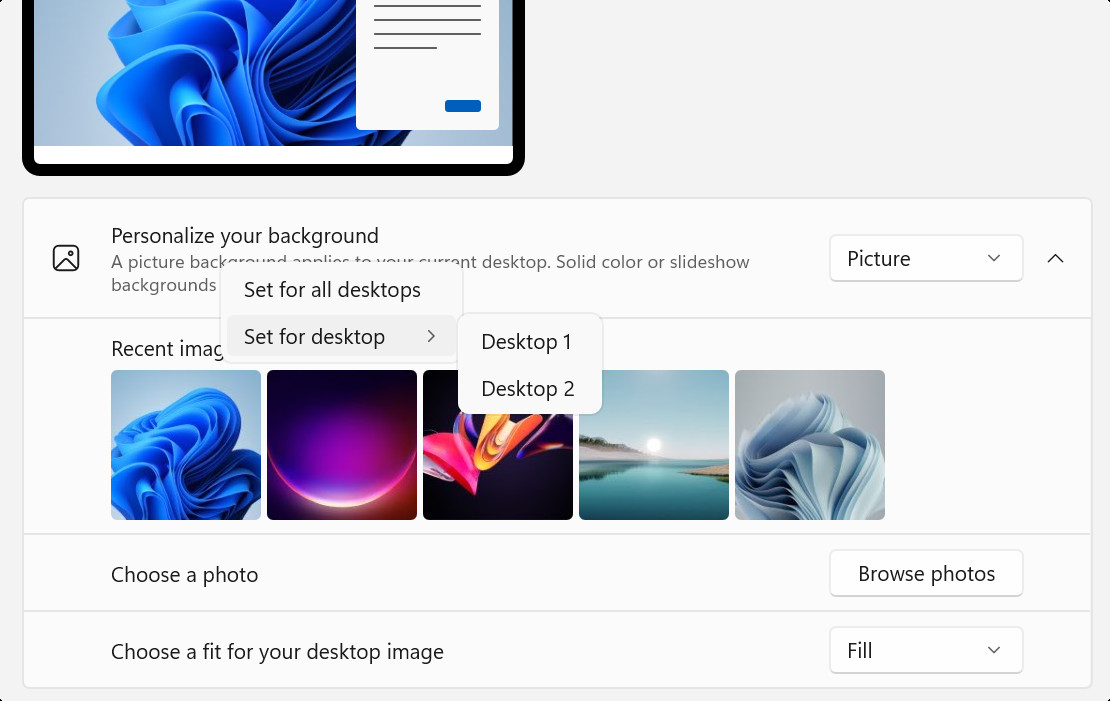 Screenshot of Settings – configuring a background for multiple desktops.
Conclusion
Changing the background on a photo in Windows is a simple yet powerful way to personalize your computer and make it feel more like your own. From setting a single cherished photo to creating dynamic slideshows or utilizing stunning daily images from Windows Spotlight, the options are plentiful. Whether you’re aiming for a visually inspiring workspace, a nostalgic reminder of happy memories, or simply a fresh look, Windows provides all the tools you need to customize your desktop background to perfectly reflect your style and preferences. Start exploring these options today and transform your digital environment!