Capturing moments with your iPhone is second nature, and photos are precious keepsakes of our lives. However, sometimes a cluttered or unappealing background can detract from the subject of your photo. Fortunately, changing the background of a photo on your iPhone is easier than ever, allowing you to make your subject truly shine.
This guide provides a comprehensive walkthrough on how to change a photo background on your iPhone. Discover simple techniques using built-in features and explore powerful apps to transform your images with stunning new backgrounds. Let’s dive into how you can effortlessly change your photo backgrounds and unlock your creative potential.
Utilizing the Built-In Photos App to Change Photo Background
Apple’s native Photos app offers a surprisingly convenient feature for isolating subjects, which is the first step in changing a photo background. This feature allows you to lift the main subject from its original background, effectively creating a cutout with a transparent background. This capability extends beyond just the Photos app, also working seamlessly within Safari.
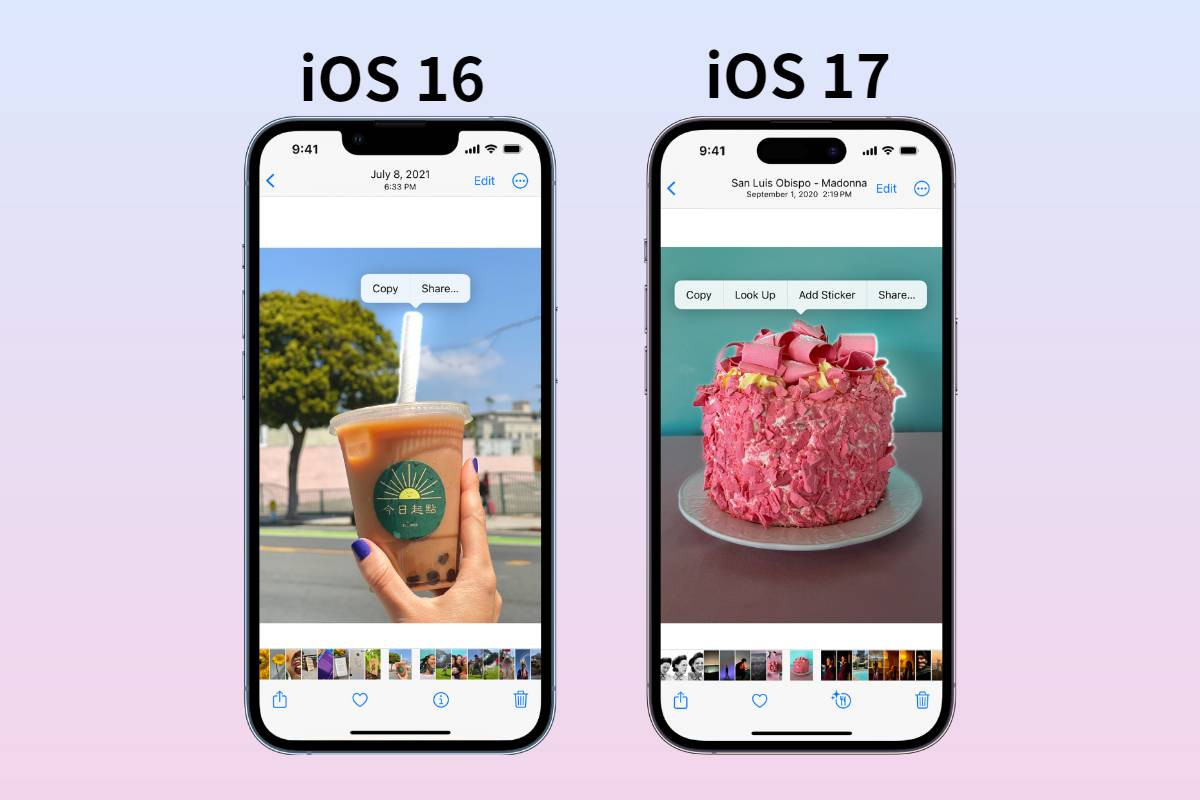 Using the Lift Subject feature on iPhone to isolate the main subject from the photo background in iOS 16 and iOS 17
Here’s how to leverage this feature to prepare for a background change:
- Open Photos and Select Your Image: Launch the Photos app on your iPhone and choose the photo you wish to edit.
- Lift the Subject: Long-press on the main subject of your photo. You’ll notice a white outline appear around the subject as the iPhone intelligently isolates it from the background.
- Copy the Isolated Subject: After the subject is highlighted, tap Copy from the options that appear. This action copies the subject as a PNG image with a transparent background to your clipboard.
- Paste and Utilize Your Subject: You can now paste this isolated subject into other apps. For instance, you can paste it into the Files app to save it as a standalone PNG image. Alternatively, you can directly paste it into messaging apps to share with friends or into other photo editing apps to place it onto a new background.
Tip: This “Lift Subject” feature isn’t limited to the Photos app. In Safari, you can perform the same action by long-pressing on an image and selecting Copy Subject to isolate and copy the subject with a transparent background.
This feature is widely available on iPhones, starting from iPhone SE 2nd generation and later models. It’s a quick and effective way to remove a photo background on your iPhone and create a transparent PNG, setting the stage for further background modifications.
Exploring Fotor for Creative Background Changes
While the iPhone’s built-in Photos app excels at creating transparent backgrounds, it doesn’t natively offer options to replace backgrounds with different colors or scenes. For more versatile and creative background changes, third-party apps like Fotor provide powerful solutions.
Fotor offers a user-friendly interface and advanced AI-powered tools that allow you to change photo backgrounds to virtually anything you can imagine. Whether you want to place yourself in front of a vibrant cityscape, a serene natural landscape, or achieve a professional depth-of-field effect, Fotor empowers you to transform your photos in seconds.
[Will need to add content about how to use Fotor or another app if the original article has more details, but it ends here. For now, keep it concise based on provided original text]
By combining the iPhone’s “Lift Subject” feature with the capabilities of apps like Fotor, you have a range of options to change the background of a photo on your iPhone, from simple transparent backgrounds to elaborate and imaginative scenes. Choose the method that best suits your needs and start transforming your photos today!