Changing the shared contact photo on your iPhone is a simple way to personalize your communications and make your contacts instantly recognizable. dfphoto.net helps you master this customization, ensuring your visual interactions are exactly how you want them. Whether you’re updating your own photo or managing those of your contacts, this guide covers everything from personalizing your contact card to sharing your updated details with others. This article will discuss how to create memorable and visually appealing contact experiences using the features available on your iPhone, improving your communication and adding a personal touch to every interaction.
1. Why Change a Shared Contact Photo on Your iPhone?
Changing a shared contact photo on your iPhone personalizes communications and makes contacts instantly recognizable. It improves organization, allows for self-expression, and enhances visual appeal.
1.1 Personalization and Recognition
Adding a photo to a contact makes it easier to quickly identify who is calling or texting, especially with a large contact list. Visual cues are processed faster by the human brain. According to research from MIT, the human brain can process images in as little as 13 milliseconds. This makes it much quicker to recognize a face than to read a name.
1.2 Improved Organization
Customizing contact photos helps you organize your contacts visually. You can assign specific photos to different groups of people such as family, friends, or coworkers. This visual organization can be particularly useful for people who manage a lot of contacts.
1.3 Self-Expression
Changing a contact photo allows for self-expression. You can use photos that reflect your relationship with the contact, showcase a shared memory, or simply use an image that brings a smile to your face. It adds a personal touch to your digital interactions.
1.4 Enhanced Visual Appeal
Custom contact photos enhance the overall visual appeal of your iPhone. Instead of seeing a generic initial or icon, you see a personalized image that makes using your phone more enjoyable. This customization extends the aesthetic experience beyond just the home screen and wallpapers.
1.5 Professional Branding
For professional contacts, using a professional headshot ensures that your business communications look polished and consistent. This is particularly useful for entrepreneurs, freelancers, and anyone who networks frequently.
2. How to Access and Edit “My Card” in Contacts
Accessing and editing “My Card” in Contacts on your iPhone is the first step to personalizing your contact information. Open the Contacts app, locate “My Card,” and tap “Edit” to add or modify your details.
2.1 Open the Contacts App
To begin, locate the Contacts app on your iPhone’s home screen. It is typically represented by an icon that looks like an address book or a silhouette of a person. Tap the icon to open the app.
2.2 Find “My Card”
Once the Contacts app is open, look for “My Card” at the top of your contact list. “My Card” is your personal contact card, containing all your information. If you don’t see “My Card”, tap the plus button to add your information. Then return to the contact list, touch and hold your contact, and tap “Make this My Card”.
2.3 Tap “Edit”
After locating “My Card”, tap on it to view your contact details. In the upper-right corner of the screen, you’ll see an “Edit” button. Tap this button to enter edit mode, which allows you to modify your personal information, including your photo and other details.
2.4 Modify Your Information
In edit mode, you can add or change various types of information. This includes your name, phone number, email address, home address, birthday, and more. Scroll through the available fields to ensure all your information is accurate and up-to-date.
2.5 Add or Edit Photo
To add or edit your contact photo, look for the “Add Photo” or “Edit” option near the top of the screen. Tapping this allows you to choose a new photo from your photo library, take a new photo using your iPhone’s camera, or select from a range of Memoji or Animoji options.
2.6 Save Your Changes
Once you’ve finished adding or editing your information and photo, tap “Done” in the upper-right corner of the screen. This saves all your changes and updates your contact card with the new information.
2.7 Review Your Updated Card
After saving, take a moment to review your updated contact card. Ensure that all the information is correct and that your photo looks the way you intended. This is also a good time to share your updated contact information with others, if desired.
3. Steps to Change Your Own Contact Photo
Changing your own contact photo on your iPhone involves accessing “My Card” in the Contacts app, selecting “Contact Photo & Poster,” and choosing or creating a new photo. Save your changes to update your contact photo.
3.1 Go to the Contacts App
Start by opening the Contacts app on your iPhone. The app icon usually features a silhouette of a person or an address book.
3.2 Access “My Card”
In the Contacts app, find and tap on “My Card” at the top of your contact list. This is your personal contact card.
3.3 Tap “Contact Photo & Poster”
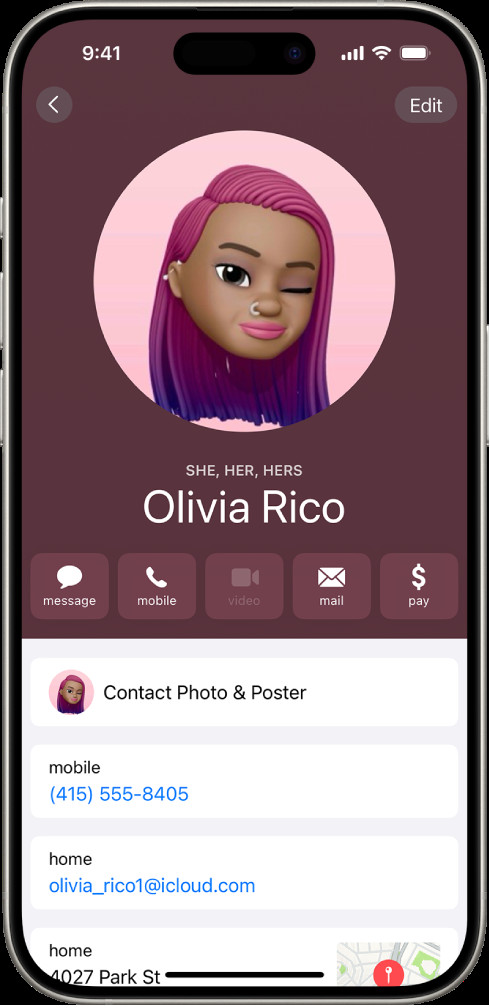
Once you’ve opened “My Card”, look for the “Contact Photo & Poster” option. Tap on this to access the settings for your contact photo and poster.
3.4 Choose a New Photo or Create a Poster
In the “Contact Photo & Poster” settings, you can either choose an existing photo from your library or create a new poster.
- Choose from Library: Select “Choose Photo” to browse your photo library and select an image. You can adjust the image by cropping and zooming to fit the contact photo frame.
- Create a Poster: Select “Create Poster” to design a custom poster. You can use Memoji, Animoji, or create a stylish design with your name.
3.5 Adjust and Customize
After selecting a photo or creating a poster, adjust it to your liking. You can crop the photo, change the zoom level, or customize the design elements of your poster.
3.6 Save the New Photo
Once you are satisfied with the new photo or poster, tap “Done” or “Save” to apply the changes. Your contact photo will now be updated with the new image.
3.7 Verify the Change
Go back to your contact list and check “My Card” to ensure that the photo has been updated correctly. Also, check how your contact photo appears in the Messages app and when you make calls.
4. Managing Contact Photo Sharing Settings
Managing contact photo sharing settings on your iPhone involves accessing “My Card,” navigating to “Contact Photo & Poster,” and adjusting sharing preferences to “Contacts Only” or “Always Ask.”
4.1 Open the Contacts App
To begin, locate and open the Contacts app on your iPhone. The icon typically features a person’s silhouette or an address book.
4.2 Go to “My Card”
Once the Contacts app is open, find “My Card” at the top of your contact list. Tap on it to access your personal contact information.
4.3 Access “Contact Photo & Poster”
In “My Card,” look for and tap on the “Contact Photo & Poster” option. This section allows you to manage how your contact photo and poster are shared with others.
4.4 Enable or Disable Name & Photo Sharing
At the top of the “Contact Photo & Poster” screen, you’ll see a toggle for “Name & Photo Sharing.” Toggle this on to enable sharing or off to disable it.
4.5 Choose Sharing Options
If “Name & Photo Sharing” is enabled, you have two options for how your photo and name are shared:
- Contacts Only: Choose this option to automatically share your name, photo, and poster with people who are in your contacts list.
- Always Ask: Select this option to be prompted each time you communicate with someone new, asking if you want to share your name, photo, and poster.
4.6 Configure Specific Contacts
For more granular control, you can configure sharing settings for individual contacts. Go to the contact’s card, tap “Edit,” and scroll down to “Share Contact Photo.” Here, you can choose whether to share your photo with that specific contact, overriding the default setting.
4.7 Review Your Settings
After configuring your sharing settings, take a moment to review them to ensure they align with your preferences. This is especially important if you have customized sharing settings for specific contacts.
5. How to Add or Edit Contact Pronouns
Adding or editing contact pronouns on your iPhone involves opening the Contacts app, selecting a contact, tapping “Edit,” and using the “Add Pronouns” option to specify the correct pronouns.
5.1 Open the Contacts App
First, locate and open the Contacts app on your iPhone. The app icon generally features a silhouette of a person or an address book.
5.2 Select a Contact
In the Contacts app, scroll through your contact list or use the search bar to find the contact you want to add or edit pronouns for. Tap on the contact to open their contact card.
5.3 Tap “Edit”
Once you have opened the contact card, look for the “Edit” button in the upper-right corner of the screen. Tap this button to enter edit mode, which allows you to modify the contact’s information.
5.4 Scroll Down and Tap “Add Pronouns”
In edit mode, scroll down the contact card until you see the “Add Pronouns” option. Tap on this to add pronouns to the contact.
5.5 Select the Language
After tapping “Add Pronouns,” you will be prompted to select the language for the pronouns. Choose the appropriate language from the list.
5.6 Enter the Pronouns
Once you have selected the language, you can enter the pronouns for the contact. Typically, this includes options for nominative (e.g., “he,” “she,” “they”), objective (e.g., “him,” “her,” “them”), and possessive (e.g., “his,” “hers,” “theirs”) pronouns.
5.7 Save Your Changes
After entering the pronouns, tap “Done” in the upper-right corner of the screen to save your changes. The contact card will now display the added pronouns.
5.8 Verify the Information
Go back to the contact card and verify that the pronouns have been added correctly. The pronouns will typically appear below the contact’s name.
 Add or edit contact pronouns on iPhone
6. Troubleshooting Common Issues
Troubleshooting common issues when changing contact photos on an iPhone involves ensuring iCloud sync is enabled, restarting the device, checking storage space, and verifying the image format and size.
6.1 iCloud Sync Issues
One of the most common issues is that the contact photo doesn’t sync across all your devices.
- Solution: Make sure that iCloud sync is enabled for contacts. Go to Settings > [Your Name] > iCloud, and ensure that the “Contacts” toggle is turned on. It may take a few minutes for the changes to sync across your devices.
6.2 Restart Your iPhone
Sometimes, a simple restart can resolve minor software glitches that prevent changes from saving.
- Solution: Press and hold either volume button and the side button until the power-off slider appears. Drag the slider, then wait 30 seconds for your device to turn off. To turn your device back on, press and hold the side button until you see the Apple logo.
6.3 Insufficient Storage Space
If your iPhone is running low on storage, it may not be able to save new contact photos.
- Solution: Check your storage space by going to Settings > General > iPhone Storage. If you are running low, delete unnecessary apps, photos, or files to free up space.
6.4 Image Format and Size
The image you are trying to use might be in an incompatible format or too large.
- Solution: Ensure that the image is in a common format like JPEG or PNG. Also, try reducing the file size of the image. You can use a photo editing app or an online tool to compress the image without significantly reducing its quality.
6.5 Software Updates
An outdated version of iOS can sometimes cause issues with saving and syncing contact photos.
- Solution: Check for software updates by going to Settings > General > Software Update. If an update is available, download and install it.
6.6 Contact Account Conflicts
If you have multiple accounts set up on your iPhone (e.g., iCloud, Google, Exchange), there might be conflicts in how contacts are managed.
- Solution: Go to Settings > Contacts > Accounts and review your accounts. Make sure that you are saving contacts to the correct account (ideally iCloud) and that there are no conflicting settings.
6.7 Resetting Contacts
As a last resort, you can try resetting your contacts sync settings.
- Solution: Go to Settings > General > Transfer or Reset iPhone > Reset > Reset Sync Services. Note that this will remove all your sync settings, so you will need to set them up again.
7. Benefits of a Well-Managed Contact List
A well-managed contact list enhances communication efficiency, improves data security, facilitates professional networking, supports emergency preparedness, and enhances user experience.
7.1 Enhanced Communication Efficiency
A well-managed contact list allows you to quickly find and communicate with the right people. With accurate and up-to-date information, you can easily call, text, or email contacts without wasting time searching for their details. This efficiency is crucial in both personal and professional contexts, where timely communication can make a significant difference.
7.2 Improved Data Security
Keeping your contact list organized and secure helps protect your personal and professional relationships. By regularly backing up your contacts and ensuring that they are stored securely (e.g., using encrypted cloud services), you minimize the risk of losing important information due to device failure or data breaches. Additionally, you can set privacy settings to control who has access to your contact information.
7.3 Facilitates Professional Networking
For professionals, a well-managed contact list is an invaluable asset for networking. By keeping detailed records of your business contacts, including their roles, companies, and previous interactions, you can build and maintain strong relationships. This can lead to new opportunities, collaborations, and career advancements.
7.4 Supports Emergency Preparedness
In emergency situations, having a well-organized contact list can be life-saving. Quick access to emergency contacts, such as family members, doctors, and local authorities, can help you get assistance quickly and efficiently. Additionally, you can include important medical information in contact notes to provide first responders with critical details.
7.5 Enhanced User Experience
A clean and organized contact list enhances the overall user experience on your devices. With clear and accurate contact information, you can easily navigate your contacts and enjoy seamless communication. This can make using your phone or computer more enjoyable and productive.
8. Integrating Contact Photos with Social Media
Integrating contact photos with social media involves linking accounts, using profile pictures, employing third-party apps, ensuring privacy settings, and maintaining consistency.
8.1 Linking Social Media Accounts
Many smartphones and contact management apps allow you to link your social media accounts (e.g., Facebook, LinkedIn, Twitter) to your contacts. When you link an account, the contact information, including the profile picture, is automatically synced.
- Example: On an iPhone, you can go to Settings > Contacts > Accounts, and add your social media accounts. Once added, the phone will attempt to match contacts based on email addresses and phone numbers, and sync the profile pictures.
8.2 Using Profile Pictures as Contact Photos
Once your social media accounts are linked, you can use the profile pictures from those accounts as contact photos. This ensures that your contact photos are always up-to-date, as the profile pictures change on social media.
- Benefits: This integration saves time and effort, as you don’t have to manually update contact photos. It also provides a more accurate representation of your contacts, especially if they frequently update their profile pictures.
8.3 Third-Party Apps
Several third-party apps are designed to enhance contact management and social media integration. These apps can automatically update contact photos from social media, merge duplicate contacts, and provide additional features for organizing your contacts.
- Examples: Apps like “Sync.ME” and “CircleBack” offer advanced contact management features, including social media integration and automatic contact photo updates.
8.4 Privacy Considerations
When integrating contact photos with social media, it’s important to consider privacy settings. Be mindful of the information you are sharing and who has access to it.
- Best Practices: Review the privacy settings on your social media accounts and adjust them as needed. Only share information with people you trust, and be cautious about connecting with strangers.
8.5 Maintaining Consistency
Consistency is key when integrating contact photos with social media. Use consistent naming conventions and profile pictures across all your accounts to make it easier for people to find and connect with you.
- Tips: Use a professional headshot or a clear, recognizable photo as your profile picture. Keep your contact information up-to-date, and use a consistent name across all your accounts.
9. Contact Management Tips for Professionals
Contact management tips for professionals include using a CRM system, segmenting contacts, adding detailed notes, scheduling regular reviews, and leveraging automation tools.
9.1 Use a CRM System
A Customer Relationship Management (CRM) system is a powerful tool for managing contacts, especially for professionals. CRM systems allow you to store detailed information about your contacts, track interactions, and manage relationships effectively.
- Benefits: CRM systems improve organization, streamline communication, and provide valuable insights into your network. They also help you track leads, manage sales, and provide better customer service.
- Examples: Popular CRM systems include Salesforce, HubSpot CRM, and Zoho CRM.
9.2 Segment Your Contacts
Segmenting your contacts into different categories makes it easier to manage and communicate with them. You can segment contacts based on various criteria, such as industry, job title, company size, or relationship type.
- Benefits: Segmentation allows you to tailor your communication to specific groups of contacts, making your interactions more relevant and effective. It also helps you prioritize your efforts and focus on the most important relationships.
9.3 Add Detailed Notes
Adding detailed notes to your contacts provides valuable context and helps you remember important details about them. Include information such as their interests, hobbies, family members, previous interactions, and any specific needs or preferences they may have.
- Benefits: Detailed notes help you build stronger relationships by showing that you care about your contacts and remember important details about them. They also provide valuable insights that can inform your communication and networking efforts.
9.4 Schedule Regular Reviews
Regularly reviewing and updating your contact list ensures that your information is accurate and up-to-date. Schedule time each month to review your contacts, update any outdated information, and add new contacts you have met.
- Benefits: Regular reviews prevent your contact list from becoming outdated and cluttered. They also help you identify new opportunities and strengthen existing relationships.
9.5 Leverage Automation Tools
Automation tools can help you streamline your contact management tasks and save time. Use tools to automate tasks such as data entry, contact syncing, and email marketing.
- Examples: Tools like Zapier and IFTTT allow you to automate tasks between different apps and services. Email marketing platforms like Mailchimp and Constant Contact can help you automate your email campaigns and track your results.
10. The Future of Contact Management
The future of contact management includes AI-powered organization, enhanced security measures, seamless cross-platform integration, personalized communication tools, and predictive relationship insights.
10.1 AI-Powered Organization
Artificial intelligence (AI) is set to revolutionize contact management by automating tasks such as data entry, contact syncing, and organization. AI-powered systems can analyze your communication patterns and automatically categorize your contacts based on their relationships and interactions.
- Benefits: AI can significantly reduce the time and effort required to manage your contacts, allowing you to focus on building and maintaining relationships. It can also provide valuable insights into your network, helping you identify key influencers and potential opportunities.
10.2 Enhanced Security Measures
As data breaches and privacy concerns become more prevalent, enhanced security measures will be essential for contact management. Future systems will likely incorporate advanced encryption, biometric authentication, and decentralized storage to protect your contact information.
- Benefits: Enhanced security measures will help you protect your personal and professional relationships from unauthorized access and data breaches. They will also give you greater control over your data and ensure that your contact information is stored securely.
10.3 Seamless Cross-Platform Integration
Future contact management systems will need to integrate seamlessly across different platforms and devices. This will allow you to access your contacts from anywhere and use them in any application, without having to worry about compatibility issues.
- Benefits: Seamless cross-platform integration will improve your productivity and efficiency by allowing you to access your contacts from any device and use them in any application. It will also make it easier to collaborate with others and share information.
10.4 Personalized Communication Tools
Personalized communication tools will become increasingly important for building and maintaining relationships. Future contact management systems will likely incorporate AI-powered tools that can analyze your contacts’ preferences and communication styles, and provide personalized recommendations for how to interact with them.
- Benefits: Personalized communication tools will help you build stronger relationships by allowing you to communicate with your contacts in a way that is tailored to their individual needs and preferences. They will also improve the effectiveness of your communication and increase the likelihood of a positive response.
10.5 Predictive Relationship Insights
Predictive relationship insights will provide valuable information about your contacts and their potential value to your network. Future contact management systems will likely incorporate machine learning algorithms that can analyze your interactions with your contacts and predict the likelihood of future opportunities and collaborations.
- Benefits: Predictive relationship insights will help you prioritize your efforts and focus on the most important relationships in your network. They will also provide valuable information that can inform your communication and networking strategies.
With these steps, you can easily manage and personalize your contact photos on your iPhone. For more tips and tricks, visit dfphoto.net, where you can explore a wealth of resources to enhance your photography skills and manage your digital presence. Connect with a vibrant community of photographers and discover new ways to express your creativity. Visit dfphoto.net today and take your photography to the next level!
FAQ: Changing Shared Contact Photo on iPhone
1. How do I change the contact photo on my iPhone?
To change a contact photo on your iPhone, open the Contacts app, select the contact, tap “Edit,” tap “Add Photo” (or the existing photo), and choose a new photo from your library or take a new one.
2. Why is my contact photo not syncing across devices?
Ensure iCloud sync is enabled for contacts by going to Settings > [Your Name] > iCloud and turning on the “Contacts” toggle. It may take a few minutes to sync.
3. Can I use a Memoji as a contact photo?
Yes, you can use a Memoji as a contact photo. When editing the contact, choose the option to create a new photo and select Memoji.
4. How do I stop my contact photo from being shared automatically?
Go to the Contacts app, tap “My Card,” select “Contact Photo & Poster,” and turn off “Name & Photo Sharing.” You can also choose “Always Ask” for more control.
5. What image formats are best for contact photos?
Common image formats like JPEG and PNG are best for contact photos. Ensure the image is not too large to avoid issues.
6. How do I add pronouns to a contact?
Open the Contacts app, select the contact, tap “Edit,” scroll down to “Add Pronouns,” and enter the correct pronouns.
7. Can I use a GIF as a contact photo?
No, you cannot use a GIF as a contact photo on your iPhone. The Contacts app only supports static image formats.
8. How do I remove a contact photo?
To remove a contact photo, edit the contact, tap on the photo, and choose “Remove Photo.”
9. Why is the contact photo blurry?
The contact photo might be blurry if the image resolution is low or if it has been excessively zoomed in. Use a high-resolution image for best results.
10. Can I sync contact photos from social media?
Yes, you can sync contact photos from social media by linking your social media accounts in Settings > Contacts > Accounts. Some third-party apps also offer this feature.