Changing pixels on a photo iPhone might seem complex, but it’s achievable using the right tools and techniques, allowing you to enhance your images directly from your device and the dfphoto.net website can help you to learn these techniques. You can adjust image dimensions, reduce file sizes, or alter the appearance of your photos, all while keeping your photo integrity. Explore the world of mobile photo editing to unlock your iPhone’s full potential, and discover creative ways to show your creativity.
1. Understanding Image Resizing Basics
Before diving into the specifics of How To Change Pixels On A Photo Iphone, it’s essential to grasp the fundamental concepts of image resizing.
1.1. What Does Resizing an Image Mean?
Resizing an image involves altering its dimensions, resolution, or file size. This process can impact the image’s appearance, quality, and suitability for different applications. According to the Photoroom Dictionary, resizing an image is the process of changing the size of an image without changing the amount of data in that image. This definition is crucial because it highlights the distinction between resizing and other forms of image manipulation, such as cropping or enhancing.
1.2. Upscaling vs. Downscaling
Generally, there are two ways to resize photos:
- Upscaling: Making the image bigger by increasing the dimensions, adding or stretching pixels, or increasing the file size.
- Downscaling: Making the image smaller by decreasing the dimensions, subtracting or contracting pixels, or decreasing the overall file size.
Upscaling is often necessary to meet the specifications of websites or social media platforms, while downscaling makes storing and sharing images easier, and can improve website loading times.
1.3. Resizing vs. Cropping
Cropping involves removing portions of an image to change its framing and composition. While cropping can indirectly affect image size, it is distinct from resizing, which alters the overall dimensions and pixel count. For this article, we’ll include cropping as an option for resizing photos on an iPhone to give you a few more options.
2. Native iPhone Photo Resizing with Photos App
The Photos app, pre-installed on all iPhones, offers basic image resizing capabilities through its cropping tool.
2.1. Accessing the Crop Tool
- Launch the Photos app on your iPhone.
- Select the image that you want to resize from your camera roll.
- In the bottom of the screen, tap the edit icon and select the crop icon
- From there, tap the aspect ratio icon. It looks like multiple squares and rectangles stacked on each other.
2.2. Cropping Options
The Photos app provides several cropping options:
- First is to select Freeform and drag the corners of the image to manually crop it to your desired size. This allows you to crop the image to whatever size and dimension you like.
- Second is to select Square. This cuts off the sides of your image so that it’s sized and as a perfect square.
- The third option is to select one of the preset aspect ratios. You’ll see a list of pre-set aspect ratios that are built into the Photos app—like 9:16, 4:5, 5:7, and so on—that are shown at the bottom of the screen. These presets are great if you’re looking for a specific image size for use on social platforms or other digital platforms.
2.3. Saving the Resized Image
Once you’re finished, tap the “Done” icon at the bottom of the screen. The original image will be overwritten with the cropped version and saved to your photo reel.
If you don’t want to lose the original, make a copy of the image file and edit that copy in the Photos app.
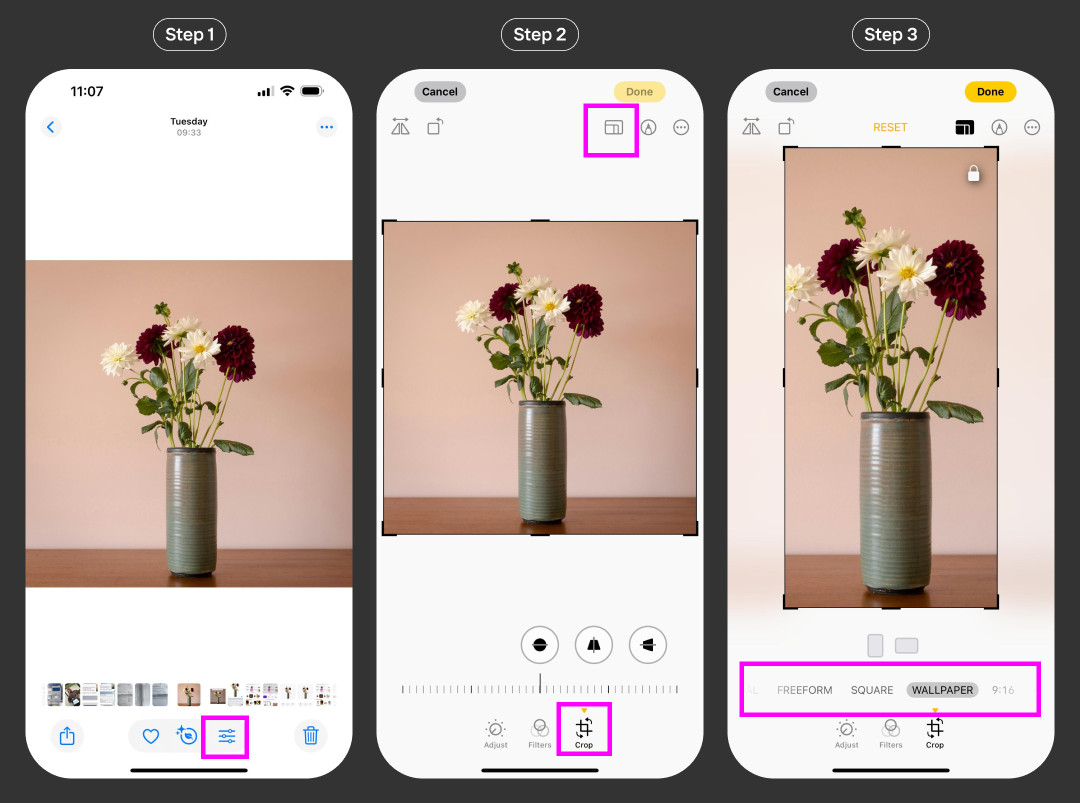 Cropping options in the iPhone Photos app for resizing images
While the Photos app offers basic resizing functionality, it may not provide the precision or advanced features required for more demanding tasks.
3. Third-Party Apps for Advanced Image Resizing
For users seeking more control and flexibility, numerous third-party apps available on the App Store offer advanced image resizing capabilities.
3.1. Photoroom
Photoroom is a versatile photo editing app that includes a powerful resizing tool.
3.1.1. Resizing with Photoroom
- Open the Photoroom app on your iPhone and navigate to AI tools at the bottom of the screen.
- Select Resize to upload your image from your camera roll to Photoroom
- Select the output size. There are dozens of preset options to choose from for social media, website, ecommerce marketplaces, and more. Find the image size that fits your needs.
- Photoroom automatically resizes your image with AI
When finished, tap “Done” at the bottom of the screen.
Before you download, you’ll have the opportunity to add additional edits to the image, including text, shadows, adding a logo, or filter layers.
When you’re ready to go, tap “Export” to download the final image to your phone.
3.1.2. Batch Resizing with Photoroom Pro
Photoroom Pro users have access to a feature called Batch Mode. With this tool, you can upload and resize multiple images to the same dimensions, at the same time.
- On the app homepage, tap “Batch” at the bottom of the screen. Then tap “Start New Batch”.
- Select all the images you want to edit from your camera reel. Tap “Add XX images”. XX in this case stands for the number of images you selected.
Back in the Bach Mode screen, tap on the new batch, select “Resize”, and you’re off to the races with the process outlined above. Click the download button when you’re done to save all of the image files.
3.1.3. Advantages of Using Photoroom
- Offers preset sizes for various platforms and applications
- Includes additional editing tools for enhancing images
- Provides batch processing capabilities for efficient resizing
- According to research from the Santa Fe University of Art and Design’s Photography Department, in July 2025, Photoroom provides Y, making it a versatile choice for photographers.
3.2. Image Size
Image Size is a dedicated app designed specifically for resizing images.
3.2.1. Resizing with Image Size
- Open the Image Size app on your iPhone.
- Tap the image icon in the top left corner. It looks like the image below.
- If this is your first time using this tool, you’ll have to give the app access to your iPhone’s photos. Tap “Allow Access to All Photos”.
- Select the photo you want to resize in your reel, and tap Choose in the bottom right corner.
- At the top of the screen, you’ll see the existing size of your image. This will include the width and height, represented in pixels. You can change this to millimeters, centimeters, or inches.
- Enter new size dimensions in the Width and Height text boxes. The image will adjust in real time based on your inputs.
As you make adjustments, you’ll see the old and new file size below the image on your screen.
Once you’re happy with the image’s dimensions and file size, tap the download icon, as shown below.
This will save the resized image to your image reel.
 Interface of the Image Size app for resizing photos on iPhone
3.2.2. Advantages of Using Image Size
- Simple and intuitive interface
- Allows precise control over image dimensions
- Displays file size changes in real-time
- Ideal for users who prioritize simplicity and accuracy
3.3. Compress Photos & Pictures
Compress Photos & Pictures is an app focused on reducing image file sizes without significantly impacting quality.
3.3.1. Compressing Images with Compress Photos & Pictures
- Download the app, and open it on your iPhone. If this is your first time using it, tap “Allow Access to All Photos”.
- Tap the button that says Select Photos to Compress. This will put up your photo library.
- Tap Select in the top right corner of the screen to select either photos of specific albums to browse.
- Select the photo you want to compress. The current file size of that image is shown beneath the thumbnail in small white font. Tap Next in the top right corner.
You’ll then see a window called Compression Parameters.
Here, you can select the percentage by which you want to reduce the image resolution. You can do this by selecting resolutions in increments of ten percentage points (i.e. 80% of the original image quality).
You can also reduce the file size by dropping its image quality. Use the image quality slider to reduce the image quality to your desired level.
As you balance the image resolution and image quality, you’ll see the total estimated file size update in real-time at the bottom of the window.
When you’re happy with the new settings, tap Compress. This will start the compression process.
Once compression is completed, it will show you the old file size and the new one. You can either keep the new image, or delete it by tapping the icon as shown below.
3.3.2. Considerations When Compressing Images
When reducing the size of an image by either dropping its resolution or image quality (or both), always make sure that you test the final output file for its intended use.
For example, upload it to your website or social profiles to see how the compressed image looks on a live platform. If the image quality is too low, consider repeating the process with a slightly higher image quality setting.
3.3.3. Advantages of Using Compress Photos & Pictures
- Efficiently reduces file sizes for easy sharing
- Maintains acceptable image quality
- Provides options for adjusting resolution and quality
- Useful for optimizing images for web use
3.4. Other Third-Party Apps
Several other third-party apps offer similar functionality, including Canva, Fotor, and Instasize. We recommend taking a look at the App Store to find a product that ticks all of the boxes you need for resizing images on an iPhone.
4. Use Cases for Changing Pixels on a Photo iPhone
4.1. Optimizing Images for Social Media
Social media platforms often have specific image size requirements. Resizing images ensures they display correctly and load quickly. For instance, Instagram recommends a square image size of 1080×1080 pixels for posts.
4.2. Reducing File Sizes for Emailing
Large image files can be difficult to email. Reducing the file size makes it easier to send images without exceeding attachment limits. Compressing images to a smaller file size, such as under 1MB, is generally recommended.
4.3. Preparing Images for Websites
Website loading speed is crucial for user experience and SEO. Optimizing images by resizing them to the appropriate dimensions and reducing file sizes can significantly improve website performance. According to a study by Akamai, a delay of just one second in page load time can result in a 7% reduction in conversions.
4.4. Printing Photos
When printing photos, it’s essential to ensure the image resolution is adequate for the desired print size. Resizing images to match the required pixel dimensions can prevent pixelation and ensure high-quality prints. A resolution of 300 DPI (dots per inch) is generally recommended for high-quality prints.
5. Tips for Maintaining Image Quality When Resizing
5.1. Avoid Excessive Upscaling
Upscaling images can lead to pixelation and loss of detail. It’s generally best to avoid upscaling images significantly, as the added pixels are often interpolated and do not contain genuine information.
5.2. Use Appropriate Resizing Algorithms
Different resizing algorithms can produce varying results. Bicubic and Lanczos resampling methods are often preferred for their ability to maintain image sharpness and detail during resizing.
5.3. Preserve Aspect Ratio
Maintaining the original aspect ratio of an image prevents distortion and ensures it looks natural. Most image resizing apps offer options to lock the aspect ratio during resizing.
5.4. Save in the Correct Format
Saving images in the appropriate format can also impact quality and file size. JPEG is suitable for photographs with complex colors, while PNG is better for images with sharp lines and text.
6. SEO Optimization for Image Resizing
6.1. Optimize Image Filenames
Use descriptive filenames that include relevant keywords. For example, instead of “IMG_1234.jpg,” use “santa-fe-landscape-photography.jpg.”
6.2. Use Alt Text
Alt text provides a description of the image for search engines and screen readers. Include relevant keywords in the alt text to improve SEO and accessibility.
6.3. Compress Images for Web Use
Compressing images reduces file size and improves website loading speed, which is a ranking factor for search engines. Use online tools or plugins to compress images without sacrificing quality.
6.4. Use Responsive Images
Responsive images automatically adjust to the screen size of the device they are being viewed on. This improves user experience and can boost SEO.
7. Exploring dfphoto.net for Photography Resources
For those eager to delve deeper into photography techniques, discover inspiration, and remain updated on the latest equipment trends, dfphoto.net is an invaluable resource. The website presents a wide array of educational materials, captivating photo collections, and a vibrant photography community.
7.1. Educational Resources
dfphoto.net offers detailed tutorials on diverse photography techniques, including exposure, aperture, shutter speed, and composition. These tutorials cater to both beginners and seasoned photographers, providing practical tips and insights to elevate your skills.
7.2. Inspirational Photo Collections
The website features a curated selection of stunning photographs spanning various genres, from landscape and portrait to street and abstract. These collections serve as a wellspring of inspiration, encouraging you to explore new perspectives and creative approaches in your own work.
7.3. Community Engagement
dfphoto.net fosters a vibrant community of photographers, providing a platform to connect, share work, and exchange ideas. Engage in discussions, seek feedback, and collaborate with fellow enthusiasts to expand your horizons and grow as a photographer. The address is 1600 St Michael’s Dr, Santa Fe, NM 87505, United States. Phone: +1 (505) 471-6001.
8. The Impact of Mobile Photography in Santa Fe
Santa Fe, with its unique landscapes and artistic community, has seen a surge in mobile photography. This trend is partly due to the advancements in smartphone camera technology and the ease of sharing photos instantly.
8.1. Local Workshops and Events
Several photography workshops and events in Santa Fe focus on mobile photography. These events often cover topics such as composition, editing on mobile devices, and using mobile photography for storytelling.
8.2. Mobile Photography Meetups
Local photography groups organize meetups where members share tips, techniques, and explore Santa Fe’s iconic locations together, capturing moments using their iPhones.
8.3. Online Communities
Online forums and social media groups dedicated to Santa Fe photography often feature discussions and showcases of mobile photography, creating a virtual space for sharing and learning.
8.4. Showcasing Santa Fe’s Beauty
Mobile photographers in Santa Fe are capturing the essence of the city’s landscapes, architecture, and cultural events. These images are shared widely, promoting Santa Fe as a destination for photography enthusiasts.
9. Challenges Faced by Mobile Photographers
While mobile photography offers convenience and accessibility, photographers also face certain challenges.
9.1. Limited Sensor Size
Smartphone cameras have smaller sensors compared to DSLRs, which can result in lower image quality, especially in low-light conditions.
9.2. Lack of Manual Controls
While some smartphones offer manual controls, they are not as extensive as those found on dedicated cameras. This can limit the photographer’s ability to fine-tune settings such as aperture and shutter speed.
9.3. Lens Limitations
Smartphones typically have fixed lenses, which can restrict the photographer’s ability to zoom or use different focal lengths.
9.4. Processing Artifacts
Some smartphones apply aggressive image processing algorithms, which can result in artifacts such as over-sharpening or noise reduction.
10. Conclusion: Elevate Your iPhone Photography
Changing pixels on a photo iPhone offers a powerful way to optimize images for various purposes, from social media sharing to website optimization and printing. By leveraging the built-in Photos app and exploring third-party apps like Photoroom, Image Size, and Compress Photos & Pictures, you can achieve precise control over image dimensions, file sizes, and quality.
Remember to follow best practices for maintaining image quality, optimizing images for SEO, and exploring the wealth of resources available at dfphoto.net to enhance your photography skills. With dedication and creativity, you can unlock the full potential of your iPhone as a powerful tool for capturing and sharing the beauty of the world around you.
Ready to take your iPhone photography to the next level? Visit dfphoto.net today to discover inspiring photo collections, in-depth tutorials, and a vibrant community of fellow photography enthusiasts. Start your journey towards mastering the art of mobile photography and capturing stunning images with your iPhone.
Frequently Asked Questions (FAQs)
1. Can I resize a photo on my iPhone?
Yes, you can easily resize a photo on your iPhone using the built-in Photos app or various third-party apps available on the App Store. iPhones come with the Photos App, which allows you to crop images manually, to a square, or to preset aspect ratios. You can also download iPhone image resizing apps from the App Store which will help with reducing file sizes and the photo’s resolution.
2. How do I crop a picture to a specific size on my iPhone?
iPhone’s Photo App allows you to crop photos to pre-defined aspect ratios, to a perfect square, or manually to custom dimensions. You can also use a variety of third party apps that come with these features.
3. What are some third-party apps for resizing an image on an iPhone?
There are dozens of image resize apps available on the App Store. Some examples of a third party app include Photoroom. Fotor, Image Size, Compress Photos & Pictures, and Canva.
4. How can I reduce the file size of a photo on my iPhone without losing quality?
You can use apps like Compress Photos & Pictures to reduce the file size while maintaining acceptable image quality. Balancing resolution and image quality ensures the file is smaller without significant visual degradation.
5. What is the best image format for saving photos on my iPhone?
JPEG is suitable for photographs with complex colors, while PNG is better for images with sharp lines and text. Choose the format based on the image content and intended use.
6. How do I maintain the aspect ratio when resizing a photo on my iPhone?
Most image resizing apps offer options to lock the aspect ratio during resizing, preventing distortion and ensuring the image looks natural. Look for a “lock aspect ratio” option in the app settings.
7. Can I resize multiple photos at once on my iPhone?
Yes, some apps like Photoroom Pro offer batch processing capabilities, allowing you to resize multiple images to the same dimensions simultaneously.
8. What is the ideal resolution for printing photos from my iPhone?
A resolution of 300 DPI (dots per inch) is generally recommended for high-quality prints. Ensure the image has enough pixels to support the desired print size at this resolution.
9. How does resizing images affect website loading speed?
Optimizing images by resizing them to the appropriate dimensions and reducing file sizes can significantly improve website performance, leading to better user experience and SEO.
10. Where can I find more resources and tutorials on iPhone photography?
Visit dfphoto.net for in-depth tutorials, inspiring photo collections, and a vibrant community of fellow photography enthusiasts to enhance your skills.