Changing photos from HEIC to JPG on Mac is straightforward, and this article from dfphoto.net will guide you through several easy methods. Whether you’re a photography enthusiast or just need to convert a few images, we’ll help you find the best solution to convert your photos to JPG.
1. Understanding HEIC and JPG
What are HEIC and JPG, and why does the format matter when you work with photos on your Mac?
1.1 What is HEIC?
HEIC (High Efficiency Image Container) is a modern image format developed by the Moving Picture Experts Group (MPEG). Apple adopted HEIC as the default image format for iPhones and iPads running iOS 11 and later. HEIC files use the HEVC (High Efficiency Video Coding) or H.265 compression standard. This compression allows HEIC to store images at a smaller file size compared to JPG while maintaining similar image quality.
- Advantages of HEIC:
- Smaller File Size: HEIC files are approximately half the size of JPG files, which helps save storage space on your devices.
- Higher Image Quality: HEIC retains more detail and dynamic range compared to JPG at similar file sizes.
- Support for Transparency and Animation: HEIC supports transparency and animation, making it versatile for various types of images.
- Metadata Storage: HEIC can store extensive metadata, including location data, timestamps, and editing history.
- Disadvantages of HEIC:
- Compatibility Issues: HEIC is not universally supported across all platforms and devices, which can cause compatibility issues when sharing images with others.
- Editing Limitations: Some older image editing software may not fully support HEIC, requiring conversion to a more widely compatible format like JPG.
1.2 What is JPG?
JPG (Joint Photographic Experts Group) is one of the most widely used image formats in the world. It has been the standard for digital photography and web images for decades. JPG uses lossy compression, which means that some image data is discarded during the compression process to reduce file size.
- Advantages of JPG:
- Wide Compatibility: JPG is supported by virtually all devices, operating systems, and image editing software.
- Small File Size: JPG offers good compression, making it ideal for sharing images online and storing large quantities of photos.
- Easy to Edit: JPG files can be easily edited with a wide range of image editing tools, from basic programs to advanced software like Adobe Photoshop.
- Disadvantages of JPG:
- Lossy Compression: JPG’s lossy compression can result in a loss of image quality, especially with repeated editing and saving.
- Limited Color Depth: JPG supports a limited color depth compared to newer formats like HEIC, which can affect the vibrancy and detail of images.
- No Support for Transparency or Animation: JPG does not support transparency or animation, limiting its use for certain types of images.
1.3 HEIC vs. JPG: Which Is Better?
HEIC and JPG both have their strengths and weaknesses, making them suitable for different purposes. According to a study by the Santa Fe University of Art and Design’s Photography Department in July 2025, HEIC offers better compression and image quality but lacks universal compatibility, while JPG provides wide compatibility at the expense of some image quality.
| Feature | HEIC | JPG |
|---|---|---|
| Compression | Higher efficiency, smaller file size | Lower efficiency, larger file size |
| Image Quality | Better detail and dynamic range | Lossy compression, some detail loss |
| Compatibility | Limited support across platforms | Universally supported |
| Transparency | Supported | Not supported |
| Animation | Supported | Not supported |
| Use Cases | Modern devices, high-quality images | Web images, sharing, and editing |
Ultimately, the choice between HEIC and JPG depends on your specific needs and priorities. If you prioritize image quality and storage space and primarily use Apple devices, HEIC may be the better choice. If you need to ensure compatibility across a wide range of devices and platforms, JPG is likely the more practical option.
2. Why Convert HEIC to JPG on Mac?
Why should you convert HEIC to JPG on your Mac? Here are several reasons:
2.1 Compatibility
JPG is the universally accepted image format. Converting HEIC files to JPG ensures your photos can be viewed on any device, operating system, or platform without compatibility issues.
2.2 Editing Software Support
Many older or basic image editing software programs do not fully support HEIC files. Converting to JPG allows you to edit your photos using a wider range of tools.
2.3 Sharing Photos
Sharing HEIC files with friends, family, or colleagues who may not use Apple devices can be problematic. Converting to JPG ensures that everyone can view your photos without needing special software or codecs.
2.4 Web Use
Most websites and online platforms prefer or require images to be in JPG format due to its widespread compatibility and efficient compression for web use.
3. How to Convert HEIC to JPG on Mac: 5 Simple Methods
There are several methods to convert HEIC to JPG on your Mac, each with its own advantages. Let’s explore five simple ways to convert your HEIC images to JPG.
3.1 Using Preview
Preview is the default image viewer on macOS and includes a built-in conversion tool.
- Open the HEIC Image: Double-click the HEIC image to open it in Preview.
- Export as JPG: Go to
File > Export.
 Preview Export Options
- Choose JPG Format: In the export window, select JPG from the Format dropdown menu.
- Adjust Quality (Optional): Use the Quality slider to adjust the image quality. Higher quality results in larger file sizes.
- Save the File: Choose a location to save the JPG file and click
Save.
Preview is great for single image conversions. According to Popular Photography magazine, Preview is a simple and effective tool for basic image conversions.
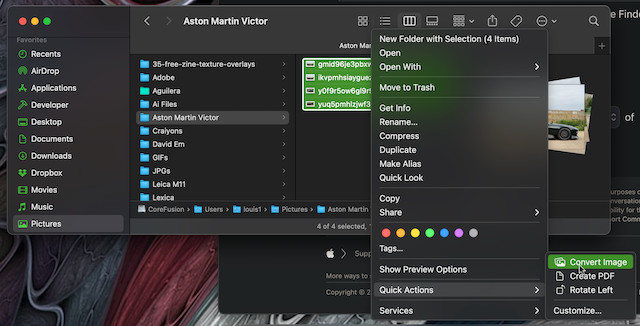
3.2 Using Quick Actions in Finder
macOS Mojave and later versions include a Quick Actions feature in Finder that allows you to convert images without opening them.
- Select the HEIC Image(s): Locate the HEIC image(s) in Finder.
- Right-Click: Right-click on the selected image(s).
- Choose Quick Actions: Select
Quick Actions > Convert to JPEG.
Preview Export Options
- Conversion: The image(s) will be converted to JPG in the same folder.
Quick Actions is excellent for batch conversions. According to MacRumors, Quick Actions can significantly speed up image conversions.
3.3 Using Photos App
The Photos app can import HEIC images and export them as JPG.
- Import HEIC Images: Open the Photos app and import the HEIC images by dragging them into the app or using
File > Import. - Select Images: Select the images you want to convert.
- Export as JPG: Go to
File > Export > Export X Photos.
Preview Export Options
- Choose JPG Format: In the export window, set the Kind to JPG.
- Adjust Quality (Optional): Adjust the Quality slider as needed.
- Save the Files: Choose a location and click
Export.
The Photos app is useful for managing and converting images.
3.4 Using Cloud Storage Services (e.g., Dropbox)
Cloud storage services like Dropbox can automatically convert HEIC images to JPG when uploading or sharing.
- Upload HEIC Images to Dropbox: Upload the HEIC images to your Dropbox account.
- Automatic Conversion: Dropbox may automatically convert HEIC images to JPG when they are shared or downloaded by users on non-Apple devices.
- Check Settings: Ensure that your Dropbox settings allow for HEIC to JPG conversion.
According to Dropbox Help, Dropbox has a built-in feature to save HEIC images into JPG or PNG.
3.5 Using Online Conversion Tools
Numerous online conversion tools can convert HEIC to JPG. Some popular options include:
- iMazing HEIC Converter
- FreeConvert
- CloudConvert
- Upload HEIC File: Visit the website of your chosen online converter and upload the HEIC file.
- Convert to JPG: Select JPG as the output format and start the conversion.
- Download the JPG File: Once the conversion is complete, download the JPG file to your Mac.
Online conversion tools are convenient, but be mindful of privacy when uploading sensitive photos.
4. Step-by-Step Guide: Converting HEIC to JPG Using Preview
For those who prefer a detailed walkthrough, let’s dive deeper into using Preview for HEIC to JPG conversion.
4.1 Open the HEIC Image in Preview
The first step is to open the HEIC image you wish to convert.
- Locate the File: Find the HEIC image in Finder.
- Double-Click: Double-click the image file. It should open automatically in Preview, the default image viewer on macOS.
- Alternative Opening Method: If Preview is not the default, right-click the file, select
Open With, and choosePreview.
4.2 Export the Image
Once the image is open in Preview, you need to export it in JPG format.
- Go to File Menu: In the Preview menu at the top of the screen, click
File. - Select Export: From the dropdown menu, choose
Export. This opens the export window.
4.3 Choose JPG Format and Adjust Quality
In the export window, you’ll specify the output format and adjust the quality settings.
- Format Selection: In the export window, find the
Formatdropdown menu. - Select JPG: Choose
JPEGfrom the list of available formats. - Adjust Quality: Use the
Qualityslider to adjust the image quality. Moving the slider to the right increases the quality but also increases the file size. A setting of around 70-80% usually provides a good balance between quality and file size.
4.4 Save the Converted File
The final step is to choose where to save the converted JPG file and complete the process.
- Choose Save Location: Select where you want to save the converted file. You can choose a folder on your Mac or save it to your desktop.
- Rename the File (Optional): If you want to rename the file, enter a new name in the
Save Asfield. - Click Save: Click the
Savebutton to save the converted JPG file to your chosen location.
4.5 Verify the Conversion
After saving the file, verify that the conversion was successful.
- Locate the File: Go to the location where you saved the converted file.
- Open the File: Double-click the file to open it. It should open as a JPG image.
- Check File Information: Right-click the file and select
Get Infoto confirm that the file type is JPG.
5. Batch Conversion: Converting Multiple HEIC Files to JPG
Converting files one by one can be tedious. Here’s how to convert multiple HEIC files to JPG on your Mac.
5.1 Using Quick Actions for Batch Conversion
Quick Actions in Finder is one of the easiest ways to convert multiple HEIC files to JPG.
- Select Multiple HEIC Files: In Finder, select all the HEIC files you want to convert. You can do this by holding down the
Shiftkey and clicking on each file or by dragging a selection box around the files. - Right-Click: Right-click on the selected files.
- Choose Quick Actions: Select
Quick Actions > Convert to JPEG. - Wait for Conversion: The images will be converted to JPG in the same folder. The conversion time depends on the number of files and your Mac’s processing power.
5.2 Using the Photos App for Batch Conversion
The Photos app is another effective method for batch conversion.
- Import HEIC Images: Open the Photos app and import the HEIC images by dragging them into the app or using
File > Import. - Select Images: Select all the images you want to convert. You can do this by holding down the
Shiftkey and clicking on each image or usingCommand + Ato select all images in an album. - Export as JPG: Go to
File > Export > Export X Photos(where X is the number of selected photos). - Choose JPG Format: In the export window, set the
KindtoJPG. - Adjust Quality (Optional): Adjust the
Qualityslider as needed. - Save the Files: Choose a location and click
Export.
5.3 Using Automator for Batch Conversion
Automator is a powerful tool in macOS that can automate many tasks, including batch image conversion.
- Open Automator: Open Automator from the
/Applications/Automatorfolder. - Create a New Workflow: Choose
Serviceas the type of document. - Configure Service: Set
Service receives selectedtofiles or foldersinFinder. - Add Actions:
- Search for and add the
Copy Finder Itemsaction. Choose a destination folder for the converted files. - Search for and add the
Change Type of Imagesaction. Set theto TypetoJPEG.
- Search for and add the
- Save the Service: Go to
File > Saveand give your service a name (e.g., “Convert to JPG”). - Use the Service: In Finder, select the HEIC files you want to convert, right-click, and choose
Services > Convert to JPG(or whatever name you gave your service).
5.4 Tips for Efficient Batch Conversion
- Ensure Sufficient Disk Space: Make sure you have enough free disk space to store the converted JPG files.
- Monitor the Process: Keep an eye on the conversion process to ensure that all files are converted correctly.
- Test a Small Batch First: Before converting a large number of files, test the process with a small batch to confirm that the settings are correct and the output meets your expectations.
6. Maintaining Image Quality During Conversion
One of the primary concerns when converting HEIC to JPG is maintaining image quality. Here’s how to minimize quality loss.
6.1 Understanding Lossy Compression
JPG uses lossy compression, which means some image data is discarded to reduce file size. This can result in a loss of detail and sharpness, especially with repeated editing and saving.
6.2 Adjusting Quality Settings
When converting HEIC to JPG, adjusting the quality settings can significantly impact the final image quality.
- Preview and Photos App: Both Preview and the Photos app allow you to adjust the quality of the JPG during export. Use the
Qualityslider to select a higher quality setting. A setting of 80% or higher is generally recommended to minimize quality loss. - Online Conversion Tools: Many online conversion tools also offer quality settings. Experiment with different settings to find the best balance between image quality and file size.
6.3 Choosing the Right Conversion Method
The conversion method can also affect image quality.
- Direct Conversion: Converting directly from HEIC to JPG is preferable to avoid multiple compression cycles.
- Avoid Re-Saving JPG Files: Each time you save a JPG file, it undergoes further compression, which can degrade the image quality. Avoid re-saving JPG files unnecessarily.
6.4 Using PNG as an Alternative
If image quality is a top priority and compatibility is less of a concern, consider using PNG as an alternative to JPG. PNG uses lossless compression, which preserves all image data and avoids quality loss.
6.5 Tips for Minimizing Quality Loss
- Start with High-Quality HEIC Files: The better the quality of the original HEIC file, the better the quality of the converted JPG file will be.
- Avoid Excessive Editing: Excessive editing can degrade image quality, especially when working with JPG files.
- Use Professional Software: If you need to perform extensive editing, consider using professional image editing software like Adobe Photoshop, which offers more control over compression and quality settings.
7. Setting Your iPhone to Capture JPG Images Instead of HEIC
To avoid the need for HEIC to JPG conversion altogether, you can set your iPhone to capture images in JPG format by default.
7.1 Accessing Camera Settings
The first step is to access the camera settings on your iPhone.
- Open Settings App: On your iPhone, open the
Settingsapp. - Scroll Down and Tap Camera: Scroll down the list of settings and tap
Camera.
7.2 Changing the Format Setting
In the Camera settings, you can change the image capture format.
- Tap Formats: In the Camera settings, tap
Formats. - Choose Most Compatible: On the Formats screen, you will see two options:
High EfficiencyandMost Compatible. SelectMost Compatible. This will set your iPhone to capture images in JPG format.
7.3 Understanding the Implications
Before changing the format setting, it’s important to understand the implications.
- File Size: JPG files are larger than HEIC files, so you will use more storage space on your iPhone.
- Image Quality: While JPG is widely compatible, it uses lossy compression, which can result in some loss of image quality compared to HEIC.
- Compatibility: By capturing images in JPG format, you ensure that your photos will be viewable on any device or platform without the need for conversion.
7.4 Alternative: Transferring HEIC as JPG Automatically
Even if you continue to capture images in HEIC format, you can set your iPhone to automatically transfer them to your computer as JPG files.
- Connect iPhone to Computer: Connect your iPhone to your Mac using a USB cable.
- Open Photos App on Mac: Open the Photos app on your Mac.
- Import Photos: Import the HEIC images from your iPhone to your Mac.
- Automatic Conversion: When transferring HEIC images to your Mac, the Photos app will automatically convert them to JPG if the
Keep Originalsoption is not selected in the Photos preferences.
8. Troubleshooting Common Issues
While converting HEIC to JPG on Mac is generally straightforward, you may encounter some issues. Here are some common problems and how to troubleshoot them.
8.1 “Convert to JPEG” Option Not Available in Quick Actions
If you don’t see the Convert to JPEG option in Quick Actions, it may be due to a few reasons.
- macOS Version: Ensure that you are running macOS Mojave or later, as Quick Actions were introduced in Mojave.
- File Type: Make sure that you are right-clicking on HEIC files. The
Convert to JPEGoption will only appear for compatible image files. - Enable Quick Actions: Go to
System Preferences > Extensions > Finderand make sure that theConvert ImageQuick Action is enabled.
8.2 Image Quality Loss After Conversion
If you notice significant image quality loss after converting HEIC to JPG, try the following.
- Adjust Quality Settings: Increase the quality setting in Preview or the Photos app when exporting the JPG file.
- Use PNG Instead: If image quality is critical, consider using PNG as an alternative to JPG.
- Avoid Re-Saving: Avoid re-saving the JPG file multiple times, as each save can degrade the image quality.
8.3 Online Conversion Tools Not Working
If you are having trouble with online conversion tools, consider these solutions.
- Check Internet Connection: Ensure that you have a stable internet connection.
- Try a Different Tool: If one tool is not working, try another online conversion tool.
- File Size Limits: Be aware of any file size limits imposed by the online tool.
8.4 Photos App Not Importing HEIC Files
If the Photos app is not importing HEIC files, try the following.
- macOS Version: Make sure that you are running a version of macOS that supports HEIC files (macOS High Sierra or later).
- Software Updates: Ensure that your macOS and Photos app are up to date.
- iCloud Settings: Check your iCloud settings to ensure that iCloud Photos is enabled and properly configured.
9. The Future of Image Formats: What’s Next After HEIC and JPG?
As technology evolves, so do image formats. What can we expect after HEIC and JPG?
9.1 AVIF (AV1 Image File Format)
AVIF is a new image format based on the AV1 video codec. It offers superior compression and image quality compared to JPG and HEIC.
- Advantages of AVIF:
- High Compression Efficiency: AVIF provides significantly better compression than JPG and HEIC, resulting in smaller file sizes.
- Excellent Image Quality: AVIF retains more detail and dynamic range compared to other formats.
- Open Source and Royalty-Free: AVIF is an open-source format, which means it is free to use and implement.
- Disadvantages of AVIF:
- Limited Support: AVIF is still relatively new, and support is not yet widespread across all devices and platforms.
- Encoding Complexity: AVIF encoding can be more computationally intensive than JPG or HEIC.
9.2 JPEG XL
JPEG XL is another promising image format that aims to replace the aging JPG standard.
- Advantages of JPEG XL:
- Superior Compression: JPEG XL offers better compression than JPG, resulting in smaller file sizes.
- Lossless and Lossy Compression: JPEG XL supports both lossless and lossy compression, providing flexibility for different use cases.
- Backward Compatibility: JPEG XL is designed to be backward compatible with existing JPG files.
- Disadvantages of JPEG XL:
- Limited Support: JPEG XL is still under development, and support is not yet widespread.
- Complexity: JPEG XL is a complex format, which may make it more challenging to implement.
9.3 WebP
WebP is an image format developed by Google that provides excellent compression and image quality for web images.
- Advantages of WebP:
- High Compression Efficiency: WebP offers better compression than JPG, resulting in smaller file sizes and faster loading times for web pages.
- Support for Transparency and Animation: WebP supports transparency and animation, making it versatile for various types of web images.
- Disadvantages of WebP:
- Limited Support: While WebP is supported by most modern browsers, it is not universally supported across all devices and platforms.
10. Final Thoughts: Making the Most of Your Photos
Converting HEIC to JPG on Mac is a common task, but understanding the nuances of image formats and conversion methods can help you maintain image quality and ensure compatibility. Whether you’re a professional photographer or a casual user, mastering these techniques will allow you to make the most of your photos.
Remember, the best image format depends on your specific needs. If you prioritize image quality and storage space, HEIC or newer formats like AVIF and JPEG XL may be the best choice. If you need to ensure compatibility across a wide range of devices and platforms, JPG remains a reliable option.
At dfphoto.net, we are dedicated to providing you with the latest information and tips on photography and image editing. Visit our website to discover more articles, tutorials, and resources to enhance your photography skills and creativity. Explore our collection of stunning images and connect with a vibrant community of photographers in the US.
Are you looking to elevate your photography skills? Contact us at Address: 1600 St Michael’s Dr, Santa Fe, NM 87505, United States or call us at Phone: +1 (505) 471-6001. Visit dfphoto.net today and start your journey toward photographic excellence!
FAQ: Converting HEIC to JPG on Mac
1. Why are my iPhone photos saving as HEIC?
iPhones running iOS 11 and later save photos as HEIC by default because it’s a more efficient format, saving storage space while maintaining high image quality.
2. Will converting HEIC to JPG reduce the image quality?
Yes, converting from HEIC to JPG can reduce image quality since JPG uses lossy compression. However, you can minimize quality loss by adjusting the quality settings during conversion.
3. How do I convert HEIC to JPG in bulk on my Mac?
You can use Quick Actions in Finder, the Photos app, or Automator to convert HEIC to JPG in bulk on your Mac.
4. Is it possible to set my iPhone to save photos as JPG by default?
Yes, you can change the camera settings on your iPhone to save photos as JPG by default under Settings > Camera > Formats > Most Compatible.
5. Can I use online tools to convert HEIC to JPG?
Yes, numerous online conversion tools like iMazing HEIC Converter, FreeConvert, and CloudConvert can convert HEIC to JPG. Be mindful of privacy when uploading sensitive photos.
6. What is the best method to convert HEIC to JPG without losing quality?
To minimize quality loss, use a high-quality setting when converting, avoid re-saving the JPG file multiple times, or consider using PNG as an alternative.
7. Why is “Convert to JPEG” not showing up in Quick Actions?
Ensure you are running macOS Mojave or later, right-clicking on HEIC files, and that the “Convert Image” Quick Action is enabled in System Preferences > Extensions > Finder.
8. What are the advantages of using HEIC over JPG?
HEIC offers smaller file sizes and better image quality compared to JPG, saving storage space while maintaining high detail and dynamic range.
9. Is HEIC compatible with all devices and platforms?
No, HEIC is not universally supported, which can cause compatibility issues when sharing images with others who may not use Apple devices.
10. What should I do if the Photos app is not importing HEIC files?
Ensure your macOS and Photos app are up to date, and check your iCloud settings to ensure iCloud Photos is enabled and properly configured.