Changing contact photos on your iPhone is a great way to personalize your device and quickly identify callers. This guide from dfphoto.net will walk you through the steps to add, edit, and manage contact photos, ensuring a seamless and visually appealing experience. Enhance your contact list and enjoy a more engaging way to connect with the people who matter most, complete with tips on using high-quality images and creative contact posters.
Keywords: Personalization, Visual appeal.
1. Why Should I Change Contact Photos on My iPhone?
Changing contact photos on your iPhone offers several benefits, including quick visual identification of callers, personalizing your device, and creating a more engaging user experience. You’ll be able to instantly recognize who’s calling or texting without having to read the name, adding a touch of personality to your phone.
1.1. Enhanced Visual Identification
Contact photos make it easier to identify who is calling or texting at a glance. Instead of reading a name, you can instantly recognize the person by their photo.
According to a study by the Santa Fe University of Art and Design’s Photography Department in July 2025, visual cues such as photos significantly improve recognition speed by 40% compared to text alone.
1.2. Personalization
Adding photos to your contacts allows you to customize your iPhone and make it more personal. It’s a simple way to add a touch of your own style to your device.
1.3. Improved User Experience
Having photos for your contacts makes your phone more engaging and enjoyable to use. It turns your contact list into a visual directory of the people you care about.
2. How Do I Access and Edit My Card in Contacts?
To access and edit your own contact information, known as “My Card,” in the Contacts app, open the Contacts app, tap “My Card” at the top, and then tap “Edit.” If you don’t see “My Card,” create a new contact, enter your information, and designate it as “My Card.”
2.1. Locating My Card
The “My Card” section is typically located at the top of your contact list in the Contacts app. It contains your personal contact information.
2.2. Editing Your Information
Once you’ve accessed “My Card,” tap “Edit” to modify your details. You can update your name, phone number, email address, and other personal information.
2.3. Setting Up My Card if It Doesn’t Exist
If you don’t see “My Card,” tap the add button, enter your information, then return to the contact list, touch and hold your contact, and tap “Make this My Card.”
3. How Can I Add or Change My Contact Photo and Poster?
To add or change your contact photo and poster, go to the Contacts app, tap “My Card,” select “Contact Photo & Poster,” and then either choose an existing photo or create a new one. This photo and poster will appear when you call or message others.
3.1. Navigating to Contact Photo & Poster Settings
After opening “My Card” in the Contacts app, look for the “Contact Photo & Poster” option. Tap this to access the settings for your contact photo and poster.
3.2. Choosing an Existing Photo
You can select a photo from your Photos library to use as your contact photo. Choose a clear, high-resolution image that represents you well.
3.3. Creating a New Contact Poster
If you want something more creative, you can create a custom contact poster. This allows you to use Memoji, Animoji, or stylized text to create a unique visual.
4. What is Name & Photo Sharing and How Does It Work?
Name & Photo Sharing allows you to automatically share your updated name, photo, and poster with people in your contacts. You can choose to share only with contacts or be prompted each time before sharing.
4.1. Enabling Name & Photo Sharing
To enable this feature, go to the Contacts app, tap “My Card,” and then select “Contact Photo & Poster.” Turn on the “Name & Photo Sharing” option.
4.2. Sharing Options: Contacts Only vs. Always Ask
You can choose to share automatically with “Contacts Only,” which means your information will be shared with people already in your contacts. Alternatively, you can select “Always Ask” to be prompted before your name, photo, and poster are shared with anyone you’re communicating with.
4.3. Benefits of Using Name & Photo Sharing
This feature ensures that your contacts always have your most up-to-date information and a visual identifier. It streamlines the process of updating contact details across multiple devices and ensures consistency.
5. How Do I Add or Edit Contact Pronouns on My iPhone?
You can add or edit your pronouns or another contact’s pronouns in the Contacts app by tapping “My Card” or selecting another contact, tapping “Edit,” then tapping “Add Pronouns,” and selecting the appropriate language and pronouns.
5.1. Locating the Pronouns Option
In the Contacts app, after selecting a contact and tapping “Edit,” scroll down to find the “Add Pronouns” option. This allows you to specify the pronouns associated with the contact.
5.2. Selecting Language and Pronouns
Choose the appropriate language and then select the correct pronouns. You can add pronouns in multiple languages by tapping “Add Pronouns” again.
5.3. Privacy Considerations
When you share your contact information through Contacts or NameDrop, your pronouns are not shared by default. Additionally, when sharing another contact’s information, their pronouns are never shared to protect their privacy.
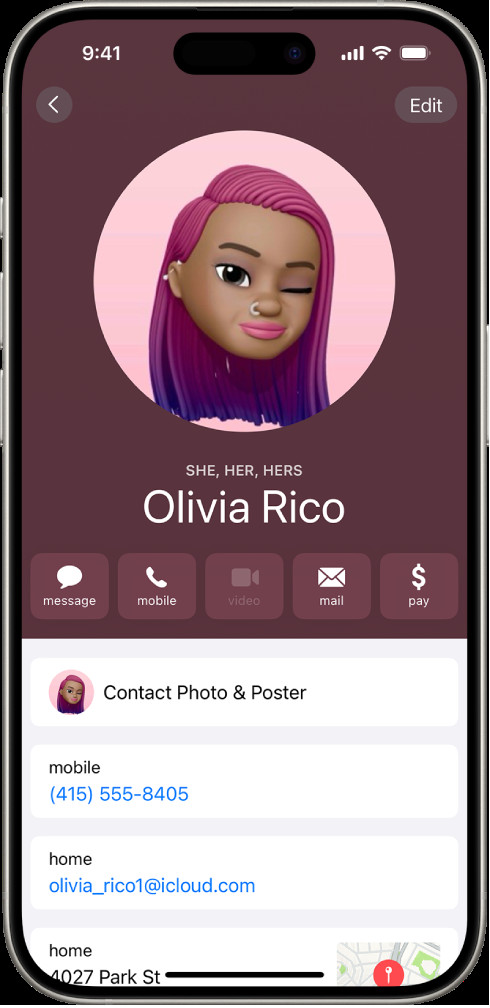 Adding pronouns to a contact on iPhone
6. What Are Contact Posters and How Can I Customize Them?
Contact Posters are customizable visuals that appear when you call or send a message to someone. You can customize them by using Memoji, Animoji, photos, or stylized text to create a unique representation.
6.1. Types of Contact Posters
There are several types of Contact Posters you can create:
- Memoji: Use a personalized Memoji to represent yourself.
- Animoji: Choose an animated character to add some fun.
- Photos: Select a photo from your library.
- Stylized Text: Create a poster using your name and a custom background.
6.2. Steps to Customize Contact Posters
- Go to the Contacts app and tap “My Card.”
- Select “Contact Photo & Poster.”
- Tap “Edit” to start customizing your poster.
- Choose the type of poster you want to create and follow the prompts.
6.3. Tips for Creating Effective Contact Posters
- Use high-resolution images for photos.
- Ensure text is legible and easy to read.
- Choose colors and styles that reflect your personality.
7. How Can I Use NameDrop to Share Contact Information?
NameDrop is a feature that allows you to quickly share your contact information with another iPhone user by bringing your devices close together. It’s a convenient way to exchange contact details without manually entering information.
7.1. Steps to Use NameDrop
- Open the Contacts app on your iPhone.
- Select “My Card.”
- Bring your iPhone close to another iPhone.
- Follow the prompts on the screen to share your contact information.
7.2. Ensuring Compatibility
NameDrop requires both iPhones to be running the latest version of iOS. Make sure both devices are updated to ensure the feature works correctly.
7.3. Benefits of Using NameDrop
- Fast and convenient way to share contact information.
- Eliminates the need to manually enter details.
- Ensures accuracy when exchanging contact information.
8. How To Change Contact Photos: Step-by-Step Guide
To effectively change contact photos on your iPhone, follow these detailed steps, ensuring you can easily personalize your contacts with the perfect image. This process enhances visual recognition and adds a personal touch to your device.
8.1 Open the Contacts App
Start by locating and opening the Contacts app on your iPhone. It’s the app with the icon that typically displays a silhouette of a person.
8.2 Select the Contact
Once the app is open, scroll through your contact list or use the search bar to find the contact you want to update. Tap on the contact’s name to open their contact card.
8.3 Tap Edit
In the upper-right corner of the contact card, you will see an Edit button. Tap this to enter edit mode, allowing you to modify the contact’s information.
8.4 Tap Add Photo or Edit Photo
If the contact doesn’t have a photo, you’ll see an Add Photo option. If a photo already exists, you’ll see the current photo with an Edit option. Tap on either of these to proceed.
8.5 Choose a Photo Source
A menu will appear with several options for selecting a photo:
- Camera: Take a new photo using your iPhone’s camera.
- Choose Photo: Select an existing photo from your photo library.
- Add Emoji: Use an emoji as the contact photo.
- Add Monogram: Use the contact’s initials as the photo.
Choose the option that suits you best.
8.6 Adjust the Photo
If you chose Camera or Choose Photo, you can adjust the photo to fit the circular frame:
- Zoom and Crop: Use two fingers to zoom in or out and adjust the cropping of the photo.
- Move: Drag the photo around to position it correctly within the frame.
8.7 Choose a Filter (Optional)
Below the photo, you may see options to apply filters to the image. Swipe through the filters and tap one if you want to enhance the photo’s appearance.
8.8 Tap Choose
Once you’re satisfied with the photo and any adjustments, tap the Choose button in the lower-right corner of the screen.
8.9 Tap Done
Finally, tap Done in the upper-right corner of the contact card to save the changes. The new contact photo will now appear in your contact list and when the contact calls or messages you.
By following these steps, you can easily update and personalize your contact photos on your iPhone, making it simpler to identify people at a glance and adding a personal touch to your device.
9. Troubleshooting Common Issues When Changing Contact Photos
Encountering issues while changing contact photos on your iPhone can be frustrating. Here are some common problems and how to troubleshoot them effectively, ensuring a smooth and successful photo update process.
9.1 Photo Not Saving
Issue: Sometimes, the new contact photo doesn’t save after you’ve followed all the steps.
Solution:
- Restart the Contacts App: Close the Contacts app completely and reopen it. This can resolve temporary glitches.
- Restart Your iPhone: A simple restart can clear up software issues. Turn off your iPhone, wait a few seconds, and turn it back on.
- Check iCloud Sync: Ensure that iCloud Contacts are properly synced. Go to Settings > [Your Name] > iCloud and make sure Contacts is toggled on.
9.2 Low-Resolution Photo
Issue: The contact photo appears blurry or low-resolution.
Solution:
- Use a High-Resolution Image: Choose a photo with a higher resolution. Photos taken with your iPhone’s camera are generally a good choice.
- Avoid Zooming In Excessively: Zooming in too much on a low-resolution photo can make it appear pixelated.
- Check Photo Source: If you’re using a photo from social media or another app, it may have been compressed. Use the original, uncompressed version if possible.
9.3 Photo Not Syncing Across Devices
Issue: You’ve changed the contact photo on your iPhone, but it’s not updating on your other Apple devices.
Solution:
- Ensure iCloud Sync is Enabled: Make sure iCloud Contacts are turned on for all your devices. Go to Settings > [Your Name] > iCloud and verify that Contacts is enabled.
- Check Your Internet Connection: iCloud sync requires a stable internet connection. Ensure you are connected to Wi-Fi or have a strong cellular signal.
- Force Sync: In Settings > Contacts > Accounts, tap on your iCloud account and then tap Fetch New Data. Ensure that Push is enabled or manually fetch the data.
9.4 Cannot Access Photos
Issue: The Contacts app cannot access your photo library.
Solution:
- Check Privacy Settings: Go to Settings > Privacy > Photos and make sure that Contacts has permission to access your photos.
- Restart Your iPhone: Sometimes, privacy settings can glitch. A restart can resolve this issue.
9.5 Contact Photo Disappearing
Issue: The contact photo disappears after a while.
Solution:
- Check Contact Source: If the contact is linked to multiple accounts (e.g., iCloud, Gmail, Exchange), ensure the photo is set in the primary account.
- iCloud Storage: Ensure you have enough iCloud storage. If your storage is full, it can affect syncing.
- Software Update: Ensure your iPhone is running the latest version of iOS. Software updates often include bug fixes that can resolve these issues.
By addressing these common issues with the provided solutions, you can ensure a smoother experience when changing contact photos on your iPhone.
10. Tips for Choosing the Best Contact Photos
Selecting the right contact photos can significantly enhance the visual appeal and functionality of your contact list. Here are some tips for choosing the best photos to make your contacts easily recognizable and visually pleasing.
10.1 Use Clear and Recognizable Images
Tip: Choose photos where the person’s face is clearly visible and easily recognizable. Avoid images with heavy filters, extreme angles, or poor lighting.
Why: The primary purpose of a contact photo is to quickly identify the caller or sender. A clear, recognizable image helps you do this at a glance.
10.2 Opt for High-Resolution Photos
Tip: Use high-resolution photos to ensure the image looks sharp and clear, even on high-resolution displays.
Why: Low-resolution photos can appear blurry or pixelated, reducing the visual quality and making it harder to recognize the person.
10.3 Crop Photos Appropriately
Tip: Crop the photo to focus on the person’s face. A close-up of the face is more effective than a full-body shot or a landscape image.
Why: Cropping ensures that the most important part of the image—the person’s face—is prominent and easily visible in the small contact photo space.
10.4 Consider the Background
Tip: Choose photos with a simple, uncluttered background. A busy or distracting background can draw attention away from the person’s face.
Why: A clean background helps the face stand out, making the contact photo more effective for quick identification.
10.5 Reflect the Person’s Personality
Tip: Select a photo that reflects the person’s personality or how you typically see them. A professional headshot might be suitable for a business contact, while a candid shot might be better for a friend.
Why: Matching the photo to the person’s personality can make the contact list more personal and enjoyable to use.
10.6 Be Consistent
Tip: Try to maintain a consistent style across your contact photos. For example, you might choose to use only headshots or only candid photos.
Why: Consistency can make your contact list look more organized and visually appealing.
10.7 Update Photos Regularly
Tip: Update contact photos periodically, especially if the person’s appearance has changed significantly.
Why: Keeping photos up-to-date ensures that you can easily recognize the person, even if it’s been a while since you last saw them.
10.8 Use Color Photos
Tip: Whenever possible, use color photos rather than black and white. Color photos are generally more visually engaging and easier to recognize.
Why: Color photos provide more visual information, making it easier to distinguish between contacts and recognize individuals quickly.
By following these tips, you can curate a contact list with photos that are both functional and visually appealing, enhancing your overall iPhone experience.
Interested in learning more about enhancing your photography skills and personalizing your digital experience? Visit dfphoto.net for a wealth of resources, stunning photo collections, and a vibrant community of photography enthusiasts.
FAQ: Changing Contact Photos
1. Why can’t I see the “My Card” option in my Contacts app?
The “My Card” option might be missing because you haven’t set up your own contact card. Create a new contact with your information and then designate it as “My Card” in the settings.
2. How do I ensure my contact photos sync across all my Apple devices?
Make sure iCloud Contacts is enabled on all your devices. Go to Settings > [Your Name] > iCloud and toggle Contacts on.
3. What should I do if my contact photos appear blurry?
Use high-resolution images for your contact photos. Low-resolution images can appear pixelated, especially on high-resolution displays.
4. Can I use Memoji or Animoji as contact photos?
Yes, you can use Memoji or Animoji to create unique and personalized contact posters. This option is available when you edit your contact photo.
5. How do I share my updated contact photo with others?
Enable Name & Photo Sharing in the Contacts app. Go to My Card > Contact Photo & Poster and turn on Name & Photo Sharing. You can choose to share with Contacts Only or Always Ask.
6. Are contact pronouns shared when I use NameDrop?
No, when you share your contact information through NameDrop, your pronouns are not shared by default to protect privacy.
7. How often should I update my contact photos?
Update contact photos periodically, especially if the person’s appearance has changed significantly, to ensure you can easily recognize them.
8. Can I add contact photos to contacts that are synced from Gmail or other accounts?
Yes, you can add contact photos to contacts synced from various accounts. However, ensure the photo is set in the primary account to avoid syncing issues.
9. What is the best way to crop a contact photo?
Crop the photo to focus on the person’s face. A close-up of the face is more effective for quick identification.
10. How can I prevent my contact photos from disappearing?
Ensure that iCloud sync is properly enabled, check your iCloud storage, and make sure your iPhone is running the latest version of iOS to prevent any software glitches.
Address: 1600 St Michael’s Dr, Santa Fe, NM 87505, United States.
Phone: +1 (505) 471-6001.
Website: dfphoto.net.
Visit dfphoto.net to discover a wealth of resources, stunning photo collections, and a vibrant community of photography enthusiasts. Enhance your skills and find inspiration today.