Changing the background color on your iPhone photos is a simple yet effective way to enhance your images. With the right tools and techniques, anyone, from amateur photographers to seasoned professionals, can transform a mundane shot into a captivating piece of art. On dfphoto.net, we provide a comprehensive guide to help you master this skill, ensuring your photos always look their best by leveraging diverse editing applications and built-in iPhone functionalities, as well as exploring artistic approaches to photography and visual arts. Discover tips for mobile photography, image manipulation techniques, and creative ways to express yourself through photo editing.
1. What Are The Intentions Behind Changing Background Color on iPhone Photos?
Changing the background color on an iPhone photo serves various intentions, from simple aesthetic improvements to more complex artistic and professional goals.
1.1 Aesthetic Enhancement
Altering the background color can dramatically enhance the visual appeal of a photo. By choosing a color that complements the subject, you can create a more balanced and attractive image.
1.2 Subject Isolation
Changing the background color helps isolate the subject, drawing the viewer’s attention to the main focus of the image and making it stand out.
1.3 Consistency in Branding
For businesses and influencers, maintaining a consistent brand aesthetic is crucial. Changing the background color ensures that all images align with the brand’s color scheme and overall visual identity.
1.4 Creative Expression
Photographers and artists use background color changes to express their creativity. Experimenting with different colors can evoke specific moods and emotions, adding depth and meaning to the photograph.
1.5 Removing Distractions
Sometimes, a cluttered or unappealing background detracts from the subject. Changing the background color can eliminate these distractions, resulting in a cleaner, more professional-looking photo.
2. What Are The Simplest Methods to Change Background Color on iPhone Photo?
Changing the background color of a photo directly on your iPhone is easier than you might think, thanks to several user-friendly apps and built-in features.
2.1 Using the Photos App’s Subject Selection Feature
The iPhone’s built-in Photos app has a handy feature that allows you to isolate the subject of your photo, which you can then copy and paste onto a different background.
2.1.1 How to Lift a Subject from the Photo Background on iPhone
Apple introduced a feature that lets you remove image backgrounds, allowing you to change your photo background into a transparent PNG format. This feature works not only for Photos but also in Safari.
Steps:
- Open Photos and select the picture you want to edit.
- Long-press the main subject until it flashes with white edges.
- Tap Copy. You can then paste the PNG image with a transparent background into Files or directly into a chat frame on social media.
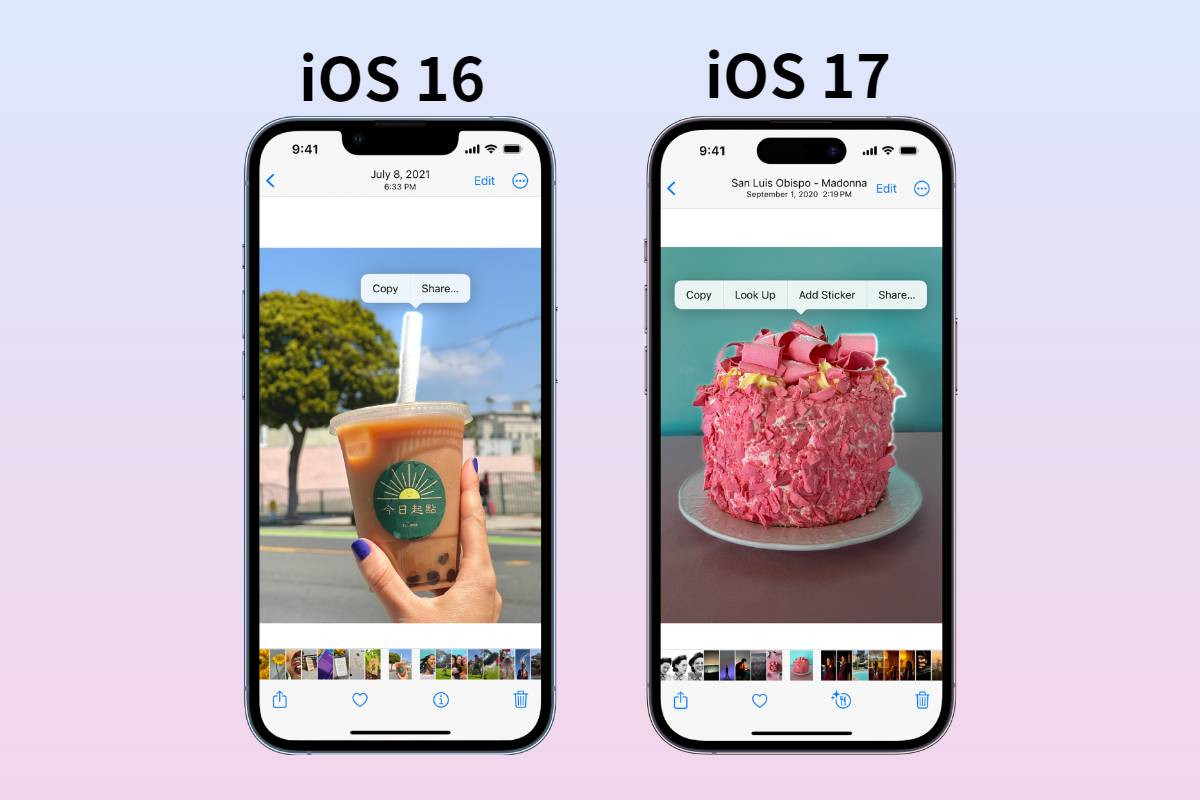 Lift A Subject from The Photo Background on iPhone ios16&17
Tip: This feature also works in Safari. Simply long-press the image and tap Copy Subject to get an image with a transparent background.
This feature is available on iPhone SE 2 and later models, allowing you to quickly remove the background from your image and create a transparent background.
2.1.2 Limitations
While this method is quick and easy, it only allows you to create a transparent background. If you want to change the background to a specific color or image, you’ll need to use a different app.
2.2 Utilizing Background Eraser Apps
Several apps in the App Store are specifically designed for removing and changing photo backgrounds. These apps often provide more advanced tools and options than the built-in Photos app.
2.2.1 Popular Choices
- Fotor: A versatile photo editor that allows you to change the background to various colors and even use custom images.
- PicsArt: Known for its extensive editing capabilities, PicsArt lets you easily remove and replace backgrounds with solid colors or other images.
- Background Eraser: A straightforward app focused solely on background removal and replacement, offering precision tools for accurate editing.
2.2.2 Basic Steps
- Download and Install: Choose an app from the App Store and install it on your iPhone.
- Upload Photo: Open the app and upload the photo you want to edit.
- Remove Background: Use the app’s tools to remove the existing background. This might involve tracing the subject or using an automatic background removal tool.
- Change Background Color: Select a new background color from the app’s color palette or upload a custom background image.
- Save and Share: Once you’re satisfied with the result, save the edited photo to your iPhone and share it as desired.
2.3 Employing Photo Editing Apps with Masking Tools
Photo editing apps with masking tools offer more precise control over background changes. Masking allows you to selectively edit specific areas of your photo, making it easier to isolate and change the background.
2.3.1 Recommended Apps
- Adobe Photoshop Express: A mobile version of the popular desktop software, offering powerful masking and editing tools.
- Snapseed: A free app from Google with a range of professional-grade editing features, including precise masking capabilities.
2.3.2 How to Use Masking Tools
- Open the Photo: Import your photo into the editing app.
- Select the Masking Tool: Choose the masking tool, which may be labeled as “Selection Brush” or “Mask.”
- Create a Mask: Carefully trace around the subject of your photo to create a mask that isolates it from the background.
- Invert the Mask: Invert the mask so that it selects the background instead of the subject.
- Apply Color Change: Use the app’s color adjustment tools to change the background color.
- Refine the Edges: Use the eraser tool to clean up any rough edges and ensure a seamless transition between the subject and the new background.
- Save the Edited Photo: Save your changes and export the final image.
3. Which Apps Are Best for Changing Background Color on iPhone Photo?
When it comes to changing the background color of photos on your iPhone, several apps stand out due to their ease of use, advanced features, and overall performance. Here’s a detailed look at some of the best options available.
3.1 Fotor
Fotor is a versatile photo editing app that provides a wide range of tools for enhancing your photos. Its background removal feature is particularly useful for changing background colors quickly and efficiently.
3.1.1 Key Features
- AI-Powered Background Removal: Fotor uses artificial intelligence to automatically detect and remove the background from your photos, saving you time and effort.
- Extensive Color Palette: Choose from a wide selection of colors to replace the background, or use a custom color by entering its hex code.
- Custom Backgrounds: In addition to solid colors, Fotor allows you to replace the background with another image, giving you even more creative options.
- User-Friendly Interface: Fotor’s intuitive interface makes it easy for beginners to get started, while still offering advanced features for experienced users.
3.1.2 How to Use Fotor
- Download and Open: Download Fotor from the App Store and open the app.
- Upload Your Photo: Tap the “+” button to upload the photo you want to edit.
- Remove Background: Select the “Background Remover” tool and let Fotor automatically remove the background.
- Change Background Color: Choose a new background color from the color palette or upload a custom image.
- Adjust and Save: Fine-tune the edges of the subject if needed, then save the edited photo to your iPhone.
3.2 PicsArt
PicsArt is a popular photo editing app with a vast array of tools and features, including a robust background removal and replacement tool. It’s a great choice for users who want a lot of creative control over their edits.
3.2.1 Key Features
- Manual and Automatic Removal: PicsArt offers both manual and automatic background removal options, giving you the flexibility to choose the method that works best for your photo.
- Extensive Editing Tools: In addition to background removal, PicsArt includes a wide range of editing tools, such as filters, effects, and text overlays.
- Creative Background Options: Replace the background with solid colors, gradients, textures, or custom images.
- Community Features: Share your edits with the PicsArt community and get inspired by other users’ creations.
3.2.2 How to Use PicsArt
- Install and Launch: Download PicsArt from the App Store and open the app.
- Select Your Photo: Tap the “+” button to choose the photo you want to edit.
- Remove Background: Use the “Cutout” tool to remove the background, either manually or automatically.
- Change Background: Select the “Fit” tool and choose a new background color or image.
- Customize and Share: Add additional edits and effects as desired, then save the photo to your iPhone or share it online.
3.3 Background Eraser
As the name suggests, Background Eraser is an app specifically designed for removing and changing photo backgrounds. It’s a simple and straightforward tool that’s perfect for users who want to focus solely on this task.
3.3.1 Key Features
- Precise Removal Tools: Background Eraser offers a variety of tools for accurate background removal, including a magic wand tool and a manual eraser.
- Simple Interface: The app’s clean and intuitive interface makes it easy to use, even for beginners.
- Transparent Backgrounds: Create transparent backgrounds for use in other projects, or replace the background with a solid color or image.
- Zoom Function: Zoom in on your photo for precise editing and clean up any rough edges.
3.3.2 How to Use Background Eraser
- Download and Open: Download Background Eraser from the App Store and open the app.
- Choose Your Photo: Select the photo you want to edit.
- Remove Background: Use the app’s tools to remove the background, either manually or automatically.
- Change Background: Select a new background color or image.
- Save Your Work: Save the edited photo to your iPhone.
3.4 Adobe Photoshop Express
Adobe Photoshop Express is a mobile version of the industry-standard photo editing software, offering powerful tools and features for enhancing your photos on the go. Its masking tools are particularly useful for changing background colors with precision.
3.4.1 Key Features
- Powerful Masking Tools: Selectively edit specific areas of your photo, making it easy to isolate and change the background.
- Advanced Editing Features: Photoshop Express includes a wide range of advanced editing features, such as color correction, noise reduction, and perspective correction.
- User-Friendly Interface: Despite its advanced features, Photoshop Express has a user-friendly interface that’s easy to navigate.
- Adobe Creative Cloud Integration: Seamlessly sync your photos and edits with Adobe Creative Cloud for access across all your devices.
3.4.2 How to Use Adobe Photoshop Express
- Install and Open: Download Adobe Photoshop Express from the App Store and open the app.
- Import Your Photo: Import the photo you want to edit.
- Use Masking Tools: Select the masking tool and carefully trace around the subject of your photo to create a mask.
- Invert the Mask: Invert the mask so that it selects the background instead of the subject.
- Change Background Color: Use the app’s color adjustment tools to change the background color.
- Save and Share: Save the edited photo to your iPhone and share it as desired.
3.5 Snapseed
Snapseed is a free photo editing app from Google that offers a range of professional-grade editing features, including precise masking capabilities. It’s a great choice for users who want powerful editing tools without having to pay for a subscription.
3.5.1 Key Features
- Precise Masking: Snapseed’s masking tools allow you to selectively edit specific areas of your photo with great precision.
- Variety of Editing Tools: The app includes a wide range of editing tools, such as curves, white balance, and healing.
- User-Friendly Interface: Snapseed has a clean and intuitive interface that’s easy to use, even for beginners.
- Non-Destructive Editing: All of your edits are non-destructive, meaning you can always revert back to the original photo if you’re not happy with the results.
3.5.2 How to Use Snapseed
- Download and Open: Download Snapseed from the App Store and open the app.
- Open Your Photo: Tap the “+” button to open the photo you want to edit.
- Use the Selection Tool: Select the “Selective” tool and tap on the area of the photo you want to edit.
- Adjust the Selection: Use the app’s tools to adjust the size and shape of the selection.
- Change Background Color: Use the app’s color adjustment tools to change the background color.
- Save and Share: Save the edited photo to your iPhone and share it as desired.
4. What Are Some Creative Ways to Use Background Color Changes?
Changing the background color of your iPhone photos isn’t just about fixing imperfections; it’s also a powerful tool for creative expression.
4.1 Creating a Pop Art Effect
Inspired by artists like Andy Warhol, you can use vibrant, contrasting background colors to create a pop art effect.
4.1.1 How to Achieve the Look
- Isolate the Subject: Use a background eraser app to remove the original background.
- Choose Bold Colors: Select bright, saturated colors like neon pink, electric blue, or lime green.
- Apply the Color: Replace the background with your chosen color.
- Duplicate and Vary: For a Warhol-esque effect, duplicate the image several times, each with a different background color.
4.2 Evoking a Specific Mood
Color psychology plays a significant role in how viewers perceive your photos.
4.2.1 Color Associations
- Blue: Calm, peaceful, serene
- Red: Passionate, energetic, intense
- Yellow: Happy, optimistic, cheerful
- Green: Natural, fresh, balanced
- Purple: Mysterious, luxurious, creative
4.2.2 How to Use Color for Mood
- Consider the Subject: Think about the emotions you want to evoke with your photo.
- Choose a Complementary Color: Select a background color that aligns with your desired mood.
- Apply Subtly: Use the color sparingly to enhance the overall effect without overpowering the subject.
4.3 Making a Retro Aesthetic
Transport your photos back in time by using background colors that evoke a retro vibe.
4.3.1 Popular Retro Colors
- Mustard Yellow: A warm, earthy tone reminiscent of the 1970s.
- Avocado Green: Another classic color from the 70s, often paired with mustard yellow.
- Dusty Rose: A muted pink that was popular in the 1950s and 60s.
- Teal: A blue-green hue that was trendy in the 1980s.
4.3.2 How to Create a Retro Look
- Remove the Original Background: Use a background eraser app to isolate the subject.
- Select a Retro Color: Choose a color from the retro palette.
- Apply the Color: Replace the background with your chosen color.
- Add Vintage Filters: Use photo editing apps to add vintage filters and textures for an authentic retro feel.
4.4 Creating a Minimalist Look
For a clean and modern aesthetic, use simple, neutral background colors.
4.4.1 Ideal Colors
- White: Clean, pure, simple
- Gray: Neutral, sophisticated, understated
- Beige: Warm, natural, calming
4.4.2 How to Achieve Minimalism
- Isolate the Subject: Remove the original background using a background eraser app.
- Choose a Neutral Color: Select a white, gray, or beige background.
- Apply the Color: Replace the background with your chosen color.
- Keep it Simple: Avoid adding any additional elements or effects that would detract from the minimalist aesthetic.
4.5 Adding a Surreal Touch
Create dreamlike images by using unexpected and unconventional background colors.
4.5.1 Experiment with Colors
- Iridescent Colors: Colors that seem to change depending on the angle of view.
- Glow-in-the-Dark Colors: Neon colors that appear to glow against a dark background.
- Abstract Patterns: Use unusual patterns and textures as backgrounds.
4.5.2 How to Add Surrealism
- Remove the Original Background: Isolate the subject using a background eraser app.
- Choose an Unconventional Color: Select a color or pattern that is unexpected and visually striking.
- Apply the Color: Replace the background with your chosen color or pattern.
- Add Dreamlike Effects: Use photo editing apps to add effects like blurring, distortion, and color manipulation to enhance the surreal atmosphere.
5. How Do Background Color Changes Impact Photo Composition?
The background color in a photo significantly impacts its overall composition, influencing how viewers perceive the subject and the message conveyed.
5.1 Drawing Attention to the Subject
The right background color can make your subject pop, capturing the viewer’s attention immediately.
5.1.1 Contrast is Key
Using a background color that contrasts with the subject’s colors creates visual interest. For example, a brightly colored object against a muted background will stand out more.
5.1.2 Color Temperature
Warm colors (reds, oranges, yellows) tend to advance, while cool colors (blues, greens, purples) recede. Using a warm background can make the subject appear closer, while a cool background can create depth.
5.2 Creating Visual Balance
A balanced composition is pleasing to the eye.
5.2.1 Color Distribution
Ensure the background color doesn’t overpower the subject. Distribute colors evenly to create a harmonious balance.
5.2.2 Rule of Thirds
Consider how the background color interacts with the rule of thirds. Placing the subject at the intersection of these lines can create a more dynamic composition.
5.3 Setting the Mood and Tone
Color psychology plays a vital role in setting the mood.
5.3.1 Emotional Impact
- Bright Colors: Energetic and cheerful
- Dark Colors: Mysterious and dramatic
- Pastel Colors: Soft and gentle
5.3.2 Consistency
Ensure the background color aligns with the overall tone of the photo. A mismatch can create confusion or dissonance.
5.4 Enhancing Depth and Dimension
The background color can create the illusion of depth.
5.4.1 Atmospheric Perspective
Lighter, cooler colors in the background can simulate atmospheric perspective, making the subject appear more distant.
5.4.2 Layering
Using multiple layers of color can add depth and dimension to the photo.
5.5 Minimizing Distractions
A clean, uncluttered background helps focus attention on the subject.
5.5.1 Simplicity
Choose a simple background color that doesn’t compete with the subject for attention.
5.5.2 Uniformity
A uniform background color eliminates distractions and creates a polished look.
6. How Can iPhone Photo Background Color Changes Improve Product Photography?
For product photography, changing the background color can significantly enhance the appeal and professionalism of your images.
6.1 Creating a Clean and Professional Look
A clean background color can make your product stand out and appear more professional.
6.1.1 White Backgrounds
White backgrounds are ideal for e-commerce as they provide a clean, distraction-free backdrop that highlights the product’s features.
6.1.2 Neutral Colors
Neutral colors like gray or beige can also work well, providing a subtle backdrop that doesn’t compete with the product.
6.2 Highlighting Product Features
The right background color can draw attention to specific details of your product.
6.2.1 Contrasting Colors
Use contrasting colors to make certain features pop. For example, if your product has red accents, a green background can make them stand out.
6.2.2 Complementary Colors
Use complementary colors to enhance the overall look of the product. For instance, a blue product can look stunning against an orange background.
6.3 Maintaining Brand Consistency
Consistent background colors across your product photos help reinforce your brand identity.
6.3.1 Brand Colors
Use your brand’s colors as the background to create a cohesive look.
6.3.2 Color Palette
Develop a color palette for your product photos that aligns with your brand’s aesthetic.
6.4 Setting the Right Mood
The background color can help convey the desired mood or emotion associated with your product.
6.4.1 Emotional Connection
Consider the emotions you want to evoke and choose a background color that aligns with those feelings.
6.4.2 Target Audience
Think about your target audience and select a background color that appeals to their tastes.
6.5 Removing Distractions
A clean background eliminates distractions and focuses attention on the product.
6.5.1 Simplicity
Choose a simple background color that doesn’t compete with the product for attention.
6.5.2 Uniformity
A uniform background color ensures that the product is the main focus of the image.
7. What Are The Best Practices for Ensuring High-Quality Background Color Changes?
To achieve professional-looking results when changing background colors on your iPhone photos, consider these best practices.
7.1 Start with a High-Resolution Image
The quality of your original photo is crucial.
7.1.1 Sharpness
Ensure your photo is sharp and in focus before making any edits.
7.1.2 Resolution
Use the highest resolution possible to avoid pixelation or blurring during editing.
7.2 Use Precise Selection Tools
Accuracy is key to a seamless background change.
7.2.1 Zoom In
Zoom in on your photo to make precise selections and clean up any rough edges.
7.2.2 Feathering
Use feathering to soften the edges of your selection and create a more natural transition.
7.3 Choose Colors That Complement the Subject
The right color can enhance the overall look of your photo.
7.3.1 Color Theory
Understand basic color theory principles to choose colors that complement the subject and create visual harmony.
7.3.2 Experimentation
Experiment with different colors to see what works best for your photo.
7.4 Pay Attention to Lighting and Shadows
Lighting consistency is essential for a realistic look.
7.4.1 Matching Lighting
Ensure the lighting on the subject matches the lighting of the new background.
7.4.2 Adding Shadows
Add subtle shadows to the subject to ground it in the new background.
7.5 Avoid Over-Editing
Subtlety is key to a natural-looking result.
7.5.1 Natural Look
Aim for a natural look rather than an overly processed one.
7.5.2 Subtle Adjustments
Make subtle adjustments to color, brightness, and contrast to blend the subject seamlessly into the new background.
8. How Does AI Technology Enhance Background Color Changing on iPhones?
Artificial intelligence (AI) has revolutionized the way we edit photos on our iPhones, making tasks like changing background colors easier and more efficient than ever before.
8.1 Automatic Background Detection
AI algorithms can automatically detect and isolate the subject of a photo, eliminating the need for manual selection.
8.1.1 Precision
AI-powered background removal tools are incredibly precise, accurately identifying the edges of the subject even in complex scenes.
8.1.2 Time-Saving
Automatic background detection saves a significant amount of time compared to manual selection, allowing you to focus on other aspects of your edit.
8.2 Intelligent Color Selection
AI can analyze the colors in your photo and suggest background colors that complement the subject.
8.2.1 Harmonious Palettes
AI-powered color selection tools can create harmonious color palettes that enhance the overall look of your photo.
8.2.2 Mood Enhancement
AI can suggest colors that evoke specific moods or emotions, helping you convey the desired message with your photo.
8.3 Seamless Blending
AI can seamlessly blend the subject into the new background, creating a natural and realistic look.
8.3.1 Edge Refinement
AI algorithms can refine the edges of the subject, smoothing out any rough areas and ensuring a seamless transition.
8.3.2 Lighting Consistency
AI can adjust the lighting on the subject to match the lighting of the new background, creating a cohesive and realistic look.
8.4 Context-Aware Editing
AI can analyze the context of your photo and make intelligent editing suggestions based on the scene.
8.4.1 Scene Understanding
AI can understand the elements in your photo, such as people, objects, and landscapes, and suggest appropriate background colors and effects.
8.4.2 Personalized Recommendations
AI can learn your editing preferences and provide personalized recommendations based on your style.
8.5 Future Trends
The future of AI-powered photo editing is full of exciting possibilities.
8.5.1 Enhanced Realism
AI will continue to improve the realism of background changes, making it even harder to tell that a photo has been edited.
8.5.2 Creative Automation
AI will automate more creative tasks, such as generating unique background patterns and textures.
9. How Do Lighting and Shadows Affect the Perception of Changed Background Colors?
Lighting and shadows play a crucial role in how we perceive colors, especially when changing background colors in photos.
9.1 Color Perception
Lighting directly affects how we see colors.
9.1.1 Light Source
The color of the light source (e.g., sunlight, incandescent light, fluorescent light) can alter the perceived color of the background.
9.1.2 Intensity
The intensity of the light can also affect color perception, with brighter light making colors appear more vibrant and saturated.
9.2 Shadows and Depth
Shadows create depth and dimension in a photo.
9.2.1 Naturalism
When changing background colors, it’s essential to add realistic shadows to ground the subject in the new environment.
9.2.2 Direction
The direction of the shadows should be consistent with the direction of the light source.
9.3 Contrast and Highlight
Contrast and highlights can enhance the visual impact of the background color.
9.3.1 Visual Interest
Using contrast to create highlights and shadows can add visual interest and make the background color more dynamic.
9.3.2 Balance
Balance the contrast and highlights to avoid overpowering the subject.
9.4 Color Temperature
The color temperature of the light can affect the overall mood of the photo.
9.4.1 Warm vs. Cool
Warm light (yellowish) can make colors appear warmer, while cool light (bluish) can make colors appear cooler.
9.4.2 Consistency
Ensure the color temperature of the light is consistent between the subject and the background.
9.5 Practical Tips
Here are some practical tips for working with lighting and shadows when changing background colors.
9.5.1 Observe
Observe the lighting in your original photo and try to replicate it in the new background.
9.5.2 Experiment
Experiment with different lighting and shadow effects to see what works best for your photo.
9.5.3 Soft Light
Use soft light to create a more natural and flattering look.
10. FAQ: Changing Background Color on iPhone Photo
10.1 Can I change the background color of a photo directly on my iPhone?
Yes, you can! The iPhone’s built-in Photos app and several third-party apps like Fotor, PicsArt, and Snapseed make it easy to change the background color of your photos directly on your device.
10.2 Is there a free app to change the background color of photos on iPhone?
Yes, Snapseed is a completely free and powerful photo editing app from Google that includes precise masking tools for changing background colors. Other apps like PicsArt offer free versions with basic features, but may require a subscription for advanced tools.
10.3 How do I remove the background from a photo on my iPhone?
You can use the iPhone’s built-in Photos app by long-pressing on the subject to lift it from the background, or use third-party apps like Fotor and Background Eraser, which offer tools for automatic or manual background removal.
10.4 Can I change the background of a photo to a custom color on my iPhone?
Absolutely! Most photo editing apps, including Fotor and PicsArt, allow you to select a custom color from a color palette or enter a specific hex code to use as the new background color.
10.5 How can I make the background color change look realistic?
To ensure a realistic background color change, pay attention to lighting and shadows, use precise selection tools, and choose colors that complement the subject. Subtle adjustments and edge refinement can also help create a seamless transition.
10.6 What are some creative ideas for using background color changes in my photos?
You can use background color changes to create pop art effects, evoke specific moods, create a retro aesthetic, achieve a minimalist look, or add a surreal touch to your photos.
10.7 How does AI help in changing background colors on iPhone photos?
AI-powered apps can automatically detect and isolate the subject of a photo, suggest harmonious color palettes, seamlessly blend the subject into the new background, and make context-aware editing suggestions.
10.8 What should I consider when choosing a new background color for my photo?
Consider the subject of your photo, the mood you want to convey, and the overall composition. Choose a color that complements the subject and enhances the visual impact of the image.
10.9 Can I use a photo as the new background instead of a solid color?
Yes, many photo editing apps like Fotor and PicsArt allow you to replace the background with another image, giving you even more creative options.
10.10 How do I maintain brand consistency when changing background colors in product photos?
Use your brand’s colors as the background, develop a color palette that aligns with your brand’s aesthetic, and maintain a consistent look across all your product photos.
Ready to take your iPhone photography to the next level? Visit dfphoto.net today to discover more tips, tutorials, and creative inspiration for mastering the art of photo editing! Connect with a vibrant community of photographers and unlock your full potential.
Address: 1600 St Michael’s Dr, Santa Fe, NM 87505, United States
Phone: +1 (505) 471-6001
Website: dfphoto.net