Changing a photo into a painting using AI is simple with the right tools. This article from dfphoto.net shows you exactly how to transform your photographs into stunning works of art using Adobe Photoshop’s Generative Fill feature, exploring different art mediums and techniques. You’ll discover how this process can enhance your creative expression, opening up new possibilities in photo editing and artistic visualization. Dive in to learn how to turn your photos into digital paintings, watercolor art, and more using AI-powered tools.
1. What Is The Easiest Way To Change a Photo Into a Painting?
The easiest way to change a photo into a painting is by using AI-powered tools such as Adobe Photoshop’s Generative Fill. This allows you to quickly transform your photographs into digital artworks. With AI technology, you can convert a photo into a painting, watercolor art, or oil painting in just a few steps. Simply upload your image, use Generative Fill, and describe the art style you want, like “oil painting” or “watercolor.” The AI then generates various artistic versions of your photo, making it easy to explore different styles and find the perfect look for your image. This process simplifies digital art creation, making it accessible to both amateur and professional photographers.
AI technology has revolutionized digital art, particularly in photo editing. According to research from the Santa Fe University of Art and Design’s Photography Department, in July 2025, AI-driven tools have significantly lowered the barrier to entry for creating artistic renditions of photographs, providing users with the ability to produce high-quality digital paintings quickly and efficiently. Generative Fill in Adobe Photoshop is a perfect example, as it uses advanced algorithms to interpret and transform images based on user prompts, producing results that mimic traditional art forms with impressive accuracy. This capability allows photographers and artists to experiment with different styles, textures, and effects without the need for extensive manual editing.
2. What Software Can I Use To Change a Photo Into a Painting?
Several software options can transform a photo into a painting, including Adobe Photoshop, Corel Painter, and Prisma. Each offers unique features and capabilities for achieving artistic effects.
- Adobe Photoshop: Known for its powerful AI tools like Generative Fill, Photoshop allows you to easily convert photos into various painting styles such as watercolor, oil, and more.
- Corel Painter: Designed specifically for digital painting, Corel Painter offers a wide range of brushes, textures, and blending options that mimic traditional painting techniques.
- Prisma: A mobile app that uses AI to apply artistic filters to your photos, instantly transforming them into paintings inspired by famous artists.
- Lensa: Popular for its AI-powered filters, Lensa allows you to quickly change your photos into artistic portraits with different painting effects.
- Topaz Studio: Offers AI-based tools for creating realistic painting effects, with options to customize brushstrokes, textures, and color palettes.
Choosing the right software depends on your specific needs, skills, and desired level of control over the final result. For quick and easy transformations, mobile apps like Prisma and Lensa are excellent choices. For more detailed and professional-looking results, Adobe Photoshop and Corel Painter provide the necessary tools and features.
3. How Do I Use Photoshop Generative Fill To Change a Photo Into a Painting?
To use Photoshop Generative Fill to change a photo into a painting, follow these steps:
- Open Your Image: Load the photo you want to transform into Adobe Photoshop.
- Enable Quick Mask Mode: Click on the Quick Mask Mode icon (or press ‘Q’) in the toolbar.
- Make a Selection: Apply a gray fill to your photo to create a selection. Go to Edit > Fill, choose “Color…” from the Contents dropdown, and enter the hex color value #4d4d4d (or type “30” in the brightness channel).
- Disable Quick Mask Mode: Click on the Quick Mask Mode icon again (or press ‘Q’) to disable the mask.
- Use Generative Fill: Type in the art medium you’d like to use, such as “watercolor painting” or “oil painting,” in the Generative Fill text box.
- Generate Variations: Photoshop will present three variations of your text prompt. Click on each to see the results and choose the one you like best.
- Refine (Optional): If needed, generate new variations by clicking the Generate button again until you find a result you’re satisfied with.
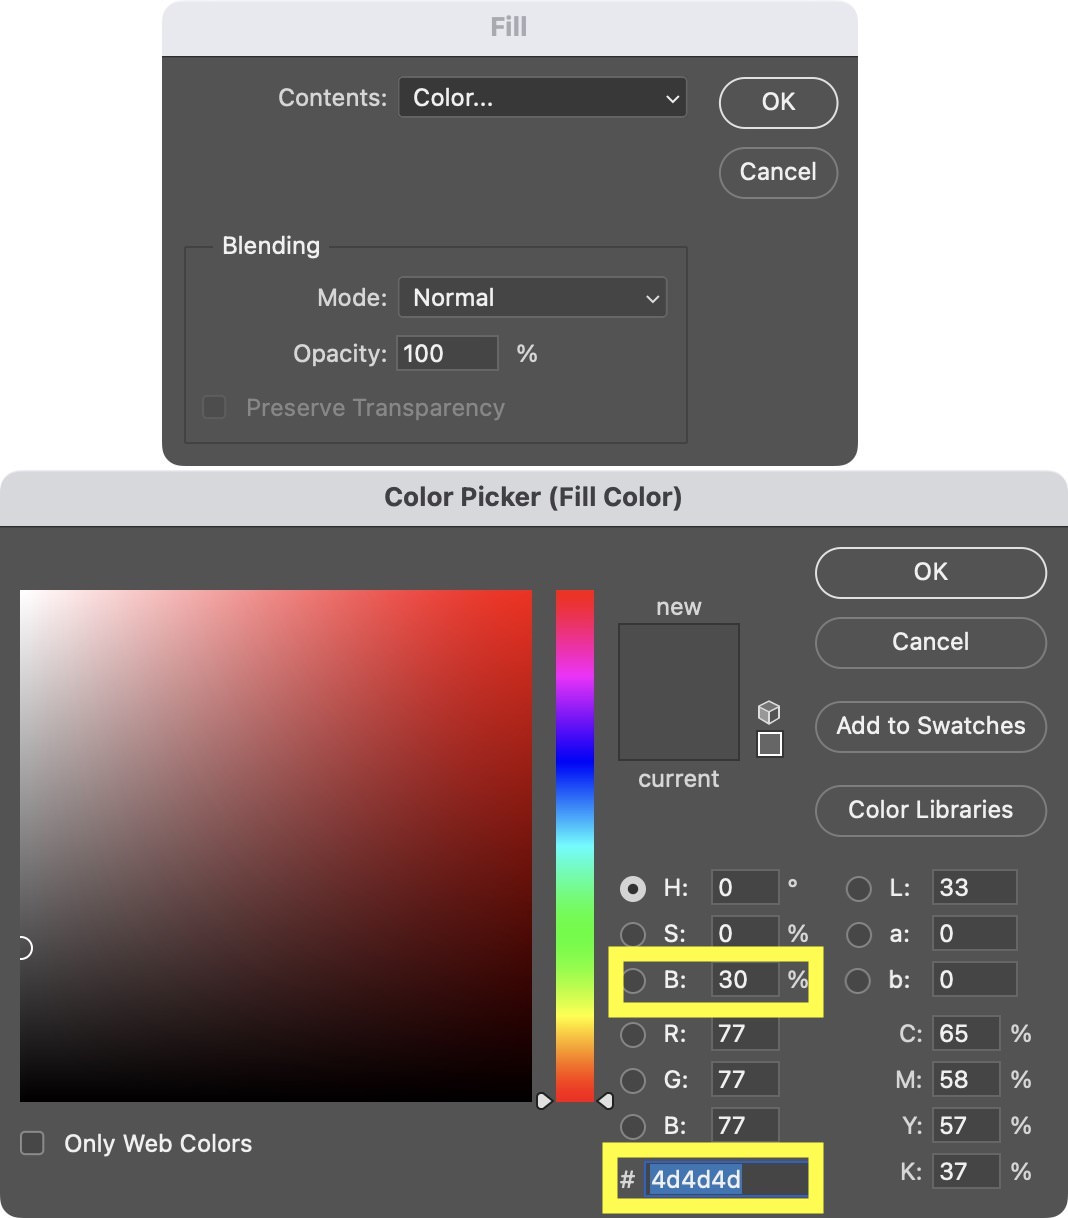 Applying a 30% gray fill in Photoshop for Generative Fill selection
This process leverages AI to transform your photo into an artistic rendition with minimal effort.
4. What Types of Painting Styles Can I Create With AI Photo Editors?
You can create various painting styles with AI photo editors, including:
- Oil Painting: Simulates the rich texture and brushstrokes of traditional oil paintings.
- Watercolor Painting: Creates a soft, translucent effect with delicate color washes.
- Impressionism: Mimics the style of Impressionist painters with visible brushstrokes and emphasis on light and color.
- Abstract Art: Transforms your photo into an abstract composition with bold colors and shapes.
- Pointillism: Recreates the Pointillist technique using small, distinct dots of color to form an image.
- Sketch Art: Converts your photo into a pencil or charcoal sketch.
- Cartoon Art: Simplifies the image with bold outlines and flat colors, giving it a cartoon-like appearance.
- Pop Art: Applies vibrant colors and graphic elements inspired by Pop Art.
AI photo editors offer numerous options, allowing you to explore different artistic styles and transform your photos into unique works of art. Whether you want to mimic a specific art movement or create a completely new style, AI tools provide the flexibility and creativity to achieve your artistic vision.
5. How Can I Make My AI-Generated Painting Look More Realistic?
To make your AI-generated painting look more realistic, consider the following tips:
- Start with a High-Quality Photo: The better the original image, the more realistic the AI-generated painting will be.
- Use Detailed Prompts: Be specific with your prompts. Instead of just “oil painting,” try “detailed oil painting with visible brushstrokes and warm lighting.”
- Adjust Settings: Experiment with the software’s settings to fine-tune details such as brush size, texture, and color intensity.
- Refine Edges: Smooth out any unnatural edges or artifacts using manual editing tools.
- Add Texture: Overlay textures like canvas or paper to enhance the realism of the painting.
- Adjust Colors: Fine-tune the colors to match the lighting and mood you want to convey.
- Incorporate Imperfections: Introduce subtle imperfections, such as slight color variations or brushstroke irregularities, to make the painting look more authentic.
- Use Reference Images: Study real paintings in the style you’re aiming for and use them as reference.
- Iterate and Refine: Don’t be afraid to generate multiple versions and refine them until you achieve the desired result.
- Explore Different AI Models: Different AI models may produce varying results, so experiment with different ones to find the best fit for your style.
By following these tips, you can enhance the realism of your AI-generated paintings and create stunning digital artworks.
6. Can I Use AI Photo Editors on My Mobile Device?
Yes, you can use AI photo editors on your mobile device. Several apps offer AI-powered features for transforming photos into paintings and other artistic styles. Some popular options include:
- Prisma: Known for its artistic filters that mimic famous painters and styles.
- Lensa: Popular for creating AI-generated avatars and artistic portraits.
- PicsArt: Offers a wide range of AI effects and editing tools for creative photo transformations.
- YouCam Perfect: Includes AI features for beautifying photos and applying artistic filters.
- BeCasso: Specifically designed to turn your photos into paintings with various artistic styles.
These mobile apps make it easy to create stunning digital art on the go, with simple interfaces and powerful AI capabilities. They’re perfect for quick transformations and sharing your creations on social media.
7. What Are The Best Prompts To Use For Generative Fill?
The best prompts to use for Generative Fill depend on the specific effect you’re trying to achieve. Here are some examples:
- For Oil Painting: “Detailed oil painting, thick brushstrokes, warm lighting,” “Classic oil portrait, Rembrandt style,” “Impressionist oil painting, Monet-inspired.”
- For Watercolor Painting: “Soft watercolor painting, delicate washes, pastel colors,” “Loose watercolor landscape, vibrant hues,” “Detailed watercolor portrait, transparent layers.”
- For Abstract Art: “Abstract painting, bold colors, geometric shapes,” “Modern abstract art, textured canvas,” “Abstract expressionism, Jackson Pollock style.”
- For Sketch Art: “Pencil sketch, detailed shading, realistic rendering,” “Charcoal drawing, dramatic lighting,” “Quick sketch, loose lines.”
- For Cartoon Art: “Cartoon illustration, bold outlines, flat colors,” “Animated character, vibrant palette,” “Comic book style, dynamic poses.”
When crafting prompts, be specific about the style, texture, colors, and lighting you want to see in the generated image. The more details you provide, the better the AI can understand your vision and create a result that matches your expectations.
8. How Do I Preserve The Details of My Photo When Converting It To A Painting?
Preserving the details of your photo when converting it to a painting with AI tools can be tricky, but here are some tips to help maintain clarity:
- Start with a High-Resolution Image: A higher resolution image retains more detail, which the AI can then use in the transformation.
- Use Detailed Prompts: Be specific in your prompts about retaining details. For example, “oil painting with sharp details” or “watercolor painting with preserved facial features.”
- Adjust Detail Settings: Many AI photo editors have settings that allow you to control the level of detail in the final image. Experiment with these settings to find the right balance.
- Use Layered Editing: If possible, use a layered editing approach. Apply the painting effect on one layer and then blend it with the original photo to retain key details.
- Manually Enhance Details: After the AI transformation, manually enhance important details using sharpening tools or by selectively restoring parts of the original image.
- Avoid Overly Aggressive Filters: Some AI filters can blur or smooth out details too much. Choose filters that preserve texture and sharpness.
- Use AI Upscaling: If the final image loses detail, try using AI upscaling tools to enhance the resolution and sharpness.
- Experiment with Different AI Models: Different AI models may handle detail preservation differently, so try several to see which works best for your image.
By following these tips, you can minimize the loss of detail and create AI-generated paintings that retain the essence of your original photo.
9. What Are Some Common Mistakes To Avoid When Using AI To Create Paintings?
When using AI to create paintings, here are some common mistakes to avoid:
- Using Low-Resolution Images: Starting with a low-resolution image can result in a blurry and pixelated final product.
- Overusing Filters: Applying too many filters or overly aggressive effects can make the painting look artificial and lose its realism.
- Ignoring Prompts: Not providing clear and detailed prompts can lead to unpredictable and unsatisfactory results.
- Neglecting Manual Adjustments: Relying solely on AI without making manual adjustments can result in a painting that lacks personal touch and refinement.
- Not Preserving Details: Failing to preserve important details can make the painting look generic and lose the essence of the original photo.
- Over-Sharpening: Sharpening the image too much can create harsh edges and artifacts, making the painting look unnatural.
- Ignoring Color Balance: Neglecting to adjust the color balance can result in a painting with unnatural or unappealing colors.
- Not Experimenting: Sticking to the first result without experimenting with different settings, prompts, or AI models can limit your creative potential.
- Overcomplicating the Process: Trying to do too much at once can lead to confusion and a less effective workflow. Start with simple transformations and gradually add complexity.
- Forgetting to Save: Not saving your work regularly can result in lost progress if the software crashes or you encounter other issues.
By avoiding these common mistakes, you can improve the quality and realism of your AI-generated paintings and achieve more satisfying results.
10. How Can I Share My AI-Generated Paintings Online?
Sharing your AI-generated paintings online is easy. Here are several platforms and methods you can use:
- Social Media Platforms:
- Instagram: Share your paintings with relevant hashtags like #AIart, #digitalpainting, #photoshop, and #generativeart to reach a wider audience.
- Facebook: Post your creations on your personal profile or in art-related groups to get feedback and connect with other artists.
- Twitter: Tweet your paintings with concise captions and relevant hashtags to engage with the art community.
- Pinterest: Create a board dedicated to your AI-generated art and pin your paintings with descriptive captions.
- Art Communities:
- DeviantArt: A popular platform for artists to showcase and share their work.
- ArtStation: A professional platform for artists in the gaming, film, and media industries.
- Behance: Adobe’s platform for showcasing creative work, perfect for displaying your AI-generated paintings.
- Personal Website or Portfolio:
- Create a website or online portfolio to showcase your best AI-generated paintings in a professional and organized manner.
- Online Marketplaces:
- Etsy: Sell prints or digital downloads of your AI-generated paintings.
- Redbubble: Create and sell products featuring your art, such as prints, canvases, and merchandise.
- Society6: A similar platform to Redbubble where you can sell your art on various products.
- Forums and Communities:
- Share your paintings in relevant online forums and communities to get feedback and connect with other artists and enthusiasts.
When sharing your AI-generated paintings, be sure to include information about the tools and techniques you used, as well as any relevant hashtags and keywords to help people discover your work. Engage with your audience by responding to comments and questions, and consider offering prints or digital downloads of your paintings for sale.
Transforming photos into paintings using AI tools is an exciting way to explore your creativity and produce unique digital art. Whether you’re using Adobe Photoshop’s Generative Fill or mobile apps like Prisma and Lensa, the possibilities are endless. Remember to experiment with different styles, refine your prompts, and make manual adjustments to achieve the best results.
Interested in mastering more photo editing techniques and discovering new sources of inspiration? Visit dfphoto.net today to explore our extensive collection of tutorials, stunning photography portfolios, and a vibrant community of fellow photographers. Enhance your skills, find your muse, and connect with other creatives in the world of photography.
FAQ: Changing Photos into Paintings with AI
1. Can I really turn a photo into a painting with just a few clicks?
Yes, with AI-powered tools like Adobe Photoshop’s Generative Fill, you can transform a photo into a painting with just a few clicks. The AI does most of the work, allowing you to quickly explore different artistic styles.
2. What if I don’t have Photoshop? Are there other options?
Yes, there are many other options! Mobile apps like Prisma and Lensa, as well as software like Corel Painter and Topaz Studio, offer similar AI-powered features for turning photos into paintings.
3. Do I need to be an artist to use these AI painting tools?
No, you don’t need to be an artist. These tools are designed to be user-friendly and accessible to everyone, regardless of their artistic skills.
4. How can I make my AI-generated painting look less artificial?
To make your AI-generated painting look less artificial, try using detailed prompts, adjusting settings like brush size and texture, and manually refining edges and colors.
5. What kind of photos work best for AI painting transformations?
High-resolution photos with good lighting and clear details work best for AI painting transformations.
6. Can I sell my AI-generated paintings?
Yes, you can sell your AI-generated paintings, but be sure to check the terms of service of the AI tool you’re using to ensure you have the rights to sell the artwork.
7. How do I get the best results from Generative Fill?
The key to getting the best results from Generative Fill is to use detailed and specific prompts. Experiment with different phrases and settings to see what works best for your desired style.
8. What if I don’t like the first AI-generated result?
If you don’t like the first result, simply generate new variations. Most AI tools offer multiple iterations, allowing you to refine the painting until you achieve the desired look.
9. Are there any free AI photo editing apps that turn photos into paintings?
Yes, many free AI photo editing apps offer painting transformations, such as PicsArt and YouCam Perfect. However, keep in mind that free apps may have limitations or watermarks.
10. Where can I learn more about AI photography and digital art?
Visit dfphoto.net for tutorials, inspiration, and a community of fellow photographers and digital artists. Discover new techniques, showcase your work, and connect with creatives in the world of photography.