Changing the background of your Windows desktop is one of the easiest and most impactful ways to personalize your computer. Whether you want to display cherished memories, inspiring landscapes, or simply prefer a clean, solid color, Windows offers a range of options to customize your visual experience. This guide will walk you through the simple steps to change your photo background and explore the various customization settings available in Windows.
Accessing Background Settings
The first step to changing your desktop background is to access the Personalization settings in Windows. There are a couple of quick ways to get there:
-
Through the Settings App: Open the Settings app by clicking on the Start Menu and then the gear icon (Settings). In the Settings app, navigate to Personalization. Alternatively, you can use this direct shortcut:
[Personalization](ms-settings:personalization)in your browser’s address bar and press Enter to open the Personalization settings directly. -
Right-Click on the Desktop: A faster method is to simply right-click anywhere on your empty desktop. In the context menu that appears, select Personalize.
Both methods will take you to the Background settings page within Personalization, where you can begin customizing your desktop’s appearance.
Choosing Your Background Type
Once you are in the Background settings, you will see a dropdown menu labeled Personalize your background. Clicking on this menu reveals several options for choosing your background type:
Picture Background
Selecting Picture allows you to set a single image as your desktop background.
- Default Pictures: Windows provides a selection of default images you can choose from. These are often scenic landscapes or abstract designs.
- Browse Your Photos: To use your own photo as a background, click the Browse button. This will open a file explorer window, allowing you to navigate to the folder where your desired image is saved. Select the image file and click Choose picture.
- Quick Set Option: You can also quickly set any image as your background by right-clicking directly on the image file in File Explorer and selecting Set as desktop background. If you are viewing an image in the Photos app, click the three-dot menu (More options), then Set as, and finally Background.
Solid Color Background
If you prefer a minimalist look, the Solid color option is for you. Choosing this option lets you select a single color as your desktop background. Simply click on one of the color swatches displayed, or click the Custom color option to choose from a wider spectrum of colors using a color picker.
Slideshow Background
For a dynamic desktop, the Slideshow option is an excellent choice. This allows you to select a folder of images, and Windows will cycle through them as your desktop background at a chosen interval.
- Choose a Folder: Click the Browse button to select a folder containing the images you want to use for your slideshow.
- Customize Slideshow Settings: You can adjust the Change picture every dropdown to set how frequently the background image changes (from minutes to days). You can also toggle the Shuffle option to display the images in a random order.
- Manual Image Change: At any time, you can right-click on the desktop and select Next desktop background to immediately advance to the next image in your slideshow.
Windows Spotlight Background
The Windows spotlight option provides a fresh and visually appealing desktop background every day. When selected, Windows automatically downloads and displays a new, high-quality image from Bing as your background. These images are often stunning photographs from around the world. Windows Spotlight also occasionally offers tips and information about the image displayed directly on your lock screen.
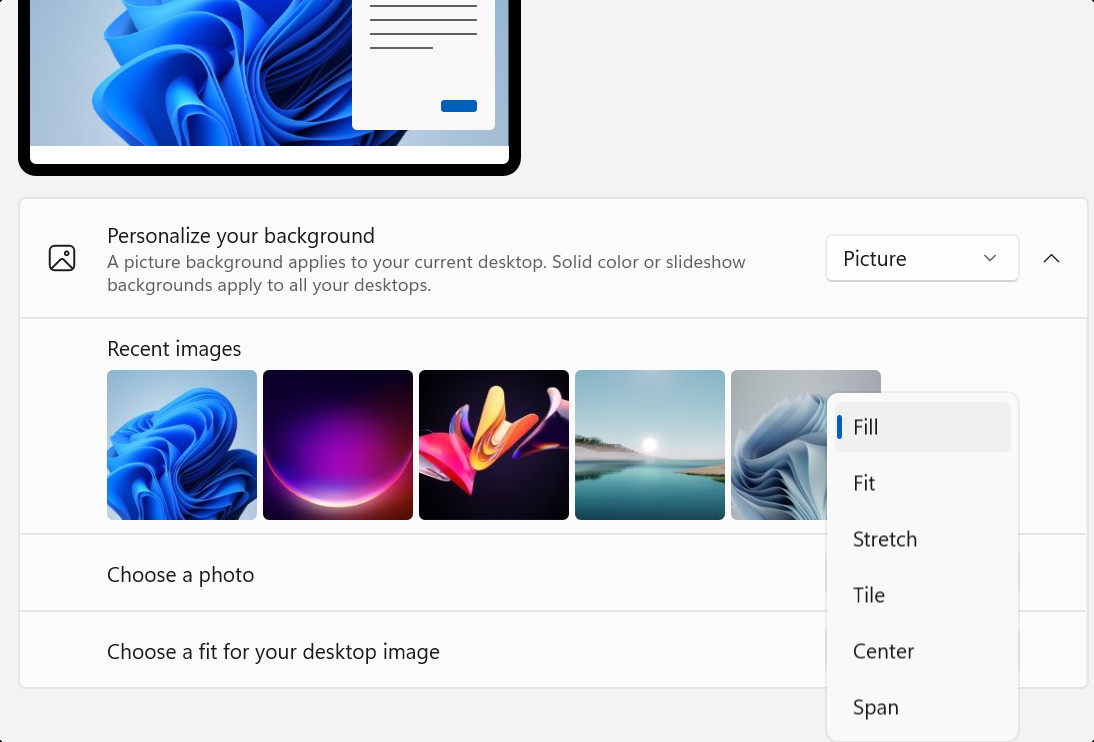 Windows 10/11 Background Fit Options: Choose from Fill, Fit, Stretch, Tile, Center, and Span to customize how your desktop background image is displayed.
Understanding Fit Options for Desktop Images
When using the Picture or Slideshow background options, you have control over how the images are displayed on your screen through the Choose a fit setting. This setting determines how the image is scaled and positioned to fit your screen resolution. Here’s a breakdown of the available fit options:
- Fill: The Fill option enlarges the image to completely cover the screen, potentially cropping parts of the image that extend beyond the screen boundaries. This option ensures no empty space is visible on your desktop.
- Fit: Fit adjusts the image to fit within the screen while maintaining its original aspect ratio. If the image’s aspect ratio is different from your screen’s, you might see black bars on the sides (or top and bottom) to prevent distortion.
- Stretch: Stretch expands the image to fill the entire screen, regardless of aspect ratio. This can distort the image if its proportions don’t match your screen’s, making objects appear stretched or squashed.
- Tile: Tile repeats the image across the screen, like tiles on a wall. This is most effective with smaller images designed to be repeated seamlessly and can create interesting patterns.
- Center: Center places the image in the middle of the screen at its actual size, without any resizing. If the image is smaller than your screen resolution, you will see the chosen background color (or black if no solid color is selected) around the image.
- Span: Span is specifically designed for multi-monitor setups. It stretches a single image across all your displays, creating a panoramic desktop background.
Desktop Backgrounds on Multiple Displays
Windows allows you to customize your background across multiple monitors. Here’s how backgrounds work when you have more than one display:
- Same Picture Across All Displays: When you choose Picture as your background, you can set the same image to appear on all your monitors. This is the default behavior.
- Different Pictures for Each Display: Alternatively, you can set a different picture for each display. To do this, after selecting Picture, right-click on one of the recent images displayed below the “Choose your picture” section. You will see options to “Set for monitor 1”, “Set for monitor 2”, etc., allowing you to assign different backgrounds to each screen. (Note: This option is not available when using multiple desktops).
- Slideshow Behavior on Multiple Displays: If you select Slideshow as your background, each monitor will display a different image from the selected folder simultaneously. Windows will cycle through the images in the folder, assigning the next image in the sequence to each display in turn.
Desktop Backgrounds on Multiple Desktops
Windows 10 and 11 offer the feature of multiple desktops, allowing you to organize your applications across different virtual workspaces. You can also customize the background for each desktop:
- Different Backgrounds for Each Desktop: You can set a unique background picture for each virtual desktop. To do this, navigate to Settings > Personalization > Background. Under “Choose your picture,” right-click on an image preview in the “Recent images” section. You will then see options to “Set for all desktops” or to choose a specific desktop (e.g., “Set for Desktop 1”, “Set for Desktop 2”).
- No Picture Per Monitor with Multiple Desktops: It’s important to note that when using multiple desktops, you cannot set different background pictures for individual monitors within each desktop. Background customization is applied at the desktop level, not at the monitor level within a multi-desktop environment.
- Slideshow Incompatibility with Multiple Desktops: The Slideshow background option is not supported when using multiple desktops. You must choose either a Picture or Solid color background for each desktop.
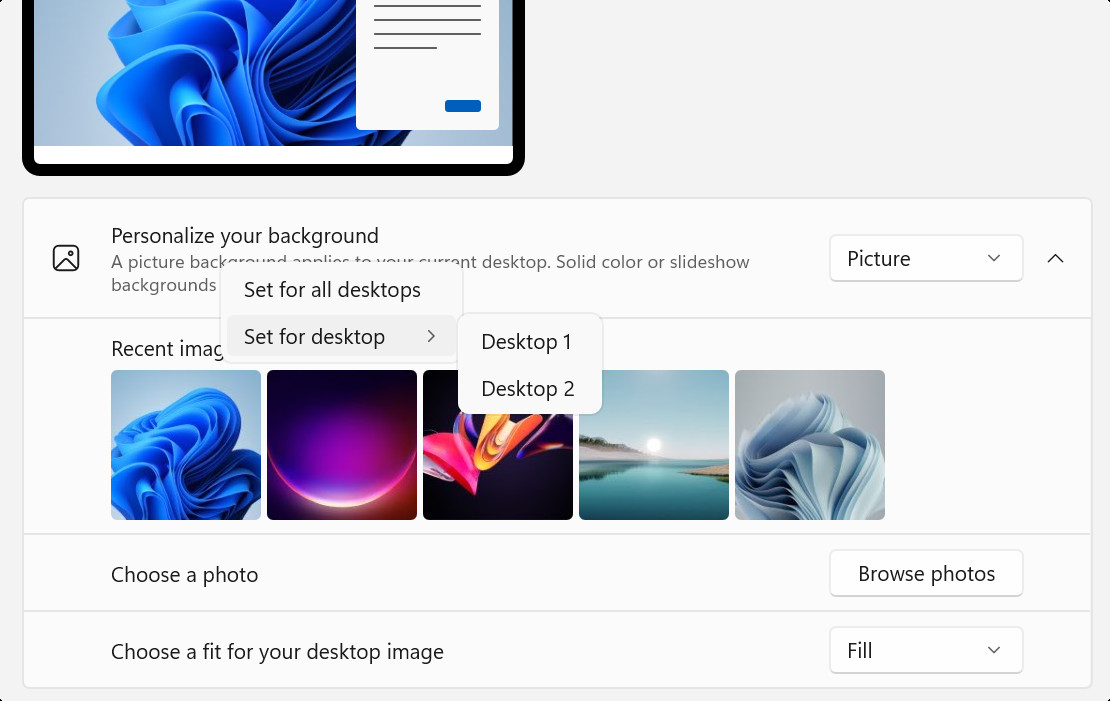 Setting Different Desktop Backgrounds for Multiple Desktops in Windows 10/11: Right-click image previews to set backgrounds for all or specific desktops.
In conclusion, changing your photo background in Windows is a straightforward process offering numerous customization options. From personal photos to dynamic slideshows and curated daily images with Windows Spotlight, you can easily tailor your desktop to reflect your personal style and preferences. Experiment with the different background types and fit options to create a visually pleasing and personalized computing environment.