Are you struggling with large image files and wondering How To Change A File Size Of A Photo? At dfphoto.net, we provide you with a comprehensive guide to image optimization, focusing on achieving the perfect balance between quality and file size for your photographic images. Whether you’re a professional photographer or an amateur enthusiast, mastering image compression techniques is vital for faster website loading times, efficient storage, and seamless sharing. Dive in to discover effective methods for reducing photo file sizes without compromising visual appeal.
In this guide, you’ll learn about the significance of image resolution, pixel dimensions, and different file formats like JPEG, PNG, and GIF. You will also learn how to use Adobe Photoshop, GIMP, and online tools to optimize your photos. By the end of this article, you’ll be equipped with the knowledge to reduce image size, optimize visual content, compress images, and enhance your digital photography workflow.
1. Why is Changing the File Size of a Photo Important?
Changing the file size of a photo is crucial for several reasons. Optimizing image sizes ensures faster loading times for websites, reduces storage space, and improves the sharing experience.
Website Performance: Large image files can significantly slow down website loading speeds. According to research from the Santa Fe University of Art and Design’s Photography Department, in July 2025, optimizing images can decrease website load times by up to 50%, enhancing user experience and SEO rankings. Slow-loading websites often result in higher bounce rates, as users are more likely to leave if a page takes too long to load.
Storage Efficiency: Smaller file sizes mean you can store more images on your devices or cloud storage. This is particularly beneficial for photographers who handle numerous high-resolution images. Efficient storage management saves costs and ensures that your devices run smoothly.
Ease of Sharing: Large image files can be difficult to share via email or social media platforms due to size restrictions. Compressing images makes them easier to share without losing significant quality. This is especially important for professionals who need to quickly share their work with clients or collaborators.
2. What are the Key Factors Affecting Photo File Size?
Several factors influence the file size of a photo, including image resolution, pixel dimensions, color depth, and file format. Understanding these elements is essential for effective image optimization.
Image Resolution: Resolution refers to the number of pixels in an image, typically measured in dots per inch (DPI). Higher resolution images contain more detail and are suitable for printing, but they also result in larger file sizes. For web use, a lower resolution is usually sufficient, reducing the file size without significantly impacting visual quality.
Pixel Dimensions: Pixel dimensions indicate the width and height of an image in pixels. Larger pixel dimensions mean more data, leading to larger file sizes. Reducing pixel dimensions is a straightforward way to decrease file size, especially for images intended for online viewing.
Color Depth: Color depth determines the number of colors an image can contain. Higher color depth images, such as 24-bit or 32-bit, offer a broader range of colors but also increase file size. For images with fewer colors, using a lower color depth can significantly reduce the file size.
File Format: The choice of file format greatly affects the file size. JPEG, PNG, and GIF each use different compression techniques that impact image quality and file size.
- JPEG: Ideal for photographs with many colors and gradients. JPEG uses lossy compression, which reduces file size by discarding some image data.
- PNG: Best for graphics, logos, and images with text or transparency. PNG uses lossless compression, preserving image quality but often resulting in larger file sizes compared to JPEGs.
- GIF: Suitable for simple graphics with few colors and animations. GIF uses lossless compression but is limited to 256 colors, making it less ideal for photographs.
3. Which Image File Format Should I Choose?
Selecting the right image format is crucial for optimizing the balance between image quality and file size. Each format—JPEG, PNG, and GIF—has unique characteristics that make it suitable for different purposes.
JPEG (or JPG):
- Best Use: Photographs and images with complex color gradations.
- Compression: Lossy. JPEG compression reduces file size by selectively discarding non-essential image data.
- Advantages: Small file sizes, widely supported by web browsers and image editors.
- Disadvantages: Loss of quality with each save, not suitable for images with text or sharp lines.
- Ideal for sharing vacation photos or product images where file size is a priority.
PNG:
- Best Use: Graphics, logos, images with transparency, and screenshots.
- Compression: Lossless. PNG compression preserves all image data, ensuring no loss of quality.
- Advantages: Supports transparency, retains sharp details, ideal for images with text.
- Disadvantages: Larger file sizes compared to JPEG, not always the best choice for photographs.
- Perfect for website logos, icons, and detailed graphics that need to remain crisp.
GIF:
- Best Use: Simple animations and graphics with limited colors.
- Compression: Lossless (limited to 256 colors). GIF uses lossless compression but is restricted to a 256-color palette.
- Advantages: Supports animation, suitable for simple web graphics.
- Disadvantages: Limited color range, not suitable for photographs or complex images.
- Great for creating simple animated icons or graphics for websites.
Here is a comparison table of the image formats:
| Feature | JPEG | PNG | GIF |
|---|---|---|---|
| Best Use | Photographs with many colors and gradients | Graphics, logos, images with transparency, screenshots | Simple animations and limited colors |
| Compression | Lossy | Lossless | Lossless (256 colors) |
| File Size | Small | Larger | Small |
| Transparency | No | Yes | Yes |
| Animation | No | No | Yes |
| Quality | Decreases with each save | Preserved | Preserved (limited colors) |
4. How to Change a File Size of a Photo Using Image Editing Software?
Image editing software like Adobe Photoshop and GIMP provides robust tools for changing the file size of a photo. Here’s how to do it using these popular programs:
Adobe Photoshop:
-
Open the Image:
- Launch Adobe Photoshop.
- Go to File > Open and select the image you want to edit.
-
Resize the Image:
- Go to Image > Image Size.
- Adjust the Width and Height to your desired dimensions. Ensure the Resample option is checked and set to Bicubic Sharper for best results when reducing size.
- Click OK.
-
Save for Web:
- Go to File > Export > Save for Web (Legacy).
- Choose the file format (JPEG, PNG, or GIF) based on your needs.
- Adjust the Quality setting. For JPEG, a quality of 60-80% often provides a good balance between quality and file size.
- Preview the image to see the resulting file size and quality.
- Click Save and choose a location to save your optimized image.
GIMP:
-
Open the Image:
- Launch GIMP.
- Go to File > Open and select the image you want to edit.
-
Scale the Image:
- Go to Image > Scale Image.
- Adjust the Width and Height to your desired dimensions.
- Click Scale.
-
Export the Image:
- Go to File > Export As.
- Choose the file format (JPEG, PNG, or GIF).
- For JPEG, adjust the Quality setting in the export dialog. A quality of 60-80% usually works well.
- Click Export and choose a location to save your optimized image.
5. How to Compress a JPG?
Compressing a JPG file is straightforward. The primary factor to consider is the quality setting during export.
- Open the Image: Use image editing software like Adobe Photoshop or GIMP to open the JPG file.
- Export or Save As: Go to File > Export or File > Save As.
- Select JPG Format: Choose JPG as the file format.
- Adjust Quality: You’ll be prompted to select a quality level. This might be presented as a slider, a percentage (0-100%), or a range (e.g., 0-12).
- High Quality (80-100%): Produces the best image quality but larger file sizes.
- Medium Quality (60-80%): A good balance between quality and file size.
- Low Quality (0-60%): Significantly reduces file size but can result in noticeable quality loss.
- Iterative Approach: Start with a high-quality setting and gradually reduce it until you find the lowest acceptable quality for your needs.
- Preview: Most programs allow you to preview the image and the resulting file size before saving.
- Save: Once satisfied, save the image.
Example of JPG Compression Levels:
Below are the example of daylily flower at different JPG quality settings:
100% Quality, 103 KB File Size
 Daylily Flower at 100% Quality
80% Quality, 48 KB File Size
 Daylily Flower at 80% Quality
60% Quality, 28 KB File Size
 Daylily Flower at 60% Quality
40% Quality, 17 KB File Size
 Daylily Flower at 40% Quality
20% Quality, 12 KB File Size
 Daylily Flower at 20% Quality
0% Quality, 7 KB File Size
 Daylily Flower at 0% Quality
6. Can Blurring an Image Reduce File Size?
Yes, blurring an image can reduce its file size, particularly for JPGs. Images with fewer sharp edges and fine details compress more efficiently.
- Blurring Technique: Use image editing software to apply a slight blur to the image. In Photoshop, you can use the Gaussian Blur filter (Filter > Blur > Gaussian Blur).
- Selective Blurring: For more artistic control, blur only specific parts of the image, such as the background. This keeps the main subject sharp while reducing the overall file size.
- Export as JPG: After blurring, export the image as a JPG, adjusting the quality setting as needed.
Example of Blurring for File Size Reduction:
Below is the example of daylily flower with sharp and blurred background:
Original Image (Sharp Background), 77 KB (60% Quality)
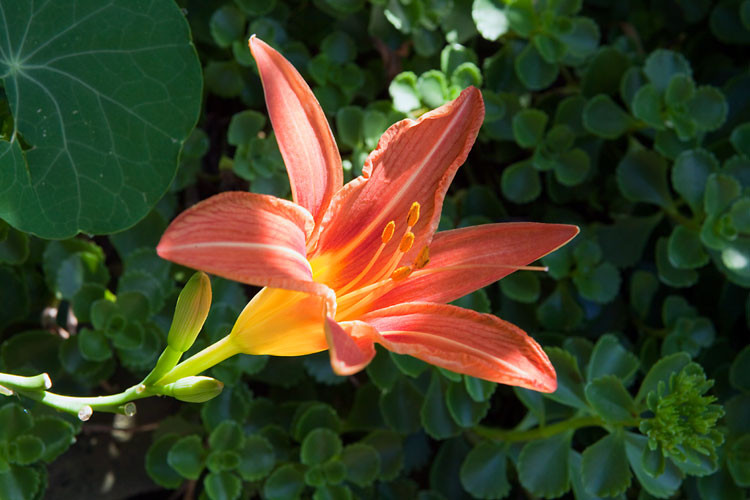 Daylily Flower with Sharp Background
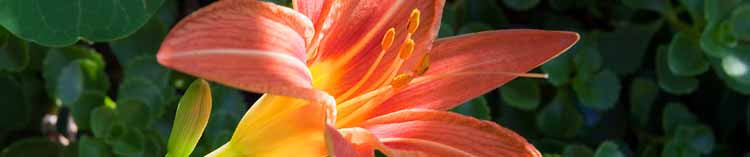
Blurred Background, 54 KB (60% Quality)
 Daylily Flower with Blurred Background
7. How Does Saving Images Multiple Times Affect Quality?
Each time you save an image as a JPG, you lose some quality due to the lossy compression. It’s best to avoid repeatedly saving a JPG file.
- Original Format: Always keep your original image in a lossless format like TIFF or PSD.
- Export for Web: Only export to JPG when you need a compressed version for web use or sharing.
- Avoid Re-Saving: If you need to make further edits, go back to your original lossless file and re-export to JPG.
8. How to Compress a GIF?
Compressing a GIF involves reducing the number of colors and using dithering to minimize banding.
- Reduce Color Depth: GIFs are limited to 256 colors. Reducing the color depth to 128, 64, 32, 16, 8, 4, or 2 can significantly reduce file size.
- Dithering: If you notice banding in areas of gradients, use a dither pattern like “diffusion” to make the transitions smoother.
- Transparency: If your image has transparent areas, ensure you select the “transparent” option when saving.
Example of GIF Compression:
Here is the example of tech cartoon saved as GIF:
32-Color GIF, 13.6 KB
 Cartoon saved as GIF
9. How to Compress a PNG?
PNG offers two main types: PNG-8 and PNG-24.
PNG-8:
Similar to GIF, PNG-8 is best for graphics with few colors.
- Reduce Colors: Select the number of colors (2, 4, 8, 16, 32, 64, 128, or 256).
- Dithering: Use dithering to reduce banding.
- Transparency: Enable transparency if needed.
PNG-24:
PNG-24 is a lossless format suitable for photographs and images with more than 256 colors.
- Lossless Compression: PNG-24 uses lossless compression, so you don’t have quality options.
- File Size: PNG-24 files can be larger than JPGs but maintain higher quality.
Example of PNG Compression:
Here is the example of tech cartoon saved as PNG:
32-Color PNG, 10.2 KB
Cartoon saved as PNG
10. Why Choose PNG over JPG?
While JPG is often smaller, PNG offers several advantages:
- Transparency: JPG does not support transparency; PNG does.
- Lossless Quality: PNG uses lossless compression, preserving image quality.
- Sharp Details: PNG reproduces sharp details and text clearly, making it ideal for screenshots and graphics with text.
Example of PNG vs. JPG:
Here are the example of macaws photo saved as different file format:
PNG-24, 400 KB
 Photo saved as PNG
JPG (100% Quality), 259 KB
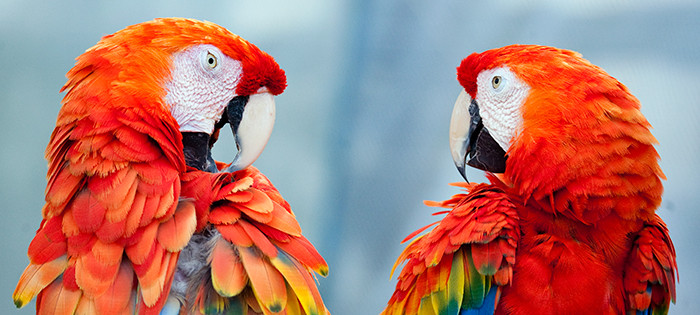 Photo saved at makimum quality JPG
JPG (60% Quality), 69 KB
 Photo saved as high quality JGP
11. How to Use Online Tools to Change Photo File Size?
Numerous online tools can help you change the file size of a photo without needing to download software. These tools often offer simple interfaces and quick results.
-
TinyPNG:
- Functionality: Compresses PNG and JPEG images using lossy compression techniques.
- How to Use: Upload your image to the website, and TinyPNG automatically reduces the file size while preserving acceptable quality.
- Pros: Easy to use, supports batch processing.
- Cons: Requires an internet connection, may not offer advanced settings.
-
ImageOptim:
- Functionality: Optimizes images by removing unnecessary metadata and applying advanced compression algorithms.
- How to Use: Upload your image, and ImageOptim will compress it to the smallest possible size.
- Pros: Supports multiple file formats, provides significant file size reduction.
- Cons: Requires an internet connection, limited control over compression settings.
-
Compressor.io:
- Functionality: Offers both lossy and lossless compression options for JPEG, PNG, GIF, and SVG files.
- How to Use: Upload your image, select the compression type (lossy or lossless), and Compressor.io will optimize the file.
- Pros: Supports various file formats, provides options for quality and file size.
- Cons: Requires an internet connection, may not be suitable for very large images.
-
IloveIMG:
- Functionality: Provides a range of image editing tools, including image compression, resizing, and format conversion.
- How to Use: Upload your image, select the desired compression level, and IloveIMG will optimize the file.
- Pros: Offers a variety of tools, easy to use.
- Cons: Requires an internet connection, may have limitations on file size for free users.
12. What is Image Optimization for the Web?
Image optimization for the web involves reducing the file size of images to improve website loading times and user experience. Optimized images load faster, consume less bandwidth, and enhance SEO rankings.
Key Techniques:
- Resizing: Adjusting the pixel dimensions of the image to match the display size.
- Compression: Using lossy or lossless compression to reduce file size.
- File Format Selection: Choosing the appropriate file format (JPEG, PNG, or GIF) based on the image content and requirements.
- Metadata Removal: Removing unnecessary metadata, such as camera settings and location data.
- Lazy Loading: Implementing lazy loading to load images only when they are visible in the viewport.
13. How Does Image Resolution Affect File Size?
Image resolution, measured in DPI (dots per inch), directly impacts file size. Higher resolution images contain more pixels, resulting in larger file sizes.
- High Resolution: Suitable for printing, where fine details are essential.
- Low Resolution: Ideal for web use, where smaller file sizes are more important than extremely fine details.
- Resampling: When reducing resolution, use resampling techniques (e.g., Bicubic Sharper in Photoshop) to maintain image quality.
14. What are the Best Practices for Resizing Photos?
Resizing photos involves adjusting the pixel dimensions to suit the intended use.
- Determine Dimensions: Determine the required width and height for your image based on its intended use (e.g., website display, social media).
- Maintain Aspect Ratio: Keep the aspect ratio (the ratio of width to height) constant to prevent distortion.
- Resampling: Use resampling methods in image editing software to minimize quality loss when reducing size.
- Sharpening: After resizing, apply a slight sharpening filter to enhance the details.
15. How Can I Optimize Images for Social Media?
Optimizing images for social media involves resizing and compressing them to meet platform-specific requirements.
- Platform Guidelines: Check the recommended image sizes for each social media platform (e.g., Facebook, Instagram, Twitter).
- Resizing: Resize your images to the recommended dimensions using image editing software.
- Compression: Compress the images to reduce file size while maintaining acceptable quality.
- File Format: Use JPEG for photographs and PNG for graphics and logos.
- Testing: Test the appearance of your images on different devices to ensure they look good on both desktop and mobile.
16. How to Maintain Image Quality While Reducing File Size?
Balancing image quality and file size requires careful consideration of compression techniques and settings.
- Lossless Compression: Use lossless compression formats like PNG for images where quality is paramount.
- Quality Settings: When using lossy compression (JPEG), experiment with different quality settings to find the lowest acceptable level.
- Resizing: Reduce the pixel dimensions of the image to match its intended display size.
- Sharpening: Apply a slight sharpening filter after resizing to enhance details.
- Preview: Always preview the image to assess the impact of compression on quality.
17. How Do Different Devices Affect Image Display?
Different devices (e.g., smartphones, tablets, desktop computers) have varying screen resolutions and pixel densities, which can affect how images are displayed.
- Responsive Images: Use responsive image techniques to serve different image sizes based on the device’s screen size.
- High-Resolution Displays: For devices with high-resolution displays (e.g., Retina displays), provide images with higher pixel densities to ensure sharpness.
- Testing: Test your images on different devices to ensure they look good on various screen sizes and resolutions.
18. What are the Common Mistakes to Avoid When Changing Photo File Size?
Avoiding common mistakes can help you optimize images effectively.
- Over-Compression: Compressing images too much can result in significant quality loss.
- Incorrect Format: Using the wrong file format (e.g., JPEG for logos) can lead to poor image quality.
- Ignoring Dimensions: Failing to resize images to the appropriate dimensions can result in unnecessary file sizes.
- Repeated Saving: Repeatedly saving JPG images degrades their quality over time.
- Lack of Preview: Not previewing images before saving can result in unexpected quality issues.
19. How to Use Batch Processing to Change File Size?
Batch processing allows you to resize and compress multiple images at once, saving time and effort.
- Software Support: Use image editing software like Photoshop or online tools that support batch processing.
- Automated Actions: Create automated actions or scripts to apply the same resizing and compression settings to multiple images.
- Organization: Organize your images into folders before batch processing to keep your files organized.
- Testing: Test the batch processing settings on a small sample of images before applying them to the entire batch.
20. What are the Advanced Techniques for Image Compression?
Advanced techniques can provide further file size reductions without compromising quality.
- Progressive JPEGs: Progressive JPEGs load gradually, improving perceived loading times.
- Vector Graphics: Use vector graphics for logos and icons, as they are scalable and have small file sizes.
- WebP Format: Consider using the WebP image format, which offers superior compression compared to JPEG and PNG.
- Conditional Loading: Load images only when they are needed, such as when they are visible in the viewport or when a user interacts with the page.
FAQ: How to Change a File Size of a Photo?
1. What is the easiest way to reduce the file size of a photo?
The easiest way is to use an online image compression tool like TinyPNG or Compressor.io. Simply upload your photo, and the tool will automatically reduce the file size.
2. How can I reduce the file size of a photo without losing quality?
Use lossless compression formats like PNG or TIFF. If using JPEG, experiment with high-quality settings (60-80%) to find a balance between size and quality.
3. What is the best file format for web images?
JPEG is generally best for photographs due to its small file size, while PNG is better for graphics, logos, and images with transparency.
4. How do I resize a photo in Photoshop to reduce its file size?
Go to Image > Image Size, adjust the width and height, and then use File > Export > Save for Web (Legacy) to save the image in JPEG or PNG format with optimized settings.
5. Can I reduce the file size of a photo on my smartphone?
Yes, many mobile apps, such as Photo Compress and Resize, allow you to resize and compress photos directly on your smartphone.
6. How does blurring an image help in reducing its file size?
Blurring reduces the complexity of the image, making it easier to compress, especially in JPEG format.
7. Is it better to resize or compress a photo to reduce its file size?
Resizing reduces the number of pixels, while compression reduces the amount of data per pixel. Both can be effective, and the best approach depends on the image and its intended use.
8. How do I maintain the aspect ratio when resizing a photo?
Ensure the “Maintain aspect ratio” or “Constrain proportions” option is checked in your image editing software when resizing.
9. What is batch processing, and how does it help in changing photo file sizes?
Batch processing allows you to resize and compress multiple images at once, saving time and effort by automating the process.
10. How can I optimize images for faster website loading times?
Resize images to the appropriate dimensions, use compression to reduce file size, choose the right file format (JPEG for photos, PNG for graphics), and consider using responsive images and lazy loading techniques.
We at dfphoto.net understand the need of optimizing images while retaining its quality. That’s why we offer detailed tutorials, articles, and resources to help you master the art of photo file size management. Whether you’re looking to speed up your website, save storage space, or simply share your photos more easily, our comprehensive guides provide the knowledge and tools you need to succeed.
Ready to take your photography skills to the next level? Visit dfphoto.net today to explore our extensive collection of articles, tutorials, and resources. Dive into the world of optimized images, stunning visual content, and a vibrant community of photography enthusiasts. Don’t miss out – join us at dfphoto.net and start your journey towards photographic excellence!
Address: 1600 St Michael’s Dr, Santa Fe, NM 87505, United States
Phone: +1 (505) 471-6001
Website: dfphoto.net.