In the digital age, compelling visuals are paramount, especially for websites. As a content creator for dfphoto.net, I understand the power of stunning photography. However, many individuals, from bloggers to business owners, find themselves intimidated by photo editing software like Photoshop. The good news? Brightening your photos and enhancing their overall appeal in Photoshop is surprisingly simple, even for beginners. This tutorial will guide you through the most effective methods to brighten your photos and make them truly pop, all in under 60 seconds. Better-looking photos translate to increased client interest, a stronger social media following, and higher engagement rates. Let’s dive in and transform dull images into vibrant, eye-catching visuals.
If you’ve ever taken a photo that looked a little lackluster straight out of the camera, you’re not alone. Often, images can appear dark or lack the vibrancy we envision. Take a look at the example below. The image on the left is the original, unedited photo – noticeably darker and less inviting. Our goal is to achieve the bright, vivid result you see on the right, enhancing its overall impact and visual appeal.
 Before and after brightening a photo in Photoshop using Curves adjustment layer
1. Brighten Photos Using “Curves” in Photoshop
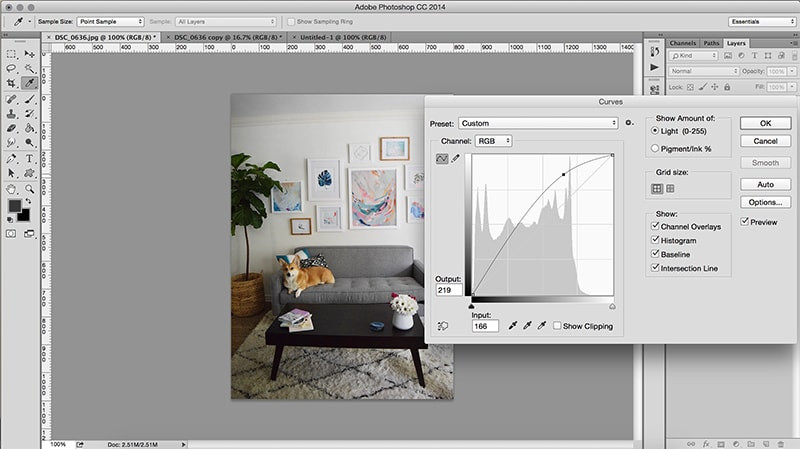
The “Curves” adjustment is a powerful yet user-friendly tool in Photoshop for brightening photos. It offers precise control over the tonal range of your image, allowing for nuanced adjustments. To access Curves, navigate to the top menu and select Image > Adjustments > Curves. Alternatively, for a quicker access, use the keyboard shortcut Command + M (Ctrl + M on Windows). A graph will appear, representing the tonal range of your photo, from shadows to highlights.
To brighten your photo using Curves, locate the diagonal line on the graph. Click roughly in the middle of the line to create an anchor point. Then, gently drag this point upwards. As you drag, you’ll notice your photo becoming brighter in real-time. The further you drag upwards, the more significant the brightening effect. It’s crucial to make subtle adjustments to avoid over-brightening, which can wash out details. Observe your image as you adjust the curve, aiming for a natural and pleasing level of brightness. Once satisfied, simply click “OK” to apply the changes.
Pro Tip: Ensure the “Preview” box is checked in the Curves panel. This allows you to see the brightening effect live as you make adjustments, enabling you to fine-tune the settings to your exact preference.
 Using the Curves adjustment layer in Photoshop to brighten an image
2. Utilize the Brightness/Contrast Adjustment
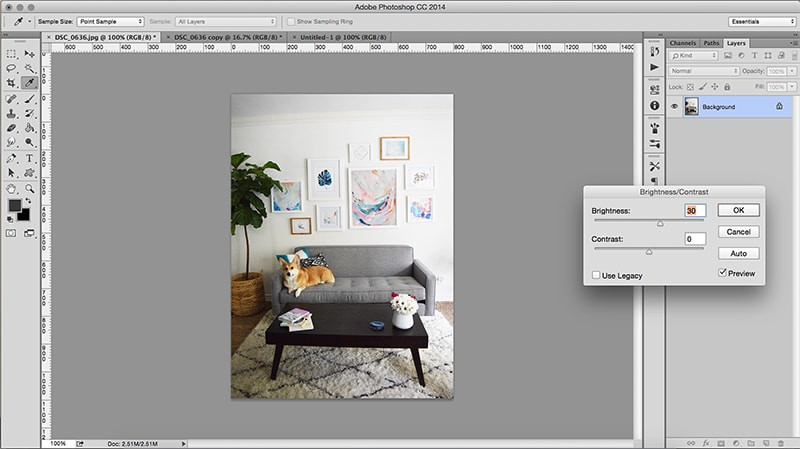
For a straightforward approach to brightening, the “Brightness/Contrast” adjustment is an excellent option. This method is particularly useful for quick, overall brightening of an image. To find this tool, go to Image > Adjustments > Brightness/Contrast. A simple dialog box will appear with two sliders: “Brightness” and “Contrast”.
To brighten your photo, drag the “Brightness” slider to the right. As you move the slider, the overall brightness of your image will increase. Adjust this slider incrementally, observing the changes in your photo until you achieve the desired level of brightness. The “Contrast” slider, located below, can be used to adjust the difference between the light and dark areas of your photo. While brightening, you might also want to slightly adjust the contrast to maintain detail and prevent the image from appearing flat. Experiment with both sliders to find the optimal balance for your photo.
 Adjusting brightness and contrast in Photoshop to enhance photo lighting
3. Correct Color Balance for Optimal Brightness
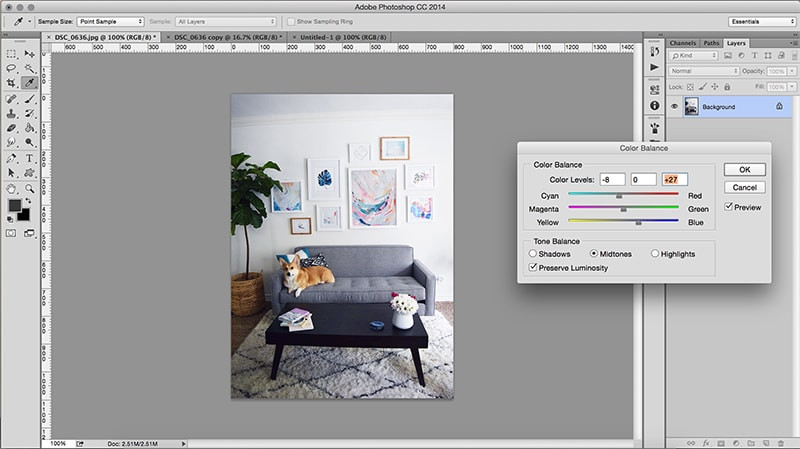
Sometimes, a photo might appear dull not just because of insufficient brightness, but also due to color casts. Imperfect lighting conditions can introduce unwanted yellow or red tones, making an image look less bright and clean. Color balance adjustments can significantly enhance perceived brightness by neutralizing these color casts and bringing out the true whites and brighter hues in your photo.
To adjust color balance, navigate to Image > Adjustments > Color Balance, or use the shortcut Command + B (Ctrl + B). The Color Balance panel allows you to adjust the levels of Cyan/Red, Magenta/Green, and Yellow/Blue in your image. If your photo appears too yellow, for example, drag the Yellow/Blue slider towards “Blue” to reduce the yellow tones and introduce cooler, brighter whites. Similarly, if there’s a reddish cast, move the Cyan/Red slider towards “Cyan”. Observe your image and make subtle adjustments to each color slider until the colors appear balanced and the overall image looks brighter and more vibrant. Correcting color balance can dramatically improve the perceived brightness and clarity of your photos.
 Using Photoshop's color balance tool to refine image brightness and color tones
Bonus Tip: Sharpen for Added Pop
After brightening your photo, consider applying a slight sharpening effect to further enhance its clarity and make it pop. Go to Filter > Sharpen > Sharpen. Photoshop offers various sharpening filters, but the basic “Sharpen” filter is often sufficient for a subtle enhancement. Be cautious not to over-sharpen, as it can introduce unwanted artifacts and make the image look unnatural. Usually, applying the “Sharpen” filter once is enough to add that final touch of crispness.
Optimizing for Web Use
If you intend to use your brightened photos online, it’s crucial to optimize them for web performance. Large, high-resolution images can significantly slow down website loading times. To optimize, first adjust the image resolution by going to Image > Image Size and setting the resolution to 72 pixels per inch (PPI), which is standard for web images. Then, to save your photo in a web-friendly format with optimal compression, use File > Export > Save for Web (Legacy). This will allow you to compress the image size without sacrificing significant visual quality, ensuring your website remains fast and visually appealing.
These simple Photoshop techniques empower you to quickly and effectively brighten your photos, enhancing their visual impact for your website, blog, or social media. Remember, the key is to experiment and adjust the settings based on the unique characteristics of each photo. Practice these methods, and you’ll be amazed at how easily you can transform your images from dull to dazzling in just seconds. If you have any questions, feel free to ask in the comments below!
![You can choose Optimize [device] storage or Download and Keep Originals.](https://dfphoto.net/wp-content/uploads/2025/02/ios-18-iphone-15-pro-settings-apple-account-icloud-photos-optimize-iphone-storage-150x150.jpg)