It’s a common frustration for photographers of all levels: you upload your photos only to find they are disappointingly dark and underexposed. This is a frequent issue, especially when shooting in AUTO mode. While modern cameras are sophisticated, they aren’t always perfect at judging exposure. A camera struggles to discern whether your subject is meant to have light or dark skin tones, often resulting in underexposed photos, particularly with lighter skin. Backlighting exacerbates this problem, almost guaranteeing a dark image. To compound matters, printed photos typically appear even darker than they do on our screens.
Fortunately, rescuing those underexposed shots is easier than you might think. With a few straightforward steps, you can brighten a dark photo and dramatically improve its appearance in under a minute. The difference can be truly remarkable, as illustrated below:
The example above showcases a significant improvement even though the subject’s eyes remain a bit shadowed due to the overcast conditions. Here’s another example demonstrating the power of brightening a dark photo:
Throughout this guide, you’ll see images labeled “SOOC” (straight out of camera), “brightened,” and “vivid.” We’ll walk through a simple method to brighten your photos using tools available in most photo editing software. We’ll also touch upon using Photoshop actions for further enhancement, especially beneficial for severely dark photos. Even without Photoshop, simply brightening your images can make a world of difference.
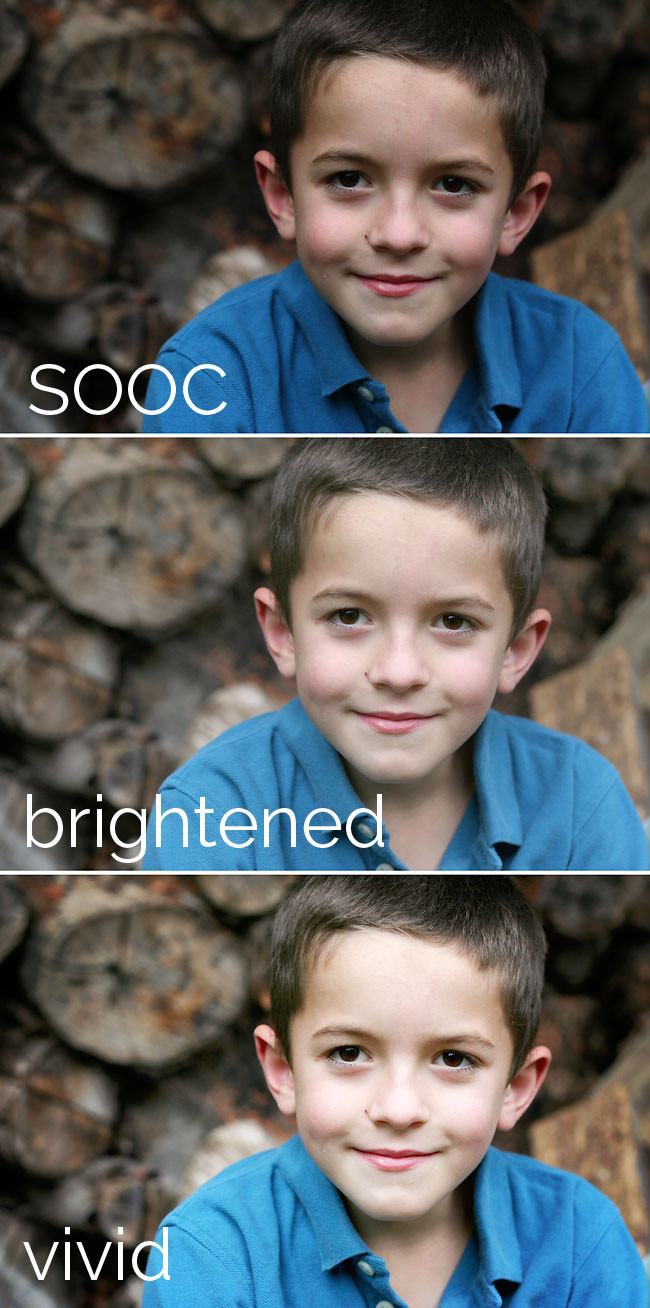 A little boy standing in front a log pile and edited versions of the same photo
Even photos that don’t immediately appear dark can often be enhanced by brightening. Many photos taken in AUTO mode tend to be slightly underexposed, a subtle issue you might not notice until you see the improved version after brightening. The following example perfectly demonstrates this point. (Note: If the ‘after’ photos in this article seem too bright, consider lowering your monitor’s brightness for a more accurate representation of printed results.)
Now that you’ve seen the transformative effect of brightening, let’s learn how to do it!
Understanding Histograms: Your Key to Brightening
While some photo editing apps, like certain mobile editors, offer simple brightness sliders, using a photo’s histogram provides a more precise and effective method for fixing dark photos. In Photoshop Elements, you can access the histogram by pressing Ctrl+L (Levels). In iPhoto, you can find it under Edit-Adjust.
Think of the histogram as a visual representation of the light distribution in your photo, resembling a mountain range. The left side represents the shadows (dark areas), and the right side represents the highlights (bright areas). A well-exposed photo with a good range of light will typically have a histogram that stretches across the entire range, from left to right, like the ideal example shown earlier. However, underexposed photos often exhibit histograms bunched up in the middle or skewed heavily to the left, as seen here:
In this example, taken as a headshot, the image is noticeably dark, and the histogram confirms this with a lack of data on the right (highlight) side. Below the histogram, you’ll find three triangular sliders. These are the tools we’ll use to brighten the photo.
Step-by-Step Guide to Brightening with Levels
-
Highlight Slider Adjustment: Begin by grabbing the rightmost slider, the highlights slider, and gently drag it to the left until it meets the edge of the “mountain” in your histogram (indicated by the yellow arrow in the example image below). This action will brighten the highlights in your photo.
-
Midtone Slider Adjustment: Next, take the middle slider, which controls the midtones, and also drag it to the left (green arrow). Adjust this slider until skin tones and the overall mid-range areas of your photo appear brighter and more balanced.
-
Shadow Slider Adjustment (If Needed): At this stage, you might notice that the darker areas of your photo look somewhat washed out. To restore depth and contrast, use the leftmost slider, the shadows slider. Drag it slightly to the right until it meets the “mountain” on the left side of the histogram (magenta arrow). This will deepen the shadows and bring back contrast to the image.
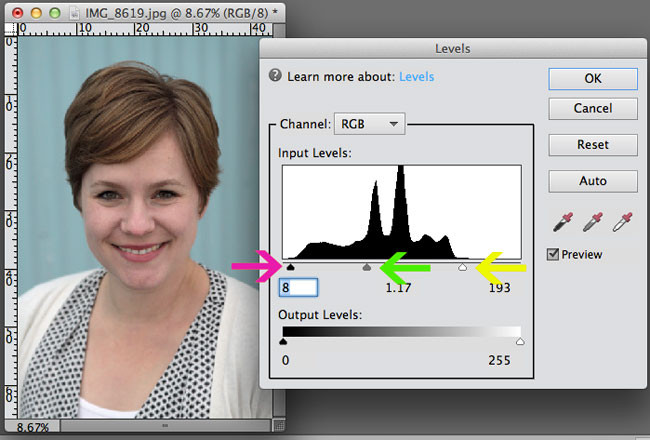 moving sliders on level bar to adjust lighting on a photo
And there you have it! Notice the significant improvement. The eyes are now visible, and the skin tone appears much more natural and less dull. A substantial enhancement achieved with just a few slider adjustments.
Taking It Further: Vividness and Photoshop Actions
To enhance your photos even further, consider using color boost actions in Photoshop or Photoshop Elements. A highly recommended free option is the “Vivid 2 Action from The CoffeeShop Blog.” This action is user-friendly and customizable. Using the “soft” option at a low opacity generally adds a subtle glow and vibrancy without making the photo appear overly processed. You can find installation and usage instructions, along with numerous other free actions, at The CoffeeShop Blog.
Here’s a side-by-side comparison showing the result of brightening and applying a vivid action:
Investing a few minutes in brightening and enhancing your photos can yield remarkable results. With a little practice, this process becomes quick and efficient.
A Word of Caution: Avoiding Overexposure
When adjusting the highlights slider (the rightmost slider), be cautious not to drag it too far past the point where the histogram “mountain” begins. Overdoing it can lead to overexposure in the brightest parts of your photo, potentially degrading image quality even further. Observe your image carefully as you adjust the sliders to avoid over-brightening.
For more examples and techniques, explore how to brighten black and white photos in this guide. Happy photo editing!