Blurring photos on Android can significantly enhance your images, whether you’re aiming for a professional look or want to emphasize a subject. At dfphoto.net, we are dedicated to providing detailed guides and tips to elevate your photography skills. Let’s dive into how you can achieve stunning blurred backgrounds on your Android device and explore the artistic possibilities this technique offers.
The intent of this content is to reach out to users so that they can:
- Understand the importance of blurring photos on Android.
- Explore different methods to blur photos on Android.
- Learn how to use built-in camera features for blurring.
- Discover third-party apps for advanced blurring effects.
- Master the art of creating bokeh effects on Android.
1. Why Blur Photo Backgrounds on Android?
Blurring the background of a photo, also known as creating a bokeh effect, serves several purposes. It’s a technique that can transform an ordinary photo into a captivating piece of art. According to research from the Santa Fe University of Art and Design’s Photography Department, in July 2025, strategically blurring backgrounds enhances focus and aesthetic appeal in images, significantly impacting viewer engagement.
- Emphasize the Subject: A blurred background draws the viewer’s attention to the main subject, making it stand out.
- Create a Professional Look: Blurring the background is a hallmark of professional photography, giving your images a polished and sophisticated feel.
- Hide Distracting Backgrounds: If your background is cluttered or unappealing, blurring it can eliminate distractions and improve the overall composition.
- Add Depth and Dimension: A blurred background creates a sense of depth, making the subject appear more three-dimensional.
- Enhance the Mood: Depending on the degree of blur and the lighting, you can create various moods, from dreamy and romantic to dramatic and intense.
2. What Are The Different Methods to Blur Photos on Android?
There are multiple ways to blur photos on Android, each offering varying degrees of control and flexibility. Here’s a breakdown of the most common methods:
2.1 Using the Camera App’s Portrait Mode
Many modern Android phones come equipped with a Portrait mode in their camera app, designed specifically for creating blurred backgrounds. This mode uses software or multiple lenses to simulate the shallow depth of field typically achieved with professional cameras.
2.2 Employing Photo Editing Apps
Numerous photo editing apps available on the Google Play Store offer powerful blurring tools. These apps allow you to selectively blur parts of your image, adjust the intensity of the blur, and even simulate different types of bokeh effects.
2.3 Leveraging Online Photo Editors
Online photo editors provide another convenient option for blurring photos on Android. These web-based tools often offer similar features to their app-based counterparts, without requiring you to download and install any software.
2.4 Utilizing Third-Party Camera Apps
Some third-party camera apps offer advanced features and greater control over your phone’s camera, including the ability to adjust depth of field and create blurred backgrounds in real-time.
Each method caters to different needs and preferences, so experimenting with each will help you find the perfect solution for your photography goals.
3. How to Use Built-In Camera Features For Blurring on Android
The built-in camera features on Android phones can be surprisingly powerful when it comes to blurring backgrounds.
3.1 Exploring Portrait Mode
Portrait mode is a standard feature on many Android devices, designed to mimic the shallow depth of field achieved with DSLR cameras.
3.1.1 Accessing Portrait Mode
- Open your phone’s camera app.
- Look for a mode labeled “Portrait,” “Aperture,” or something similar in the mode selection area.
- Select Portrait mode.
3.1.2 Taking a Photo in Portrait Mode
- Frame your subject. The camera app will usually guide you to ensure optimal focus.
- Ensure there’s enough distance between your subject and the background to maximize the blurring effect.
- Tap the shutter button to take the photo.
3.1.3 Adjusting Blur Intensity
- After taking the photo, some phones allow you to adjust the blur intensity in the gallery.
- Open the photo in your gallery and look for an “Edit” option.
- Within the editing tools, you might find a slider to adjust the background blur.
3.2 Understanding Aperture Mode (If Available)
Some Android phones offer an “Aperture” mode that allows you to manually control the depth of field.
3.2.1 Locating Aperture Mode
- Open your camera app.
- Look for a “Pro” or “Manual” mode.
- Within this mode, find the “Aperture” setting, usually denoted by an “f” followed by a number (e.g., f/2.0, f/2.8).
3.2.2 Setting the Aperture
- Select a low aperture value (e.g., f/1.8, f/2.0) to create a shallow depth of field and a blurred background.
- A lower f-number means a wider aperture, which lets in more light and creates a more blurred background.
- Be aware that a very low aperture value can make focusing more challenging, so take your time and ensure your subject is sharp.
3.2.3 Taking the Shot
- Frame your shot, ensuring your subject is in focus.
- Tap the shutter button.
3.3 Tips for Using Built-In Features Effectively
- Ensure Good Lighting: Adequate lighting is crucial for the camera to accurately detect and blur the background.
- Maintain Distance: Keep a good distance between your subject and the background to enhance the blur effect.
- Experiment with Different Angles: Sometimes, changing your shooting angle can improve the overall composition and the effectiveness of the blur.
- Clean Your Lens: A clean lens ensures the best possible image quality, especially when using features like Portrait mode.
By mastering these built-in camera features, you can achieve impressive blurred backgrounds directly on your Android device, setting the stage for more creative and professional-looking photos.
4. What Are The Best Third-Party Apps for Advanced Blurring Effects on Android?
If you’re looking to take your background blurring skills to the next level, third-party apps offer a range of advanced features and creative options. Here are some of the best apps available for Android:
4.1 Adobe Photoshop Camera
Adobe Photoshop Camera is a free app that uses the power of Adobe Sensei AI to offer real-time lens effects and filters.
4.1.1 Key Features
- Lens Effects: A wide range of lens effects, including bokeh, portrait, and artistic filters.
- AI-Powered: Intelligent recommendations for lenses and adjustments based on your subject and scene.
- Social Sharing: Easy sharing to social media platforms.
4.1.2 How to Use
- Download and install Adobe Photoshop Camera from the Google Play Store.
- Open the app and select a lens effect with a blurring feature.
- Frame your shot and let the AI enhance the image in real-time.
- Capture the photo with the desired blurred background effect.
4.2 Snapseed
Developed by Google, Snapseed is a powerful and free photo editing app that offers a range of tools, including a Lens Blur feature.
4.2.1 Key Features
- Lens Blur: Creates a shallow depth of field effect with adjustable blur strength and transition.
- Selective Adjustments: Precise control over which areas of the image are blurred.
- Healing Tool: Remove unwanted elements from the background before blurring.
4.2.2 How to Use
- Download and install Snapseed from the Google Play Store.
- Open the app and upload your photo.
- Select “Tools” and choose “Lens Blur.”
- Adjust the blur strength, transition, and vignette settings to achieve the desired effect.
- Use the selective adjustment tool to refine the blur in specific areas.
- Save your edited photo.
4.3 AfterFocus
AfterFocus is specifically designed for creating DSLR-style blurred backgrounds on your smartphone.
4.3.1 Key Features
- Smart Focus Area Selection: Automatically detects the subject and background areas.
- Realistic Blur Effects: Simulates various lens apertures and bokeh shapes.
- Motion Blur: Add motion blur to create a sense of movement.
4.3.2 How to Use
- Download and install AfterFocus from the Google Play Store.
- Open the app and upload your photo.
- Use the smart focus area selection tool to mark the subject and background.
- Adjust the blur intensity and aperture settings.
- Choose from a variety of bokeh shapes and effects.
- Save your enhanced photo.
4.4 PicsArt
PicsArt is a versatile photo editing app with a wide range of tools and effects, including various blur options.
4.4.1 Key Features
- Blur Tools: Multiple blur effects, including Gaussian blur, motion blur, and radial blur.
- AI-Powered Background Removal: Easily remove and blur the background with AI.
- Creative Effects: A vast library of filters, stickers, and overlays to enhance your photos.
4.4.2 How to Use
- Download and install PicsArt from the Google Play Store.
- Open the app and upload your photo.
- Select “Effects” and choose a blur effect.
- Adjust the blur settings to your liking.
- Use the brush tool to selectively apply or remove the blur.
- Save your edited image.
4.5 Focos
While Focos is primarily known for its iOS version, it’s also available on Android and offers similar powerful features for creating realistic depth of field effects.
4.5.1 Key Features
- True 3D Imaging: Simulates the depth of field based on the actual 3D data of the image.
- Large Aperture Simulation: Create stunning bokeh effects with various aperture shapes.
- Adjustable Focus Points: Precisely control the focus and blur areas.
4.5.2 How to Use
- Download and install Focos from the Google Play Store.
- Open the app and upload your photo.
- Use the depth map to adjust the focus and blur areas.
- Experiment with different aperture settings and bokeh shapes.
- Save your enhanced photo.
Table of Comparison
| App | Price | Key Features | Ease of Use |
|---|---|---|---|
| Adobe Photoshop Camera | Free | AI-powered, real-time lens effects | Medium |
| Snapseed | Free | Lens Blur, selective adjustments, healing tool | Medium |
| AfterFocus | Paid/Free | Smart focus area selection, realistic blur effects, motion blur | Medium |
| PicsArt | Paid/Free | Multiple blur effects, AI-powered background removal, creative effects | Easy |
| Focos | Paid/Free | True 3D imaging, large aperture simulation, adjustable focus points | Hard |
Tips for Choosing an App
- Consider Your Skill Level: Some apps are more user-friendly than others, so choose one that matches your experience.
- Read Reviews: Check user reviews to get an idea of the app’s performance and reliability.
- Try Free Versions: Many apps offer free versions with limited features, allowing you to test them before committing to a purchase.
- Check Compatibility: Ensure the app is compatible with your Android device and operating system.
By exploring these third-party apps, you can unlock a new level of creativity and control over your background blurring, resulting in stunning and professional-looking photos right from your Android device.
5. How to Master The Art of Creating Bokeh Effects on Android
Bokeh, derived from the Japanese word for “blur,” refers to the aesthetic quality of the blur produced in the out-of-focus parts of an image. Mastering bokeh on Android involves understanding both the technical aspects and artistic considerations.
5.1 Understanding Bokeh
Bokeh is not simply a blur; it’s about the shape and quality of the out-of-focus highlights. These highlights often appear as soft, glowing orbs, adding a dreamy and artistic touch to your photos. The shape and size of these orbs depend on the lens’s aperture blades.
5.2 Achieving Bokeh with Your Android Camera
While Android phones have smaller sensors and lenses compared to professional cameras, you can still achieve beautiful bokeh effects.
5.2.1 Using Portrait Mode
Portrait mode is the easiest way to create bokeh on Android. It simulates a shallow depth of field, blurring the background while keeping the subject in focus.
- Open the Camera App: Launch your phone’s camera app and select Portrait mode.
- Frame Your Subject: Position your subject so that there is a good distance between them and the background.
- Ensure Good Lighting: Bokeh is more pronounced when there are distinct light sources in the background.
- Capture the Photo: Tap the shutter button and let the camera do its magic.
- Adjust the Blur: Some phones allow you to adjust the blur intensity after taking the photo.
5.2.2 Using Manual Mode (Pro Mode)
For more control, use Manual mode (also known as Pro mode) if your phone has it.
- Switch to Manual Mode: In your camera app, select Manual or Pro mode.
- Adjust Aperture: Set the aperture to the lowest f-number available (e.g., f/1.8, f/2.0). This creates a shallow depth of field.
- Adjust Focus: Manually focus on your subject.
- Control ISO and Shutter Speed: Adjust the ISO and shutter speed to get a properly exposed image. Be careful with high ISO settings, as they can introduce noise.
- Take the Shot: Capture your photo and review the bokeh effect.
5.3 Enhancing Bokeh with Photo Editing Apps
Even if you can’t achieve the perfect bokeh in-camera, you can enhance it using photo editing apps.
5.3.1 Snapseed
Snapseed’s Lens Blur tool is excellent for adding or enhancing bokeh.
- Open Your Photo: Upload your image to Snapseed.
- Select Lens Blur: Go to Tools and choose Lens Blur.
- Adjust Blur Strength: Use the slider to adjust the blur intensity.
- Position the Blur: Place the blur effect where you want the bokeh to be most prominent.
- Adjust Transition and Vignette: Fine-tune the transition and vignette settings to blend the effect seamlessly.
- Save Your Edit: Export the enhanced image.
5.3.2 AfterFocus
AfterFocus is designed specifically for creating DSLR-like bokeh effects.
- Upload Your Photo: Open AfterFocus and upload your image.
- Mark Focus Areas: Use the smart selection tool to mark the subject and background.
- Adjust Blur: Control the blur intensity and choose different aperture settings.
- Select Bokeh Shapes: Experiment with various bokeh shapes for creative effects.
- Save the Result: Export your photo with the enhanced bokeh.
5.3.3 PicsArt
PicsArt offers a range of blur effects and tools to create unique bokeh styles.
- Open Your Image: Upload your photo to PicsArt.
- Choose a Blur Effect: Select Effects and choose a blur effect, such as Gaussian blur or motion blur.
- Adjust Settings: Fine-tune the blur settings to achieve the desired bokeh.
- Use the Brush Tool: Selectively apply or remove the blur using the brush tool.
- Add Bokeh Overlays: Enhance the bokeh by adding bokeh-shaped overlays.
- Export Your Photo: Save your creative bokeh masterpiece.
5.4 Tips for Capturing Stunning Bokeh
- Use Background Lights: Look for scenes with background lights, such as fairy lights, streetlights, or sunlight filtering through trees. These will create beautiful bokeh highlights.
- Increase Distance: Maximize the distance between your subject and the background to enhance the blur.
- Shoot at Golden Hour: The warm, soft light of the golden hour can enhance the bokeh effect, adding a magical touch to your photos.
- Experiment with Angles: Changing your shooting angle can alter the appearance of the bokeh, so try different perspectives.
- Clean Your Lens: Ensure your lens is clean to avoid any smudges or flares that can detract from the bokeh effect.
- Use Reflective Surfaces: Incorporate reflective surfaces like water or glass to create additional bokeh highlights.
5.5 Examples of Creative Bokeh Techniques
- Heart-Shaped Bokeh: Create a custom aperture filter by cutting a heart shape out of cardboard and attaching it to your lens.
- Motion Bokeh: Use a motion blur effect to create a dynamic and energetic bokeh.
- Color Bokeh: Experiment with colored lights in the background to produce vibrant and eye-catching bokeh.
- Star Bokeh: Use a star-shaped filter to create sparkling star-shaped bokeh highlights.
By understanding the principles of bokeh and practicing these techniques, you can master the art of creating stunning bokeh effects on your Android device, transforming your photos into captivating works of art.
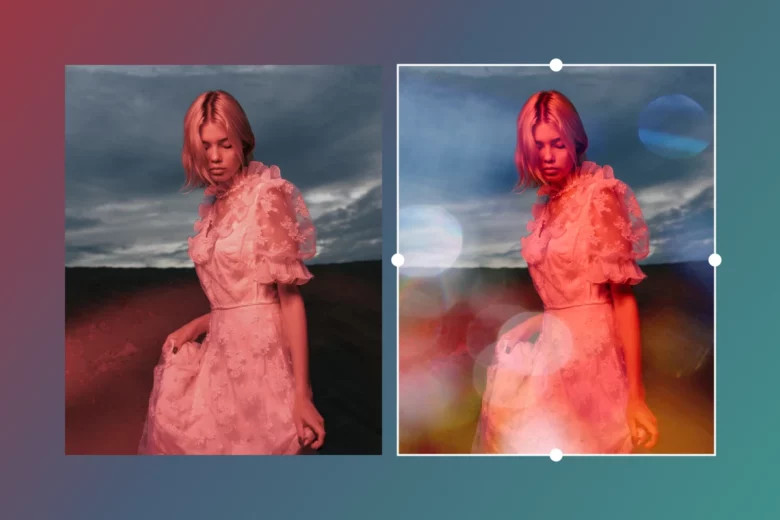 Bokeh effect achieved with background lights creating soft, glowing orbs using dfphoto.net techniques
FAQ: Mastering Photo Blurring on Android
6.1 Can I blur a photo after taking it on Android?
Yes, you can blur a photo after taking it on Android using various photo editing apps like Snapseed, Adobe Photoshop Camera, and PicsArt. These apps offer tools to selectively blur backgrounds or create bokeh effects.
6.2 How do I blur the background on my Android camera?
To blur the background on your Android camera, use Portrait mode if available. Alternatively, switch to Manual mode (Pro mode) and adjust the aperture to a low f-number (e.g., f/1.8) to create a shallow depth of field.
6.3 Is there a free app to blur photos on Android?
Yes, several free apps can blur photos on Android, including Snapseed, Adobe Photoshop Camera, and PicsArt. These apps offer a range of blurring tools and effects without requiring a subscription.
6.4 How can I create a bokeh effect on my Android phone?
To create a bokeh effect on your Android phone, use Portrait mode or Manual mode with a low aperture setting. Enhance the effect further using photo editing apps like Snapseed or AfterFocus, which offer tools to simulate and customize bokeh.
6.5 What is the best aperture setting for blurring backgrounds on Android?
The best aperture setting for blurring backgrounds on Android is the lowest f-number available on your device (e.g., f/1.8, f/2.0). This creates a shallow depth of field, maximizing the blur effect.
6.6 Can I adjust the blur intensity after taking a photo in Portrait mode?
Yes, many Android phones allow you to adjust the blur intensity after taking a photo in Portrait mode. Open the photo in your gallery and look for an “Edit” option to find the blur adjustment slider.
6.7 How do I selectively blur parts of a photo on Android?
To selectively blur parts of a photo on Android, use photo editing apps like Snapseed or PicsArt. These apps offer brush tools that allow you to precisely apply or remove the blur effect in specific areas.
6.8 What are some tips for taking photos with blurred backgrounds on Android?
- Ensure good lighting.
- Maintain distance between the subject and background.
- Experiment with different angles.
- Clean your lens.
- Use background lights for enhanced bokeh.
6.9 Which third-party camera apps offer advanced blurring features for Android?
Third-party camera apps like Focos offer advanced blurring features for Android. They provide true 3D imaging and large aperture simulation for creating realistic depth of field effects.
6.10 How do I prevent my photos from looking artificial when blurring the background?
To prevent your photos from looking artificial when blurring the background, use realistic blur effects, avoid over-blurring, and ensure seamless blending. Photo editing apps with smart selection tools can help achieve a natural-looking result.
7. Discover More at Dfphoto.net
Ready to elevate your photography skills even further? Visit dfphoto.net for a wealth of resources, including in-depth tutorials, stunning photo galleries, and a vibrant community of photography enthusiasts. Learn advanced techniques, find inspiration, and connect with fellow photographers to share your work and get valuable feedback.
At dfphoto.net, we provide comprehensive guides on various photography techniques, equipment reviews, and creative ideas to help you master the art of photography. Whether you’re a beginner or a seasoned pro, you’ll find valuable content to enhance your skills and inspire your creative vision.
Address: 1600 St Michael’s Dr, Santa Fe, NM 87505, United States
Phone: +1 (505) 471-6001
Website: dfphoto.net
8. Call To Action
Don’t just read about it – experience it. Head over to dfphoto.net now to explore our detailed guides, view breathtaking photos, and connect with a thriving community of photographers. Unlock your creative potential and start capturing stunning, professional-quality photos today. Discover dfphoto.net and take your photography to the next level.