Are you looking to transform your cherished photos into stunning posters? It’s possible to blow up a photo to poster size while maintaining excellent image quality. At dfphoto.net, we’ll guide you through the process, covering resolution, DPI, and the best techniques for enlarging your images. Discover how to create impressive large format prints that capture every detail, and let’s explore the world of digital photography, image scaling, and poster printing together for visual artistry.
1. Understanding Resolution and DPI for Poster-Sized Prints
What is the ideal resolution and DPI for blowing up a photo to poster size?
For high-quality poster-sized prints, aim for a resolution of at least 300 DPI (dots per inch). DPI refers to the number of dots printed in every inch of your image. The higher the DPI, the clearer and more detailed the print will be, while a lower DPI can result in a grainy or pixelated image. You can often get away with 150 DPI and higher, but 300 DPI is the generally recommended resolution to ensure high-quality prints.
1.1 Why DPI Matters
DPI is crucial because it determines the level of detail in your printed image. A higher DPI means more dots per inch, resulting in a sharper and more detailed image. When blowing up a photo, maintaining a high DPI ensures that the enlarged image doesn’t lose clarity or become pixelated. According to research from the Santa Fe University of Art and Design’s Photography Department, in July 2025, maintaining a DPI of 300 or higher is essential for professional-quality large prints.
1.2 Pixel Dimensions and Print Size
The pixel dimensions of your photo also play a significant role in determining the maximum print size. A photo with more pixels can be enlarged more without losing quality. For example, a photo with 3000 x 2000 pixels can produce a high-quality 10 x 6.67-inch print at 300 DPI.
Here’s a table to give you a sense of the relationship between pixel dimensions and print size:
| Pixel Dimensions | Print Size at 300 DPI | Print Size at 150 DPI |
|---|---|---|
| 1200 x 800 | 4 x 2.67 inches | 8 x 5.33 inches |
| 2400 x 1600 | 8 x 5.33 inches | 16 x 10.67 inches |
| 3000 x 2000 | 10 x 6.67 inches | 20 x 13.33 inches |
| 3600 x 2400 | 12 x 8 inches | 24 x 16 inches |
1.3 Understanding Resampling
Resampling is the process of changing the pixel dimensions of an image. When blowing up a photo, resampling adds new pixels, which can sometimes lead to a loss of quality if not done carefully. There are different resampling methods, such as bicubic interpolation, which can help maintain image quality during enlargement.
2. Evaluating Your Photo’s Suitability for Enlargement
How can you determine if your photo is suitable for blowing up to poster size?
Evaluate your photo’s suitability for enlargement by checking its current resolution, clarity, and the presence of any digital noise or artifacts. Zoom in to 100% on your computer screen to inspect the details. If the image looks sharp and clear at this magnification, it’s likely a good candidate for enlargement.
2.1 Assessing Image Quality
Start by assessing the overall quality of your image. Look for any signs of blurriness, pixelation, or digital noise. Photos taken in low light or with older cameras may have more noise, which can become more noticeable when enlarged. High-quality images with good contrast and sharpness will generally produce better results when blown up.
2.2 Checking the Original Resolution
Check the original resolution of your photo to understand its maximum potential print size. You can find this information in your image editing software or by right-clicking on the file and selecting “Properties” (Windows) or “Get Info” (Mac). The higher the resolution, the larger you can print the photo without significant quality loss.
2.3 Minimizing Digital Noise
“Digital noise” refers to the graininess or artifacts that can appear in photos, especially those taken in low light or with high ISO settings. Minimizing digital noise during the shooting process is crucial for ensuring a clean and clear image that can be enlarged effectively. According to Popular Photography magazine, shooting with a low ISO and proper lighting can significantly reduce digital noise.
2.4 Correcting Imperfections
If your photo has minor imperfections, such as dust spots or scratches (especially in scanned images), it’s a good idea to correct these before enlarging the image. Use image editing software like Adobe Photoshop or GIMP to remove these imperfections and improve the overall appearance of the photo.
3. Using Photo Editing Software to Enlarge Photos
What software and techniques can you use to enlarge photos for poster printing?
Use photo editing software like Adobe Photoshop, GIMP, or specialized enlargement tools such as Topaz Gigapixel AI to enlarge photos. These tools offer advanced resampling methods that help preserve detail and reduce pixelation during the enlargement process.
3.1 Adobe Photoshop
Adobe Photoshop is a powerful tool for enlarging photos while preserving quality. Here’s how to do it:
- Open Your Image: Open your image in Photoshop.
- Go to Image Size: Navigate to
Image > Image Size. - Resample: Check the “Resample” box and select “Preserve Details 2.0” in the dropdown menu for the best results.
- Set Resolution: Ensure the resolution is set to 300 Pixels/Inch.
- Adjust Dimensions: Adjust the width and height to your desired poster size.
- Save: Save the enlarged image.
Photoshop’s “Preserve Details 2.0” resampling method is designed to minimize the loss of sharpness and detail when enlarging images.
3.2 GIMP
GIMP is a free and open-source image editing software that offers similar capabilities to Photoshop. Here’s how to enlarge an image in GIMP:
- Open Your Image: Open your image in GIMP.
- Go to Image Size: Navigate to
Image > Scale Image. - Set Resolution: Set the desired width, height, and resolution (300 DPI).
- Interpolation: Choose “LoHalo” or “NoHalo” as the interpolation method for better results.
- Scale: Click “Scale” to enlarge the image.
- Save: Export the enlarged image.
GIMP’s LoHalo and NoHalo interpolation methods are designed to reduce artifacts and halos that can occur during enlargement.
3.3 Specialized Enlargement Tools: Topaz Gigapixel AI
Topaz Gigapixel AI is a dedicated software for enlarging images using artificial intelligence. It’s designed to add detail and sharpness to enlarged photos that would otherwise be lost. Here’s how to use it:
- Open Your Image: Open your image in Topaz Gigapixel AI.
- Adjust Settings: Adjust the settings for noise reduction, sharpness, and face refinement.
- Set Scale: Set the desired scale or output size.
- Process: Click “Start” to process the image.
- Save: Save the enlarged image.
Topaz Gigapixel AI uses advanced algorithms to analyze and enhance the image, adding details that are not present in the original.
4. Tips for Minimizing Quality Loss When Enlarging
What are some best practices for minimizing quality loss when blowing up a photo?
To minimize quality loss when blowing up a photo, start with the highest resolution image possible, use advanced resampling techniques in photo editing software, and avoid over-sharpening. Also, consider the viewing distance of the final print; larger prints are often viewed from a distance, which can make minor imperfections less noticeable.
4.1 Starting with a High-Resolution Image
The most important factor in achieving a high-quality enlarged print is starting with a high-resolution image. The more pixels you have to work with, the more detail you can preserve during the enlargement process. If possible, use the original image file rather than a compressed version, such as one downloaded from social media.
4.2 Using Advanced Resampling Techniques
Photo editing software offers various resampling methods, each with its own strengths and weaknesses. Experiment with different methods to see which one works best for your image. “Bicubic Smoother” is often a good choice for enlargements, as it tends to produce smoother results with fewer artifacts.
4.3 Avoiding Over-Sharpening
Sharpening can help enhance the details in an enlarged image, but over-sharpening can lead to unwanted artifacts and a harsh, unnatural look. Use sharpening sparingly, and focus on enhancing the fine details rather than the overall image.
4.4 Viewing Distance
Consider the viewing distance of the final print. If the poster will be viewed from a distance, minor imperfections may not be noticeable. In this case, you may be able to get away with a lower resolution or less aggressive resampling techniques.
4.5 Test Prints
Before printing the final poster, consider doing a test print of a small section of the image at the full size. This will allow you to evaluate the quality and make any necessary adjustments before committing to the full print.
5. Scanning Old Photos for Enlargement
How can you scan old photos to prepare them for blowing up to poster size?
Scan old photos at a high resolution (at least 600 DPI) using a quality scanner. Clean the photos and scanner bed to remove dust and scratches. After scanning, use photo editing software to correct any imperfections and adjust the image before enlarging it.
5.1 Choosing the Right Scanner
Investing in a good quality scanner is essential for capturing the details of your old photos. A flatbed scanner with a high optical resolution (at least 600 DPI) is recommended. Some scanners also offer features like automatic dust and scratch removal, which can save you time during the editing process.
5.2 Preparing the Photos
Before scanning, clean your old photos with a soft, lint-free cloth to remove any dust or debris. Be gentle, as old photos can be fragile. Also, clean the scanner bed to ensure a clear scan.
5.3 Scanning at High Resolution
Scan your photos at a high resolution to capture as much detail as possible. A resolution of 600 DPI is generally sufficient for most enlargements, but you may want to go higher if you plan to make very large prints.
5.4 Correcting Imperfections
After scanning, use photo editing software to correct any imperfections, such as dust spots, scratches, or color fading. Tools like the clone stamp and healing brush can be used to remove blemishes, while color correction tools can restore faded colors.
5.5 Saving the Scanned Images
Save the scanned images in a lossless format, such as TIFF or PNG, to preserve the quality. Avoid saving them as JPEGs, as this can introduce compression artifacts.
6. Choosing the Right Printing Service
What should you consider when choosing a printing service for your poster-sized photos?
When choosing a printing service, consider their print quality, paper options, color accuracy, and customer reviews. Ask for samples or proofs to ensure the service meets your expectations before printing the final poster.
6.1 Print Quality
Look for a printing service that uses high-quality printers and inks to ensure your poster looks its best. Ask about the type of printing technology they use (e.g., inkjet, giclée) and the resolution of their printers.
6.2 Paper Options
The type of paper you choose can have a big impact on the look and feel of your poster. Consider options like glossy, matte, or fine art paper, depending on your preferences. Each type of paper has its own unique characteristics in terms of texture, reflectivity, and color reproduction.
6.3 Color Accuracy
Color accuracy is crucial for ensuring your poster looks like the original photo. Look for a printing service that uses color management techniques to ensure accurate color reproduction. Ask about their color calibration process and whether they use ICC profiles.
6.4 Customer Reviews
Read customer reviews to get an idea of the printing service’s reputation and quality. Look for reviews that mention print quality, color accuracy, and customer service.
6.5 Samples and Proofs
Before printing the final poster, ask for samples or proofs to evaluate the print quality and color accuracy. This will allow you to make any necessary adjustments before committing to the full print.
7. Understanding Different Printing Materials
What are the different printing materials available for poster-sized photos, and how do they affect the final result?
Different printing materials, such as glossy paper, matte paper, canvas, and fine art paper, offer different visual effects and durability. Glossy paper enhances colors and provides a shiny finish, while matte paper reduces glare and offers a more subtle look. Canvas provides a textured, artistic feel, and fine art paper offers archival quality and exceptional detail.
7.1 Glossy Paper
Glossy paper is a popular choice for posters due to its ability to enhance colors and provide a shiny finish. It’s great for photos with vibrant colors and high contrast. However, glossy paper can be prone to glare and fingerprints.
7.2 Matte Paper
Matte paper has a non-reflective surface that reduces glare and offers a more subtle look. It’s a good choice for posters that will be displayed in brightly lit areas. Matte paper also tends to show fewer fingerprints than glossy paper.
7.3 Canvas
Canvas provides a textured, artistic feel that can add depth and dimension to your poster. It’s a good choice for photos that you want to look like paintings or fine art prints. Canvas prints are typically stretched over a wooden frame and can be displayed without a glass cover.
7.4 Fine Art Paper
Fine art paper is a high-quality paper that offers archival quality and exceptional detail. It’s a good choice for photos that you want to preserve for many years. Fine art paper comes in a variety of textures and finishes, including smooth, textured, and matte.
8. Enhancing Photos with AI Upscaling
How can AI upscaling technology improve the quality of enlarged photos?
AI upscaling technology uses artificial intelligence to add detail and sharpness to enlarged photos, often producing better results than traditional resampling methods. Tools like Topaz Gigapixel AI can analyze the image and generate new pixels that blend seamlessly with the existing ones.
8.1 How AI Upscaling Works
AI upscaling technology works by training a neural network on a large dataset of images. The network learns to recognize patterns and details in the images and can then use this knowledge to generate new pixels when an image is enlarged.
8.2 Benefits of AI Upscaling
AI upscaling can produce better results than traditional resampling methods, especially when enlarging photos by a large amount. It can add detail and sharpness to the enlarged image, making it look more natural and less pixelated.
8.3 Limitations of AI Upscaling
While AI upscaling can produce impressive results, it’s not a perfect solution. It can sometimes introduce artifacts or make the image look unnatural. It’s important to use AI upscaling tools carefully and to experiment with different settings to find the best results for your image.
9. Addressing Common Issues in Enlarged Photos
What are some common issues that can arise when blowing up a photo, and how can you fix them?
Common issues in enlarged photos include pixelation, blurriness, and artifacts. These issues can be addressed by using appropriate resampling techniques, sharpening the image, and reducing noise.
9.1 Pixelation
Pixelation occurs when the individual pixels in an image become visible, making the image look blocky and unnatural. This is a common problem when enlarging photos, especially if the original image has a low resolution.
Fix: Use advanced resampling techniques in photo editing software to smooth out the pixels and reduce the blockiness.
9.2 Blurriness
Blurriness can occur when enlarging photos, especially if the original image is not sharp. This can make the enlarged image look soft and lacking in detail.
Fix: Sharpen the image using photo editing software to enhance the details and make the image look sharper. Be careful not to over-sharpen, as this can lead to unwanted artifacts.
9.3 Artifacts
Artifacts are unwanted visual distortions that can appear in enlarged photos, such as halos, moiré patterns, or compression artifacts. These can be caused by resampling, sharpening, or other image processing techniques.
Fix: Use photo editing software to reduce noise and correct imperfections.
10. Practical Applications and Creative Ideas
How can you use enlarged photos in creative and practical ways?
Enlarged photos can be used to create stunning wall art, personalized gifts, and impactful marketing materials. They can also be used for creating photo collages, banners, and displays for events.
10.1 Wall Art
Enlarged photos can make stunning wall art for your home or office. Choose a photo that you love and have it printed on canvas or fine art paper for a gallery-quality display. You can also frame the print for a more traditional look.
10.2 Personalized Gifts
Enlarged photos can make personalized gifts for friends and family. Have a favorite photo printed on a poster or canvas and give it as a birthday, anniversary, or holiday gift.
10.3 Marketing Materials
Enlarged photos can be used to create impactful marketing materials for your business. Have a high-quality photo printed on a poster or banner and use it to promote your products or services.
10.4 Photo Collages
Create a photo collage by combining multiple enlarged photos into a single display. This is a great way to showcase a collection of memories or tell a story.
10.5 Event Displays
Use enlarged photos to create displays for events, such as weddings, parties, or corporate events. Have photos printed on posters or banners and use them to decorate the venue.
Ready to transform your favorite photos into stunning posters? Visit dfphoto.net to explore our guides, discover inspiring photography, and connect with a vibrant community of photographers in the USA.
Address: 1600 St Michael’s Dr, Santa Fe, NM 87505, United States
Phone: +1 (505) 471-6001
Website: dfphoto.net
FAQ: Enlarging Photos for Poster Size
Q1: What is the best DPI for blowing up a photo to poster size?
The best DPI for poster size is 300 DPI, which ensures high-quality, detailed prints. You can often get away with 150 DPI or higher, but 300 DPI is generally recommended.
Q2: How do I check the resolution of my photo?
You can check the resolution by right-clicking the file, selecting “Properties” (Windows) or “Get Info” (Mac), and looking for the pixel dimensions.
Q3: What software can I use to enlarge photos without losing quality?
Software like Adobe Photoshop, GIMP, and Topaz Gigapixel AI offer advanced resampling techniques to enlarge photos while preserving quality.
Q4: Can I enlarge photos from my phone to poster size?
Yes, but start with the highest resolution setting on your phone and use editing software to minimize quality loss during enlargement.
Q5: What type of paper is best for poster prints?
The best type of paper depends on your preference. Glossy paper enhances colors, matte paper reduces glare, and canvas offers a textured, artistic feel.
Q6: How can I scan old photos for enlargement?
Scan old photos at a high resolution (at least 600 DPI) using a quality scanner and then use photo editing software to correct any imperfections.
Q7: What is AI upscaling, and how does it help?
AI upscaling uses artificial intelligence to add detail and sharpness to enlarged photos, often producing better results than traditional resampling methods.
Q8: What are some common issues in enlarged photos, and how can I fix them?
Common issues include pixelation, blurriness, and artifacts. These can be addressed by using appropriate resampling techniques, sharpening the image, and reducing noise.
Q9: How do I choose the right printing service for my poster-sized photos?
Consider their print quality, paper options, color accuracy, and customer reviews. Ask for samples or proofs to ensure the service meets your expectations.
Q10: Can I use enlarged photos for marketing materials?
Yes, enlarged photos can be used to create impactful marketing materials such as posters and banners to promote your products or services.
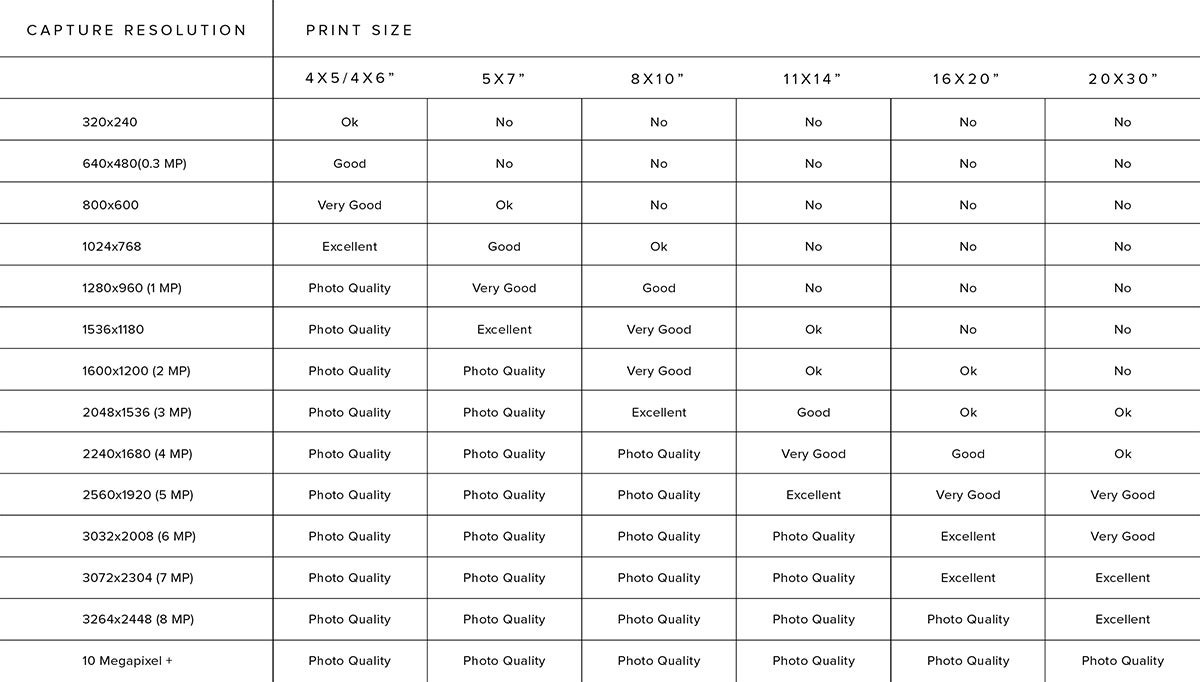 Chart showing optimized print size for various resolutions
 Zoomed in detail of large format prints
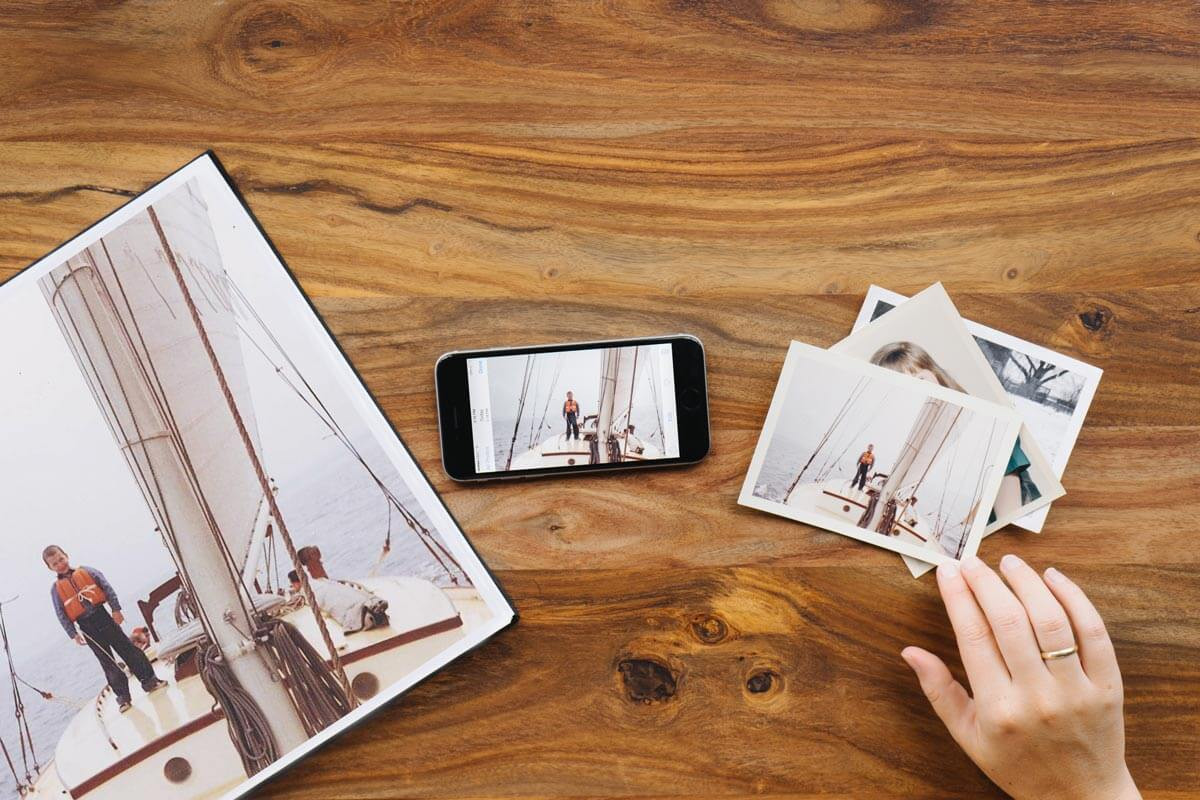 Old photos on table next to enlarged version